Part 1: Getting Started
Part 1: Getting StartedStarting up a singleplayer game brings you here, where you can select your starting date and country. There are a handful of bookmarked dates on the left where certain things like rulers, advisors, armies, and diplomatic states have been pre-set with some care, but you can modify the exact starting date down to the day if you desire. The earliest starting date is October 14, 1399 and the game ends on January 1, 1821. I generally always start the Grand Campaign, which is the earliest start date, and that's what we'll be doing here.

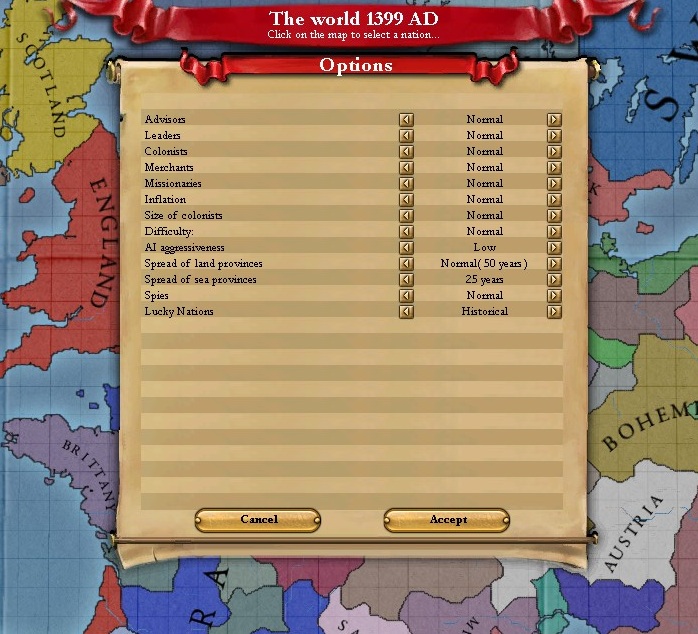
Clicking on Options from the country selection screen will bring up this menu where you can change some settings for the game you are about to start. You can't get to this option menu for a game that is in progress, so make sure you've changed anything that you want to change before you start. I've turned AI aggressiveness down to low because sometimes large AI nations tend to bite off more than they can chew and then completely fall apart. I'd rather see some other superpowers develop. I used to turn "Lucky Nations" to off, but this time I've left it on Historical. What this will do is give some additional bonuses to help 7 AI nations such as England, France, and Portugal stay in the game as stronger powers. This menu also has options to make Leaders and Advisors historical only (a bad idea, because there aren't rulers and advisors hard coded in for every nation for every date), and options to make the cost of using agents like spies and missionaries free (which we aren't going to do). The Spread of Land and Sea Provinces options means that after a nation uncovers the fog of war over an undiscovered land or sea province, it will spread to every other nation which shares the same technology group as them after that many years.
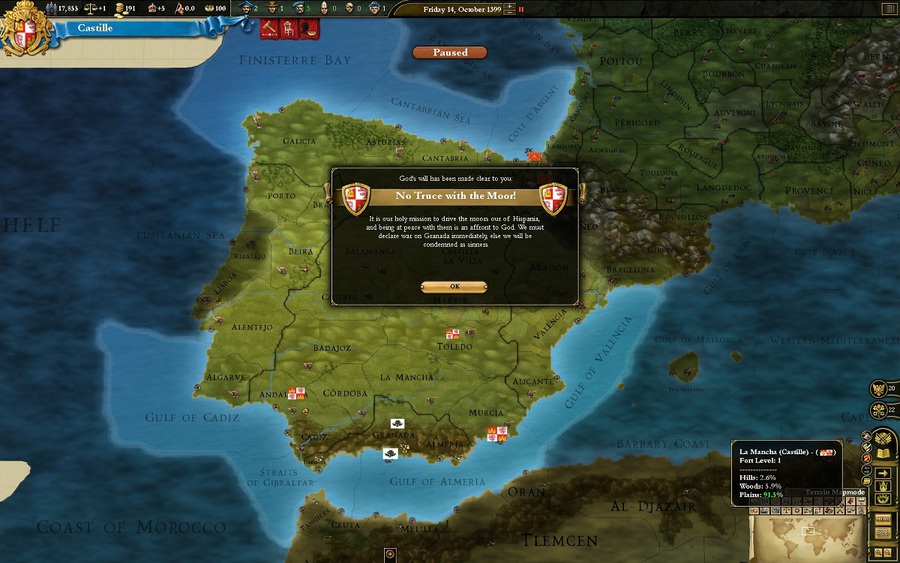
After I've got my options set, I select Castille and start the game. We begin with the game paused, the map centered on our country in the terrain mapmode and a popup detailing our first mission. There are plenty of things to do before we unpause the game. For now, let's take a look at the screen, and then we'll look at all of the features of the UI.
National Menu - At the very top left, we have our nation's name and coat of arms. Clicking on this will bring up a 9 tab national menu full of information and options regarding our nation. Leave it closed for now.
Manpower - Next to the coat of arms is a little group of men standing by the number 17,855. This is our nation's Manpower. Manpower dictates how many men you can recruit at once and what your capacity is for replenishing men lost in battle. Spent manpower returns partially at the beginning of each month, but if you are in a horrible war and losing troops faster than your manpower is replenishing, you will eventually find yourself in a situation where your armies aren't able to get back into fighting condition.
Stability - The next number, indicated by a small set of scales, is your nation's stability. Stability ranges from -3 to +3. Stability influences things like the efficiency of your tax collection and your global monthly revolt risk in each province among other things. If you are ever lower than +3 stability, your priority should be to raise that before anything else. We'll come back to that later.
Treasury - Next to Stability is our Treasury. We have 191 ducats in our treasury that we can spend on hiring new troops, commissioning new ships, ordering the construction of new buildings, among other things. We don't want to spend all of it though. Hover over our 191 gold and you'll see that each month we pay a bit of money out from our treasury. If we spend all of our money now, we'll end up going into the red before the end of the year when we collect our yearly taxes and be forced to take out a loan that we'll have to pay interest on.
Prestige - The number next to the little crown shows how much Prestige our nation has. This number can range from -100 to +100, and right now we have +5. Our prestige has minor passive effects on various things that you can see if you hover over it. Also, including nations into our sphere on influence costs prestige, and we need to have more prestige than another nation in order to claim their throne. We'll come back to those 2 subjects in later updates.
Infamy - The little number by the flag shows how much Infamy we have. Infamy is a bad thing. If negatively influences our relations with other nations, increases our revolt risk, and cripples the effectiveness of our merchants trading in other countries. Hovering over Infamy will show you how much it decays yearly, as well as your current infamy limit. If you go over the infamy limit, you can expect to see non-stop revolts all across your country as well as enemy nations jumping into wars against you because you are 'dishonorable scum'. Infamy is the biggest roadblock to world domination, because taking provinces that you have no right to increases it quickly.
Legitimacy - The number by the crown is our ruler's legitimacy. This is the perception of how rightful his or her rule is. If you are a republic with an elected ruler (maybe with the exception of a Noble Republic), your nation doesn't have a legitimacy measure. High legitimacy gives you some bonuses, and low legitimacy gives you some penalties.
Agents - The next segment of the UI has 6 little face icons with numbers next to them. This is how many of each agent type we have. You can have up to 5 max of any agent stored up at a time. Agents replenish automatically over time at different rates of speed based on our government policies and other modifiers. For now, here's a short description of each agent type from left to right.
- Merchants: We send merchants to Centers of Trade, and depending on how savvy our merchants are based on trade technology and other things, they will remain in business there for some time and provide us with monthly trade revenue.
- Colonists: We will send colonists to unsettled areas that we've discovered to create colonies.
- Diplomats: 1 Diplomat is used for each diplomatic action we attempt, such as asking another nation for an alliance or declaring war.
- Missionaries: We send missionaries to provinces that don't share the same religion as our nation. In time, they eventually convert those provinces.
- Spies: Spies are most frequently used to cause revolts in enemy provinces and to infiltrate their administration so we can see their troop movements.
- Magistrates: It costs 1 magistrate for each building that we queue up to build in our provinces. Cultural actions inside of the National Menu use magistrates as well.
Next we have the date display where you can pause, unpause, and speed up or slow down the game.
At the very far top right corner there is an icon. Click it and it'll display some useful information in the top right corner.
Moving down the right side of the screen, there's an icon with a double headed eagle. This is the menu for the Holy Roman Empire, and the number indicates how much influence the current Holy Roman Emperor has. We may or may not get into this later.
Below the HRE icon is the icon for the Holy See, or the Papacy. This number is how much Papal Influence we have. If we have a large amount of Papal Influence, then we have an increased chance that next time a new cardinal is appointed, they might be from our country. When a majority of the cardinals in the Holy See are from our country, we are considered the Papal Controller and can suggest for the Pope to excommunicate other Catholic rulers or to call crusades against heathen nations.
The final vertical bar at the bottom contains from top to bottom:
- A list of Triggered Modifiers. These are buffs that your nation can receive if you fulfill certain conditions. For example, holding Rome would give us a yearly bonus to prestige.
- National History. The game generates a little chronological list of facts about your nation, grouped by ruler.
- Find a Province. You can click on the arrow, type in a province name, and the map will center on it.
- Hotkeys to center the map on your Capital and National Focus
- The Game Menu
- The Ledger, which has something like 29 pages of numbers, graphs, lists, and details about your nation and the world.
- Zoom buttons, which don't do anything different than scrolling the mouse wheel.
The Mapmodes - There are 22 different map modes that you can switch through an display on the main map. I'm not going to go into detail about all of these. The game starts in Terrain Mapmode, but I spend about 99% of my time in Political Mapmode. Sometimes I switch back to Terrain Mapmode for a minute to pick out my army icons more easily. Sometimes they get a little lost in the flood of colors in Political Mapmode. When a situation arises where I use any other mapmode for decision making or information gathering during gameplay, I'll bring it up further.
The Journal - The final feature of the UI in this picture is the Journal. If you click the little + sign in the bottom middle of the screen, you can display a text journal where all of the other news from other nations that I've hidden from popups will be displayed. I rarely need to look at this.
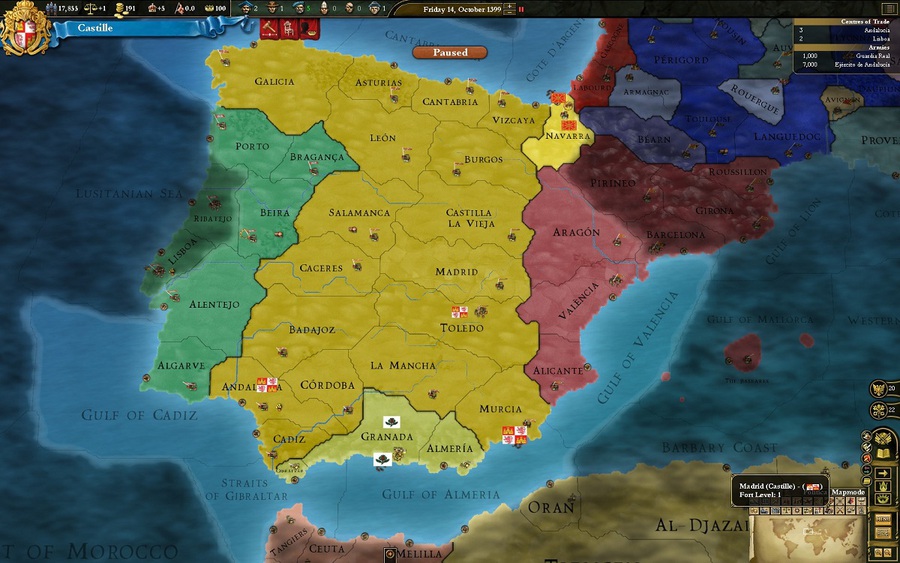
So here is what the screen looks like after I click away the mission, click the icon in the top right to display that useful information, and switch the Mapmode from Terrain to Political.
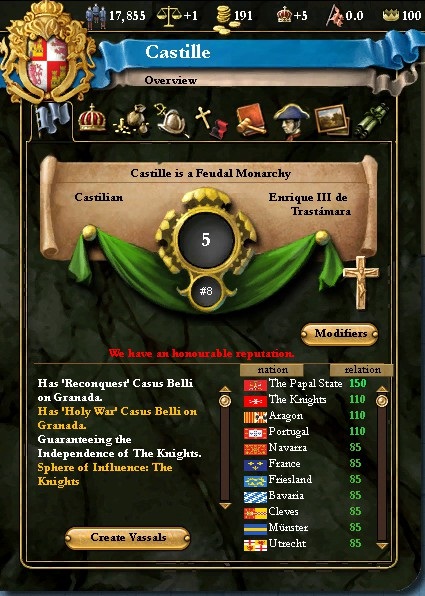
Now, go click on the National Menu. That's the coat of arms in the very upper left. I'll go through each tab of this menu briefly and we can take care of some things that we need to do before we unpause the game. The first tab is our country overview. It displays our government form (Feudal Monarchy), our state religion (Catholic), the name of our ruler (Enrique III) and our primary culture (Castilian). It also prominently displays our Prestige and where we rank in prestige in relation to other countries - but this screen sort of makes a bigger deal out of that than it really is. Our diplomatic status is listed in the lower left, and the level of our relationships with other nations is listed in the lower right. Relations with other nations can range from -200 to +200, so we begin the game pretty friendly with the Papal States. The Create Vassals button allows us to release provinces that we own which other nations have cores on as vassal states. I have no need or desire to release any of my provinces right now, so we'll leave that alone.
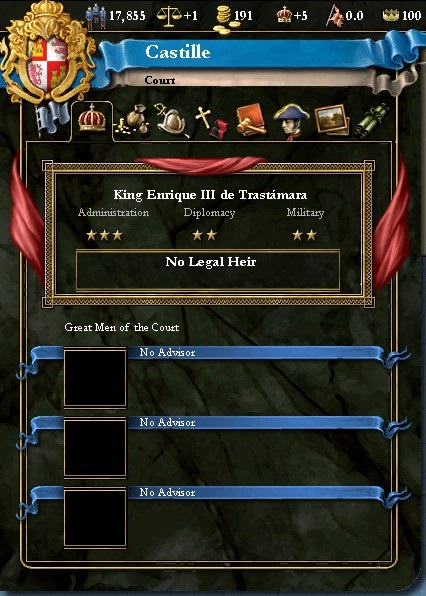
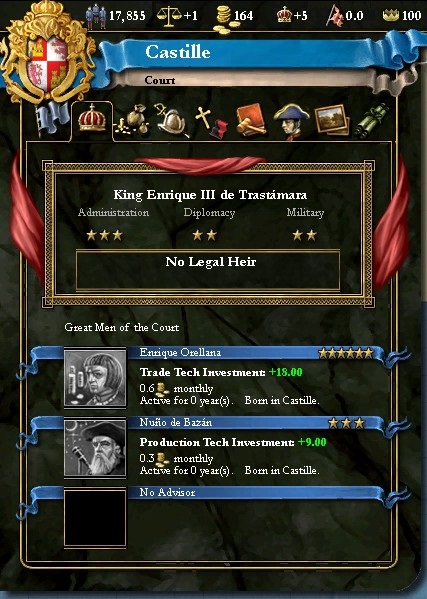
The next tab of the National Menu is our Court. This tab displays our King and all of his statistics, an heir (if we have one), and all of our advisors. We need an heir, but there's nothing we can do other than wait for one. Our ruler's stats can all range from 3 to 9, and we get all sorts of wonderful bonuses based on how high those are. Mouse over them to see what we get. Exceptional rulers with say, 7+ in every stat are always wonderful to see. We have 3 empty slots for advisors, and we start the game with a pool of potential advisors to browse through. Let's assign some advisors to our court.
Click on an empty advisor slot, and we open up the pool of great men available to our nation to appoint as advisors. Near the beginning of the game, advisors that give a bonus to technology research are pretty good. This 6-star treasurer adds +18 to monthly trade tech research. Right now, our entire monthly income that we can apply to investments is only a few ducats higher than that. We don't have any need for the Fort Defense that other advisor provides. The stability investment bonus of those great artists would be better than nothing if we were going through some kind of great turmoil that was amplifying our stability costs and we we having trouble increasing stability, but we're not in that situation.

I pick up the 6 star trade tech investment advisor and scroll further down the list to look for another person to get. This alderman that gives +5% production efficiency is an example of an advisor that is great later on in the game, but relatively worthless right now. Right now our total monthly production is only a few ducats per month, so he wouldn't even make up for his own monthly salary. Later in the game, our production income will be hundreds per month and he'd be a much better pick.
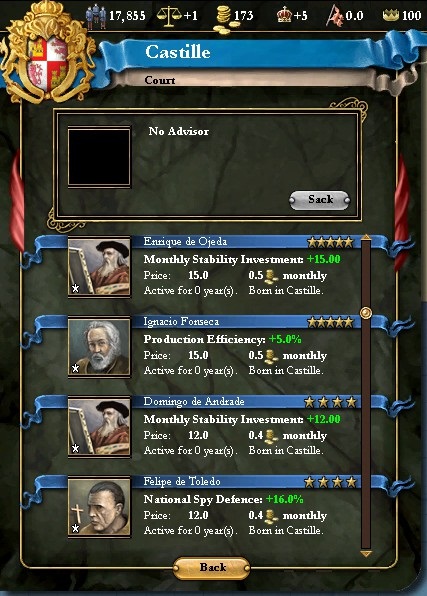
I end up picking up a 3 star natural scientist to get a bonus to production tech investment. None of the other options available right now seemed too good to me, so I'm leaving the third seat empty. I would have liked to get a statesman for + to monthly government tech investment, but none were available. We'll get a popup if any new great men get added to the advisor pool, and if one pops up that looks good we can always go assign them a position later. We also have the option of cultivating a specific type of advisor through another tab of our national menu, but chances are any advisor we try to add to the pool right now will be a measly 1 or 2 star chump. I also should point out, we have a 1 year exclusive right to all of these unassigned potential advisors. Once that year is up, on October 14, 1400, they will basically become free agents and can be hired by any other country in our tech group. This goes both ways though, and every other western nation is going to have unassigned advisors sitting around that we can hire 1 year from now as well. I always seem to end up missing this, but we should try to remember to pause the game on Oct 14, 1400 and check for some talented advisors from other countries.
The next tab is our Economy. This tab shows us all of our monthly income and expenses, allows us to adjust the amount of maintenance we're spending on our placed colonists and missionaries, gives us the option to take out a loan, and provides us with a group of sliders so we can assign where our monthly income is going. Tax income is unique in that we collect it twice per year. We collect tax as one of the components of our monthly income, and we also collect a yearly tax on the 1st of January every year as the sole source of our yearly "census tax" income. The actual "Tax" number listed under monthly income actually includes a couple other categories, however. If you hover over our tax efficiency percent (110%), you'll see that some of it is from Taxation, while the rest is from tolls and harbor fees. All you really need to know about that at the moment is that only the Taxation amount is collected in the yearly census tax. If you multiply the amount listed as "Taxation" by 12, it should equal the amount that is listed as the amount collected at the end of each year when you hover over the amount in our treasury at the top of the screen.

By adjusting the sliders to the right, we can dictate where our monthly income is going to be invested. Government, Production, Trade, Naval, and Land sliders all impact how much we are investing into technology. Investing in those technologies will unlock new government types, buildings, military units, and increase things like our production and trade efficiency, the range that our colonists and merchants can travel, and what national ideas and decisions we can implement. The Stability slider impacts how much of our monthly income is being invested into increasing our Stability. Remember earlier when I said that if your stability is less than 3 you should always focus on increasing that first? This is where you do that.
Finally we have the treasury slider. This slider impacts how much of our monthly income is converted directly into more ducats for us to spend on recruiting new units or building new buildings. This is a dangerous slider to mess with, because unless we have some method in place of reducing inflation, any increase to the treasury slider will increase our inflation slightly each month. Inflation is bad. For example, in this screenshot I've maxed out the treasury slider. This means that our monthly change to our treasury, instead of a negative, would be 24.8-4.2 = +20.6. We'd be paying a great price for this though. None of our technologies would be increasing beyond the passive investments we get from out ruler and advisors, our stability would not be making any progress towards increasing to +2, and we would accumulate 1% of inflation per year with this slider policy. 1% of inflation in EU3 increases the cost of all military units, buildings, ships, technology research, stability investment by 1%. If you were to keep going like this for a long period of time, like uh a couple decades, you'd end up falling significantly behind your neighbors in technology. One way to lessen this effect is to increase your inflation reduction modifiers. For example, a 5 star Master of the Mint advisor would give -0.10 yearly inflation. This would let you work down 1% of accumulated inflation over a decade, or alternatively, set your treasury slider up to the breakeven point so you can mint some extra ducats with no change in inflation. You still end up losing the tech investment that you would have gained from not minting at all, though.
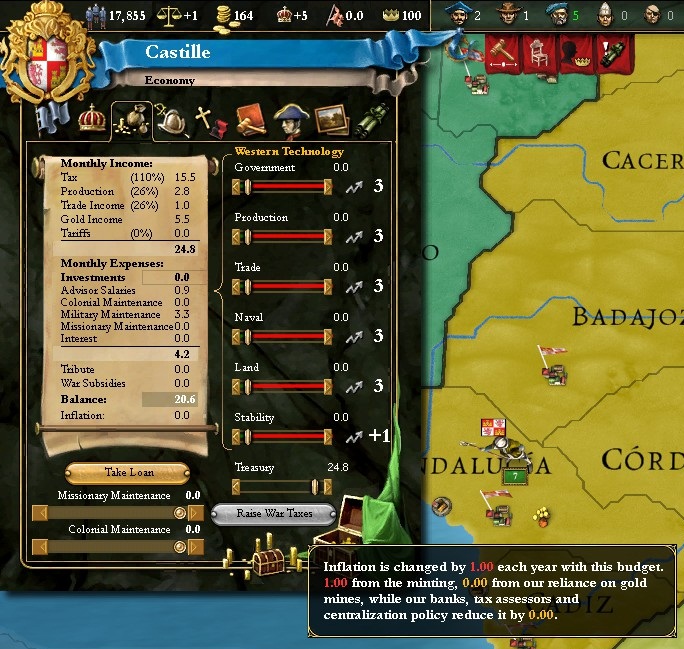
For now, I just set my Stability investment to the maximum, and right click my treasury slider at 0 (which locks it) so I don't accidentally increase it.

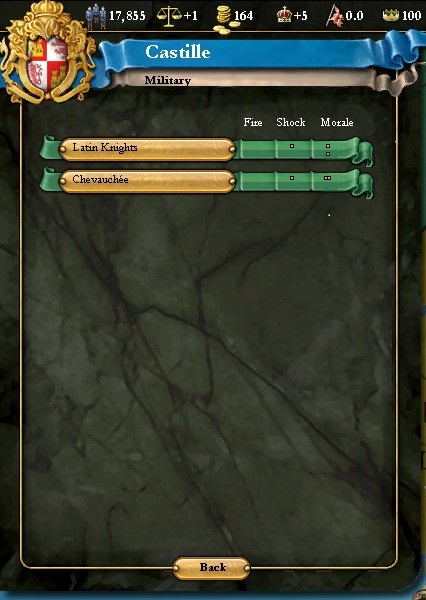
The next tab is our military tab. Our units are in the Western Unit Tech group. This is the best unit group, in the end. All of our preferred units are listed, along with their Fire and Shock multipliers, which are directly effected by our levels of Land and Navy technology. The number of units we own in each category is displayed as well. Our war exhaustion is also displayed on this screen, and if you hover over it you can see exactly what is increasing or decreasing it each month. High war exhaustion can cause rioting in your cities. The bottom of the tab lets you adjust your maintenance level for your land and sea units. If we were going to spend several years in peace doing a build-up, we could probably lower the land slider to 25-50% and the naval slider to 0, but since we're going to be going to war almost right away I'm going to keep them maxed out.

Clicking on one of our preferred land units, like Latin Knights for example, will bring up a list of all the options we have available to set as our preferred cavalry unit. When we choose a preferred land unit, all of our existing land units of that class will change to our new preferred type. This is good, because when we hit a new level of Land Technology that allows better troops, we can upgrade all of our land units with a single click. This temporarily cripples your morale though, so don't do it in the middle of a war. Naval units don't work the same way. Once you build a ship, it remains the same forever. If you research a new type of vessel, you need to actually build them and phase your old ones out or use them for other jobs (like parking in new world ports to deter piracy).
The 5th tab is our Religion tab. This is the tab where we enact all of our religious decisions. Our tolerance towards other faiths are listed here as well. This means that if we own a Catholic province, that province has -4% chance to its revolt risk, but if we owned a heretic or heathen province, it would get +2% to its revolt risks. This tab also has a button that allows us to claim the title of Defender of the Faith. We will claim that title later before we go to war deeper in the Holy Lands. When the reformation starts, this is the tab where we can decide to switch to Protestant or Reformed Christianity if we so desire. There are some good decisions to enact here, but not yet.

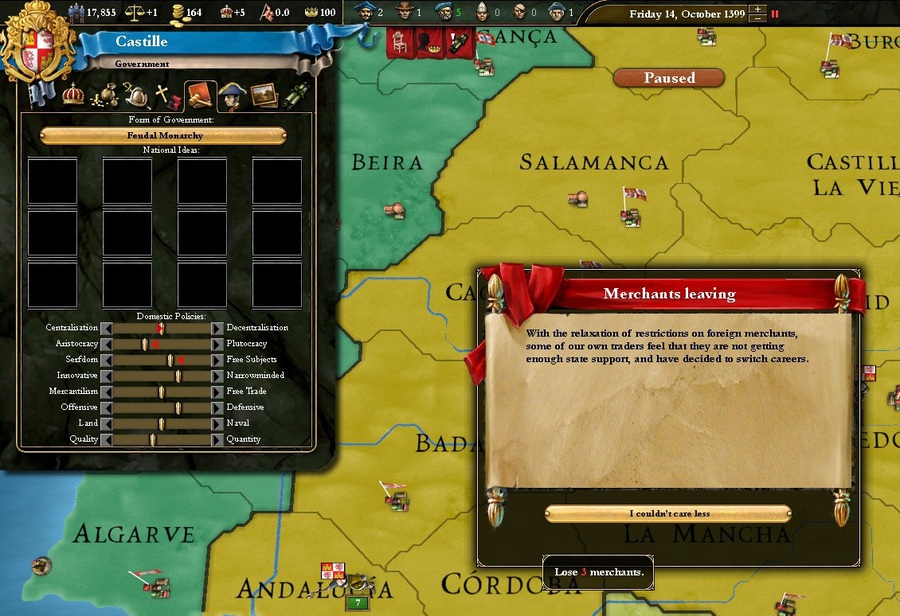
This is the Domestic Policy tab. This is where you can change your government form, choose national ideas, and move your domestic policy sliders. Each of the domestic policy sliders range from -5 on the left end to +5 on the right end, and you can move one slider one step every 10-12 years or so, based on your government form. The red barriers in the middle of the top 3 policy sliders are "soft caps" based on our form of government. Feudal Monarchy requires us to have the Serfdom/Free Subjects slider below +2. For each tick we take a slider beyond its soft cap, we gain +1% national revolt risk in each province. My first priority is to move one tick towards free trade. This update has enough information as it is, so I'll go more into these sliders when Castille's next slider move becomes available in about a decade.
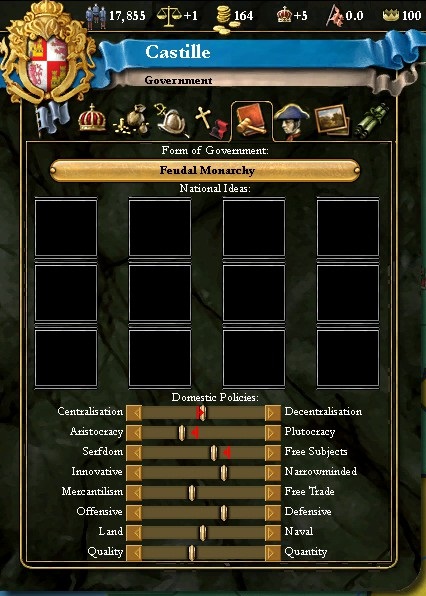
Moving a slider has the potential to cause good and bad events to happen. In this case, when I moved the slider towards Free Trade it caused some of my merchants to pack it up and go get a job farming dirt or something.
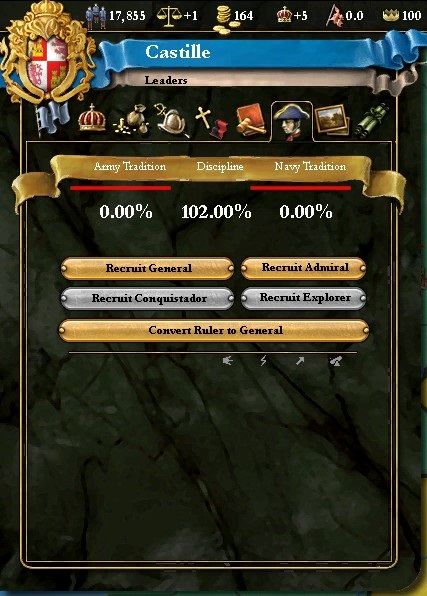
The Leaders tab is relatively simple. Discipline indicates what percent of base damage your troops will inflict. 100% discipline troops will do normal damage. This is where we recruit generals to lead our armies and admirals to lead our navies. Recruiting a general or admiral will cost 50 ducats, spend 1 diplomat agent, and reduce our current Army or Navy tradition, respectively, by 20%. In order to recruit conquistadors or explorers, we need to have a specific national idea that we won't have access for to a while. These lead armies and navies much like generals and admirals, but they can also move into unexplored territory to uncover the fog of war and open up new places for us to colonize. Converting your ruler to a general tends to reduce his lifespan, even if you never put him into an army or use him in combat. I would recommend making terrible rulers into generals so they can die a bit sooner and never converting a particularly good ruler into general.
In the culture tab, we can add a fresh advisor of any type to the advisor pool. Doing this decreases your Cultural Tradition by 20%, so we'd go down to 16% tradition after recruiting one. In my experience, we'd be lucky to get a 2 star advisor out of 20% cultural tradition, so we're not going to do this yet. With 100% cultural tradition, the advisor would be 5 or 6 stars. We can also spend magistrates here on cultural decisions. We don't have the capability to construct any buildings yet, so our magistrates might as well be spent here. I spend our one starting magistrate on commissioning a tapestry.

The final tab shows us our current mission and any possible national decisions we can enact. This is the mission we were issued as soon as we started the game. Of all the national decisions below that, the only one we can enact right now is the Liquor Act. This increases our tax efficiency by a few percent and makes our stability a few percent harder to increase. I'm going to go ahead and enact the liquor act. You may notice that at the bottom of the list is a decision to form the nation of Spain. We will definitely be doing that down the road.

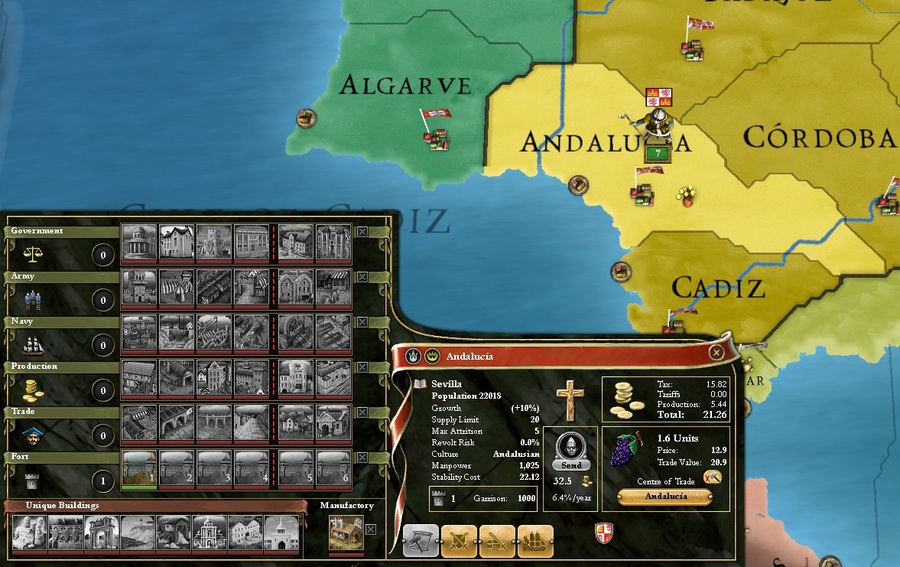
Now that we've gone through all of those tabs in the national menu, lets take a look at something back on the map: one of our provinces. I selected the province of Andalucia. On the left is where we would click to queue up the building of a structure. We don't have the technology level needed to build anything other than level 1 forts (which all out provinces start with), although some of our provinces actually begin the game with some buildings we can't construct yet which is nice. Every province can potentially have every building in each category up to the 4th one, but you can only have a level 5 and 6 building of a single category in each province. The unique buildings row shows off the 8 unique buildings our nation can have. We can only have 1 of each of these buildings in our entire empire, but we won't be able to make any of them for a long time. Finally, the manufactory slot can contain one of the manufactory type buildings. We can't build any of those yet either, but we're lucky enough to have one of them - a University - in one of our other provinces. That University adds +5 monthly government tech investment and +6 yearly production income for us.
Taking a look at Andalucia's stats on the right, it has a population of 22,018 with a population growth rate of +10% every 10 years. Population determines how many units of a trade good a province produces. Its supply limit is 20, which means up to 20 full regiments of 1000 men each can stand in the province without suffering from attrition. Max Attrition is the maximum % of soldiers a stack can possibly lose by standing in this province under the worst conditions. Max Attrition can increase due to bad winters (Switzerland and Russia often have bad winters), and can also be increased by scorching your own land. Revolt Risk is the monthly chance that this province will spawn some kind of stack rebel army. Culture can affect revolt risk. Unaccepted cultures and cultures that aren't in your culture group will increase it. Manpower is how much manpower this province contributes to your national manpower pool in the top left. Stability Cost for all of your provinces is totaled on the economy tab of the national menu to determine how many ducats you need to invest to increase Stability by +1. The little tower indicates that that there's a level 1 fort there with a garrison of 1000 men, and the buttons below that are for enacting provincial decisions, recruiting troops, hiring mercenaries, and building ships.
The cross in the middle tells us that the majority religion of the province is Catholic, which matches our state religion. The Send button underneath the cross is therefore unimportant, because we have no need to send a missionary to a province that already matches our religion. On the far right, the province's yearly contribution to Tax and Production is listed, as well as what kind and how many units of a trade good the province produces. Andalucia produces 1.6 units of Wine multiplied by the cost per unit of 12.9 for 20.9 total trade value. The yearly Production of the province is equal to the total trade value of the province (20.9) multiplied by our production efficiency (26%). The full value of the provinces trade value is added to the value of whatever Center of Trade that province trades through. In this case, Andalucia itself contains a CoT and it trades through itself. Finally, notice at the bottom of the province window that there is a tiny Castillian flag. This indicates that this is one of our "core" provinces. Cores will come up more later.
Let's take a quick look at the Capital, Toledo. Toledo is both our Capital and our National Focus. Sometimes you must make a province your national focus to enact a particular decision there, or to build a Center of Trade there. Your National Focus also gives a few bonuses such as increased colonial growth to bordering provinces, and increased chance of converting to your religion. Generally I only assign a new national focus when I want to build a new center of trade, which isn't very often. Another big difference between Toledo and any of our other provinces is its trade good. Toledo produces gold, which has no trade value. Our currency is gold, so merchants are not standing around in centers of trade arguing and bartering over its price. Gold producing provinces go directly into production, which unfortunately means that trade value boosting buildings do nothing to increase the trade value (and thus, production) of gold.

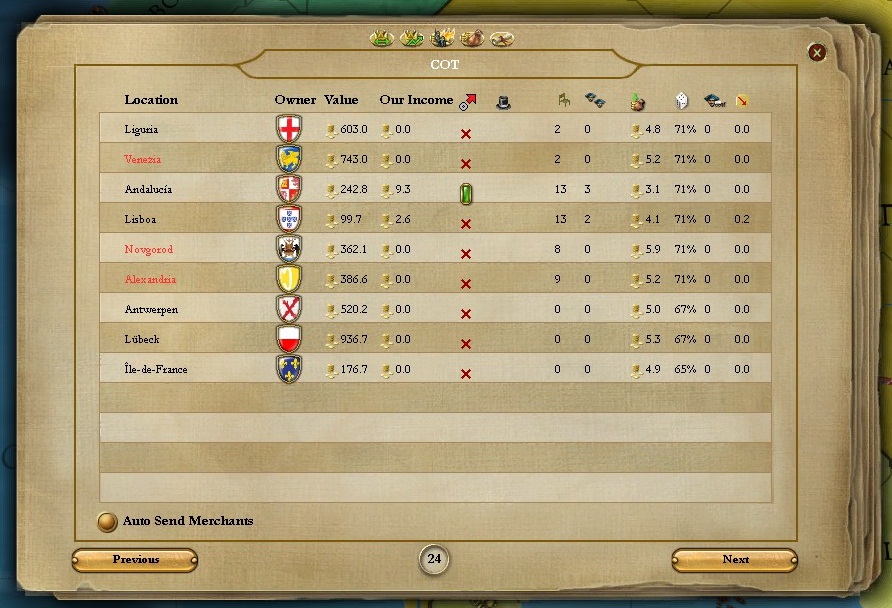
Clicking on any Castillian province will show the center of trade as Being Andalucia. Clicking on the center of trade for any of those provinces will bring us to the Center of Trade screen for Andalucia. The total trade value of every province that trades through this CoT is totaled here (242.84). This is essentially the amount of ducats that are up for grabs. We can see how many merchants are placed here by every nation. We have 3, Portugal has 2, The Knights and Granada each have a single merchant. You can have up to 5 merchants in a single CoT unless you have sufficient trade technology to allow monopolies, in which case you can have 6. I'll touch on monopolies again when our trade tech reaches that level. Every CoT has exactly 20 spots, and this one has 13 that are currently unfilled. Every merchant that you place in a center of trade will bring you home 5% of that CoT's total value, multiplied by your trade efficiency, yearly. 242.84 total value * 15% for our 3 merchants = 36.4 * our trade efficiency (26%) = 9.47 annual trade income for us from this CoT. Apparently there's some other hidden voodoo that turns it into 9.27 on the screen here. As our trade technology rises and we start building trade buildings, we'll see the price of goods increase, which will increase the total trade value of that province (and likewise our production income), along with the total value of whatever CoT that province is trading through and ultimately the amount we bring home in annual trade income if we trade there.

Click on the little brown book in the CoT panel and it will open the journal page for all known CoTs. We can sort this by some useful measure like Total Value or the % chance for our merchants to successfully compete there (the dice icon) by clicking on the headers at the top. From personal experience, I can say that if we try to go trade in Liguria, Antwerp, or Lubeck, despite what this screen says we will immediately get punted out by the 3 dozen little HRE microstates that do nothing but spam merchants all day long. Those CoTs are the big leagues and Castille isn't ready to compete there yet. For now, I click on the red X on Andalucia 3 times to increase the merchant autosend priority on our own CoT to max. Now, as we produce fresh merchants they will automatically be sent there whenever we have less than 5 merchants placed and enough ducats to send one.
In the next update, we will get to unpause the game (but not right away)! Isn't it exciting?