Introduction
How does it look through your eyes? Let's Play Atelier Shallie
1...2...3...4...5...6 PS3 Ateliers?!
You got that straight. 2014 / 2015's Atelier Shallie: Alchemists of the Dusk Sea is the sixth Atelier on the PS3 (not counting Atelier Rorona+, a remake), and the third entry in the Dusk Trilogy (Ayesha's Japanese title was "Alchemist of the Ground / Land of Dusk", something that was kind of lost in its localized name, Escha obviously was the "Sky", and we have the "Sea" now). As stated in the previous two threads of mine that have covered the Dusk Trilogy, in this world, humanity finds itself on the brink of cataclysm and desolation, the eponymous Dusk. The causes run deeper than any one man can so far find, but that has not stopped several individuals from finding their own solutions, and making their own stories. This time, we join Shallistera Argo (the girl in the red / orange dress) and Shallote Elminus (green-haired girl), as they unite their very distant lives and goals toward returning water to a parched land. The road may not always be easy, but they've got more than a few folks helping out. Many of whom we've seen before.
As far as the game's somewhat confusing name goes, Shallistera (whom Shallote nicknames Stera to avoid confusion with herself) and Shallote (whom Stera nicknames Lotte, for the same reason), have the same nickname - Shallie. As far as the two protagonist thing is executed, it may be fairly compared and contrasted with Escha & Logy. To Gust's credit, it is far from a simple retread.
So what does Gust do with the Atelier game plan this time?
Well, the game is structured rather differently from Escha or Ayesha. Indeed, its most valid comparison would be either Rorona or Meruru (the first and third PS3 Ateliers, respectively), strangely enough. This game is divided up into 10 chapters. At the start of each chapter, your heroine is tasked with something related to advancing the story. This may be investigating new lands, defeating a special monster, or any number of various tasks. Once this plotline task is completed, the chapter opens up and you're allowed to embark on various subquests, what the game calls Life Tasks. Life Tasks take on a myriad of distant forms, from synthesizing new items with special properties, breaking barrels, talking to people, exploring, defeating boss monsters, etc. etc. etc.
Completing enough Life Tasks allows you to end the chapter and proceed to the next one, where the cycle repeats. Once you reach Chapter 10, however, you are very quickly given your final storyline task, and from then you can proceed to do anything and everything you want before completing the final objective. However, once you complete the objective, you are more or less locked into completing the game, so make sure all your affairs are in order before you finish up.
One final important difference from every previous Atelier is that the time limit is GONE. The game does not track in any way whatsoever how long you spend traveling, or gathering new materials, or anything. This, more than anything, changes how Shallie is played and veterans of the Atelier series on the PS3 may initially be caught off-guard, because the gameplay expectations between Shallie and the other five are pretty different. But, I think we'll figure something out.
Ah, but we can be expecting the Sylphid touch, eh?
Indeed. The natural extention from what I did in the Escha thread would be to write my own dialogue for all characters, when I deem appropriate. And this is just what I'll do. As you might expect, italics indicate anything I make up, plain text is the game's own. Otherwise, a full 100% playthrough, including all sorts of bonus videos and a tour of the game's DLC dungeon, and the two DLC characters, seems sensible to me.
However, I will not promise to complete ALL Life Tasks, as there's no particular point to completing all of them, or to reach Combat or Alchemy Level 99, since that's really more effort than is necessary for a comprehensive playthrough, but that may just be a natural consequence of me playing the game through again (a completely new game playthrough for Stera, New Game+ for Lotte). Rest assured I'll cover all content that is remotely interesting to a prospective audience.
I heard you talking about Atelier artbooks in the Escha thread...
And I stand by it. For those that missed that particular announcement, when I was LPing Escha, I had come into the possession of all three artbooks for the Dusk Trilogy. I love this trilogy, and hopefully these three threads taken together will show you why. To that end, I acquired all three artbooks, and I intend to post all kinds of extras in the thread that are in those books, and in those books only, such as very rough concept art for characters, interviews with some of the staff, and various other interesting tidbits.
Though I do not speak any Japanese, there are more than a few ways to get around something like that. How I'll do it has yet to be decided, but hey, there's always hope.
Spoiler Policy
I have never had a particular problem with spoilers in any of my threads, but typical spoiler rules are fully in effect here. No talking about future events except in spoiler tags blah blah blah.
Huh...that was kind of a long OP, huh? Well, I said what I wanted to say. For those who have followed along with my Atelier threads, and folks who are new to my Atelier LPing crusade, I swear to finish the Dusk Trilogy with all the care and respect it deserves.
Updates
Chapter I: The Near Side of the Dusk Sea
Chapter II: The Calamitous Side of the Promised Meeting
Chapter III: The Dangerous Side of the Lush Archipelago
Chapter IV: The Vanished Side of the Past World
Chapter V: The Varied Side of the Converging Stories
Bonus Update 1
Chapter VI: The Financial Side of the Girls' Journeys
Chapter VII: The Unsure Side of the Twin Adventures
Chapter VIII: The Energetic Side of the Talented Girl
Chapter IX: The Final Side of the Separate Paths
Chapter X: The Resolute Side of the Desperate Battle
Bonus Update 2
Chapter XI: The Decisive Side of the Great Confrontation
Chapter XII: The Efficient Side of the Job Taking
Chapter XIII: The Mysterious Side of the Eastern Lands
Chapter XIV: The Ghostly Side of the Ship Graveyard
Chapter XV: The Close Side of the Two Friends
Bonus Update 3
Chapter XVI: The Aerial Side of the Alchemist's Training
Chapter XVII: The Wrathful Side of the Great Spirit
Chapter XVIII: The Illusory Side of the Floating Ruin
Chapter XIX: The Tragic Side of the Woman's Love
Chapter XX: The True Side of the Buried Remains
Bonus Update 4
Chapter XXI: The Flying Side of the Youthful Wish
Chapter XXII: The Sweet Side of the Dynamic Festival
Chapter XXIII: The Valiant Side of the Great Heroes
Chapter XXIV: The Far Side of the Twilight Ocean
Bonus Update 5
Endings
Chapter XXV: The Other Side of the Cloudy Glass - Homeward Bound
Chapter XXVI: The Other Side of the Cloudy Glass - Taskmasters
Chapter XXVII: The Other Side of the Cloudy Glass - The Great Work
Chapter XXVIII: The Other Side of the Cloudy Glass - Eternal Dream
Chapter XXIX: The Other Side of the Cloudy Glass - My Fated Person
Endgame Post
So, in lieu of awkwardly trying to explain the high-level alchemy you're almost expected to do at the end of the game (Chapter 10) in an actual update, I decided it would be best to explain this stuff in an OOC post, covering all the odds and ends of doing alchemy with powerful traits and ingredients. Keep in mind, aside from the alchemy I do, the choices of what traits to use are your choice. I'll merely explain how you maximize whatever path you take.
Let's start, appropriately, at the beginning. To even get the traits you need, you'll need powerful prey to drop them. In Chapter 9's free roam, Solle will give whichever alchemist you're playing the game as with the heads up that a bunch of powerful monsters have shown up around the Dusk Sea. This is your cue that you can begin grinding powerful ingredients. There are a bunch of them, but the three you should be most concerned about are the Silver Dragon at Geofront, the Phoenix of the Sea at the Altar of Spirits, and the Servant of the Beast King in the Herb Garden -Depths- I've already shown, in the previous update, where the three are. Anyway, the Phoenix and the Dragon are going to be your primary source of powerful traits at this point of the game. The Silver Dragon's gimmick is that it is resistant to a lot of attacks (most blunt-type attacks and magic attacks. Everyone's normal attack except for Lotte and Solle, I believe, will be able to inflict normal damage on it. It's also a pretty powerful monster, so don't assume he's a total cakewalk. it's also good to know he takes normal damage from every element, so you don't need to worry about those resistances.
His real gag is that after a set number of turns passes, he'll transform into a much more powerful monster, and your fight will drag on for quite a bit longer. There's two different enemies he can transform into, but both are strong monsters. But since we're grinding, you're going to want to avoid that stage. Throw everything at the first form, and if you beat it, you'll get a drop that looks something like this.
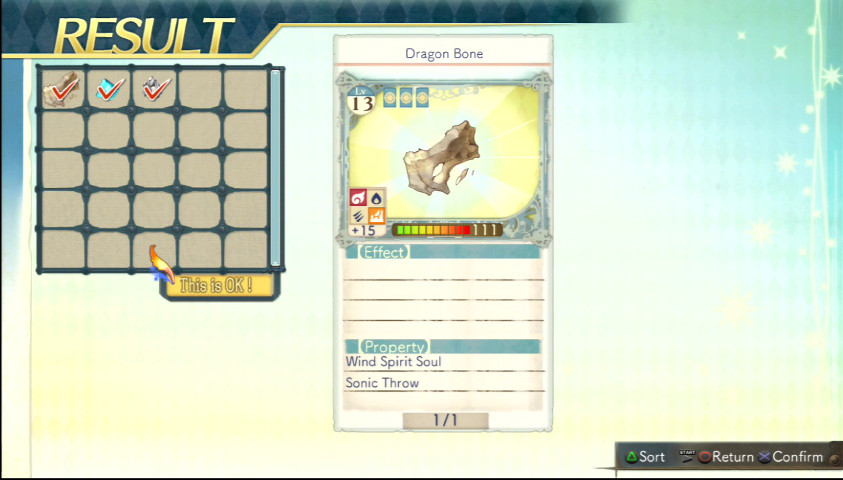
The Pendelook has the traits Count Super Enhance (increases the power of an item significantly by the amount of uses it has left) and Traditional Soul (adds 50 PP to any synthesis that trait is in, with a maximum PP of 99). The Diamond Gemstone has the trait Valorous Soul, which provides various increases to a weapon's attack. This is just an average drop (with a possible drop count of four. Use Jurie's Unseen Attack to increase item drop rate), but it contains our golden boy Traditional Soul, which you'll need for funding almost all of your powerful end-game traits.
Now, the Silver Dragon, and all of his ilk, do respawn, I'm just not sure of the rules of when or how they do. It has something to do with other locations you visit, which is why I mentioned the two other bosses. Phoenix is an interesting fight, in that it will pass on two of its turns, with the gimmick that the third time it gets a turn, it'll launch a devastating line-up of six powerful attacks in a row. You shouldn't let it get to this point, obviously. The Servant is simply a powerful physical attacker without any particular weaknesses (he is strong against Fire and Water), but without gimmicks. Once your rotation or thereabouts is complete, return to Stellard, and the Silver Dragon should respawn.
You may be asking, why the Silver Dragon? That's because it'll provide the best traits on average, but the Phoenix will give the most experience, and a good trait or two of its own (in fact, this end-game trait grinding is a good way to get a lot of EXP. The Phoenix will give about 4 times the experience the Dragon will, with the EXP number dropping dramatically once your characters are past level 80.
Anyway, keep that rotation going, and get the traits you want. Now, it's on to the alchemy aspect of it.
This was taken in the latter parts of my synthesizing, but the point always remains. So, how do you move the traits you want to the equipment you want? This is the point of this post, and what I'll do my best explaining.
All things begin with the Traditional Soul. I had an incredible bout of misfortune regarding that trait, as it only showed up once in like 6 hours of grinding. And just for the record, like a lot of powerful end-game traits, you can't create it by combining two more common traits, so don't ask. It happened to be on a material called the Dragon Bone from the Silver Dragon, which was an unfortunate occurance, as the Dragon Bone is a (Dragon Material) item. There's only one synthesis that could have resulted in the outcome I wanted: the Sun Flower. The Sun Flower is an alchemy level 70 item that needs 9 Scrap Metals (from the factory area where we got the first automaton as Lotte way back when), 1 Dunkelheit, one Aroma Materia (another high-level synthesis. Alchemy level 50 something, and a very valuable synthesis item in its own right), and a Dragon material.
The reason I wanted a Sun Flower was because it's an ingredient in several categories. It counts as a (Jewel), (Ancient Power), (Metal), and (Elixir). Once I got the Sun Flower made, I obviously put Traditional on it and began spreading it around. That's the way it goes. Unless you are supernaturally lucky at getting that trait, you need that trait on items all over the place. Create Supplements (you should only be interested in Rainbow, Black, and White Supplements, though the other four have their uses), anything that falls into one of those four categories. Just keep spreading it around, and if you think you have enough items that have it, you're wrong.
So once you're done spreading it around, time to start preparing your synthesis items.
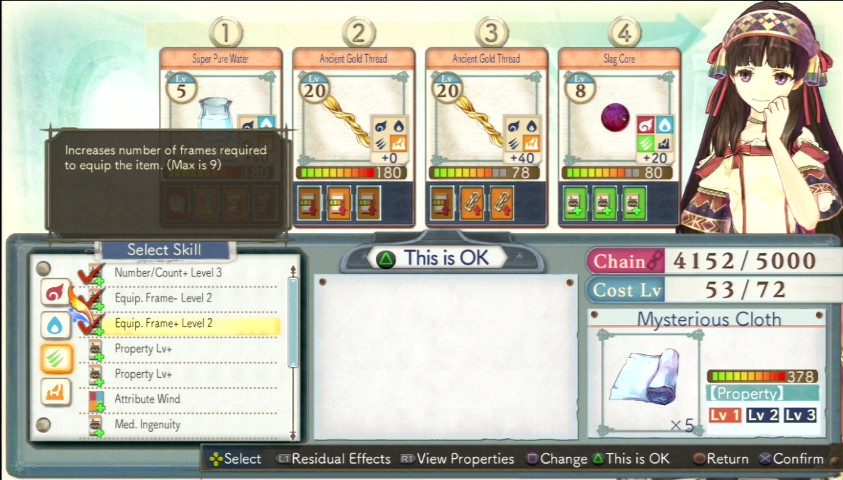
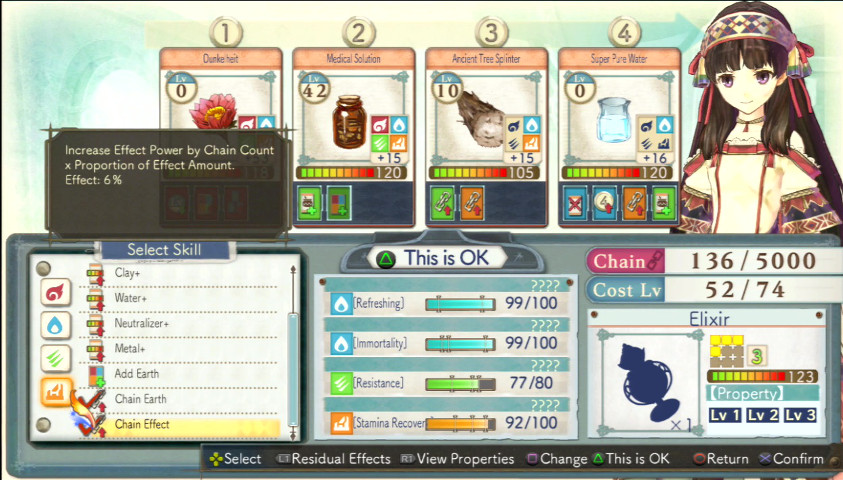
This is an average synthesis. Why do I have so many Earth-type alchemy skills on this synthesis? Surely I don't need all of them, you say. You only have half the story looking at that screenshot. First, check out how good this Mysterious Cloth is (the Mysterious Cloth is a good item to add armor-enhancing traits to, by the way). 378 quality, with a quality cap of 999. How in God's name did I get that? There's no sorcery here, just good ol' fashioned synthesis. Higher quality will just increases the effects (damage dealing, stats, etc.) of the item. Higher is better, of course.
Check what all the ingredients have in common. With the exception of the Slag Core, they all have an Earth value (the Super Pure Water has an Earth trait attached called Attribute Earth, which adds Earth to any item that doesn't already have it. When you add two alchemy skills that have the same attribute (so, for example, if I added Med. Ingenuity and Property Level+ for Wind), I would get Chain Bonus x2. If I added Equip. Frame- Level 2 next, and that material still had slots to put alchemy skills in (or the next material in the synthesis also had a Wind attribute), my Chain Bonus becomes x4. You keep going, and going, and you keep doubling that number.
You could get around Chain Bonus x16,000 if the cap on the Chain Bonus wasn't 5000, and every item in the synthesis had four alchemy skill slots, but that's plenty (and when you run out of alchemy skills of an element, the Chain resets with a new element.). What you want to do next is leave two slots open. One is the Earth skill Chain Effect, which increases the effect of an item in proportion to the Chain Count (which is how I got that Mysterious Cloth up to 378), and Number / Count level 3. For an item like this, that increases the number of that item that comes out of the synthesis (here, I'd get five Cloths) or for items with a use count, it increases the number of times you can use it.
Just as a side note, with Miruca, the Chain Count can go up to 7000.
Here we go with the actual alchemy we're interested in, making superweapons. Now, whether it's armor, weapons, accessories or healing items, it's always the same. You want powerful traits mixed with PP increasing traits (Traditional Soul is 50, PP Frame Expansion is 8, and PP Frame Maximization is 20. Added together with your alchemist's base PP, that's easily 99) on the items you want. If you don't find it from a drop, you can artificially create Expansion with PP Expansion +3 and +5 in the same synthesis, and Frame Maximization comes from PP +5, which is pretty common, and +7, which you can get by getting Property level 3 with a Red Supplement.
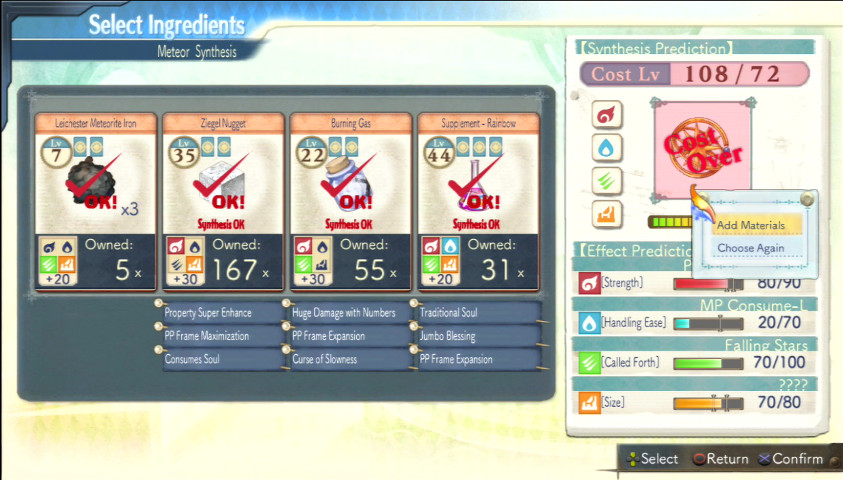
It would be simpler if you could just have all the traits you wanted on one synthesis ingredient, but this is rare. It's not critical, anyway. Now, let's check out how I made this Meteor (Stera is the only one who can use this. It's probably her best attack item, since it also has a timed effect, meaning when you use Meteor, it'll drop three more times before it goes away).
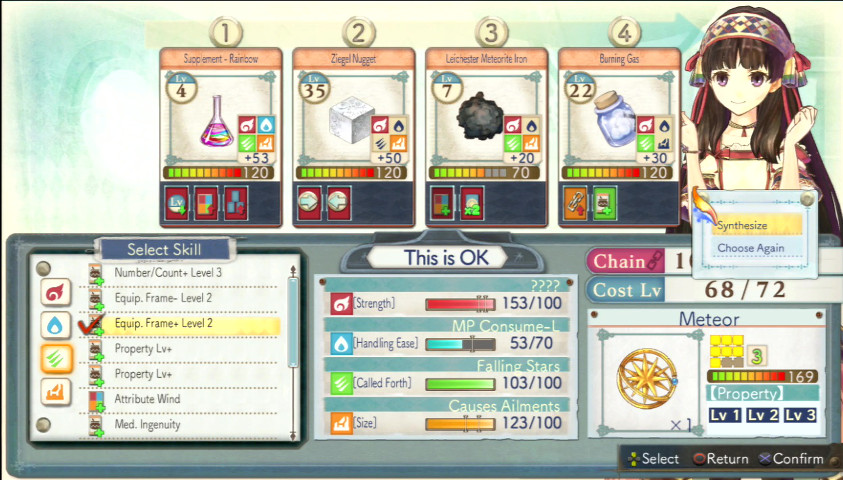
All those Fire skills in a row, I've already explained why I do that(with the Leichester Meteorite Iron needing Attribute Fire), but the last one is Equip Frame+ Level 2. Why I used this, I will shortly explain.
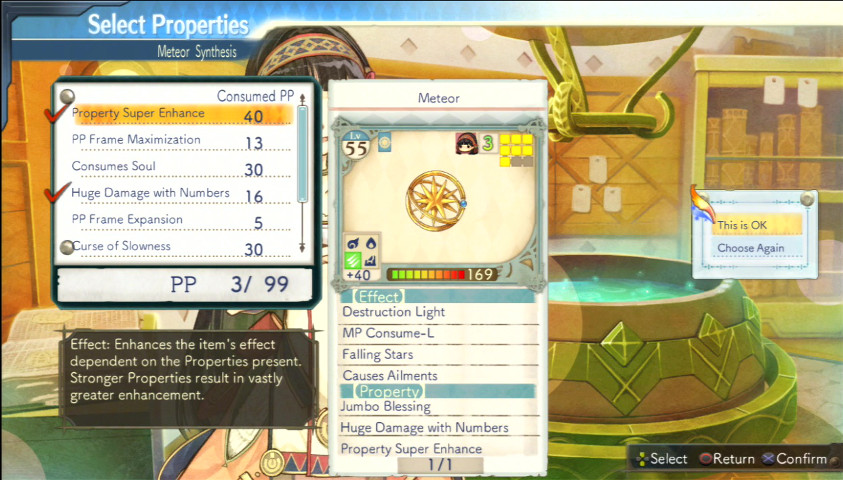
Jumbo Blessing is the reason. That trait increases the power of an attack or healing item x10 depending on how many equip slots it takes up (up to a maximum of 9). That means you can almost double the power of an attack item with a single trait, depending on how much room it takes up. Quality always trumps quantity when it comes to attack / healing items in this game. Huge Damage with Numbers "Massively enhances attack items by a fixed amount. Weaker power results in stronger enhancement." Which means I probably could have better spent this slot elsewhere, but eh. Things worked out. Property Super Enhance massively increases the effect of an item depending on the properties present. What this means, is that the higher PP the cost of the traits on your item, the more that trait increases the power of the item. Since these traits together cost me 96 PP, that's a *huge* increase.
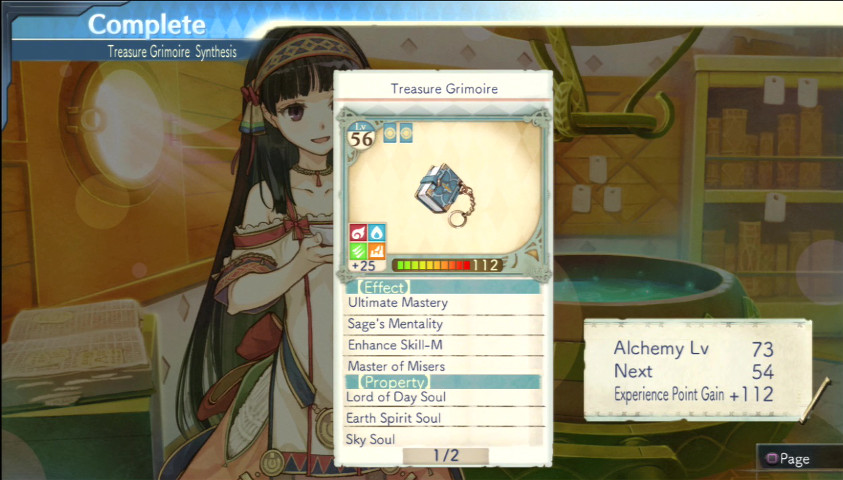
This is another accessory I like a lot. The Treasure Grimoire might not objectively be one of the best, but it does provide one significant buff: significantly increasing the power of Ultimate Attacks (Ultimate Mastery). I usually like to put this on a few characters, as it'll make Ultimate Attacks hit like a runaway train powered by a jet engine packed with nitroglycerin. In my battle against the ultimate final boss, Keith broke the damage scales of the game. The game said he hit for 53,320, which is perfectly respectable, but the numbers just didn't add up. The boss had more than 80,000 HP left before his Ultimate. When I actually did the math, the final attack actually hit for 153,320. It's the most damage I've ever seen any of my characters do.
For this Grimoire, Lord of Day provides HP regeneration and a chance to avoid KO, Earth Spirit resists turn delay attacks and increases the assist recovery rate, and Sky Soul both increases assist effects and increases the amount of Burst Gauge filling each attack by that character does. Not a terribly exciting line-up, but certainly a solid, supportive one.

For Lotte and Stera, your accessories should be different. Since their primary role is to survive and use items to support everyone else, you should focus on defensive accessories / traits. This Gold Coin of Fortune increases MP and defense (Water Spirit), HP and attack (Fire Spirit), and increases all stats except for resistances and fire and water resistance (Sunlight). I only made this for the Avoid KO-S (gives a small chance to avoid a KO, as the name might suggest), and because it's a fairly easy accessory to get good traits on.

This accessory is unique to Stera's story and something Lotte players will just have to envy. From top to bottom, the highest level effects get you larger than expected damage (higher level increases this effect), automatically revive from KO (only when that character's turn comes up), increases damage of critical hits by 15%, and increases damage in Burst Mode by 5%. For traits, I went with Light God (bestows damage reversal and neutralizes all negative status effects), Lord of Night (increases critical hit chance and chance of dramatically reducing wait time after an action), and Dark God (increases speed and reduces skill wait time). Considering all you should be using is skills, an incredibly valuable trait.
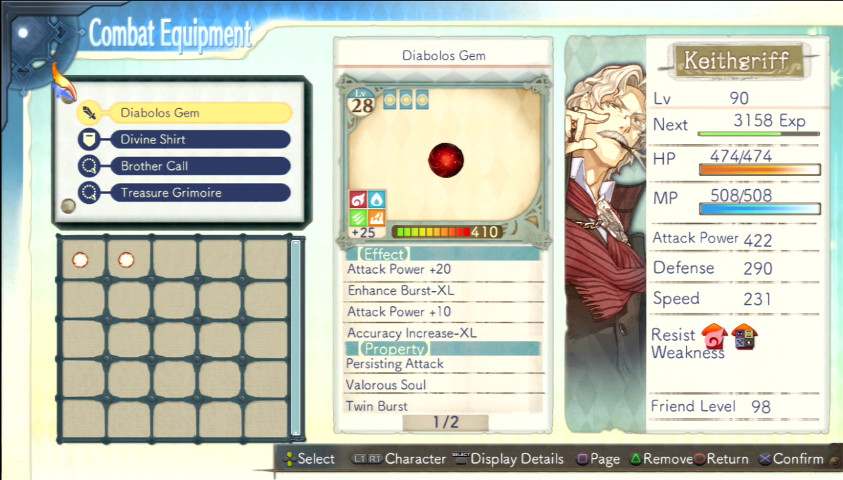
This is what I have weapons for Keith. For all my characters, I went with some combination of Persisting Attack (power / skill power increase), Valorous Soul (which does much the same thing. These two traits stack), Twin Burst (significantly increases the amount of Burst Gauge percentage added per attack. Makes getting into Burst Mode much easier), and Chaos Attack, which is much the same as Persisting Attack. It's not very imaginative, but you can hardly argue with results, eh?
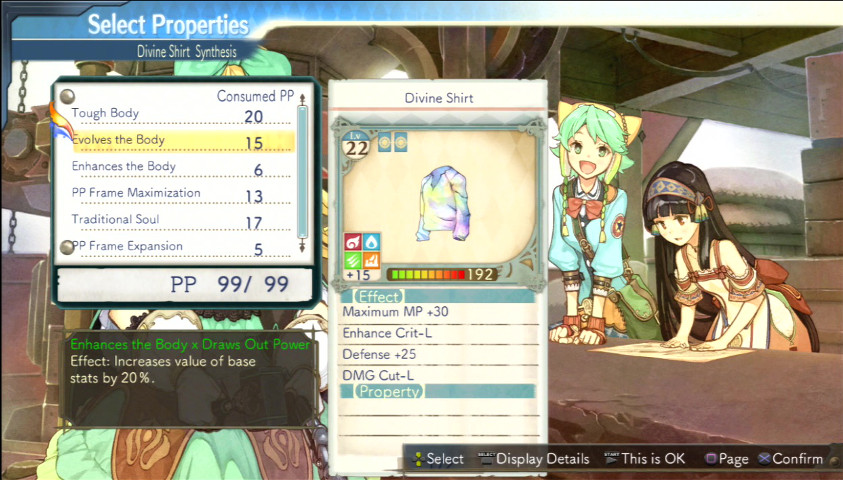
For armor, the choice is between Combat Shirts or Divine Shirts. Divine Shirts have better stats, and DMG Cut-L reduces incoming damage by 10%, hardly an inconsiderable amount, but Combat Shirts give you a pretty strong chance of avoiding a KO. The choice is yours. For traits, you could do much worse than Evolves the Body, Enhances the Body (base stats increase by 10%), and Tough Body (base stats increase of 15%, and +30 to defense).
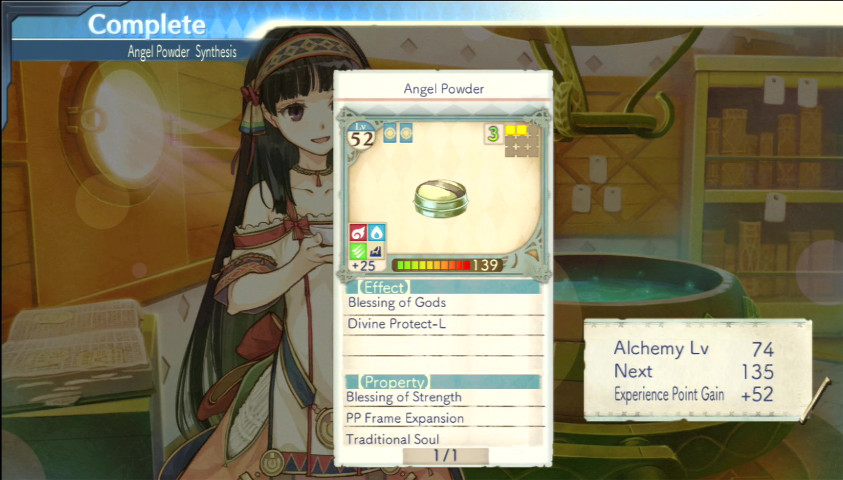
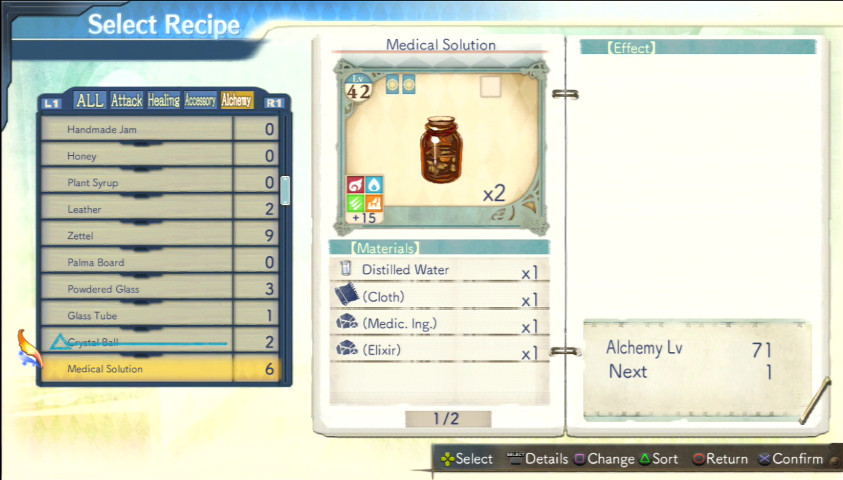
For the last part of this post, let's talk the Elixir, since it's by far the most valuable healing item and pretty much makes all others obsolete. Now, this Angel Powder is an indirect, but important step. The reason I made this with these traits is that the Angel Powder can move ingredients from a Supplement to a (Medicinal Ingredient), which in turn can be applied to a Medical Solution (the Solution is an excellent transfer item to weapons, armor, accessories, or healing / attack items), and the Solution can be applied to the Elixir in the (Mystery) category.
The Elixir itself is an alchemy level 74 item, and requires a Dunkelheit, (Water), (Mystery), and (Elixir).
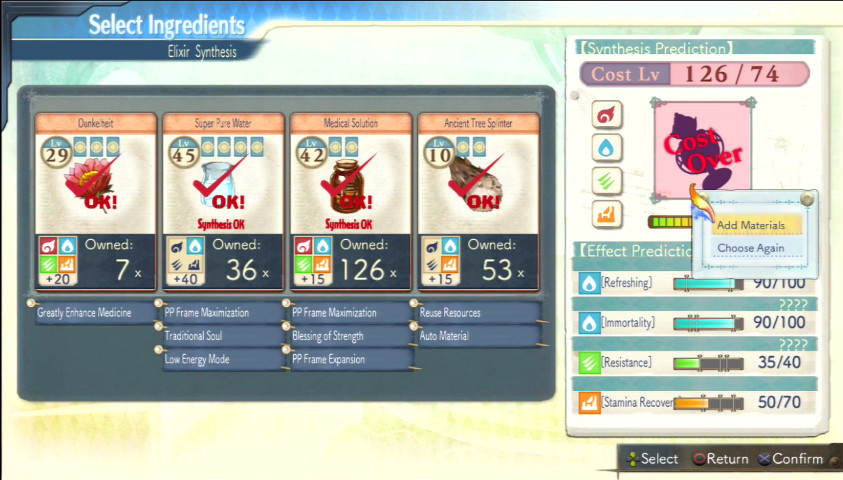
Now, under normal circumstances, I could jack all the Effects on this thing all the way, but that's not what you want to do, for the sake of the Wind effect (which, at its highest value, has no effect, but second highest removes all negative status effects). You can see all the usual PP enhancing suspects, but take note of Low Energy Mode on the Super Pure Water and Reuse Resources and Auto Material on the Ancient Tree Splinter (quite a lucky break to get those two in one, actually). By the way, Low Energy Mode, unless you find it as a property on a material, can also be acquired by combining Recycle and Recycle+ in the same synthesis. You can find these traits on the Junk / Scrap Metal and the Small Relic, respectively.
This is about ideal, as the Elixir takes up fairly little space, has all the best possible effects. I wish I could have gotten the effect value a little higher, but I'll just have to accept this as a result.
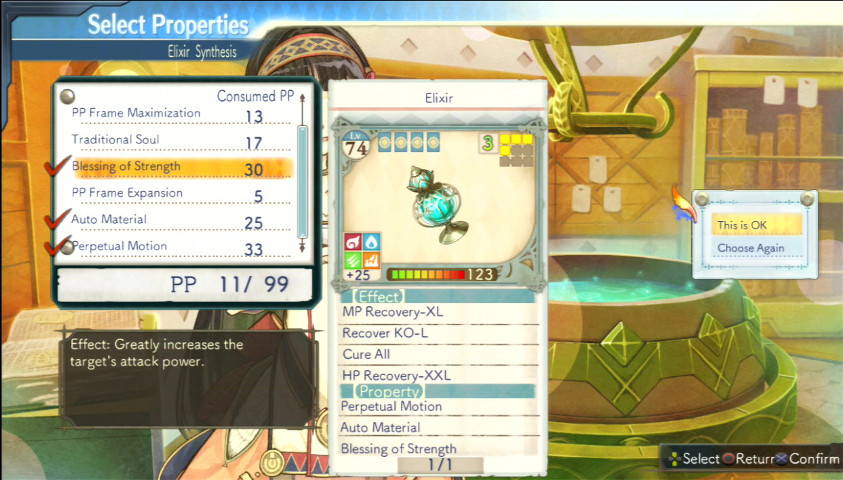
Perpetual Motion means the use count of the item will never go down, but it consumes the alchemist's MP instead. Not a big deal, since it will immediately be replaced by the MP Recovery XL. Auto Material turns the Elixir into a timed effect and is automatically used when an alchemist's HP falls below 25%, and Blessing of Strength grants a massive (about 40 points) attack increase to all characters affected by it. Perpetual Motion and Auto Material (or any "Alchemist falls below x health in battle, automatically used" traits) are your primary targets here. You can put anything you want in the third slot. Totally up to you.
Honestly, I may have to revisit the Elixir, since 25% is not great, and you can get an auto-use up to 60% with the trait Auto Use. We'll see how things work out, and it wouldn't be that hard to get those traits back.
Edit: turns out things worked out marvelously with this Elixir.
As a postscript, I am not saying this is the only combination of traits, accessories, attack items, armor, weapons, etc. that will guarantee success. With the high level alchemy in this game, and the wide variety of traits available to you, there are any number of choices that will all have the same chance of success I had when going up against the two most powerful bosses in the game. Hopefully this was informative, and any questions will be addressed appropriately as edits to this post.