Part 10: GDI 10: Recapture Hammerfest Base
GDI 10: Recapture Hammerfest Basehttps://www.youtube.com/watch?v=QMil93_nWIc
Recapture Hammerfest Base

With Vega's pyramid under GDI control, and his forces either destroyed or fleeing, it is only a matter of time before McNeil gets his hands on Vega!

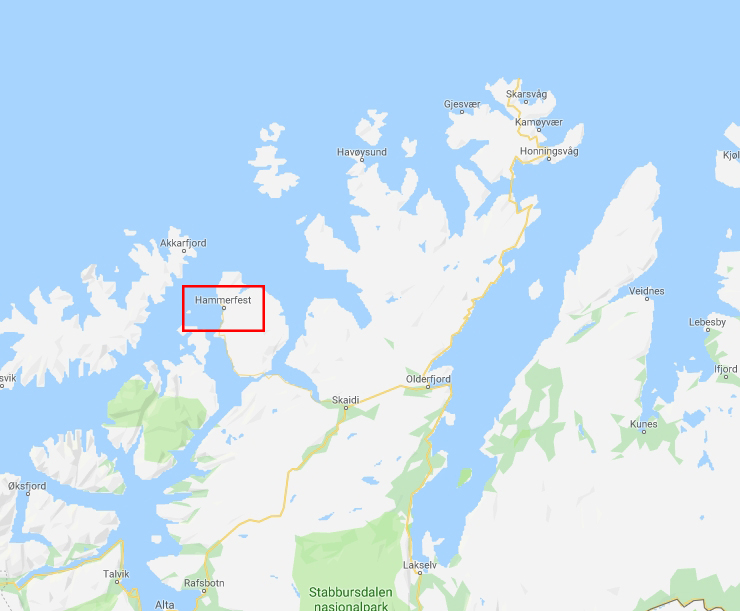
Hammerfest, Norway.

Location: Hammerfest, Norway
Objective: Recapture Hammerfest Base, and destroy all NOD forces in the area.
Briefing: Hammerfest base has been overrun by Nod troops. The Firestorm walls block direct approach, so another route must be found back into the complex. Using hover MLRS and waterways for access, find a way back to the GDI base and re-capture it. Once the base is back in GDI hands, destroy all Nod forces in the area.
Author's note: A lovely mission with a nice intro and nice trigger work. Also a nice introduction to several new things, such as the MRLS and the firestorm defenses.


Name: Commander Michael McNeil
Aliases: Mack
Affiliation: GDI
Occupation: GDI Commander
Voiced/Played by: Michael Biehn
Commander McNeil was personally requested for by General Solomon, and was briefed of Kane's return by the same. Initially skeptical of the return of Kane, he immediately set out to destroy NOD forces attacking Phoenix Base. Helped capture and secure an alien ship that had crash landed near Texas. He loves to win. Has little compassion for the Forgotten. Attempted to capture Vega alive, but his foiled by a nuclear weapon launched by Kane.
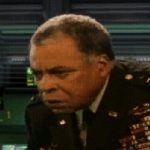
Name: General Solomon
Aliases: None
Affiliation: GDI
Occupation: Supreme Commander of GDI
Voiced/Played by: James Earl Jones
The Supreme Commander of GDI, he oversees GDIs actions from the GDI Space Station Philadelphia. Gen. Solomon was taken aback by the return of Kane, but quickly called for one of his more promising commanders, Michael McNeil. Tasks Com. McNeil with destroying the NOD forces responsible for the attack on Phoenix Base. Believes the Brotherhood of NOD is attempting to steal GDI technology.
Name: 1st Lt. Chandra
Aliases: None
Affiliation: GDI
Occupation: Kodiak Co-pilot and 2IC
Voiced/Played by: Kris Iyer
Friend and second-in-command to Com. McNeil, he serves as the Kodiak's co-pilot. Helped McNeil capture Vega.

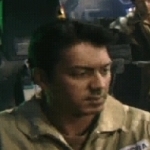
Name: Vega
Aliases: Faze
Affiliation: NOD
Occupation: Commander within the Brotherhood of NOD (Rank is presumed)
Voiced/Played by: Francesco Quinn
Presumably, he was the leader of the forces behind the attack on Phoenix Base. Murders Lt. Com. Peter Tao. Killed by a nuclear missile launched by Kane.
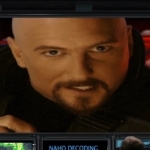
Name: Kane
Aliases: Caine, Jacob; al-Quayym, Amir
Affiliation: NOD
Occupation: Leader of the Brotherhood of NOD
Voiced/Played by: Joseph David Kucan
First seen since his so-called demise, Kane hacks into the SS Philadelphia's communications and taunts GDI's General Solomon.


Firestorm Defense
ARMOR: Heavy
COST: 2000
POWER USAGE: 200
PURPOSE: Firestorm Defense ability
The Firestorm Defence Generator creates an infinitely high force field. Once the generator is constructed, special Firestorm Defence Emitters must be placed on the perimeter of an area to be defended, just like a wall. When activated, the force field
that results from these emitters is impenetrable. The Firestorm Defence Generator consumes massive amounts of power. Because of this, it can only be active for a short period before it needs to recharge. The shield can be turned on and off at will.
Author's Note: The firestorm defense is a thing I'm divided on. It can be really great, if you can use it properly. The problem lies in that its not so easy to do. Its also a big money and power investment.

Firestorm Defense Wall Section
ARMOR: Light
COST: 50
POWER USAGE: 2
PURPOSE: Firestorm Defense
Used in conjunction with the Firestorm Defence Generator, these emitters are placed like a wall and control the placement of the Firestorm Defence shield. These emitters can be used to completely encircle a base or can be used at key defensive
positions.
Author's Note: You cannot use the sections without having the main building, but at least the cost is cheap and power consumption is low. Nothing can pass through an activated Firestorm wall.

Tech Center
ARMOR: Light
COST: 1500
POWER USAGE: 200
PURPOSE: Access to higher tech units.
The Tech Centre is where GDI conducts its high tech weapons research. This structure is required prior to the construction of certain high-tech units and structures.
Author's Note: Necessary to unlock the ability to build the best units in the GDI arsenal.

RPG Add-on
ARMOR: Light
COST: 600
POWER USAGE: 20
PURPOSE: Defensive add-on to the component tower.
The rocket propelled grenade, or RPG, upgrade launches grenades at enemy units. The RPG is designed for use against vehicles but can be used against infantry as well. Its explosive charge ensures splash damage to any other units caught around its target.
Author's Note: Essentially the anti-vehicle add-on to the component tower. Its an amazing upgrade to have in conjunction with vulcan defenses, because they always force infantry to go prone.

Hover MLRS
RANGE: Medium to Long
ARMOR: Light
WEAPON: Hover Missiles
The Hover MLRS is a medium to long range missile delivery system mounted on a hover chassis. Like the Amphibious APC, the hover MLRS is capable of crossing both land and sea. Because of its hover capability, the unit is unaffected by most terrain types, making it an ideal (although somewhat expensive) unit for scouting enemy territory. Its rockets are capable of hitting both air and land targets with equal effectiveness.
Author's Note: If you don't use Titans, you better be using MLRS'. They are a little pricey, at 100 credits more than a Titan, but they exchange armor for mobility. Their ability to hover means they can go almost anywhere.