Part 42: Stats for All Of Us
Side Course 1: Stats For All Of UsWith a new series open to us, of course there's a million little details to go over. We'll start with the overview stuff, before going into the nitty gritty... of stuff we actually know about. Etrian Odyssey 1 is a game with many secrets still hiding away that we must know about. But hey, we know some of it, so we'll start from there! Let's talk about the party's stats, using Lavin as an example, since he's a pretty basic guy.
 ...
...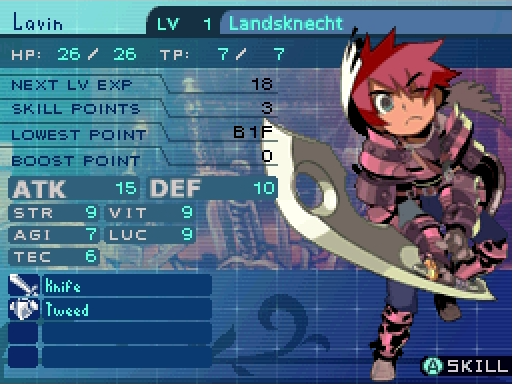
Level: A weird one to start with, you might think, but it actually dictates how the entire game is played. The difference between your level and the enemy's level determines damage taken and damage dealt, which is why it seems like some monsters are kicking your ass when you first encounter them. This is something that applies the entire game, so if you're having a problem against a certain enemy or Boss... the best thing to do is grind. Seriously. This will only take you so far in some cases, you should be fine if you only have a few levels difference, and both the party and enemies have a level cap of 70.
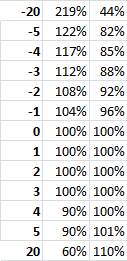
First row is Your Level - Enemy Level, second row is the enemy's damage and third row is your damage. It's a bit weighted towards the enemy, let's be honest, but there's never any time when the game expects you to fight an enemy 20 levels higher, it's only to really hammer in that you shouldn't be fighting this monster yet. Usually, you'll fall in the -5 to +5 range, with a few -10 ranges when you first reach a new stratum. It's something to keep in the back of your mind, but it's something you can't control. Just play the game normally and enemies will become much easier to handle.
ATK/DEF: These aren't really their own stats, as they're derived from your STR and VIT stats. ATK is STR + Weapon ATK value, while DEF is VIT + Armour DEF value. All four stats get used in various damage formula we'll go over at a later point, so it's good to keep these stats as high as possible, though a few points won't make a difference, probably.
HP: When it drops to 0, you're dead!!!
TP: Let's you use skills. When it drops enough that you can't use anymore skills, if you don't deal much damage with a regular attack, you're deadweight!!!
STR: Used for physical damage (Cut, Bash, Stab), but ATK is the one properly used in formulas, since STR is only used at the start to determine ATK.
TEC: Only used in formulas for elemental damage. That's it, so this stat is mostly for the Alchemist to deal ridiculous damage in the early game when things have low VIT, or when you use the few composite skills in the game, mostly on the Ronin, who has the worst TEC in the game tied with Landy. The other classes only use this stat when their regular attacks get an elemental boost from oils or from Troub songs. The attacks get a bit of a kick from TEC, since the damage formula of (2 * TEC) + (BaseAt * Mastery) wouldn't be impressive otherwise, since the numbers on the second half are so low, especially with the skills' pitiful "bonus damage."
VIT: Used for both physical and magical defense. Both VIT and DEF are used in the same formula, so it's good to keep them both topped up if you can, even though the Armour numbers in this game aren't very exciting. The only major difference between defending against STR or TEC based attacks is TEC damage gets the chance of rolling higher random numbers in the formula, so it's not a big difference, but TEC starts out pretty high. However, since base damage is ATK - DEF, anything that lowers ATK (or mitigates damage) makes a bigger difference than simply boosting DEF, so simply buff skills aren't as effective as reducing damage dealt.
AGI: Used to determine a bunch of things, from turn order, accuracy, evasion, escape rates, preemptives and blindsides. We don't know all the specifics, but it doesn't effect accuracy or evasion much and turn order is determined by [AGI � 5] � Speed Modifier, which also makes it mediocre. You won't notice a difference if you decide to buff AGI via skills during a battle, since some enemies will be faster than you no matter what you do. Accuracy = (attacker AGI + attacker Lv + 500) � (receiver AGI + receiver Lv + 500) � Accuracy modifiers � Accuracy/Evasion buffs/debuffs, result is capped between 20 and 100. Before accuracy modifiers are applied, the resulting number is pretty damn small, so AGI changes again do very little.
LUC: Used for item drop rates. Uh, that's it, probably. Drop rates aren't fixed in this game, which is handy since they're so low, but the ways to boost them are with a shitty stat that does nothing else, or by wasting points in Scavange, which the Alchemist could do once they're finished up all their skills. The LUC bonus, like the AGI boost, is pretty small, at (100 * (2000 + Party's Total LUC) / (2000 + (Party's Total Levels / 5))), so a max level party with no LUC boosting equipment has a... 13% increase to drop rates. That's not a lot. This results in the final formula of Chance = (Base Chance * LUC Bonus) * Scavenge Bonus (130% max, though stackable). There are some pretty low numbers in this game and these bonuses really don't do a lot.
And that's every stat! You're right, most of them barely matter, especially to physical classes, since the numbers involved are usually too small to even think about. Still, at least you know.
Enemy Stats
NOW, we've gone over the character stats, but just because it's slightly flipped for the enemy doesn't mean nothing much has changed. So let's go over an enemy overview, such as the Hare, since they're pretty basic.
 ...
...Hare
Level: 7
Starting off with the most important stat, of course, though the game never tells you this at any point, nor makes any indication that level difference is even a thing! So it explains why certain enemies are kicking your ass when you first face them, and why they're doing much less now that you're stronger. This makes weapons and armour much less useful than you think it is, since if you didn't know about this mechanic, you'd think that changing equipment would be doing something, even if it really isn't. Just keep gaining levels and you'll be much better equipped than anything you could unlock.
HP: 38: Same as us, though since there's usually one enemy compared to 5 of you, HP stats increase pretty quickly, up to the tens of thousands. That's a lot to chew through, but that's five actions compared to one, so you can buff DEF and heal and all kinds of crazy stuff. It's weighted in your favour.
Note that no enemy has TP. They do in later games (and don't use it aside from 3) and you only really know they have it due to Fear from EOU on. Don't think about it, worry about yours.
STR: 23: How much they do with physical attacks. An enemy's regular attack can be Cut, Bash or Stab, though you'd only know from animations that play when they attack other enemies, so it's something you don't need to worry about, since all classes have a 100% resistance (well, 99%, don't worry about it) to all damage types. As you'll start to notice as the game goes on, the STR value starts getting really high, like in the 500s, compared to the other stats staying around the mid 100s. It's the best way for the game to keep you on your toes, though you can use damage mitigation skills to deal with that.
VIT: 19: How well they take both physical and elemental attacks. Note that you do know these numbers, since they're given in the compendium as ATK and DEF. Though since enemies don't wear equipment, that's just their STR and VIT stats. Aside from HP, that's all you get from them, though only level is the important one. All of these numbers are put into the damage formula, which we'll go over soon enough.
AGI: 14: Identical to your stat. Any enemy that runs away will do so unless you stop them. No, leg binds will not stop them in this game, because of course not. Enemies with a high enough AGI stat will be very hard to outspeed due to the low numbers you work with in this stat, which is a real shame. Only a few enemies have AGI+ skills, but since they're usually faster than you anyway, you won't notice it, aside from when they keep fucking dodging! There's also a few AGI skills that are bugged, so those will be fun to go over.
LUC: 14: Enemies can crit in this game, to thunderous applause, I assume, so having a high stat in this can be annoying, but we don't know the specifics to really assume. If LUC only effects item drops, then this stat is completely useless for an enemy. Who knows, really. It won't make a huge difference, since these stats stay relatively low compared to STR and VIT, usually they're just lazily copied, since the developers didn't care that much.
TEC: 14: Like for us, only applies if the enemy has an elemental skill. For enemies with those skills, this stat is high, but never higher than STR, since most of an enemy's skills will be physical based, with only one or two actually being elemental and they're often party wide and sometimes the strongest skills in the game! But that's not important. Elemental damage mitigation isn't as common as physical ones, but is notable enough to make those skills, and indeed this stat, not something to really think about, since it's so easy to plan around.
EXP: 36: Divide by surviving party members, round down. There we go. Unless it's an FOE or Boss, taking down one enemy really won't matter towards your total exp, especially since this number never gets that high to begin with. It can even be 0, because of course it can. There will be places to easily grind, but that's not early on and especially not an easy way to level up a character from scratch. Just choose 5 peeps and stick with them, it'll make your life so much easier.
Skills
None
Huh, maybe I should've used an example with skills, uh, look below. Regardless, like your skills, all of them use a body part (except for when they don't), have an attribute, an accuracy modifier (usually between 80 and 100) and a speed modifier (is either low, between 80 and 100, or sometimes much higher). Most enemies, if they have a skill, will only have one or two, it's the Bosses that have a large variety, even FOEs just have one or two skills, so once you know what you're up against, it makes it a lot easier to plan around. Buff skills and the like are easy to get around if you can dispel them/reverse it with another opposite effect skill.
Scythe: Uses the Arms. A Cut attack that deals 120% damage to a single target. Has a 97% accuracy modifier and 10% speed modifier.
Damage Vulnerabilities
 100%
100%  100%
100%  100%
100% 100%
100%  100%
100%  100%
100%How much damage is multiplied by at the end of the formula. Remember for all these various values that 100% is the baseline, anything below that is a resistance, above is a weakness. I've tried to make it all consistent across the whole thing, but it's a lot to keep track of. For other skill related numbers, such as attack damage and accuracy/speed modifiers, they are only good or bad compared to others in the same category. Only some skills actually affect the resistance numbers, most skills just affect the final DEF numbers, or the actual amount of damage, so it's important to know the difference, as the difference between a 50% resistance and a 5% resistance is staggering and pointless to usually attack against.
Disable Vulnerabilities
 100%
100%  100%
100%  100%
100% 100%
100%  100%
100%  100%
100%Not as important, but still a lot to keep in mind. These numbers are simply the base chance of something landing, before going through the formula, meaning you can increase these numbers past 100%, though they will never be higher than that to begin with. The first number is ALL ailments, they have the same infliction chance no matter what, from Sleep to Confuse to Curse. Second is Stun, which is the same for each category of enemies: 100% for regular, 50% for FOEs, 25% for red FOEs, 15% for story bosses, 10% for all other bosses. So while no enemy is ever truly immune to it, it's something you can't really rely on. Final number is Instant Death and Petrify, oh baby, though the skills for that are very limited and only needed for one Conditional for Instant Death. In fact, there's no ailment conditionals at all in this game, limiting their usefulness, though they still have their uses. While Petrify won't remove enemies from the field, they never recover from the status and are basically dead.
Binds aren't as important as other games, since stronger enemies have AI that specifically check for binds and use different skills because of it, but it's still useful to slap down an enemy's shit. Only a few conditionals require binds, so if you're not impressed by disables in this game, then you don't have to use them, even if a Dark Hunter lets you use all the various Whips you've accrued. While I might be misremembering, the numbers for all three binds are always the same, so they're all dependable in equal amounts, which might not be too fun for bosses. Most of the deadly skills are used by the Head, then Arms, with only a couple for the Legs.
Drops
Normal: Small Fang. 32% chance. Sells for 10en.
3 required for Dagger (Sword, ATK+9)
5 required for Fang Whip (Whip, ATK+10)
Rare: Hare Tail. 30% chance. Sells for 15en.
1 required for Buffcoat (Clothing, DEF+2, AGI +3)
3 required for Doublet (Clothing, DEF+3, VIT+1)
Conditional: None
Drops are pretty unlikely in this game, but at least you've got the LUC stat, right? R-Right? Conditional Drops are uncommon, but you can usually get them when you trigger them, but it's not guaranteed. The game rolls backwards to determine drops, so 3rd, then 2nd, then 1st, so getting high levels in Scavenge or a higher LUC stat actually makes it harder to obtain 1st drops, since once a drop is determined, the game stops rolling. There's also quite a few enemies with really rare 2nd drops that are a pain in the ass to obtain! Also the unlock requirements can get a bit eye watering. You think 10 of a drop is too much. Oh boy, there's still plenty to come!
And that's most of what makes up an enemy. But of course, there's still plenty to go over. Like damage formulas. Or AI. Who doesn't love all that stuff?