Part 85: Difficulty Options
Side Update: Difficulty OptionsThanks to the comments, I realized I was probably putting out an impression of the game being harder than it needs to be. Whether that’s mostly due to my difficulty choices or my actual playing skill is a mystery for the ages, but I should still probably go over all of the ways that you can customize things.
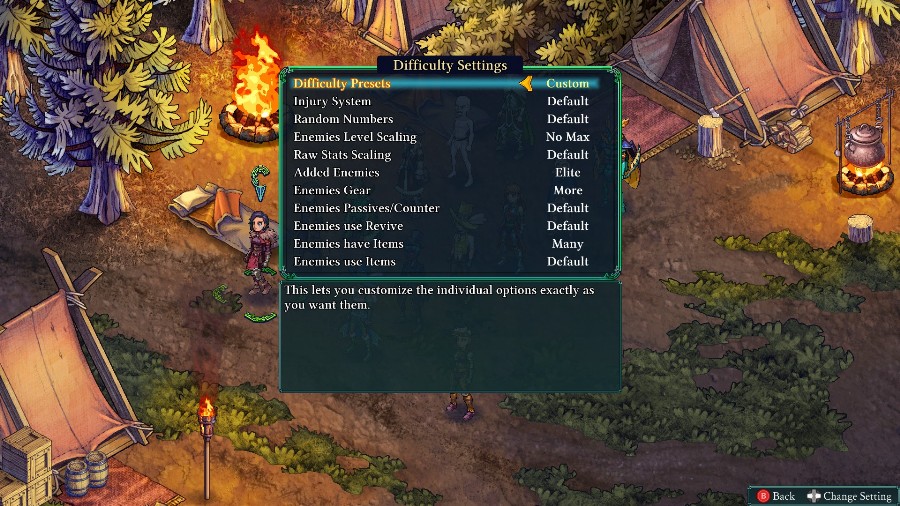
Here’s the box with all of the settings. You set them at the beginning of the game, but can change them at any time from the troops screen.
At the top there are 6 presets to pick from, but I’ll go over them once I hit the actual meat of the options.
Injury System
This has 5 different setting that you can pick from:
- None (No penalty whatsoever to getting KO’d)
- AP Malus (When a character falls, they will earn less AP at the end of the fight and falling multiple times stacks the penalty)
- Default (When a character falls in battle, they will have a penalty to all stats until they rest for a full battle)
- Permanent (Every time a character falls, they will receive a 5% penalty to a random stat, which stacks).
- Permadeath (same as permanent, but if a character receives 5 injuries then they’re unable to participate in combat. Kyrie is immune to the full permadeath effect but not to cumulative stat penalties)
Random Numbers
There are only 2 options for this one:
Normal (A flat 1D100 is rolled for every action to determine success)
Weighted (“The game will use a randomizing system that’s more in the player’s favor”)
I looked around and couldn’t find exactly how the weighted RNG is done, but it’s definitely noticeable if you choose it. This is pretty much up to preference, and I just didn’t see any need to change it.
Enemy Level Scaling
This has 3 options:
- Default (Each level has a minimum and maximum level range for enemies)
- Max Up (Each level has a minimum and maximum level range for enemies, the max is 33% higher than default)
- No Max (Each level has a minimum level and most levels have no maximum level)
Personally, I like being able to go back to a bunch of different maps to fight and not having the option to just out-level enemies and brute force through (though that would take quite a bit of grinding to actually hit the level cap). Otherwise, I think that any of the settings can work.
Raw Stats Scaling
There are 5 options here, all of which are pretty straightforward.
- -10% Stats
- -5% Stats
- Default (No changes)
- +5% Stats
- +10% Stats
I get annoyed when I see that units are just straight up better than my units are and prefer to give them boosts through other means, but this is a solid option to either boost or reduce the difficulty at a consistent rate.
Added Enemies
There are 3 settings here
- Default (each map has a regular number of enemies, the game was balanced around this option)
- Extra (Some maps will have extra enemies, usually 1 more)
- Elite (Some maps will have extra enemies, usually 1-2 more. In some encounters, one or more enemies will be replaced by a special version of the enemy with more abilities)
I like running this on elite because it adds a challenge to the map itself, rather than just making the enemies’ numbers bigger. But this also helps explain why most fights start off roughly, because instead of starting off even or at 7 v 6 odds, I’m usually running 8 to 9 or even rarely 10 v 6, which can have drastic effects on the fight just due to the action economy the other team gets.
It also snowballs a bit with both giving enemies more items (since the extra actions let them heal more effectively) and letting them revive at a normal rate (because it’s harder to keep any momentum going if the extra enemies can bring back whoever you take out).
Enemies' Gear
This has 4 options:
- Less (enemies typically have 1 fewer piece of gear than normal (2-3 slots filled at the start, usually about 4 later)
- Default (enemies will usually wear as much armor, weapons, etc. as they can, but will probably not fill all of their accessory slots (so usually 3-4 slots filled at the start, 4-5 later))
- More (enemies will have 1 more piece of gear than normal (usually 4-5 slots filled to start, and typically 5 later in the game))
- Full (enemies will fill every equipment slot that they can (all slots filled, usually with multiple accessories))
I prefer More, because it gives enemies a boost and usually an extra status immunity or 2, but doesn’t go crazy. On the other hand, Full is fine late game, but it seems to me that it can make the early game much harder when stats are small and your status infliction tools are limited.
Enemies Passives/Counter
There are just 2 settings here:
- Less (enemies have a chance of spawning without class or secondary passives or a counter ability)
- Default (enemies will always spawn with passives and counters if their level is high enough)
Enemies use Revive
This has 4 settings:
- None (Enemies will never revive others unless it’s a scripted part of the encounter)
- Less (Enemies will rarely revive fallen enemies and have a very low maximum number of times they can revive per battle (seems to be about 2))
- Default (Enemies will sometimes revive fallen enemies and have a low maximum amount of times they can revive per battle (Seems to be 3-4))
- More (Enemies will often revive fallen enemies and have a high maximum amount of times they can revive per battle (No idea how high, too many))
I don’t like None because IMO enemies should have some ability to recover losses. And then the choice between Less and Default comes down to preference. With boosted items, enemies have 2 uses of phoenix ashes, so I prefer Default so that they actually can use whatever additional revival skills they have. The main issue is that if you end up with 1 or 2 bulky enemies that have revives left, they can do a chain of revivals that makes the whole thing drag on a bit.
And I think More could be a very interesting setting if you didn’t go for Elite on the Added Enemies like I prefer. With more even numbers, it’d make reviving and healing an enemy have an actual solid opportunity cost for the enemy, instead of being nearly free thanks to their numbers.
Enemies Have items
There are 3 settings here:
- None (Enemies have no access to items, though they do still have a stockpile that you can steal from)
- Default (Enemies have access to a small stockpile of items, usually less than the player has. They might get access to higher tiers faster than the player, depending on levels)
- Many (Enemies have access to as many items as the player does (not drawn from your stockpile numbers, but instead determined by the upgrades you could have access to) and might gain access to higher tiers faster than the player, depending on levels)
Enemies Use Items
This has 2 settings:
- Less (Enemies have a low chance of making use of items when they need them)
- Default (Enemies have a good chance of making use of items when they need them)
I see this as a bit unnecessary, since item use should generally be covered by the previous setting. Still, I guess this could be a solid way of reducing item use without totally neutering the Peddler.
So yeah, this game has a ton of ways to customize the difficulty however you want.
For reference, the presets are:
- Beginner: (Default, Weighted, Default, -10% Stats, Default, Default, Less, Less, Default, Less)
- Veteran (All Default)
- Hard (Default, Default, Max Up, Default, Extra, More, Default, Default, Default, Default)
- Very Hard (Default, Default, No Max, +10% Stats, Elite, Full, Default, More, Many, More)
- Custom (whatever you want)
I think that my settings are between Hard and Very Hard (closer to Hard though), which might explain a bit as to why the game seems difficult. My main concessions were to avoiding any stat bonuses, the super slog of max revivals, and the early game difficulty spike of full accessories.