Part 42: Chapter 28x (part 1) and the War Room Part 29 (The Boots)
One of my favorite chapter titles. This chapter is one of the biggest challenges in the game- and max ranking it well is a challenge on the level of anything from the harder FE titles.
In many ways, it’s similar to my 3 favorite chapters: Whereabouts Unknown, Dragon’s Gate, and Battle Before Dawn. It’s a large, indoor map with a large number of secondary objectives to complete and requires unusual tactics and careful consideration.
However, it’s a sidequest and so, though it’s a critically important chapter in Nino’s personal story, it doesn’t have the kind of epic feel that those major turning point chapters do.
Further, the level revolves around a single gimmick (appearing and disappearing bridges) which doesn’t make much sense and doesn’t actually add much to the gameplay.
Relatedly, this chapter completely lacks the dynamism and blazing speed of the aforementioned 3 great chapters. Those were FAST chapters. You had 4 turns to be ready to save Zephiel. You had 5 turns to be ready to steal the north thief’s lockpick in Whereabouts Unknown. You had something like that to recruit Legault and seize control of the map in Dragon’s Gate. I brought massive numbers of 7 and 8 move units to those chapters and had a lot of fun coming up with creative ways to use starting formation and rescue dropping and equipment to move across the map with absolute maximum speed.
Those chapters were complicated, large, and sometimes had an intricate layout, but it was one you could move through quickly if you could clear the enemies efficiently. In contrast, Night of Farewells more or less locks you in position. Almost the entire map is water, so no one but air units can move across it. It’s not even Ocean or River type water which Dart or Hawkeye could at least cross in a turn or two, instead it’s the Lake variety so that they can barely move a square. And the bridges that appear to allow passage onward do so very slowly.
Those chapters had no staff using enemies. Staff wielders are often a good element of the game, but they are not good in chapters where you can’t actually do anything about them but hope they miss or waste turn after turn restoring away their statuses. This chapter is nearly carpeted with staff wielders with absolutely massive range so that you can’t rush in and assassinate them and with water to prevent most of your troops from even trying to engage them. The upshot is that you’re just going to have to hope for lucky misses or waste a lot of time curing people.
Those chapters put you in the driver’s seat and on the offensive. Yes, even the survival type chapter Battle Before Dawn. There were enemy reinforcements, but the standing forces were the bigger threat and the enemies (generally) came from predictable and even non-problematic directions. This meant that you knew what you were getting into and could plan accordingly and stay on the offensive. In Night of Farewells you rapidly come under attack by reinforcements in too many directions to defend against properly- particularly since most of the reinforcements are air units. Meanwhile you’re bombarded by staves, ballistae, and bolting. It’s often all you can do to just stay alive.
Ultimately, this chapter seems designed to be slow paced and bog you down. There’s really no hurry and there are many, many factors keeping you from moving at the exhilarating speed of those 3 chapters. So instead of being an epic race to do 10 things in 5 turns, Night of Farewells becomes a slow and irritating slog as your formations are gradually destroyed by the terrible terrain and the need to counter reinforcements from too many directions and you gradually run the enemy out of long ranged ammo.
In sum, I enjoy this chapter’s character development but I always find the gameplay to be unpleasant at best on HHM. Normal Eliwood mode at least is actually MUCH better. There are more valuable items to steal- diabolically including a blue gem on the right wyvern lord- and there are eighteen fewer turns to do everything in. The time limit is, in fact, absurdly low. Meanwhile, there are still a significant number of staff-wielders and the like, but their range is smaller so that they can actually sometimes be taken out pre-emptively and there are just not as many bogging your troops down in critical places. The result is a very fun and challenging chapter revolving around mass air-dropping of troops and other out of the box tactics.
Chapter Summary:
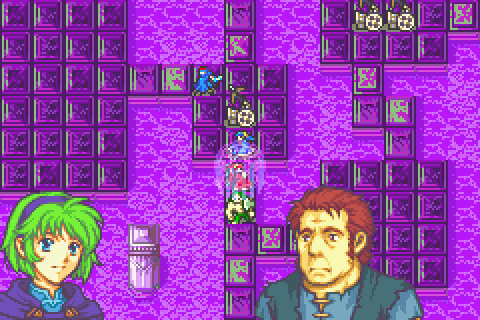
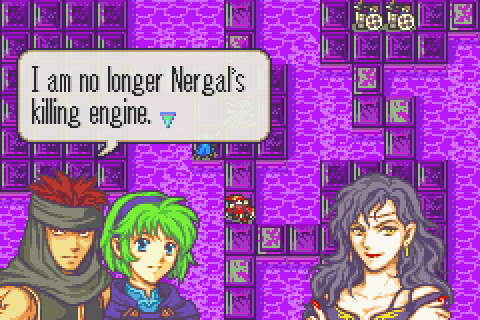
Shocked and horrified at the revelation that her own (supposed) mother Sonia hated her and tried to have her killed, Nino decides that she simply has to hear the truth first hand from Sonia herself. She sets out for the Black Fang’s last stronghold in the middle of the night, but is followed by first Jaffar and then the rest of the party. Their intervention saves Nino because Sonia decides to just murder her herself after killing Brendan Reed and most of the remaining black fang.
Ultimately, Sonia is slain and the Black Fang is no more- save for a few scattered survivors and one last, baseless band led by Lloyd.
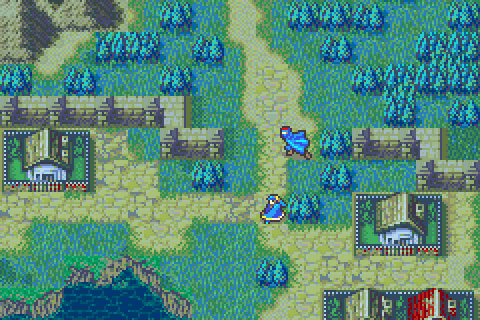
Nino is intercepted by Jaffar as she tries to slip away. Perhaps it’s just coincidence that this little town looks exactly the same as the little town Linus was walking through when Limstella ambushed and killed him. On the other hand, perhaps this is actually supposed to be the same town. In that case, this village seems to be within a mile or two of the Black Fang’s most secret lair. Further, it must be very close to the area Four Fanged Offense is fought in.
The sad theme Requiem plays again.
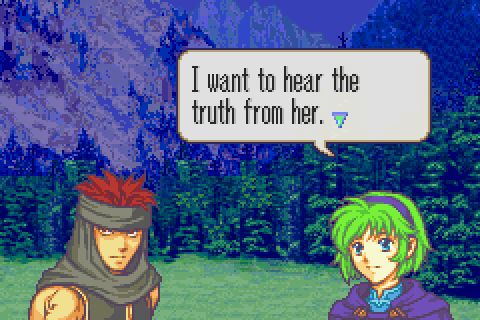
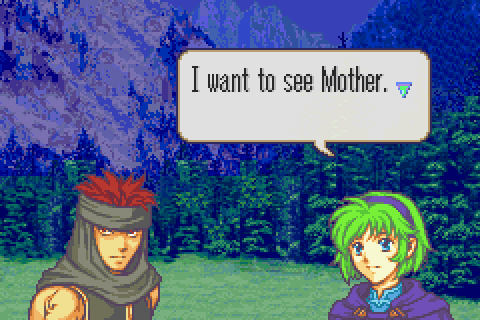
Nino explains to Jaffar why she must go back to the Fang’s lair even though Sonia will probably kill her
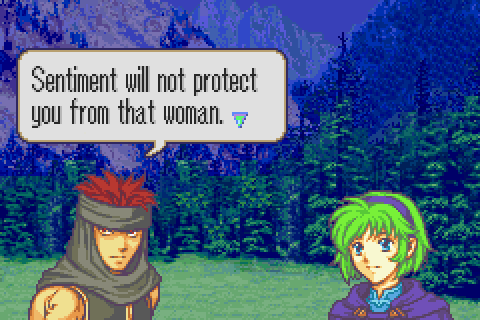
He ought to know.
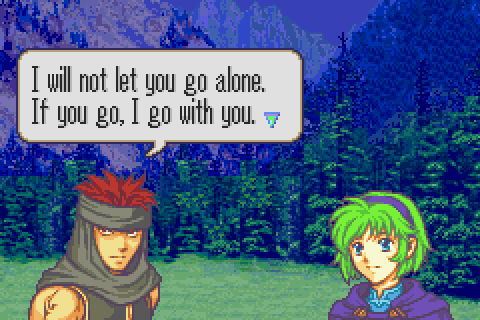
I always find Jaffar’s personal devotion to Nino rather compelling. They’re two of my favorite characters.
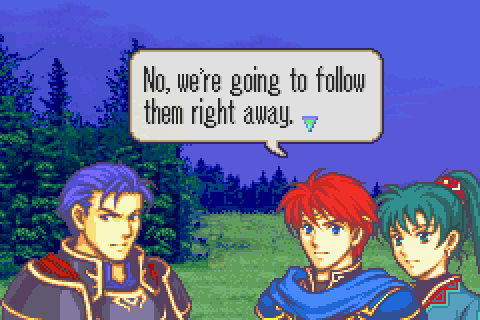
And here’s three of my other favorite characters. Apparently Nino is terrible at sneaking around. That or everyone decided it was a good idea to keep an eye on Jaffar. There’s a brief debate about whether to follow them or not with Hector, who hates Jaffar, in favor of just letting them go.
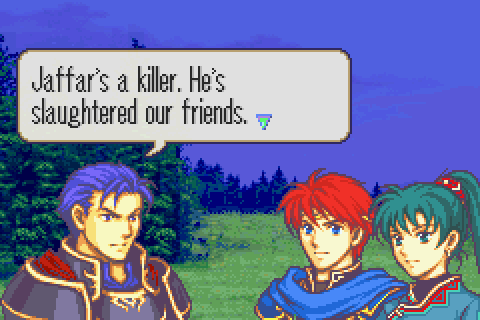
And he puts on his angry face and makes a completely legitimate point.
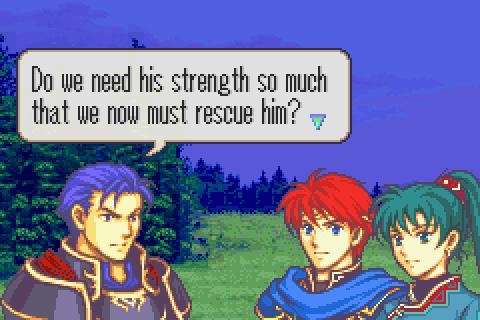
But then he reveals he really doesn’t understand why Eliwood wants to help them. Hector just isn’t as compassionate as Eliwood and assumes Eliwood must want Jaffar for his fighting skill, rather than so he can have a chance at a life not dominated by Nergal.
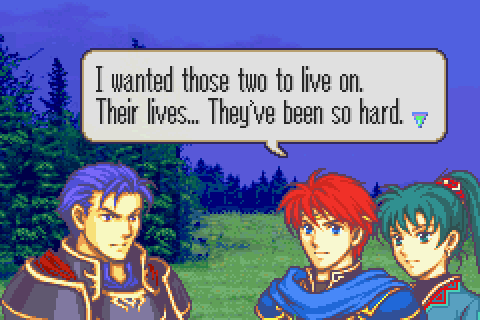
I think this is really a great scene for these characters- though Lyn to a lesser extent since Eliwood pushes her out of the limelight during much of the Bern arc. She’ll be back.
Hector grudgingly acquiesces and they give chase.
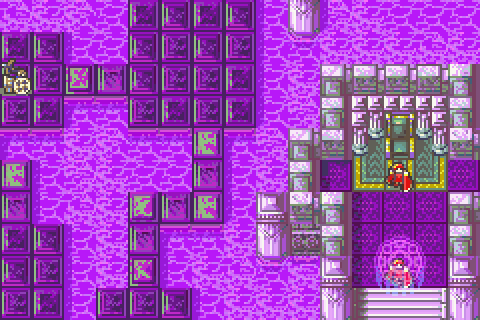
Meanwhile, the great What Comes From Darkness https://www.youtube.com/watch?v=_94fD5MR8Wg plays as Limstella teleports into the Black Fang’s ‘Water Temple’ to relay some orders to Sonia.
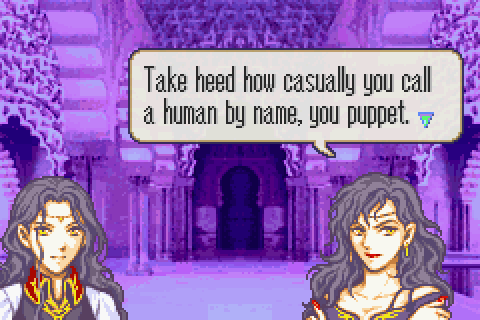
No doubt you’ve noticed that Sonia is clearly a morph- she looks almost exactly the same as Limstella and Ephidel and is similarly a puppet of Nergal’s. But as has been seen several times, she believes herself to be human and holds morphs in contempt. As has been noted, none of Nergal’s morphs really seem to be right in the mind, and Sonia’s denial of clear reality is a pretty interesting case of this.
Did Nergal make her that way as a test? As a cruel joke of some sort? Or did she come to believe this herself? Why, in that case? Afterall, Nergal- who she seems genuinely loyal to- seems to consider morphs superior to humans.
Limstella, a consummate professional, puts up with Sonia’s craziness and obnoxious tendencies as long as she does her job.
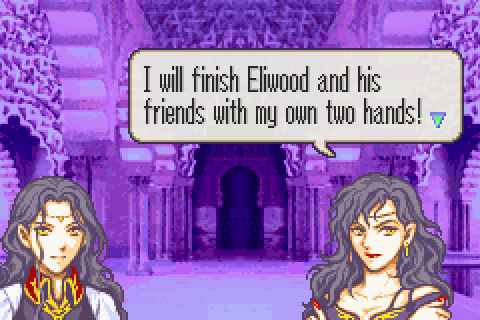
And that’s what she’s here about, to point out that Sonia has failed to kill Eliwood as ordered. Sonia, though, is not one to give up. She nearly had Eliwood at several points and decides that now that her existence is known (remember, she had every reason to think Eliwood and company didn’t know she existed, let alone her true power until Jaffar switched sides), she may as well take the field herself.
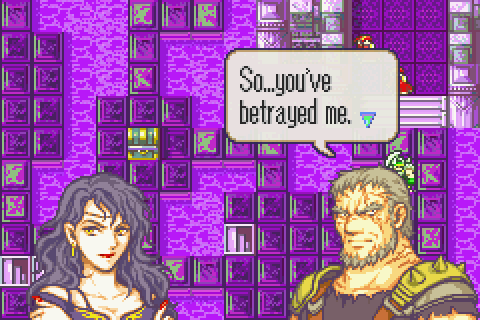
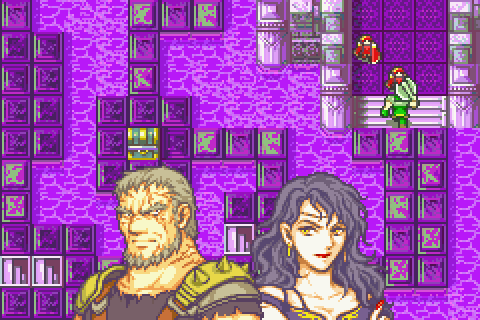
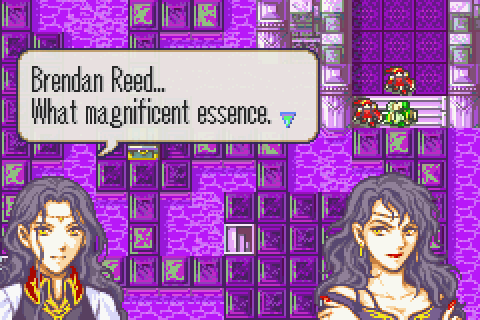
And Brendan arrives.
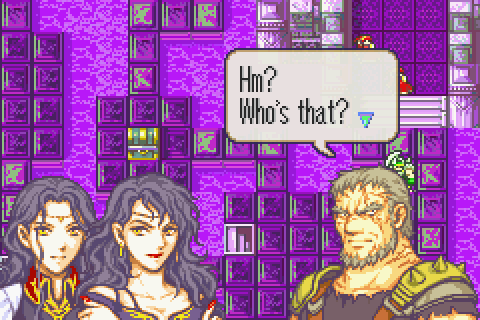
And sees Limstella. I’m not sure why that actually matters. Afterall, he knows Nergal- just not his real power or that Sonia serves him. Sonia could just pass Limstella off as a friend or acquaintance of Nergal’s. Of course, Brendan would be sure to notice that the two look very similar- but Sonia herself seems to be unaware of the clear resemblance, so she can’t see that as a problem. Perhaps Brendan would just be angry that she let a stranger into the fortress without permission? Still, one would think she could just smooth things over easily enough.
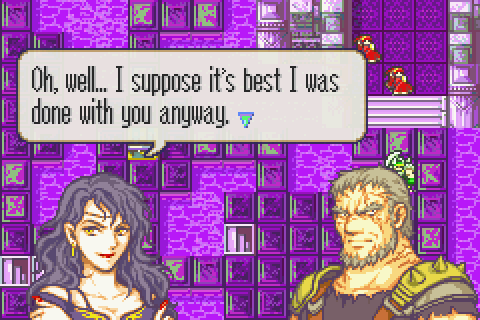
But apparently it does matter enough that now she has to kill him- though she wanted to anyway.
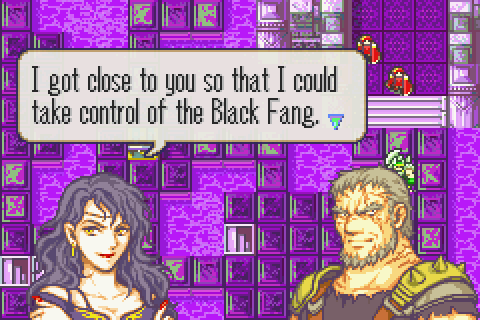
Unlike Limstella and Ephidel, Sonia is really cunning and also really likes to gloat and let people know just how thoroughly she’s outwitted them. She now explains to Brendan that she never loved him and was just using him to control the Fang from the beginning. His world has just been turned upside down.
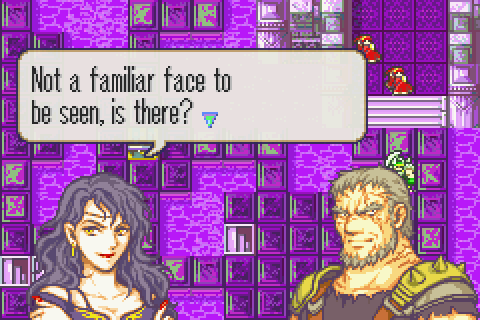
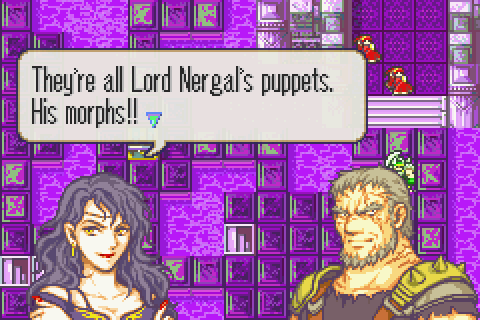
And another bombshell, she’s gradually been replacing the Black Fang around them with ones loyal to her and Nergal, one by one.
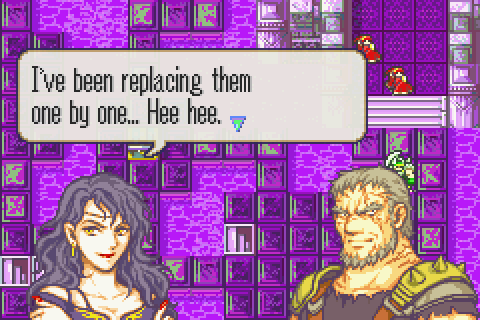
This chapter really has this great horror kind of vibe to it as we see Sonia from the Black Fang’s perspective. She’s devoured the organization from the inside out without any of them realizing what was really going on and now reveals to them for the first time that there are beings other than humans in their tiny little world of noblemen and assassins.
Did you think that one up yourself or did you have help? Even now he doesn’t REALLY get it though; she just explained that she was never on his side to begin with.
We all wanted to say it.
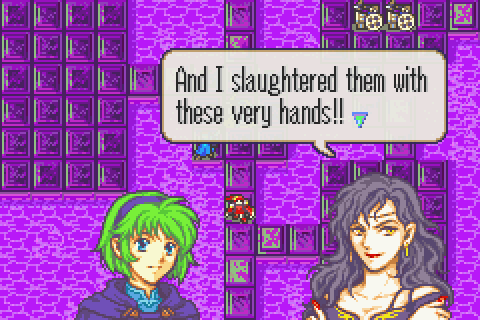
Awesome. As I’ve said before, Sonia really manages to be a viscerally vile and awful person in a way many Fire Emblem villains don’t. She’s evil and petty and cruel in a personal way rather than just as some abstract force of badness.
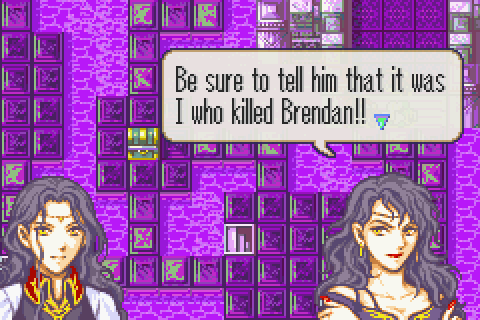
And they fight.

And he apologizes to his sons, who he now realize suspected Sonia all along and who he probably also now suspects he got killed by trusting her.
And Limstella, with that same disinterested expression, walks up and harvests his quintessence.
Sonia is really desperate for Nergal’s approval- maybe almost as much so as Nino is for hers. There’s really a great irony there.
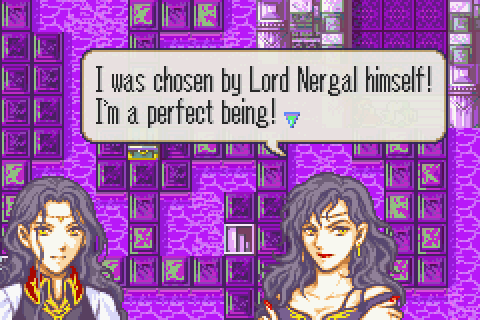
She sounds like she’s trying to convince herself as much as Limstella doesn’t she?
Limstella departs. The entirety of the Black Fang’ leadership except for Lloyd is now gone. Nergal has fed off everyone you killed and grown strong and replenished his armies.
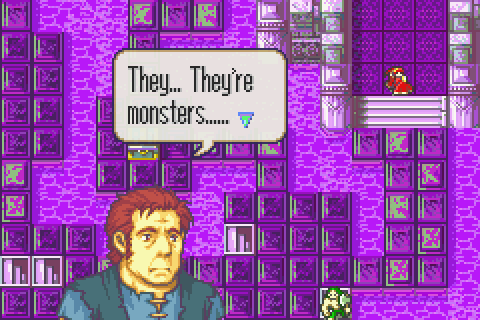
And this poor sap, Jan, witnessed Sonia’s horrifying revelations and murder of Brendan. Remember, no one except a few scholars have ever heard of morphs or had any idea that there were any non-human beings in their world. I think they did a good job capturing the kind of reaction that would get.
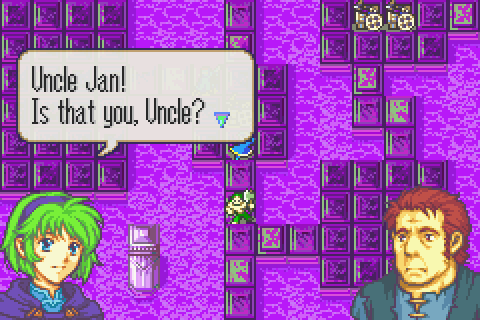
He flees and runs into Nino coming the other way. Note that he’s not her real uncle of course, he was just friends with Brendan so she called him that.
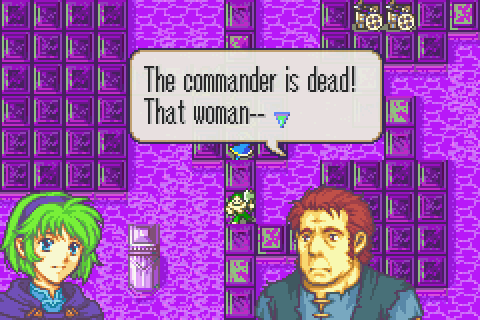
He’s been flying in a panic and tries to warn her.
Oops.

Awesome. As I mentioned, there’s really this great horror vibe- half invasion of the body snatchers and half slasher movie- as these assassins realize they’re completely out of their league.
And he flees.
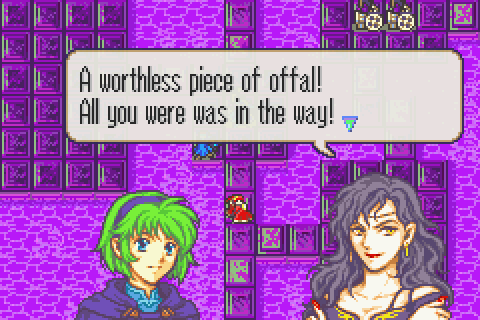
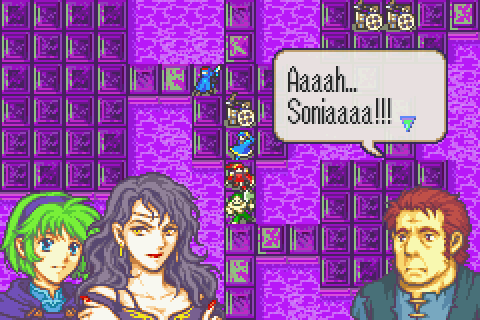
Sonia turns to Nino and jumps at the chance to twist the knife and rub some salt in the wounds by telling her daughter how much she hates her.
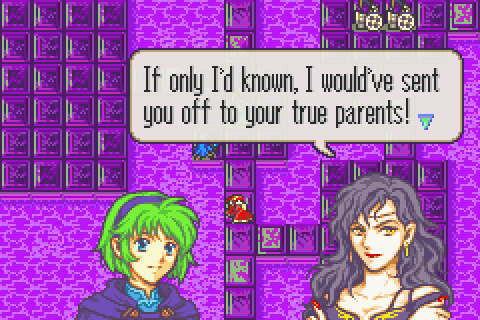
And another great reveal!
Sonia gleefully explains how she murdered Nino’s real parents and was going to kill Nino.
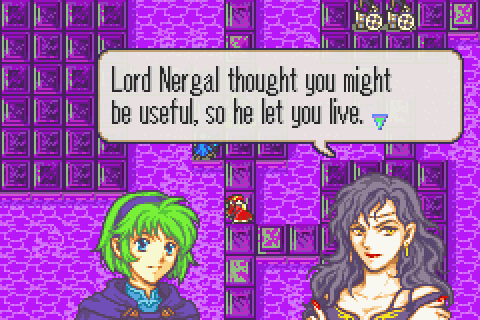
But Nergal decided she could be useful- much like Jaffar. Sonia herself just wanted to kill Nino and only grudgingly agreed to raise her instead.
Note that it was Nino’s parents that Sonia and Nergal got the secret of the Dragon’s Gate from. This again stresses how recent and yet how quiet and stealthy much of his villainy has been.
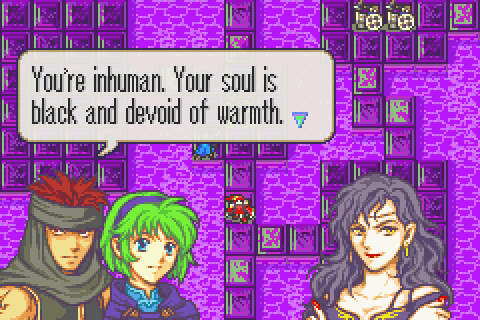
Another great Jaffar line.
She didn’t see all his character development of course, all she saw was that he was “acting strangely” as she informed Ursula.
And more Jaffar awesomeness. As I’ve said before, he doesn’t speak often but most of what he says is great. The best part is he actually has a solid chance.
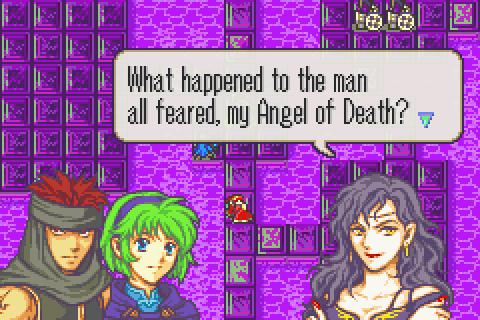
She, of course, has nothing but contempt for such sentiment.
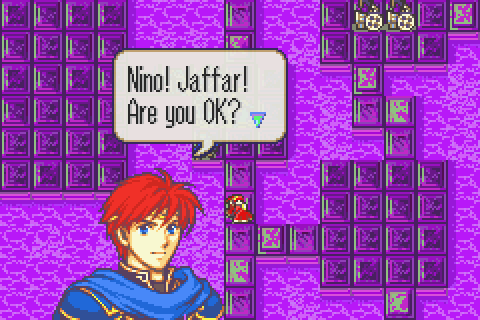
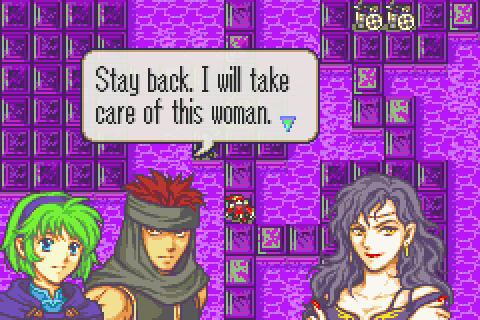
Eliwood and the others arrive just in time.
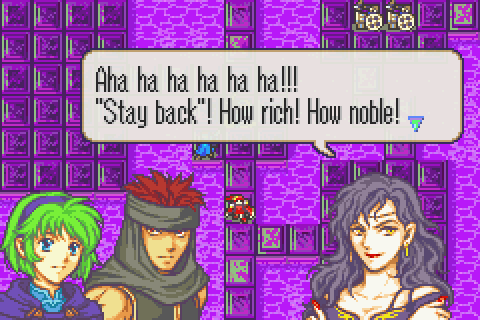
Sorry, but that would wreak havoc on my survival score.
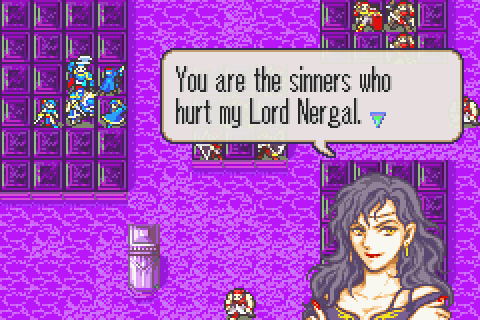
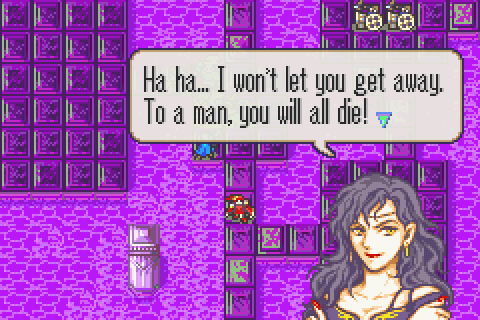
She floods the room and taunts us as battle is joined. Note once again that Nergal’s followers often talk about him in religious terms- though he himself interestingly never calls himself a god.
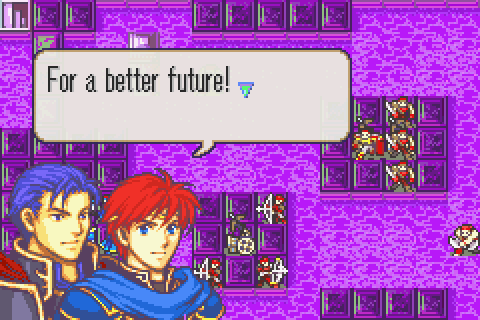
It sounds a bit melodramatic until you think a moment and realize Nergal and Sonia are actually behind like 50% of everything bad that has ever happened in Elibe and that Eliwood has figured this out. Then it’s awesome.
The War Room, Part 29
Last chapter I acquired two very interesting and useful unique items: the Delphi Shield and the Boots. The latter are so valuable and useful that they deserve a War Room introduction of their own.
As I’ve mentioned many times, Fire Emblem is full of stat boosting items like Angelic Robes and Energy Rings and the Boots. Each is worth a huge amount of gold- 8000- and that value is lost if they are used. None of the stat boosts are worth 8000 so none of these items should be used… except for the Boots. Boots increase movement by 2, in a game where the only other possible source of a movement increase is promotion (which usually just grants +1, if that).
In a game where most people never get more than 6 movement, some never get more than 5, and the only people who get more usually have weaknesses like generally lower stats or vulnerability to certain weapons, +2 movement is a huge boost. But giving them to, say, Raven wouldn’t be worth 8000. No, the Boots have potentially game-changing power – but only in the hands of a few select units. The 3 best usual candidates are as follows:
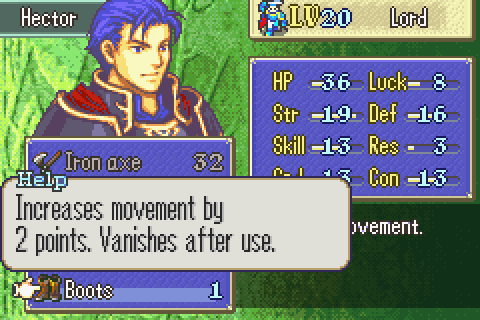
Like giving the boots to Raven, but better. Hector is an absolutely phenomenal warrior and is required for every chapter. However, he’s hampered by terrible movement because he gains nothing upon promotion. This means he can have trouble keeping up with your army and get left behind when you move fast. That alone would make him a solid candidate for the boots, but there’s another factor to consider: Tactics.
The speed at which you can complete most chapters depends entirely on how fast you can get Hector to the throne. Rescue-dropping him is not always really viable and is always at least somewhat trick to arrange and a waste of one or more unit’s turns. With the boots, he can get to the throne much faster and help you save valuable turns.
This is especially valuable on Chapter 30, on which Hector must essentially do ALL the fighting and can’t be rescue-dropped. More movement can shave many turns off your time, very handy for your tactics score.
On the other hand, Hector won’t be promoting till after Cog of Destiny so he won’t get to use his enhanced movement to fight on all the remaining chapters. And 30 is the only chapter on which it’s more or less totally infeasible to drop him around.
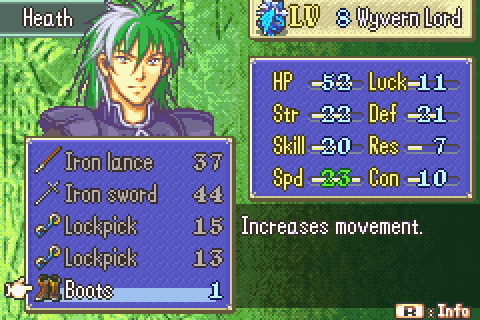
Another good candidate is Heath- or Farina or whoever your best flyer is. Usually your best flyer will be Heath though, especially on HHM. Why him rather than some superior warrior like Hector or Canas or whatever?
Well, +2 move on a flyer is more squares than +2 move on a ground unit. Depending on the terrain in question, the boots might not add even one more square of movement for a ground unit- a complete waste that turn. But they’re ALWAYS fully effective for flyers. This can let Heath do things like dive in from outside Bolting or staff range to instant kill a problem enemy by giving him an effective attack range of 12 instead of his usual 10. Or it can let him rescue-drop other people around even more effectively, which in a certain sense is like ALL of your characters getting to use the Boots.
And of course it lets one of your most effective units move more freely to the fights you need him in and so on.
The big downside is this: units with higher movement tend to do more fighting- unless you just waste their movement. This results in the person you give the boots to hogging a lot of XP, which hurts your XP score. Worse yet, eventually he’ll hit 20. And it won’t take long. This level 8 Heath might be able to hit 20 by the end of Cog of Destiny if I overused him. And once he hits 20 you basically have to stop using him forever for the sake of your XP score. Not only are your boots no longer helping you, but you’ve now lost one of your best units!
This is also pretty much the reason for not giving the boots to your best warrior in general. Chances are they’re already too high level and will just end up hitting 20 prematurely, and they don’t bring the added benefits of Bootsing a flyer in particular.

The third option is Ninian/Nils. This is a big change to the role Ninian/Nils can play in your army. Up till now they’ve been gradually falling behind as you moved across the map- not only because 5 move is now well below average for your army but also because people they dance for then typically move forward even further.
With the boots, Ninian and Nils can essentially keep up with almost anyone in your army indefinitely. This not only ensures they’ll always be able to boost up whoever you need at any given time without you needing to slow down, but also can allow them to do things like boost the same unit as it runs for a destination multiple turns in a row, really increasing speed a lot. Most advanced strategies involve Ninian/Nils in some way, and giving them 7 movement can unlock new tactical options you didn’t even have before- much like giving them to Heath so that he can snipe Bolting enemies safely.
On the other hand, they won’t be around for all the coming levels. In particular, you will not have them on 30 or 31 or 31x (not that that matters much). That’s a significant fraction of the remaining chapters.
There are other good candidates to consider- like Canas for example, increasing your healing mobility and allowing your most powerful unit to keep up with your fastest ones. However, I generally believe these 3 to be the best for a max ranking run. I’ll let which one I went with remain a surprise for a little longer.
Battle Preparations & The Map:
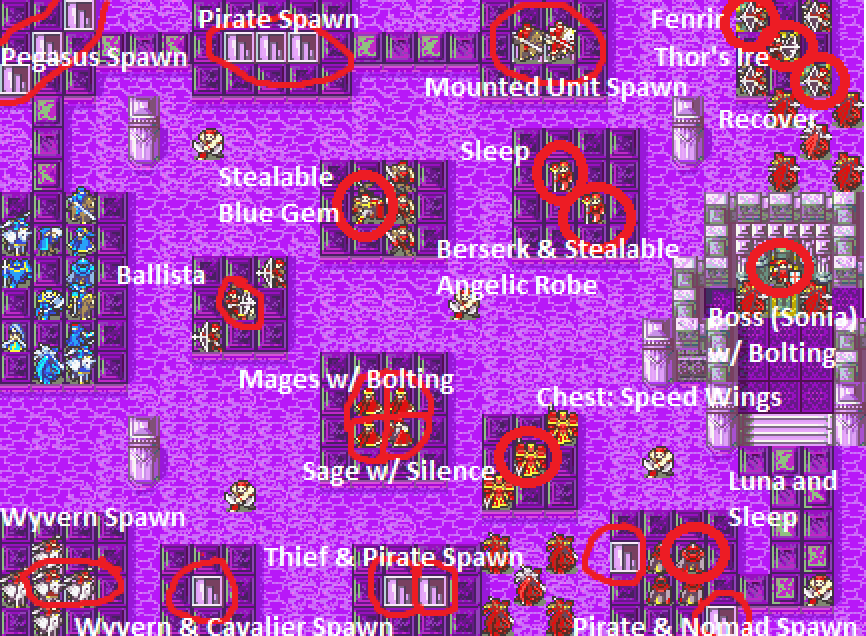
Oh yeah. It’s that kind of map. As I mentioned before, I usually love this kind of thing. But in this particular case the result just isn’t much fun.
If it looks like there’s too much going on to keep track of, that’s because there’s too much going on to keep track of. My biggest problem with this chapter is that there are constant ‘gotcha’ situations where if you forget the exact range of any of like 10 threats, you lose and must restart.
For starters, those wyvern lords are tremendously powerful and will slaughter any but your strongest anti-wyvern troops. Their wyvern rider allies are no slouches either, and they’re going to be aided almost immediately by vast hordes of bottom left wyvern reinforcements. This is an air map. This is an air map the likes of which the world has never seen, and the enemy has all the air units.
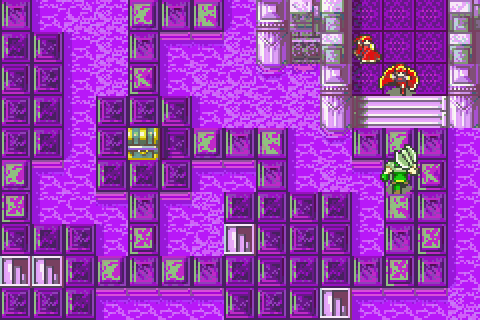
For another, there are 3 chests in the top right and one in the bottom rightish of the middle (with a general standing on it). These items are valuable and there will NEVER be a bridge to the top right as far as I’m aware, so you pretty much have no choice but to rescue-drop a thief up there (or have a flyer go over with chest keys, but that’s less efficient).
Furthermore, there are 2 very valuable items to steal from very problematic enemies: a blue gem and an angelic robe. And late in the map there will be 4 thieves with chest keys to steal.
That’s a ton of treasure to acquire and the funds ranking for this chapter pretty much requires you to get absolutely all of it except the chest keys.
Complicating this for no good reason, you cannot bring Merlinus to this chapter. Why? It’s never explained. You can bring him into all sorts of awful places, but not this one. This means that if you ever forget you’re carrying 5 items and loot a chest or kill an enemy who drops something good, you MUST throw something away. At that point, you pretty much have to restart the chapter. After almost the whole game of having Merlinus, that’s kind of hard to remember. This also means that your inventories will fill up a lot over the course of the chapter, making it increasingly hard to free up inventory space by trading for your thieves to use to steal. Honestly, that’s what I hate most about this chapter. I don’t know how many times over the years I’ve been doing great but then forgot to have a free space when killing Sonia and had to drop a flux or worse. It’s also important to remember that Jaffar CANNOT steal, but CAN open chests.
On top of that, there’s a number of long-ranged enemies never seen before or after this chapter. There are 3 ballistae, some of which are operated by snipers. On a chapter where you must rely so heavily on air units, that’s a serious problem.
Then there’s a whole island full of mages with bolting. All together. Ready to focus fire. It’s like those darned spirits in the ending of Radiant Dawn. They’re paired with a very strong sage with a Silence staff. If he silences one of your Restorers, you’re pretty much out of luck. Fortunately he’s not in a terribly important location (until bridges appear later) so you have some time to eliminate him.
In the bottom right is perhaps the biggest threat, a druid with absolutely massive magic power (and thus range and accuracy) and a sleep staff. His range is so enormous that he can really surprise you if you’re not thinking about him carefully. To add insult to injury, he’s got an ever-perilous Luna tome to deal with.
His main rivals are the two bishops, because they work as a tag team. On a max ranking run, it’s VERY difficult to have more than two restorers, so if they do something like Sleep one of your restorers you’re in deep trouble. Worse yet, even though their range is only moderately large, you can’t just rush in and snipe them with a flyer because one of them has an angelic robe that you have to steal.
Plus, Sonia covers most of their island with her Bolting range. In comparison, she almost doesn’t seem like much of a threat, but she can still instant-kill most of your units, so you’d better watch out.
One big problem with this map is that the AI is totally unpredictable in deciding its staff targets- or even whether to use its staves at all. Many times I’ve deliberately put a bait unit in range to begin running the enemy out of ammo, only for the enemy to stand passively by and not fire. On my 2nd run the Berserk bishop refused to Berserk Hector, for example despite 100% chance of success and just did nothing instead. On my 3rd run though, he jumped at the opportunity. That kind of thing makes it REALLY hard to strategize well since you can’t really predict when the enemy will actually be out of ammo.
Now as you can see, this map is mostly just water. However, some bridges will appear as time goes on, linking the platforms. Other bridges will disappear over time. Basically, new bridges show up on every 5th turn and the pattern is fairly simple on HHM: a path gradually opens up across the top and then down close to Sonia to the bottom. And the early bridges gradually disappear, not that that should matter much if you’re moving at a reasonable pace. This severely limits your speed and your ability to deal with problem enemies on your own terms. Fortunately, the time limit is less strict than on normal mode and there are fewer things to steal, so you don’t have to do as many mass rescue-drops by air.
Oh and there’s reinforcements everywhere of many kinds, but with a heavy number of air units.
Now a few preparations before choosing formations:
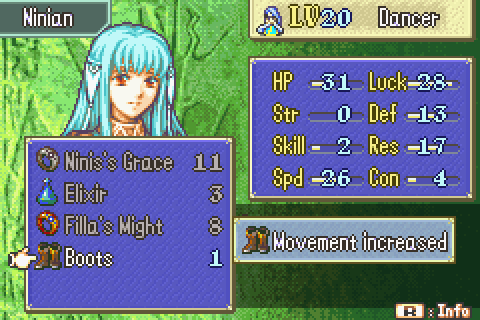
Ninian eats the boots. I really want her boosted movement on this chapter and Cog of Destiny and Victory or Death. And Nils is central to my approach to Light too. The more mobile those two are, the better off I am. I rejected Heath pretty much immediately as already too high level to feed much more XP to. Hector was tempting- particularly because I think I might really have trouble beating 30 fast without him having 7 move- but I ultimately decided I might be able to save more turns with Ninian/Nils dancing on other chapters than he will on that one.
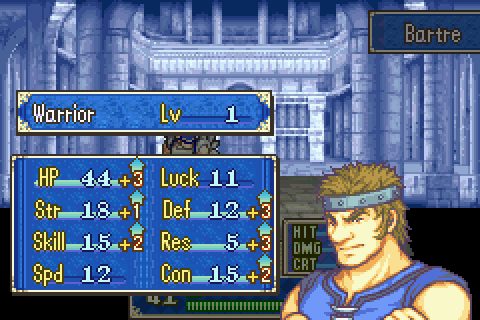
And Bartre promotes. This was not, of course, part of my original plan. He’s a lousy unit, and Karla is one of the worst in the game. But a lot of people want me to get Karla and to at least prove that I COULD have had enough funds to recruit Farina, so I’m making this last minute (and expensive) change. There’s not much time to train this guy up, so let’s get to it.
That Def boost will be VERY handy on this chapter.
…yay?
Now you don’t need luck to complete this chapter, but you do need luck to complete it efficiently. Too many units being hit by status staves can completely stall your progress, etc.
There is so much going on in this chapter and the chaos so complete and the bridges and lack of defensive terrain so disruptive that your formations are basically going to collapse by turn 3 and never really reform properly and your army will be increasingly battered and disorganized as the battle goes on. By the end, I can’t even really call what I’m doing tactics- I just try to fight fires as they spring up with whatever injured units with 2 weapon uses remaining I happen to have in the area and hope for the best.
Things start off really great with one of my cleverest formations and starting moves to date:
Objective: Seize the Throne
Secondary Objective: Get the Fenrir from the left top right chest
Secondary Objective: Get the Thor’s Ire from the middle top right chest
Secondary Objective: Get the Recover staff from the right top right chest
Secondary Objective: Get the Speedwings from the bottom rightish chest
Secondary Objective: Steal the Blue Gem from the hero
Secondary Objective: Steal the Angelic Robe from the bishop with the Berserk staff.
Secondary Objective: Steal the Chest Key from the first thief.
Secondary Objective: Steal the Chest Key from the second thief.
Secondary Objective: Steal the Chest Key from the third thief.
Secondary Objective: Steal the Chest Key from the four thief.
Reinforcements: Tons. First many wyverns from the bottom left area, then assorted mounted units in the top middle area. Late in the map no less than 24 units pour out of the top left- pirates with varied weapons and Pegasus and falco knights of serious level. And in the last few turns a wide variety of units including some thieves spawn across the bottom stairs.
Turn Limit: 28 (Amazingly generous, particularly compared to the impossibly short 10 turns on normal mode). No more enemies spawn after turn 16, so one should try to win by 17.
Units Allowed: 9 + Hector + Nino + Jaffar. It sounds like a lot, but it’s really not. There’s just so many fronts to fight on and so many healers, thieves, flyers, etc. needed. This is enough, but not enough to be comfortable or to try anything fancy. With one more, it might be feasible to do something like drop someone off in the bottom area early and start sweeping the map from that direction too.
Units Brought:
1) Hector. Required and a bit less useless than he has been recently. He’s finally fallen behind enough that he can not-quite kill many types of enemies, allowing him to feed kills to units in training
2) Nino. Required and a very good unit, but somewhat underleveled. This chapter is a great chance to level her, and just like Erk and Lucius before her she’s startlingly easy to train.
3) Jaffar. Required and somewhat handy. He’s way too high level to actually fight much with him and he’s too strong to feed kills to weak people, but at least he’s tough enough that you don’t need to worry about him. And he CAN pick locks if you give him a lockpick. He doesn’t start with one though; that would be too easy.
4) Ninian. Although she’s hit 20 so she no longer contributes XP, Ninian remains my unsung MVP. Since my number of Restore staff wielders is strictly limited, she’s particularly useful here for curing the huge number of status ailments I’ll run into. Plus of course she’s always fantastic for training weak people.
5) Matthew. It’s essential to bring a real thief since Jaffar cannot steal and there are 2 extremely precious items to seize here. Legault of course is better than Matthew, but Matthew is lower level. He’s EXTREMELY vulnerable though. Bolting can instant kill him, most staves have 100% chance to affect him, most enemies completely crush him in a fight, and the ballisticians can gun him down easily. It’s a real nuisance.
6) Kent. Mobility is very handy on this level- and I particularly need a mounted unit to carry people around in the early turns. Plus he’s one of my most usable low-level people, trainable even on this brutal level.
7) Canas. Good luck beating Sonia without him. My best healer, my best Physic user on a level where Physic will almost certainly be needed at least once, my best Restore user, and my best unit when I really need something dead.
8) Bartre. If I want to get Karla, I don’t have many chances to train this guy. He’s decently effective against Pegasus knights and wyverns, which this map is flooded with, so this chapter presents a good chance to train him against the reinforcements. Of course, he’s still, you know, Bartre, so you can expect him to completely fail at even killing pegasi without some healing.
9) Priscilla. I desperately need a second Restore user and healer. That’s pretty much essential. As usual, Priscilla is the only real option. Her mobility and rescue capacity is nice too.
10) Florina. You should bring every flyer you have to this chapter. No exceptions. I wish I had Farina for this really.
11) Fiora. Florina but better.
12) Heath. Fiora but better.
Notable Units Rejected:
1) Oswin. Yeah, that’s right. My original plan was to have Oswin kill most of the flying reinforcements since he’s so low level at this point. He kind of sucks at that job and needs tons of expensive Physic support. Still, he CAN do it and got a ton of levels out of it and no other low level person can, so it’s probably worth it if one doesn’t need to suddenly use Bartre.
2) Eliwood. I already have too many promoted units. He’d be quite effective here though.
3) Pent. Man, I’d love to bring this guy. I really need more Restores and heals, but he’s too high level and I’m already bringing more promoted units than I want to.
4) Erk. Like Pent, except lower level but with no Restore staves.
5) Lucius. If I had another spot for a unit to train, I’d like to bring him. He’d be pretty easy to train here, just like Nino.
6) Legault. Of course he’s much better than Matthew so I’d really like to bring him instead. Trouble is, he’s nearly level 20 and I’m going to need to bring a thief who can take a hit and do a bit of fighting on 30, so I pretty much can’t use Legault until then.
7) Dart. Darn, I really planned on using him. But, though I tried not to get him too high level, I realize now that his 16 is just too high anyway. Furthermore, this water is like Lake terrain- meaning he actually doesn’t move through it fast enough to be usable anyway. Oh well.
8) Hawkeye. Like Dart but terrible, but capable of moving 2 squares through the water. I did actually consider him tanking the bottom reinforcements and then wading over to open up a second front in the bottom area but he’s waaaay too sucky. And too high level.
9) Serra. I could use another Restorer, but I only have 2 Restore staves (and I only have 2 because I ran out and bought a spare on the only chapter they were available). Plus she’s way too slow and fragile.
10) Lowen. Mine is now a bit less usable but higher level than my Kent, so he’s off the team again.
It’s absolutely essential to get equipment right on this chapter since it’s difficult and you can’t bring Merlinus. It’s also important to have a really good starting formation and plan. You’ve really got to make your first couple of turns count big time since the chapter is going to get rough and the clock is ticking. That 28 turns sounds like a lot- and it is- but the trouble is that there are some really tight time limits and 2 more 0 chapters coming up, so there are not many more chances to build up surplus before the end of the game. In fact, it’s pretty much just this and Cog of Destiny. Make it count.
Hector has an iron sword and lockpick for Jaffar- and a halberd for himself because he needs that to do just the right amount of damage to not quite kill some of these mounted units. Hector is the ideal person to trade with Jaffar on turn 1 because he has much less to do and needs to be carried to get into position anyway.
Nino has my mostly broken Fire and Thunder tomes as well as an Elfire. Although it’s pricey, I’m going to be using the Elfire when possible to conserve uses of my Fire and Thunder for when I really need speed.
Ninian needs relatively little gear, and I’m keeping as many of her inventory slots as possible open so she can trade to allow my thieves to steal more later. As usual, she’s positioned as close to the front as possible for maximum dancing mobility in future turns.
Kent is only slightly further back because he needs to work with her on the initial rescuing to get people toward the front quickly and then get training.
Similarly, Matthew himself will carry very little gear. There’s nothing to steal for a long time, so he doesn’t need to go close to the front.
Canas is fully loaded with a Heal, a Physic, a Restore, a Flux, and a Luna. And he’ll need to use every one of them at least once. He’ll be rescued by a flyer, so his starting positon doesn’t matter much.
Bartre is loaded up with handaxes and iron axes and a vulnerary, and he’ll still nearly run out of weapons. He won’t be moving much for a while, so he can pretty much go whenever.
Prisilla, like Canas, has a Heal and a Restore and a Physic but also saves space for a vulnerary just in case. Her position is precisely chosen for getting Nino exactly where I need her.
The three flyers are all armed with javelins, iron lances, iron swords, and vulneraries of course. However, several practice runs convinced me that it was necessary to give Florina a silver lance, expensive though that is. Fiora carries the Delphi shield mostly because I don’t care much who has that this time. The details of their positions matter little as long as they’re near the bottom.
The Characters:
“Die for me now, will you? Die for your beloved wife!”” –Sonia, Chapter 28x
One of my favorite villains in not only FE but video games in general, Sonia is an awesome character. She’s a serious threat both as a warrior and a tactician, having nearly killed the party off several times with her actually fairly good plans and been several steps ahead of them all along. If it hadn’t been for Jaffar’s betrayal- which she actually had a pretty good countermeasure for- she would undoubtedly have succeeded in her goal. At no point does she do anything that’s really just stupid, like Ephidel did all the time.
Plus her pettily cruel and self-deluded personality is interesting, and makes finally crushing her very satisfying.
Yeah, just look at those stats. And she’s on a throne. Most people can’t scratch this lady, and she can retaliate with an instant kill on anyone with bad resistance. And she doubles many people too. One of the most problematic non-moving bosses in the game. This sounds like a job for Canas. For reasons no one seems certain of- probably just a typo when entering her stats- she’s now apparently tiny with a con of 4. In normal mode, she has 7- high average for an adult woman. This slows her down a bit actually, even including her HHM speed bonuses. Speaking of HHM bonuses, mine appears to have turned out better than she should have in most stats. Oh well, not a big problem.
Now THOSE are big problems. Bolting in her powerful hands is instant death to Priscilla and Matthew and Nino and Kent and nearly instant death to Hector among others. And she’s REALLY accurate too! Only Canas and Ninian can actually stand up to her blasts for long.
Fimbulvetr is a magic never before seen, the strongest normal Anima spell. It hits even harder than Bolting and is much more accurate. At least it’s still heavy so she won’t be doubling.