Part 43: Overview of the Clan Screens

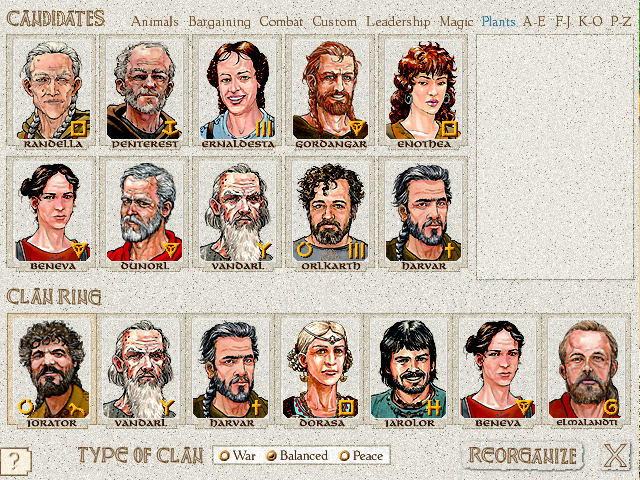
We've decided to reach a compromise for our clan ring, with Elmalandti staying for his great Magic stat, and Dorasa & Beneva coming onboard in an attempt at gender balance.
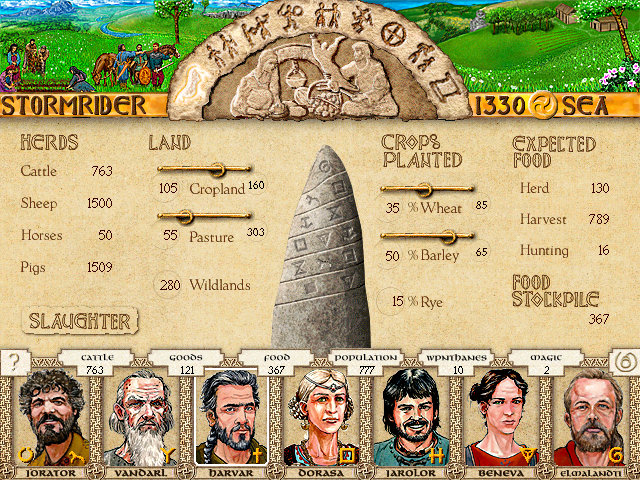
With that out of the way, it's time to look at our other clan screens. This is the farming screen, and lets us see the status of our herds, how we're dividing up our lands, and what the anticipated food production is. We have three crops to worry about - Wheat, Barley, and Rye. Wheat has the highest potential yield but can fail most easily, while Rye is the opposite and Barley is somewhere in-between. Ernalda expects us to raise at least a little of each type of crop, and will penalize us if we don't. In general there's not much need to fiddle with this allocation unless one crop is expected to have a particularly good or bad year. Our lands are divided between Cropland and Pasture(which are for what you'd expect), and Wildlands(which are where our pigs feed and our hunters hunt).
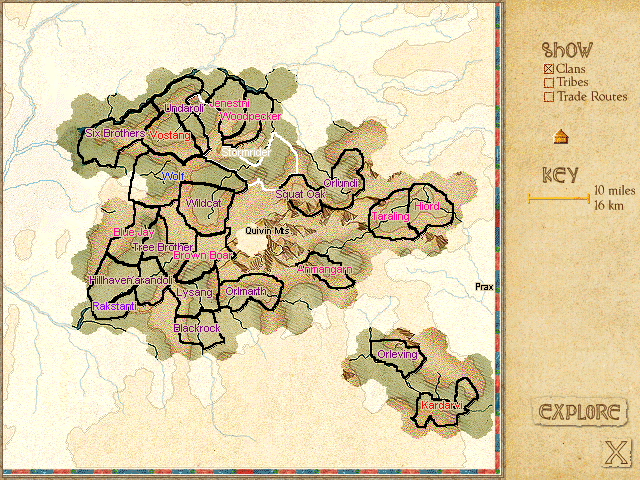
This is the Map screen. Dragon Pass is much larger than this, but this map shows all the areas we actually know about. Our clan is highlighted with white borders. The other clans have various colors used for their names - colors closer to red mean they dislike us more, while colors closer to blue mean they like us more. The map screen also allows us to send out explorers to various parts of dragon pass. We can also explore our own tula; it may not seem exciting, but many secrets lay within it.
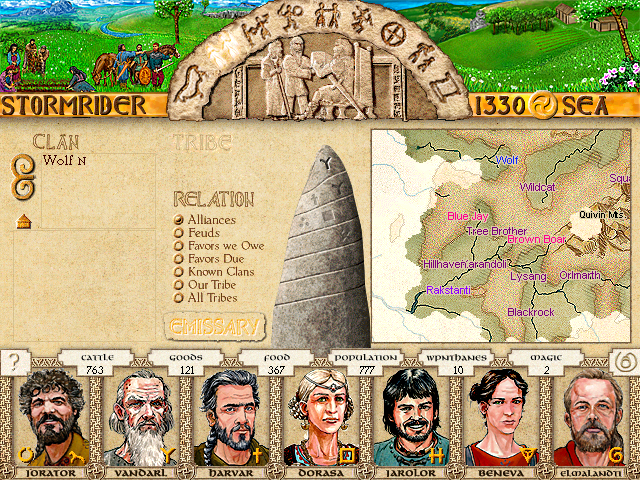
We can find out about other clans in more detail in the Diplomacy screen, including which clans we're allied with, which ones we're feuding with, and favors that we owe or are due. Here's a breakdown of our diplomatic situation:
Alliances
Wolf
Feuds
Kardarvi
Vostang
Favors We Owe
Anmangarn
Hillhaven
Orlmarth
Taraling
Tree Brother
Woodpecker
Favors Due To Us
Blue Jay
Brown Boar
Orleving
There's also a tribe that has formed in these new lands, called the Colymar tribe. It consists of the Tree Brothers, Karandoli, Hillhavens, Blue Jays, and Rakstani. Their king is Fedarkos of the Tree Brothers. Fans of last LP will probably find this hilarious.
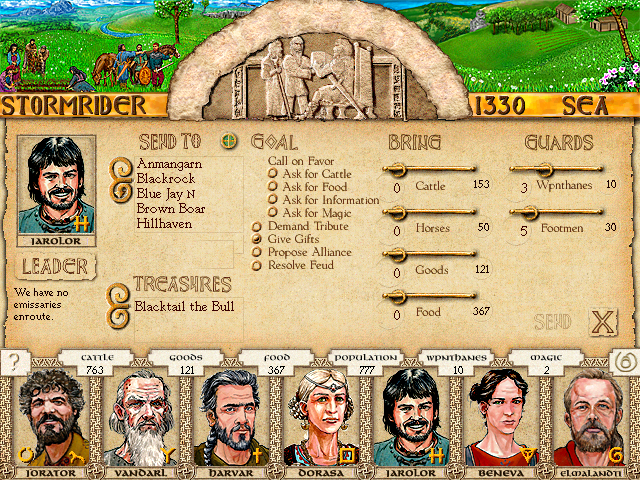
We can send emissaries to other clans, with one of the goals listed in the image. A guard goes with our emissary to protect them(and any gifts they bring with them) from bandits.

The trading screen lets us check who we're trading with, and what treasures we have. We can also send a trader out to perform various trading missions:
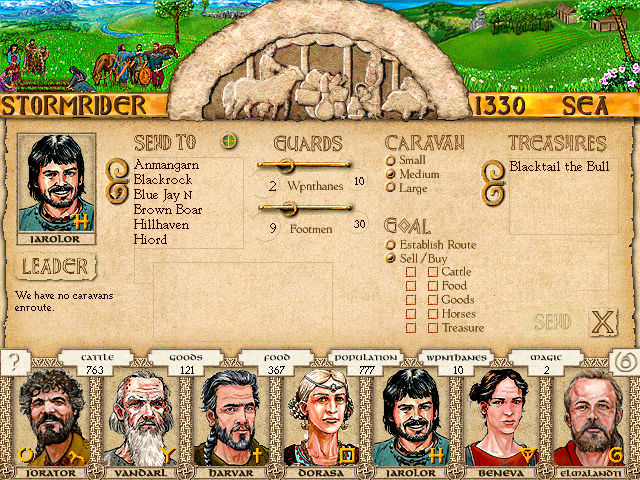
These missions involve either trying to trade one or more things for different things, trading/buying treasures, or setting up a permanent trade route. Our clan can only support a certain number of trade routes depending on the output of our crafters, so it's best not to go overboard with this. The size of our caravan will affect the scale of individual Sell/Buy missions, unless a treasure is involved. Buying(and selling, but why would you want to do that?) treasures works somewhat differently, and I'll make sure to show it off later. You can see that our only treasure right now is Blacktail the Bull, which is simply a bull that's more virile than usual.
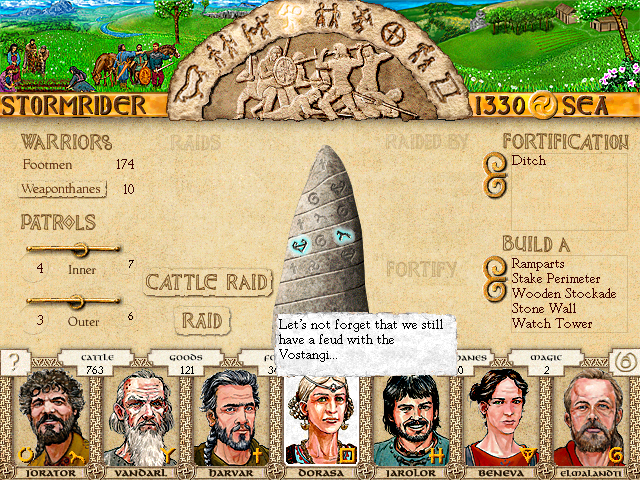
This is the War screen, where we can see the military status of our clan, and send out warriors to go on raids. Weaponthanes are dedicated warriors, while the footmen are simply farmers who picked up a weapon. This makes raiding in Sea and Earth seasons a bad idea - your farmers are needed to plant stuff in Sea, while they're needed for the harvest in Earth. We can also set up our Inner and Outer Patrols(Outer Patrol helps spot cattle raiders, Inner Patrol helps spot regular raiders), increase the number of weaponthanes, and build fortifications. We start with the Ditch, but can also build the following:
Ramparts (costs 50 goods)* - Protects us from raiders trying to take captives or burn steads.
Stake Perimeter (costs 40 goods) - Helps protect us from raiders on horseback.
Wooden Stockade (costs 75 goods)* - Protects us from raiders trying to plunder our lands.
Watch Tower (costs 10 goods) - Helps us spot raids, meaning that more warriors will be able to respond.
Stone Wall (costs 150 goods)* - Protects us from raiders trying to seize our lands.
*The game is rather vague on what these do, so these effects are taken from the (rather incomplete, but better than nothing) KODP wiki.
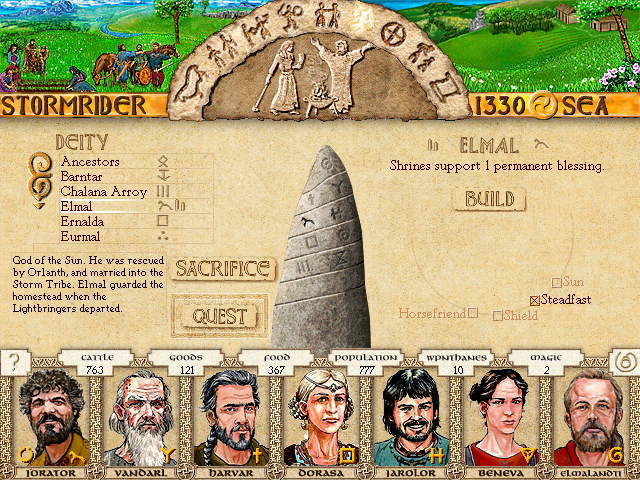
This screen allows us to sacrifice to and build shrines for various deities and spiritual forces. Shown here is our shrine to Elmal, which provides one permanent blessing. We can also Heroquest here, which is a large and dangerous affair for any clan, nevermind a new one. Heroquesting involves one of our nobles reenacting one of the myths of the gods. We can get great rewards if we succeed, but can also suffer great harm if we fail.

This is the screen that shows up when you decide to Sacrifice, in this case to our Ancestors. You can sacrifice for Mysteries whenever you don't know all the rituals or myths associated with a given deity/spirit, and you can also sacrifice to temporarily gain the effects of a blessing. Most blessings can also be obtained permanently by building a shrine; we can enlarge shrines to gain extra permenent blessings for a given god. Shrines cost goods, cows, and sheep for upkeep, and there's a minimum number of worshippers needed for each level, so as with most things, we have to make a tradeoff in terms of what shrines to build.
List of blessings provided by deities and other spirits:
Ancestors - Can provide Protection(Defends against hostile spirits) as a permanent blessing. We can sacrifice to them to temporarily gain the effects of Summons of Evil(summons our ancestral enemy, the Elves, so that we can do battle with them) and Divination(which can answer various questions we have). We currently only know the rituals for Divination.
Barntar - Can permanently provide us with Plowsong(allows our oxen to plow more land) and Vigor(allows our farmers to work more productively.)
Chalana Arroy - Works slightly differently from most gods. She can permanently provide Curing and Healing, which hasten the recovery of sick and wounded people, respectively. But when we sacrifice for these blessings, she will recover a bunch of sick/wounded at once(potentially healing all of them, if our offering is large enough). We can also temporarily gain the Hope blessing(which improves clan morale), and sacrifice to perform a Resurrection(which can potentially bring a recently deceased noble back from the dead).
Elmal - We currently have his Steadfast blessing(improves our chances when defending) from our shrine, and that's the only ritual of his we know right now. His other permanent blessings include Horsefriend(prolongs the life of our horses), Shield(reduces the number of deaths and wounds among our weaponthanes), and Sun(helps ripen our crops).
Ernalda - Can provide Bless Children(increases fertility of our women), bless crops(improves crop yield, especially of barley), swine blessing(increases fertility of our pigs), and preserve(reduces food spoilage).
Eurmal - We can't get any of his rituals because there's no trickster on our ring. Woe is us!
Humakt - Can provide us with Battle Luck(improves our chances of winning battles), Morale(improves the ability of our warriors in battle), Oath(seals bonds between clans), and Truesword(Weaponthanes(who normally fight with the strength of five men) fight with the strength of of two(meaning they now fight with the strength of ten men)).
Issaries - We already have the Silvertongue blessing(helps our traders and negotiators) available, although it's not permanent since we don't have a shrine. We can also learn Market(improves trading route profit), Spare Grain(obtains extra food via trade), and Trading(improves the profit of trading missions).
Lhankor Mhy - We can sacrifice to him to obtain a divination, much like we can with our ancestors. He can also provide the Clan Lore(helps divine the truth), Lawspeaker(aids in legal disputes and ensures that clan mood isn't soured by unresolved disputes), and Literacy(helps our dealings with other clans).
Malia - She is considered one of the Unholy Trio, and sacrificing to her is usually a Very Bad Idea(half the clan ring gives advice that literally is "Not Malia!", and the other half express the same sentiment but with more words). But if we're truly in a bind, we can propitiate her. She can provide Curing(cures illness, much like Chalana Arroy can) and Immunity(grants immunity to a plague), and can Cause Plague to another clan.
Maran Gor - Can provide the Earthblood blessing(improves crop yields when people die on our lands). We can also sacrifice to her to perform Blast Earth(ruins another clan's fields).
Odayla - Can provide tracking(Helps us find things), Sureshot(improves hunting yield), and friend of Yinkin(reduces food spoilage caused by vermin).
Orlanth - Can provide Lightning(deals out more wounds in battle), Rain(helps raise our crops), Thunderstone(improves effectiveness of our skirmishers), and Woad(reduces deaths and wounds among our farmers).
Uralda - Can provide Calf Blessing(improves fertility of our cows) and Milk Blessing(increases milk yield from our cows).
Urox - Currently provides the Berserker blessing(increases chances of victory, but with more deaths and wounds on boths sides). Can also provide Sense Chaos and Smite Chaos, which do exactly what they say. Urox is a very straightforward bull.
Vinga - Can provide Fyrdwomen(allows our women to defend the tula) and Pathfinder(helps protect our explorers).
(don't worry too much about remembering all of that; I'll remind you of blessing effects as we learn them. I'll also be updating the OP with a list of information about each god and what we know about their myths, but you can get a general idea of what the gods do from the blessings they provide.)
That may be a lot of info to take in at once if you're new to KODP, so here are our basic options for what we can do now:
Send an emissary or trader to another clan. Be sure to specify what clan, and what the goal of the diplomat or trader is. We're not particularly in need of anything right now, but it's never too early to start winning other clans over.
Explore Dragon Pass. We can explore our own tula, or you can pick a direction for us to explore in. Be aware that we're very close to the southeastern corner of the map, so we won't see too much new stuff if we go that way.
Learn mysteries. Specify a god if you choose this.
Build a fortification or obtain more weaponthanes. Specify which one if you want a fortification, and note that we don't have enough goods to build the Stone Wall. Note that we can have a maximum of 14 weaponthanes, and we currently have 10. (No, we won't be raiding anyone yet - we already have a bad harvest omen, and I don't want our clan to be completely fucked from year 1).
Any one of these things will take up a turn. We get two turns per season to do things like rearranging the clan ring(meaning we've already used up a turn!), exploring, and sacrificing, so choose wisely. (it's also possible to do nothing in a turn, but I'm assuming nobody here wants to do that)