Early Maneuvers (16:00 - 12:00)
The three forces started the battle in three different ways.
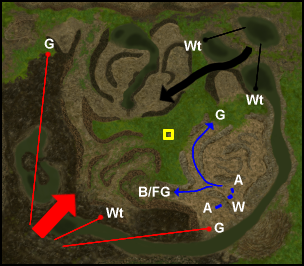
Rommel (in the NE) knew where he wanted to be. He immediately sent his forest giant, ghôls, berserks, and all but two archers straight for the closest of the two slopes leading up to a bluff overlooking the flag field. His two wights he sent south and west with apparently no particular aim other than to get them dispersed.
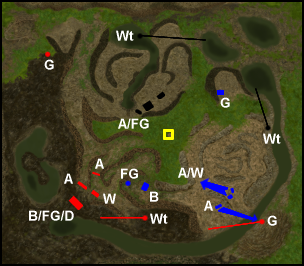
Hors d'oeuve (in the SE) sent his warriors, flanked by two archer squads, across the river, and then sent a massive scout force of berserks and a forest giant west, while sending his ghôl pack north. A risky move in splitting his forces so significantly, ameliorated by the fact that his troops in the SE should be safe from attack for a few minutes, and his scout forces were made up of fast troops that should be able to withdraw from engagement if necessary.
I moved more cautiously than either, sending one ghôl scout north and two ghôls east (one of the two eventually targeted for the NE corner). My one wight I also sent east, to get it near possible concealment in water, perhaps next to another player if someone started in the SE corner.
There are several paths out of the swampy SW corner toward the center field, and I wasn't sure which ones were best. I sent my main infantry force (berserks and the forest giant) to the junction where a plateau rises northward, and one archer squad slightly forward of them along the plain to the west of the plateau. The plateau is split into east and west paths by a ridge; I sent the other archer squad up the western path to get some height, with warriors for support (or so I intended...). My dwarfs I kept back until I got a better look around.
Once his initial movement was well underway, Rommel began moving his remaining troops in two groups toward the bluff, one archer with each group, presumably for wight control. His early forces were soon positioned on top of the bluff with archers and the forest giant controlling the front slope down toward the flag plain, and infantry arrayed behind them. The other two groups were moving up to "park" for a while on the back slope.
The ghôl scouts that I had sent eastward encountered one flanking squad of Hors d'oeuve's archers about this time in the SE corner, and one of the ghôls went down. That archer squad pursued the remaining ghôl while Hors d'oeuve advanced his warriors and other archers further away from the river. Preoccupied with getting my ghôl away, I made two major mistakes. First, I didn't notice that I hadn't moved my warriors close enough to the archers they were supporting. Second, I didn't keep a close enough eye on my main forces; I thought there were no enemies close enough to strike during the seconds that I spent guiding my scout out of harm's way.