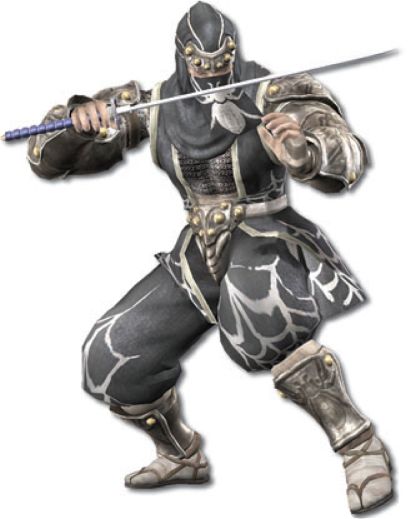
Part 15: Ninja Gaiden Black: Advanced Gameplay
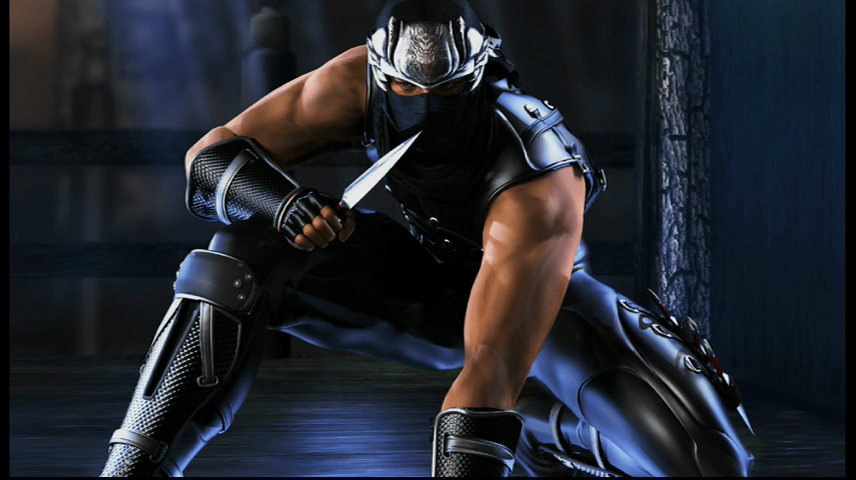
"Some day you will come to understand the pursuit of power. Perhaps beginning with your training here."
Another bonus update, because we can't let our progress in Black get far ahead of Sigma, so this update is going to be a little bit different. Just a write up covering various aspects of gameplay that I have made mention of but never took the time to fully explain, along with some convenient if not crude drawings and diagrams to better explain these concepts. It wouldn't be right to gloss over the little details that make this game great, now would it?
Note that this is not a full breakdown of every single specific of the combat system like frame counts on individual moves or insane shit like that. I'm not that nuts. But this is a collection of what I think are the most useful techniques and knowledge to have not just for this game, but for future games in the series as well. Though if you really want to see someone go way more in depth in breaking down all these systems, there is the Advanced Combat Guide by aaxe over on Gamefaqs. In fact, some of his stuff in that guide I used to validate and test stuff in game myself before writing this update. Seriously, it is well worth a read if you want to see all the nitty gritty details of this game yourself.
Cancelling
Compared to many other character action games, Ninja Gaiden allows for surprisingly little cancelling in your moveset. You are committed to your combos once you're in, and there's no obvious means to get out of one without simply pressing nothing to drop the combo and return to neutral. Cancelling exists in this game, but is more balanced in that you can only take advantage of it at specific moments, as opposed to the Platinum style of cancelling where moves can be cancelled at literally any frame of animation in order to react to incoming attacks. The most flexible cancelling technique in this game is known as Shuriken Cancelling.
Simply pressing the B button will fire a shuriken, as we all know. What is less known is that this can be used to interrupt a vast majority of moves, both on ground and airborne. Even running moves. It's easiest with the default shuriken due to its speed and unlimited use. You can even use this technique with the Windmill and Incendiary Shuriken, although the timing and application of this differs. For obvious reasons, the bow does not have this ability, hence why it's just called "Shuriken Cancelling" and not just "Projectile Cancelilng."
That said, it still has its limitations. While it can be used to cancel out of attacks, this only applies to light attacks that are not the last hit of a combo (heavy attacks regardless of stance also apply). Obviously because the game would become too easy if you could break out of the recovery animations and combo enders that put yourself at risk during battle.
Another important thing to note is that this only really works with the Dragon Sword and all other katana based weapons (the Wooden Sword and another weapon that we'll get in the future). All other weapons thus far like the Vigoorian Flail and the Lunar are designated as two handed weapons, which is odd considering Ryu's stance is typically holding the Dragon Sword using both hands. But the distinction is that certain animations in his moves imply that his non-dominant hand is actually free during most of them. Every other weapon type requires Ryu hold it with both hands at all times and thus does not have a free hand to quickly fire a shuriken to cancel the attack. There is one exception and that is using a light attack with these weapons in the air, in which case you can fire Shurikens to cancel out of the attack. Still, considering the Flail and Lunar have default combos that hit more times than the Dragon Sword, I say that balances it out considering every Shuriken hit adds to your combo counter anyway.
Now, there are two other types of cancelling, though they aren't quite as versatile or practicle as the shuriken. The second cancelling method is done with Ninpo.
It's actually pretty straight forward, as it allows for Ryu to cancel out of the recovery animation for attacks that cannot be done with Shuriken, those being heavy attacks and combo enders. Simply pressing both B and Y at the earliest possible moment in the recovery frames will cancel and use whatever Ninpo Ryu has equipped. Nothing to it, of course you only want to use this if you're really desperate to not die. Not much else to it.
The last cancelling method is much more subtle and not quite as necessary as it has an alternative method that is a bit more tricky. This is Block Cancelling.
Now this method is based around dropping your current combo so you can repeat the same one or go into a different attack. The way Ryu's moves work is that each strike in a combo can be delayed to varying degrees, so you can mash it out as fast as possible or time your strikes in order to better catch an enemy off guard. However, because of this you are effectively locked into a combo with no way out other than through a viable branch in the combo tree. So how do you get out of an attack you don't want to commit all the way to?
What is done is that during a part of a combo that you want to drop out of, you hold the Left Trigger briefly. At first you may think it doesn't work, but that's because Ryu does not go into a defensive stance immediately. The animation of the last attack still needs to play out through the active frames. What most don't realize behind the scenes is that the combo is already dropped by the system and during the transition to what would be the recovery animation, you can buffer your next input and go straight into a different attack. Here's a visual example.
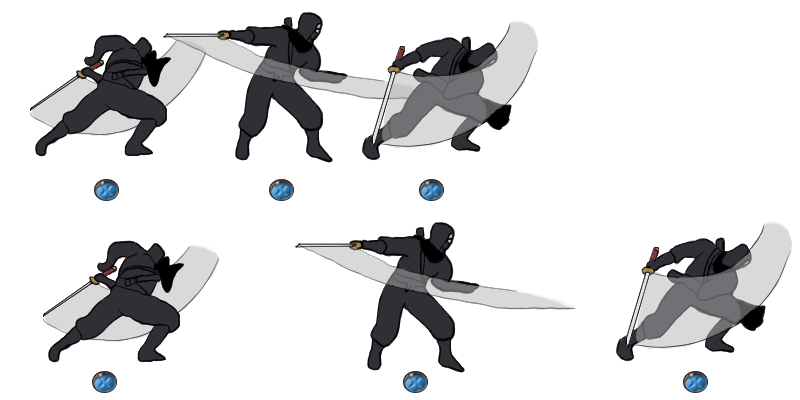
Let's take the default 3 hit combo of Ryu's Dragon Sword, the Crimson Slash. We want to cancel out of the second attack so we can repeat the first two hits again and again. If we try and hit X again after the second swing has finished, Ryu will still go into the final slash. By holding Block near the end of the second swing, the game now says that Ryu will return to neutral and another combo can be initiated. However, in keeping with the game's rules, the new combo can only start once the active frames of the attack are completely finished (in this case, when Ryu is halfway towards holding the Dragon Sword in both hands again).
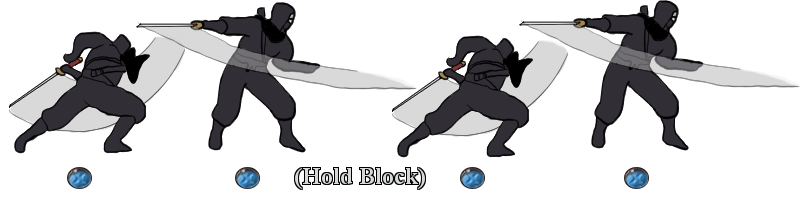
This type of cancelling is not the only way to get out of a combo. In fact, it's more or less the same as not pressing anything and letting Ryu return to neutral. The reason why I bring this up though is that it ensures the player can start a new combo at the earliest possible moment. Whether you use Block Cancel or not, the specific frame transition between active and recovery is still largely the same. What's different is you'll be given a chance to buffer the move without risk of it continuing the combo. If you want to challenge yourself you can try and repeat this without the Block Cancel, but the timing requirement will be much more strict.
It's a neat trick, and the closest analog to this I can think of is Twitch Cancelling in DMC1, where you rotate the analog stick during an attack to reset Dante's basic Rebellion combo. However unlike in that game I don't use Block Cancelling much if at all when playing normally. It's useful if you're wanting to farm essence with high hit combos (like the Flail/Nunchaku with its high stun rate), but there's no reason to engage in it if you're just trying to get shit done as you have more than enough other tools do so.
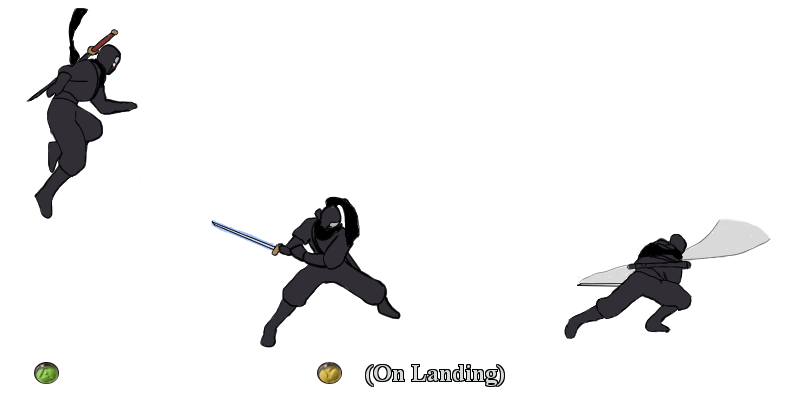
On Landing State
Much like with cancelling, there is very little in terms of Just Frame states or moves in Ninja Gaiden compared to other character action games. They largely exist in a state that comes from landing after a jump, and before fully transitioning back into a ground state. This is known as On Landing.
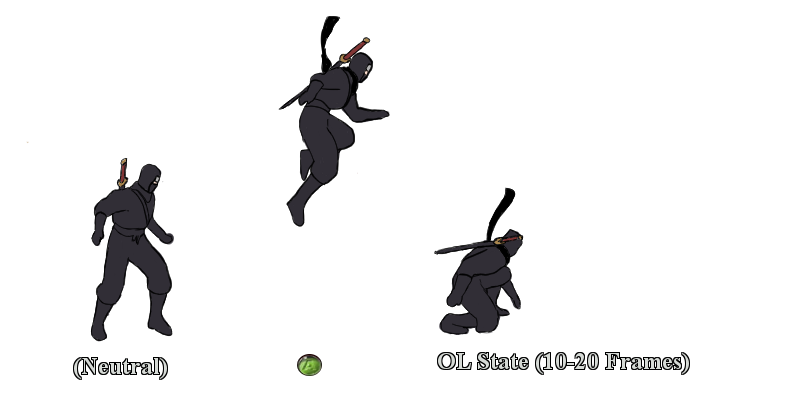
The conditions for the On Landing State are such that upon Ryu touching the ground, there is an ~10 frame window with which few, select moves will completely bypass the start up phase of their animation and go straight into their active frames. If you're jumping into a crowd of enemies and have a certain move that can easily disrupt that crowd this is a good technique to master. If you want an easier time getting the OL State to work, try throwing Shuriken in the air. It will leave you airborne for just a bit longer and stop your forward momentum, letting you easily see when you're going to land. In fact, it's what I regularly do for one particular technique that benefits from this.
If you wondered how I was instantly able to perform an Ultimate Technique faster than most players would be able to, even with absorbing essence, this is how.
Charging for an Ultimate Technique has a start up phase, regardless of whether there is essence on screen this phase must be completed before the essence can be absorbed. But in an On Landing State, not only will you instantly absorb the essence at that moment, but the Y button doesn't even need to be held. Simply pressing and releasing will absorb the essence and initiate the technique on the spot. When doing Karma Runs or just trying to survive on the higher difficulties this is a crucial skill.
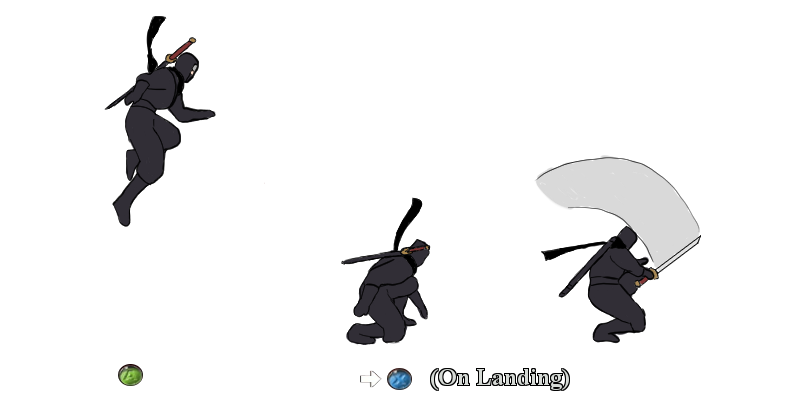
There are still a few moves in the game besides the UT that benefit from On Landing. For instance, forward X with the Dragon Sword has no start up time when used. Another On Landing trick actually involves the moves that Ryu has when he is in a running state. Normally you'd have to start physically moving Ryu before you can initiate one of these attacks. However, when jumping and landing, holding the left stick in a direction is still treated as being in a running state, meaning you can buffer a running attack to initiate the moment you enter an On Landing state. Violent Wind/Gale is an excellent move to use in this example as the move sends Ryu forward in multiple directions and is rarely blocked (like the Thunderclap Kick and other kick moves tend to be).
For extra clarity regarding On Landing, this state only applies to Ryu if he lands on the ground normally. Using an airborne attack, be it light or heavy, to quickly land negates this state and instead is treated as a regular attack. Messing up the timing for an instant UT can come from either pressing the button too late after landing, or too early and instead performing a Helmet Splitter or any regular air Y move.
iFrame Abuse
Well, I say abuse as if it's somehow a bad thing, but it's actually a necessity for a game like this. Knowing when to avoid attacks that are otherwise near impossible is a godsend.
As you'd imagine, various moves in Ninja Gaiden have invincibility frames, due to the length of their animations and the context in which they're performed. The most obvious example is the Ultimate Technique. Once the button is released and Ryu dashes forward and connects the hit, he is invulnerable for the entire duration. There are other major techniques that have prolonged invincibility frames such as the Guillotine Throw and Izuna Drop. Naturally many players would prefer to latch onto these techniques early on due to their safe properties. But there are other moves that apply, even though their window of invulnerability varies.
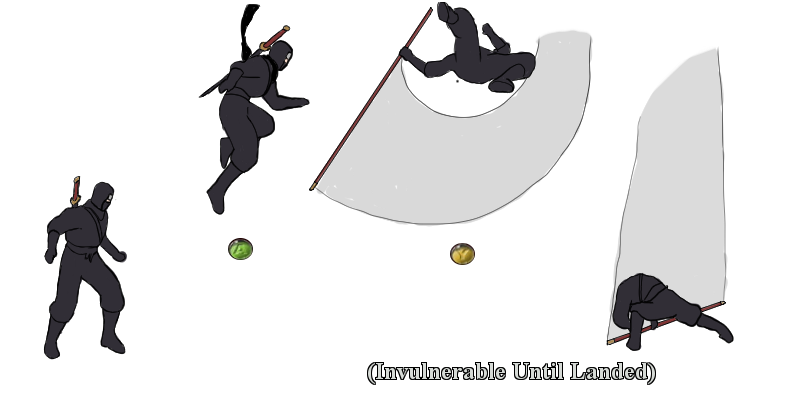
While not 100% consistent across all weapons, airborne Y attacks grant various amounts of iFrames as the animations typically must be completed before an attack can interrupt Ryu. The Lunar's air Y attack is the most obvious and probably safest example of all the early game weapons, as Ryu is still airborne for relatively longer after initiating the attack, before plummeting straight down.
As you'd expect after briefly showing it, taking advantage of invincibility frames is a life saver when dealing with the Black Spider Ninja. Their incendiary shuriken can't be shaken off if you're pegged by one, so you have to take advantage of any moves that allow for protection, regardless of it being big or small. Sometimes a simple Reverse Wind provides enough invulnerability when timed properly. When Ryu is actively rolling he cannot be damaged, but this ends upon entering recovery or going straight into a rolling jump.
On a minor note, while there are plenty of moves that cannot be interrupted by enemies, not all of them provide iFrames. A clear example is when using a hold Y move that is neither an ET/UT, such as the Dragon Sword's Haze Straight Slash. When the move is initiated, Ryu will not be knocked out of it, but any enemy attacks that collide with him during this will still deal damage. The reverse of this concept actually applies to plenty of enemies in game, particularly the Gallas and other similiarly large fiends. They have specific attack animations that cannot be interrupted once started, but they can still take damage. The downside is sometimes taking damage from those attacks isn't worth the obvious risk. Something to keep in mind.
Targeting System
The Ninja Gaiden series I feel is the one standout action series that exclusively uses a soft lock system for targetting enemies, and yet still allows for a large amount of control in how you want to engage in it. Devil May Cry obviously uses a hard lock system extensively as specific moves are tied to it and Dante's orientation to the enemy, and Platinum's brand of character action games gives a choice between both types. But Ninja Gaiden only has one option, and it works so well that the first time going through you don't even realize how much more it helps than it does hinder.
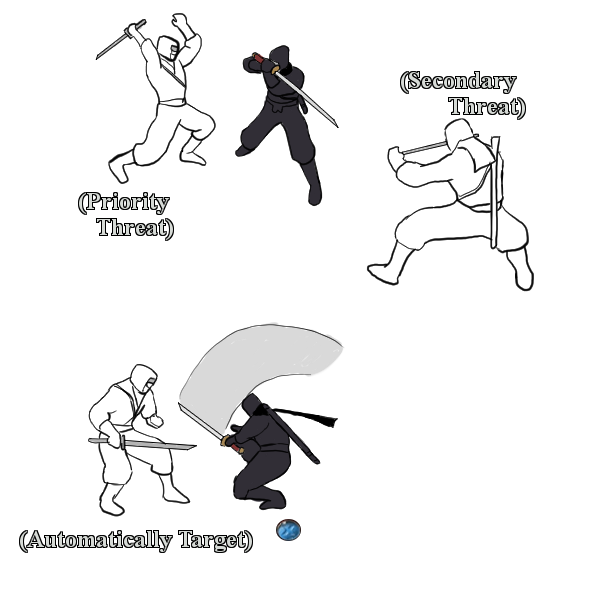
So how does the system work exactly? How does it determine which targets Ryu will automatically track during a combo? If you guessed based on proximity, you would be half right. In fact, it's based on both proximity and the threat level of the particular enemy. Ryu will lock on to an enemy that is in melee range and is about to or in the middle of an attack. No matter which direction the enemy is in, so long as they're in range and you press any attack button, Ryu will automatically turn to face that enemy and strike, and that enemy continues to be the target of the combo.
If you want to see a neat detail that informs you of which enemy the game labels as the primary target, look at Ryu's head during a fight. He'll look in the direction of whichever enemy is currently locked on to by the system. And if an enemy is not close enough to hit but still targetted by the system, pressing X and A to do a Wind Run will have Ryu automatically home in on that enemy. But despite being a very automatic system, it is not restrictive on the player's actions. In fact, the moment user control with the left stick is implemented, targeting controls are placed directly in the player's hands from then on.
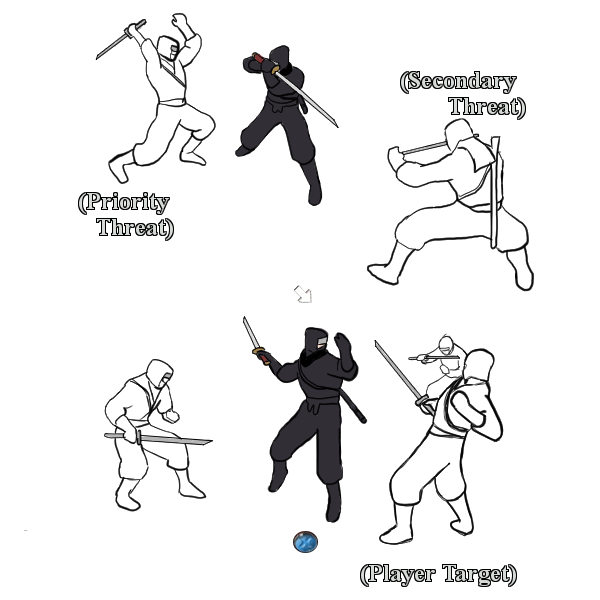
Ninja Gaiden's combat and combo structure is flexible such that, unlike many action games before it, changing the direction of your attack is easy and intuitive, all with the left analog stick. This is why the only directional input attacks in the game are forward (pushing the stick in any direction) or 360 rotation, because Ryu's orientation prior to attacking has no effect on what takes place. Before even attacking an enemy, if there is a specific one you want to target, simply push in the direction of that enemy then strike. This can be with a light or heavy attack, or even a projectile. Simply tossing a shuriken can be a handy way to confirm which target you'll focus on and the game will assist in making that enemy a priority. And when you're attacking an enemy, if another is in close enough range, you can adjust Ryu's facing direction mid combo to hit both or just the other enemy entirely.
The even better part about this feature is how it can be utilized in multiple situations. On ground it's pretty clear how it's useful, but even in a limited capacity you still have control over which enemy you'll target while airborne. Two enemies caught in the air at once can be used to sustain an air combo and you can still choose which of the two you might want to Izuna Drop. And when you use an Ultimate Technique, you still have complete control over who you want to target, making the UTs of weapons like the Vigoorian Flail or Dragon Sword more useful than they'd ever be in another, more restrictive action game.
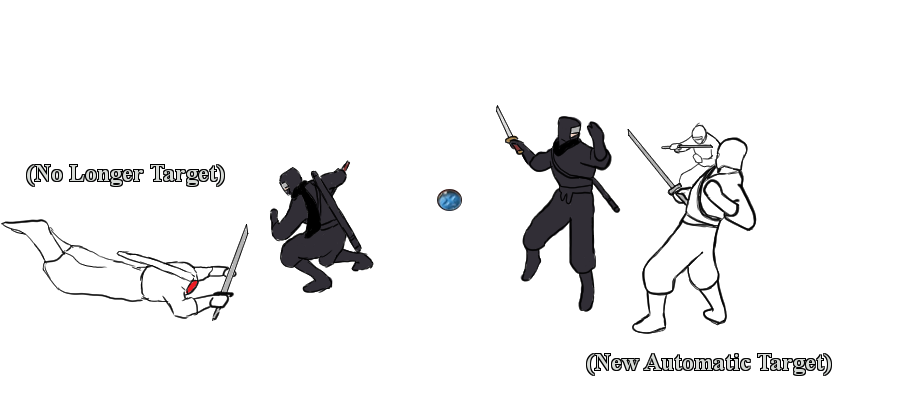
Even so, it's important to remember that once you're current target is either killed, crumpled, knocked out of range, or in the case of the imps burrowed, not continuing to input with the left stick will revert targeting control back to the game itself. Ryu will return to fighting the closest, most offensive enemy in the battle (if no enemy is close enough, he'll attack in the direction he was last facing). It's important to remember this especially if you want to finish an enemy with a down attack. Simply pressing Y despite the enemy's body being very close does not result in the attack if another enemy has been deemed a higher priority. The auto targeting is a very useful system though it is not 100% full-proof, so it still requires skill and various inputs from the player themselves to be used effectively. Relying on just one targeting method is not enough, utilizing both modes will ensure that every attack hits where you want it.
Essence Breakdown
Essence is a crucial part of the Ninja Gaiden experience, serving as either currency to buy items and weapon upgrades, or a means to unleash devastating Ultimate Techniques. But you never really see how much essence you actually get until you pause the game and check your total. Depending on how an enemy is killed and how many hits it took, the amount of essence released will vary. Here's a breakdown of Essence as it applies to ET/UT.
Enemies release a set amount of essence once they are killed. Besides the obvious reason of killing them with an Ultimate Technique (doing it fast and flashy), doing so will actually multiply the amount of released essence. So take a normal early game enemy that releases 100 essence upon death. If that enemy is killed by an Essence Technqiue, the essence released is 300% that of its original value. Kill 'em with an Ultimate Technique and the payout is 700%. But it actually doesn't stop there.
Essence released is also determined by how high your combo counter is at the time of an enemy's death. If you're just playing with the Dragon Sword you may not notice the effects because combos that are less than 20 hits will release the default amount of essence (or have a chance of releasing blue or red essence depending on the situation). Once you pass the 20 hit mark, the essence amount begins to multiply incrementally. Eventually the multiplier bonus caps out once the combo counter exceeds 50 hits. But because of how rare it is normally to get to that high of a combo, it is a very satisfying reward for skillful play when it occurs. Even better is that this multiplier gets combined with the ET/UT essence multiplier which really leads to a massive payout. Here's a chart that lays out all the percentages:
pre:
Combo		Normal		ET Kill		UT Kill

00-19		100%		300%		700%
20-24		300%		500%		900%
25-29		350%		550%		950%
30-34		400%		600%		1000%
35-39		450%		650%		1050%
40-44		500%		700%		1100%
45-49		550%		750%		1150%
 50+		600%		800%		1200%
Essence Control
Getting large amounts of Essence is all well in good, but getting those 20+ hit Ultimate Technique finishes won't mean anything if the released essence is then immediately absorbed to start another UT. You see, the game penalizes for essenced harnessed for these techniques by not giving you nothing, but instead only 20%, but that trade off should not be encouraged if you're still in need of getting items and upgrades from Muramasa in a timely manner.
That is where Essence Control comes into play.
The way the player interacts with Essence can be described as the opposite of how the player interacted with orbs in the Onimusha series. As opposed to holding a button to absorb them all at once, Ninja Gaiden lets you hold block to stop the absorbtion. And even then, the proximity for triggering essence absorption is a lot shorter than one would think at first. But so long as you are holding the block button during any action, be it actual defense or just holding it during the end of a combo, the essence will stay where it is until the game decides to unload it from the world after a set time.
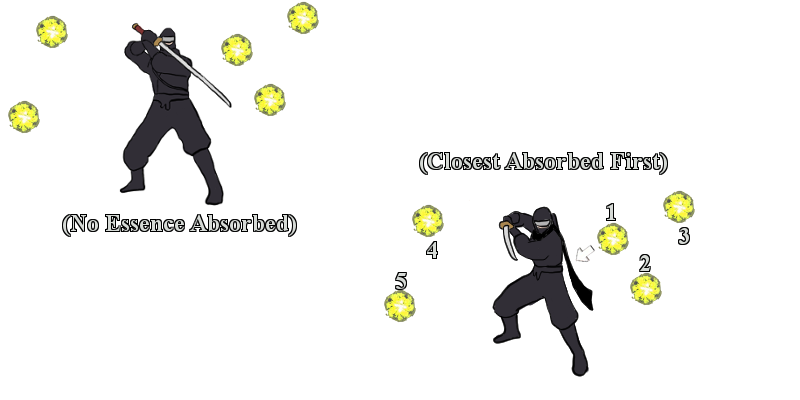
Thankfully, much like the targeting system for enemies, the game will always absorb the first piece of essence that is closest to Ryu, followed by the second closest and so on. If a lot of enemies have released a ton of essence of multiple types (mostly yellow and some blue as a common example), a good tactic is to stand close to the group of Yellow, then release the block button and hold again to absorb the first piece. This is the safest means to control essence absorbtion as once the first orb gets pulled in, the others start to react in quick succession, making it hard to stop the flow exactly where you want. Then once you've got all the yellow you want, you can take the remaining blue or small yellow essence for an Ultimate Technique and repeat the cycle. By the time we get to Chapter 10 in Ninja Gaiden Black (12 in Sigma) you'll see a very clear example of this in action.
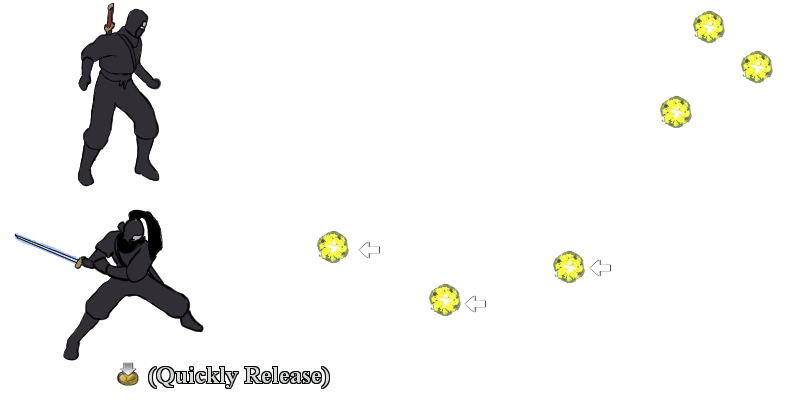
Now, because you have to be fairly close to naturally absorb essence, there are many encounters in the game where the safest approach is to kill enemies from a large distance (like the Middle Cabin on the airship, shooting the SAT soldiers on the other side with the arrow). In these situations, there is no need to harness that essence for a UT, but it is sometimes handy to absorb it regardless. You might get some extra health out of it and that's always beneficial.
The main way to pull far away essence towards yourself in this situation is to begin a charge for an Ultimate Technique, and then quickly start. Note that compared to the strategy for controlling essence absorption listed earlier, this one is a lot more challenging because the essence gets pulled in much faster and from much farther that many times you'll hold the button for too long and it will instantly charge. Thankfully, if you're in this situation where you want to pull essence to you with a charge move, don't worry if it screws up. It's not a big of a loss considering most released essence in this situation is typically small in value.
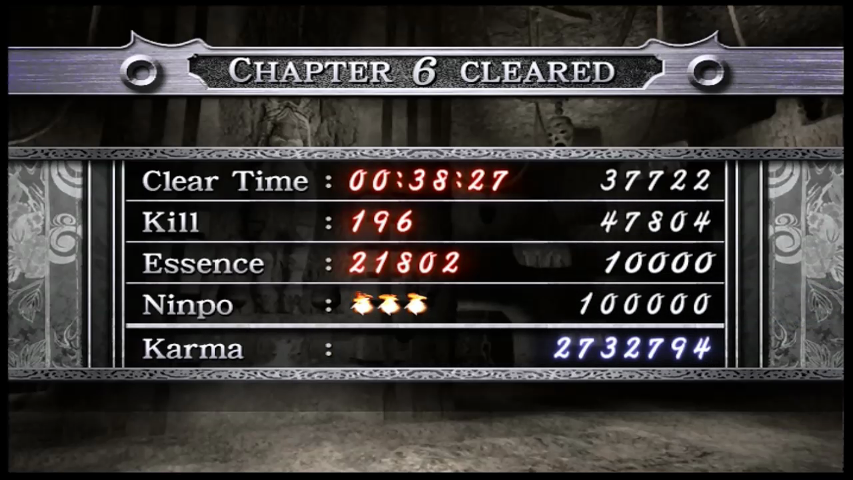
Karma Breakdown
The crux of high level score play in Ninja Gaiden. Playing for score and rankings has been a strong motivator for many in character action games, myself included, and Ninja Gaiden's no exception. Though compared to its stylish, more over the top brethren, Ninja Gaiden uses a scoring system that perfectly emphasizes what it's all about : Getting shit done.
I've demonstrated this system exclusively during the Sigma playthrough, but all the same principles apply to Black since that game provides the base for everything the future updates were based on. Basically, each chapter of the game can be easily split up into a series of ranked encounters where the player will be able to increase their overall Karma score. This score does not change anywhere outside of these battles, as a means to deter certain players from grinding repeat encounters ad infinitum and instead encourage players to get the most out of each new encounter on the first go. By now you've seen that the Karma Counter during battles tracks three categories: Combo, Kills, and Time. Those all seem pretty easy to figure out on there own, but there are specifics to the Karma score payout that isn't readily obvious:
- The combo section of the counter just takes your current hit combo and multiplies it by 10 once completed, and the number is immediately added to your overall Karma score. Its effects on the counter are in actuallity very marginal, so much that I'd almost argue its place in the score system to be unnecessary. It doesn't play any part in the final scoring calculation that is about to be detailed later on.
- Each enemy you kill in an encounter is worth 1000 points (a boss being 100,000 by comparison), and a kill is immediately registered upon the enemy uttering it's death rattle. However, the encounter cannot truly finish until all dead bodies have been dissolved, which can impact a player's chances of hitting the time bonus.
- The Time section of the counter gives an obvious 10,000 point bonus if you meet the time requirement in finishing the battle. However, the game does discern whether you finished the fight with a fraction of a second or 5 whole seconds remaining, and that time factors into the final point total.
- How the final score is tallied is determined by (separate from the 10,000 par time bonus) multiplying the added up points for each kill with the time remaining based on this equation:
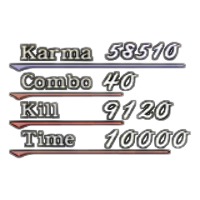
So as an extra example, we'll use the Karma counter image I provided for this update and analyze it. The encounter came from fighting 9 Shadow Clan Ninja, so already that's 9000 points rewarded. Then we take the time finished (approximately .51 seconds) and divide by the time alloted (36 seconds) then add 1 to it. Multiply by the 9000 points per kill, and with some rounding down behind the scenes, you get 9120 points from the encounter. And if you end up leaving an encounter before the every enemy is dead, the time bonus is not only forfeited, the score you had earned up to that point is reduced to 1/10 of its value. And you can't go back to fix it, so don't be a coward.quote:
[1,000 * (Regular kills) + 100,000 * (Boss Kills)] * [1 + (Time Remaining / Allocated Time)]
- Everytime an ET or UT is charged and connects with an enemy, a point bonus of 2000 and 5000 is rewarded respectively for each. Because of the point payout it is much more significant than the combo counter's contributions to the overall score, but still does not factor into the equation that determines points for total kills and time remaining. However, the speed and safe properties of these moves makes them heavily encouraged for finishing fights. Especially when you have good essence control and can set up fights to give you that head start on an instant death combo.
Now, that scoring is only for each individual encounter in a chapter. The score you see at the very end of each chapter works on a different set of rules. There are the four categories of time, kills, essence, and ninpo, but what are all of those categories looking for specifically and how can you get the max score on each of them?
- There is no universal time or kill count requirement across chapters, and figuring out all the individual requirements for each would be a hassle. But the idea is simple in that if you meet the requirements for them, you will be rewarded with a 100,000 Karma point bonus for each.
- For Time, the requirement is simply to beat the chapter's par time. However, if you go over that time limit the game does not immediately retract the bonus, but rather reduces it based on the final time. In this case, the equation would be:
Essentially, going over the par time doesn't matter much until the time taken to complete the chapter becomes essentially twice that or more. So a chapter with a 10 minute par time is fine so long as it doesn't reach 20 minutes, in which case the 50,000 point multiplier will mean nothing because you can't multiply zero into something that isn't zero.quote:
[(Par Time - No. of seconds exceeded) / Par Time] * 50,000
- The Kill bonus is much more easy to quantify as it's simply looking for did you kill X number of enemies. If you did, good, full point bonus. If not, then the number you did kill gets divided by the expected amount then multiplied by 50k. Like so:
The neat thing with this is that this number can always be increased outside of ranked encounters, because certain areas of the game are designed to respawn the same groups forever. But if you're looking to get the most out of your time killing enemies to get the Karma bonuses, each chapter actually has enough ranked encounters to both contribute to the end of chapter results AND flesh out your Karma score even more. The tricky thing though is that a good fraction of these ranked encounters are actually hidden and off the beaten path. So there's never an actual need to grind respawning groups if you know exactly how to route your way through a chapter.quote:
[(no. of kills / designated kills) * 50,000]
- The Essence category only has a bonus of 10,000 Karma points, and it's based around how much essence you have saved since starting the chapter. Specifically, the start of a new chapter treats your current Essence count as 0, that starting count is subtracted from the amount of essence you earned and/or spent over the course of the chapter.
And because the max bonus is 10,000 points, you only need to finish the chapter with 2000 essence more than when it started for the full benefits. This way players aren't obligated to farm essence to ridiculous amounts for reasons other than needing to restock on health potions after every fight because Master Ninja's a bitch.quote:
[(ending essence - starting essence) * 5]
- I don't think I even need to explain the 100,000 point bonus you get for the Ninpo category, but might as well. It's as simple as you'd expect, based on how many slots you have still filled by the end of a chapter, and it doesn't matter if you use Spirit of the Devils during the game or not. All slots that you currently have must be filled to get the full bonus.
It's not hard to figure out what you'd get for having 1 slot out of 4 still filled, and because there's no penalty from item usage, having some elixers on hand to refill your ki right before a chapter ends makes this the easiest bonus to get consistently in the game.quote:
[(full ki slots / max. ki slots) * 50,000]
So that's the breakdown. Doing a Karma Run is an interesting way to approach a game that many people struggled to survive through the first time, but the neat thing when you look at the specifics is how little room there is for exploiting the system. Limiting the score increases to ranked encounters and setting a limit on end of chapter bonuses ensures players have to fight to make the most out of every moment to earn every finite Karma point possible. There is no glitch or exploit in the game to break the score and push it up to impossible amounts (Unlike a later Team Ninja game where the response to a Karma score glitch was to shut down the leaderboards. Fucking Razor's Edge...), and while OG Xbox Live and all its leaderboards are now banished to the void, some of the high scores I've seen for Karma Runs on Master Ninja are in the 25 million range. Which is incidentally only slightly less than half of what my final score was when I completed my Master Ninja run for the first time.