Part 71: Assignment #AC2: Handheld Timer
Handheld TimerIt's been a bit since my last entry, but Avalon City has been growing astoundingly fast. We've gotten several new plates in already, at the rate of one every few days. Each plate is bare metal, attached to pilings* going down into the ocean once it's in place. From there, work crews start laying surfaces, installing foundations (fun fact: buildings are bolted to the plate base), marking spaces for roadways, and so on. I've seen my new (under construction) apartment building, and it looks pretty impressive - for a building skeleton.
*No, I don't know what the pilings are attached to. We've got kind of a deep seafloor beneath us, though I don't actually know if, or how, we're tethered to the bottom - but I assume we are.
On a more personal note, I got to see my robot arm in action in the Ocean's Bounty chemistry lab. It works like a dream! (The crates are a bit bigger than I expected. Think containers the size of a filing box - or larger.) I should note that I only visited the lab once - getting in involved wearing a cumbersome getup including a full hair net, labcoat, etc., so I've been generally staying away from the place.
It looks like they're going to need my skills again, though. And this job isn't anything I could have expected.

Yep. It me, creator of timers and stopwatches. Though this'll be a stopwatch in a hardened case, at least, so it's... kinda-custom. Let's see what they're after.
This doesn't seem too hard. It kind of reminds me, a little, of the scale I did back at Longteng - once you got used to the 'off/on/do stuff' mode, everything sort of fell into place and was simple.
Let's see what we can do...
[ ~ ]
This was a lot harder than it looked at first glance.
For those wondering why, it's a combination of the way the buttons are laid out and the timing loop. The loop is the biggest problem - the timer increments every two time units, but you need to listen for input on the buttons every time unit.
Suppose we had one MC doing the timing, and another monitoring for input. As a general rule, if you use XBus to communicate between two MCs, and the receiving MC checks for status updates every time unit (using an slx to do so), the MC sending the updates needs to send something every time unit.
This means that, if you have a MC that enters a real-time loop (such as our timing MC), and you want to stop the loop by means of a signal from outside it (such as from our input MC), the loop either (A) can't include a slx to receive messages (in which case you need to find some other way to stop the loop, probably involving simple I/O), or (B) you have to send the looping MC an XBus message every time unit. Either situation stinks in our case - especially as a start-stop button press could come in the middle of the two-time-unit wait between updating the display, so we can't even make the timing MC only respond every other time unit.
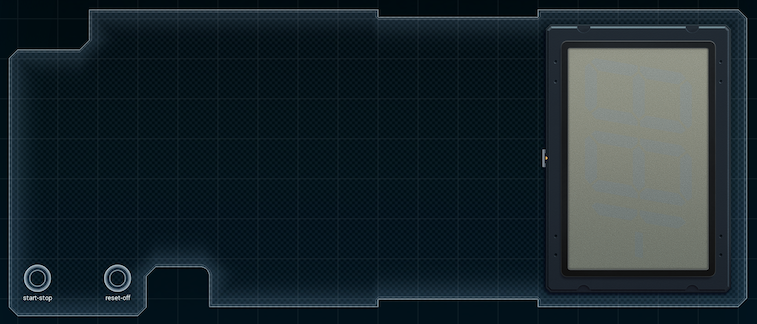
On top of that, the way the buttons are laid out brings further problems. The start-stop button starts and stops the timer when it's on, sure - but it also turns the timer on. It's not like reset-off can be a dedicated power button - both buttons have to be in a position where they can update the display to and from -999 (blank, indicating 'off').
So this took me the better part of a day to come up with, and now I have a roaring headache.
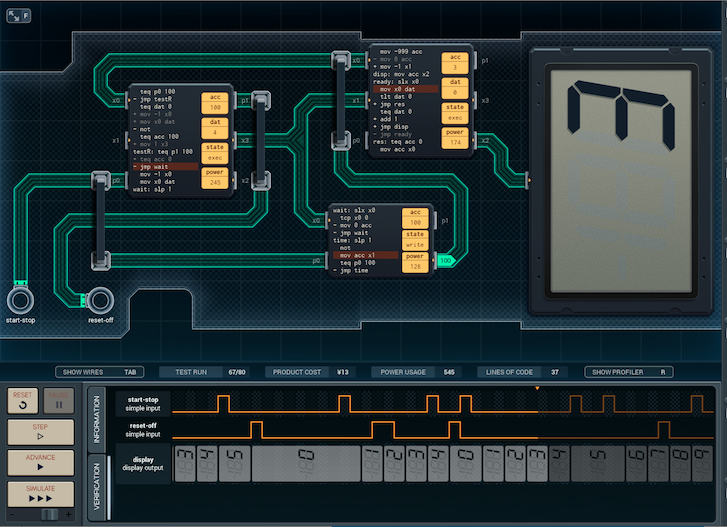

Here's what everything is.
The MC6000 on the left handles the input. Its acc tracks whether the timer is running (0 = stopped, 100 = running), and its dat tracks for whether the timer is on or off (0 = off, anything else = on). If the start-stop button is pushed, it checks if the timer is on - if so, it'll toggle acc with 'not' to set it to running/stopped. If not, the input MC will send a -1 to the display-handling MC6000 on the top right, to let it know to turn the display on. (It updates its dat with the value the display MC sends back.)
If the start-stop button has just been pushed and the timer is now running, the input MC will send a '1' to the timing assist MC (the MC4000 on the lower right) to let it know to start the timing loop. The input MC does not stop the timing assist MC - it'll read the start-stop button and do that by itself.
If the reset-off button gets pushed, the input MC will (assuming the timer's not running) send a '-1' to the display MC, letting it know to reset the display. It'll update dat using the display MC's reply, which indicates whether the timer is now on or not.
The small MC4000 on the bottom right is the timing-assist MC. When it receives a '1' (or any positive value) from the input MC, it starts the timing loop. During every time unit in the loop, the timing MC will use not to swap its acc between 0 and 100. It sends this value to the display MC on its output line (x1). The loop continues until the timing MC sees the start-stop button pressed again; then, it goes back to waiting for messages.
If the timing-assist MC receives a '-1' (or any negative value), usually from the display MC, it'll reset its acc to 0.
Finally, the MC6000 in the upper right is the display-handling MC. Its acc keeps track of the value currently shown on the display.
When the display MC receives a '0', it adds 1 to this value (and updates the display afterwards; every change to acc results in a display update sooner or later). Coincidentally, the display MC will receive a '0' every other time unit from the timing-assist MC, as long as the timing loop is running.
When the display MC receives a number greater than 0, it does nothing. (This is to ignore the '100's the timing-assist MC sends every other other time unit.)
Finally, when the display MC receives a negative number (-1 or less), it will reset the display. If acc was already 0, it will be set to -999, which turns the display off; otherwise, acc, and the display, will be set to 0. (This has the side effect of turning the display on if it was previously off.) Once the display is reset or turned off, the previous value of acc will be sent out to the input MC, to be used to determine whether the timer is now on or not.
Phew. I'm very, very unsatisfied with this. It's ¥15, uses 947 average power per run, and just screams 'overcomplicated' at me as I look at the spec. That said... I've been working for hours on this, and the day's almost over. I'm going to grab some fishcake and shut down my tablet for the day.
I'll come back to this tomorrow.
[ ~ ~ ]
As you can imagine, I was pretty dissatisfied with my last design. So, the next day, I threw everything out and started thinking in terms of inputs, states, and outputs.
The inputs are, of course, the two buttons. The states are Off, On (but not timing), and Running (on and timing). And the output actions that the timer needs to do are as follows:
• Turn display off
• Turn display on / set display to 0 (these both use the same command)
• Increase display by 1
• Change internal state from Off to On
• Change internal state from On to Running
• Change internal state from Running to On
• Change internal state from On to Off
I also listed about all the possible things the timer might need to check (test):
• If the start-stop button is pushed
• If the reset-off button is pushed
'nough said.
• If the timer is on or off
Used to determine behavior of both buttons.
• If the timer is running or not
Changes behavior of the start-stop button; if the timer is running, the reset-off button is inert and the timing loop happens.
• If the timer is displaying a value above 0
Used to determine whether to set the timer to '0' or turn it off when reset-off is pressed.
I was going to use those lists to try and make a one-MC version of the timer - my reasoning was: if each test and effect listed above uses one instruction, the challenge was to figure out which tests and instructions could be combined together, until I had 14 or less instructions and some way to arrange them that worked.
I couldn't find a way to do it all in one MC, but I did get the design slimmed down significantly from the first version:
Yeah. The first version was a bit of a rat's nest, but this one is much better. It turns out there was one thing I assumed based on the spec, but the test cases don't back up: The timer doesn't have to respond to button presses during the two-time-unit wait period while it's running - so I can just have the design wait that long with slp!
Because of this, I don't have to track 'half-values' where the timer is paused in the middle of a two-time-unit wait period, so that was a big help in making the new design.
Interestingly, though I started this design from scratch, parts of the code ended up being very similar (structurally speaking) to my earlier design. There's an input-handling MC and a display-handling MC; the input MC's code is a lot like a combination of the input MC's and the timing-assist MC's from the last design. The display MC is also fairly similar to the old version's display MC.
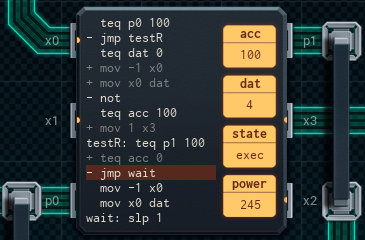
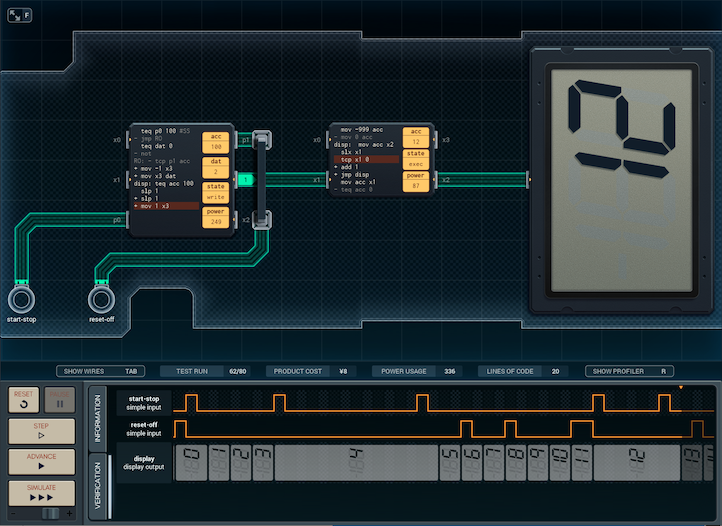
Here's how the new version works:
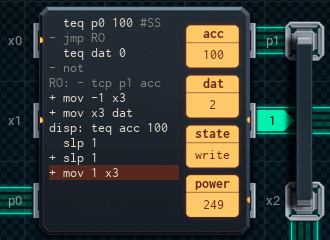
The left chip is the input-handling MC. For the most part, it behaves almost the same as the input MC from the previous version. The MC still uses its dat to determine if the timer is on or off (0 = off, anything else = on), and its acc to determine if the timer is running or not (0 = stopped, 100 = running.)
• If the user pushes start-stop, it'll check if the timer is on, and then either toggle the running/stopped status with a not, or send a -1 to the display MC on the right to handle the 'turn on' request.
• If the user pushes reset-off, the input MC will check that the timer isn't running. If not, it'll send a -1 to the display MC, indicating 'turn off or reset the display'.
In either case where a -1 value was sent out, the display MC's reply will say whether the timer is now on or not. This reply gets stored in the input MC's dat.
The main difference between the two version's MCs is this: if the timer is in the 'running' state, then the input MC will finish its script by waiting two time units, then sending a 1 to the display MC, which means, "add 1 to the value on the display".
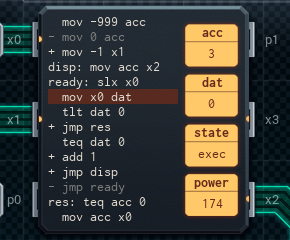
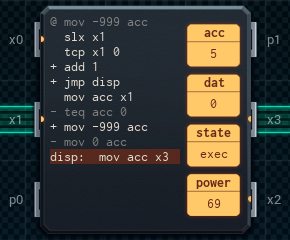
The display-handling MC, on the right, is also very similar to the previous version's display MC. It still uses its acc to store the value on the display, and any changes to acc are pushed to the display. However, the sequence of signals it responds to is drastically simplified.
• If the MC receives a 1, it'll add one to the displayed value.
• If the display MC receives a -1, it'll reset the display to 0 if it wasn't showing a '0' (turning it on in the process), or turn off the display if it was already showing a '0'. The previous value that was on the display gets sent back to the input MC, as before, to signal whether the timer is on or not.
Usually, the display MC will get '-1' pings only when the user pushes a button, but it will get '1' pings every two time units when the timer is running.
This version clocks in at ¥10 and 403 average power per run. I'll just check it over a bit before I send it off.
[ ~ ~ ~ ]
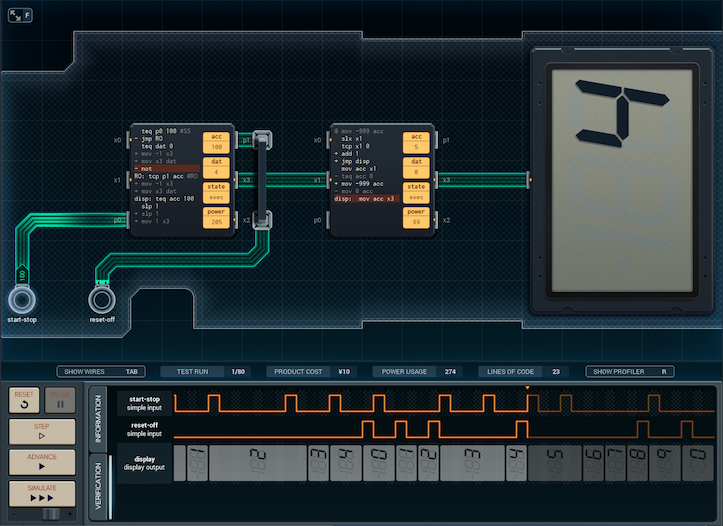
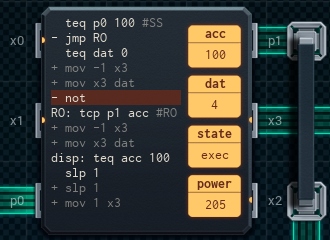
Just a few more improvements! Here's the final version of the design.
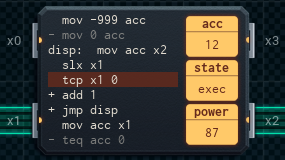
I made two changes since the last version.
First off, I realized I was duplicating some code in the state-tracking MC - the bit that signals to the display MC to turn on, off, or reset the display to 0.
("+ mov -1 x3 / + mov x3 dat".)
I was able to remove the duplicate lines, and arrange things so that the code 'fell through' to the remaining copy through conditional flags.
Second, I was able to bump the display MC down to a MC4000 - I'd used mov -999 acc twice, and I was (once again, through the power of conditional flags) able to cut it down to one copy. The new mov -999 acc always runs during a display-reset request, even if acc (and the display) are immediately set to 0 right afterwards, so there'll be a very slight decrease in power efficiency.
The new version's statistics aren't bad. ¥8, and about 407 average power per run. I'm glad I was able to simplify things, though. The original version of the timer was too embarrassing to release! Now, though - the Ocean's Bounty project can have the timer they deserve.
I'm torn between curiosity about what went down, and relief I wasn't there, given how Derrick's talking about it! But it feels like things are slowly coming together. More and more plates are added every day, and buildings continue to rise. It feels like Avalon City is becoming a proper... well, a proper city.
So far, I'm excited to be a part of it.