Part 75: Episode LXIX: A Nice Trial
Episode LXIX: A Nice Trial.jpg)
For once we don't have any business in Wales. Florence is also devoid of new content. But Cannes does require a pit stop as we need to advance the Treasure Hunting side quest side we discovered that Seere Crest back in Gerome Valley.

Music: Town of Twilight ~ European Town
.jpg)
 Damn! I was sure you'd never find that! I hid it really well! It's not easy to evade the militia of a cult in a hidden valley in Turkey, you know.
 So I've gathered. Okay, one more time! Give me one last chance to beat you! Please! The last time already? That's kind of a letdown. Don't be so sure of yourself! This last one's really hard! This time, you'll be the ones feeling bad, not me! Go on, do your worst! You know there's always the option I just don't bother and never come back here. Then victory will be mine! Yeah, sure...
.jpg)
Note: This is the final treasure hunt... on Disc 1. As for this clue, it's read by reading the letters on the note from top to bottom and working our way forward down the note. So the clue is:
In a cabin on the warship in the port. Check the pocket of the military uniform hanging on the wall.
If you cannot guess, this is a location that won't be available until the second half of the game. So, this quest is officially on the back burner for the duration of Disc 1.
.jpg)
Manmariana Island and the SG Italian Branch HQ will never need to be revisited. St. Marguerite Island doesn't have anything going on either... yet... Petrograd we've already taken care of so that leaves Goreme Valley.
Music: Spiritualization ~ Holy Land of God
.jpg)
It may be time to mop up the first set of Solomon's Trials. We've put that off long enough. But first, if we return to the church where we met Bishop Jovis and learned of the great big questionable Albert Simon retcon, Lawrence is now hanging out. Let's see how he's doing.
.jpg)
 It's very sad about Bishop Jovis... But I'm sure the people of the valley won't allow his death to be in vain.
  ...The Bishop DIED?! Yes... almost immediately after you ran out on him. Did... nobody tell you? No! Oh well... this is awkward.
.jpg)
It seems the dearly departed Bishop left a keepsake of the second Soul Drop. That seems like something he should have given Yuri when they met but I suppose he didn't want to undercut the hyping up of Amon.
Music: Holy Mistletoe ~ Graveyard
.jpg)
There is no sense in hanging onto this for a rainy day. So let's drop back into the Graveyard. We wouldn't want Bishop Jovis' final gift to go to waste.
.jpg)
Since we obtained the Level 3 Dark Fusion last time, it seems only right to grab the Level 3 Light Fusion next.
.jpg)
Music: Vicious 1915 ~ Battle in Europe
.jpg)
So these Level 3 Fusion fights are all pretty much identical with just the elemental class swapped out and abilities swapped accordingly. Oh and a different Slavic deity name. This one is Svarog, the god of heaven and the sun. All of these mini-bosses have 600 HP and if Yuri can take one, he can take all of them with increasingly less effort.
.jpg)
Svarog immediately casts Barrier, inflicts Special Defense Down with its physical strikes and supposedly can cast Nova but it never bothered when I fought it here.
.jpg)
Like its Dark counterpart, Amon can take this thing pretty easily with just physical strikes and munching a Thera Root after four or so turns before resuming the attack.
Music: Holy Mistletoe ~ Graveyard
.jpg)
As before and always with these clashes, there is no reward other than the Fusion.
.jpg)
Your Power of Light has been completely resurrected.
.jpg)
Defeating Svarog grants Yuri the Miserati Fusion. Which looks a lot like the Puera Fusion if it got the most minuscule armor additions, body tattoos, a sillier hat, and its head swapped out with David Bowie.
Miserati buffs the following stats by default:
- Strength +4
- Vitality +4
- Agility +9
- Intelligence +11
- Power +10
- Luck +10
Arc Barrier - 36 MP. Increases Special Defense for all allies. Pretty handy even if we've got Crest Magic that can do the same already.
Resurrection - 40 MP. Restores all HP and SP to one unconscious ally. Really playing the support role here.
Pulse - 64 MP. Large-area Light class attack. The strongest Light elemental attack in the game. So, you know, not bad if we encounter a particularly rude Dark elemental enemy.
Music: Spiritualization ~ Holy Land of God
.jpg)
Now that the Fusion business is sorted out, I guess it's time to grind out the first set of Solomon's Trials. Yippee. I always love sections of the game that take me an hour and the LP content amounts to something you can read in five minutes.
.jpg) His orders? But I thought he was already dead? He better not be a ghost. I'm not taking any orders from no ghosts!
His orders? But I thought he was already dead? He better not be a ghost. I'm not taking any orders from no ghosts! There is no life and death for the king. Just as I have lived for 3000 years, so the king lives in eternity...
  Huh?! I don't get it! And... did you just say you're 3000 years old? Did I hear that right...? You do not need to understand! All we have to do is obey the king's orders. So, let's get on with the trial!
.jpg)
What all that mumbo-jumbo meant was a roundabout way of saying that a new set of trials has unlocked. Idar Flamme appearing is the trigger for the Monk set. We are going to save those until after we deal with Rasputin's flying castle. Today we are just going to mop up the remaining three of the Beginner set of trials.
Music: Vicious 1915 ~ Battle in Europe
.jpg)
For this trial, we need to form a party and perform a 28-hit Combo before defeating the enemy. Technically, we nearly accomplished this trial earlier in the game.
.jpg)
That's because it's a rematch with our old pal Godhand Lenny. Sarah, it's not cool dragging people's souls back from Second Banana Heaven to make them battle in Pit Fights. It wasn't cool with that demon summoner orphan and it's not cool here.
.jpg)
We already managed to clown on Lenny with a 25-hit combo back during the original battle against him and that was four bosses and several upgrades to our characters ago. So this is a cinch. Hell, Karin's upgraded Geuschbenst Sword Art is outputting 18 hits by itself. I'm PRETTY sure the remaining three characters can chip in an additional ten hits while Lenny flails about getting air juggled.
.jpg)
.jpg)
After that, it's just a matter of kicking Lenny's ass again. It wasn't too much of a problem the first go and it's just mean to do now.
.jpg)
And that is one more in the book.
.jpg)
Now let's talk about prizes and how the first couple kind of suck. Doing a 28 hit combo to poor back from the dead Lenny gets us...
.jpg)
An almost entirely worthless accessory! If we were negligent monitoring SP long enough for a character to go Berserk then we can do a saving Judgment Ring and if the player succeeds then all that character's SP is restored. The only instance I can think this being useful is the Lucia Aromatherapy Incident and we won't be making that same mistake twice.
.jpg)
On to the next trial! Two characters only, Reverse Ring and we're not allowed to miss a single Judgment Ring spin.
.jpg)
That seems doable. We'll equip Yuri with the accessory that slows down the Judgment Ring just for some safety. I never really internalized everyone's Judgment Ring Hit Area positions in the first place so the ring going counter-clockwise isn't much of an issue. We'll have Karin come in as our number two for this trial.
.jpg)
Four rounds of enemies each pulled from different points of the early game. Unlike the first trial, which pulled randomly from an assorted stock of enemy mobs, this one is static in its order. First up we have the Ducky Toy and Wooden Lion representing the Domremy visit back before Nicolai took his heal turn.
.jpg)
Then we have two Ekimmu, a Clawed Soldier and Sting from the first brown underground dungeon we encountered back in the Paris underground.
.jpg)
Next up is the Thug and Fat Thug goon squad from Le Havre or the first half of the Wine Cellar if you prefer.
.jpg)
And finally bugs on parade from the back half of the Wine Cellar with two Gregor, a Centipede, and a Roach Queen.
.jpg)
And that is 75% of the Beginner Trials knocked out. Our prize this time...
.jpg)
Oh... They're really giving us an awful lot of these things. At this rate, Yuri will have enough to punch out another god with a single combo.
.jpg)
One final trial. A three-person party with everyone poisoned and we're not allowed to cure the status effect for six fights.
.jpg)
We're not allowed to cure the status ailment. That doesn't mean we cannot just have Blanca cast Arc-Cure when everyone gets into dangerous health territory and mitigate any ill effects it might have.
.jpg)
We've got six fights on the docket and they're randomly ordered. For the LP, we ended up fighting six Calamity Orbs from our time in the Neam Ruins.
.jpg)
Next, we have a pair of Revenants and Statues, the very first enemies in the game from way back in the Vatican.
.jpg)
Following them up are Manmariana Island's eccentric doll reps of Domovoi, Katherine and a pair of Fortune Sticks for good measure.
.jpg)
St. Marguerite Island sent a Gatorback, Kheperer and a Claw Admiral our way.
.jpg)
Rustic Ardennes Forest gets some love with a pair of Death Snails, a Skeet and a Zosim.
.jpg)
And finally, we're forced to remember the tedium of Rhondda Mine with a duo of Lambton Worms.
.jpg)
Most of these fights are over in the first round. But that still means most of the party is taking around 30-40 HP of damage a turn so healing is necessary once or twice. But other than that, well... It is a Beginner difficulty trial.
.jpg)
The last one, in fact. That's one set of trials down. Only... fourteen more plus a super boss fight, fuck me to go... Yay...
Music: Spiritualization ~ Holy Land of God
.jpg)
But at least we are amply rewarded for completing this set.
.jpg)
America!
.jpg)
Since we have obtained another Stud Card and Pierre is standing all of ten feet away I suppose we may as well obtain the final elemental dress for Cornelia.
.jpg)
Please don't talk anything about coming of age with the six-year-old doll. Thanks... Thankfully, we're nearly done with this whole creepy dress affair. There are only two available in Disc 2 and they both have special requirements other than Stud Cards. But, we'll reluctantly worry about that in a far off time from now.
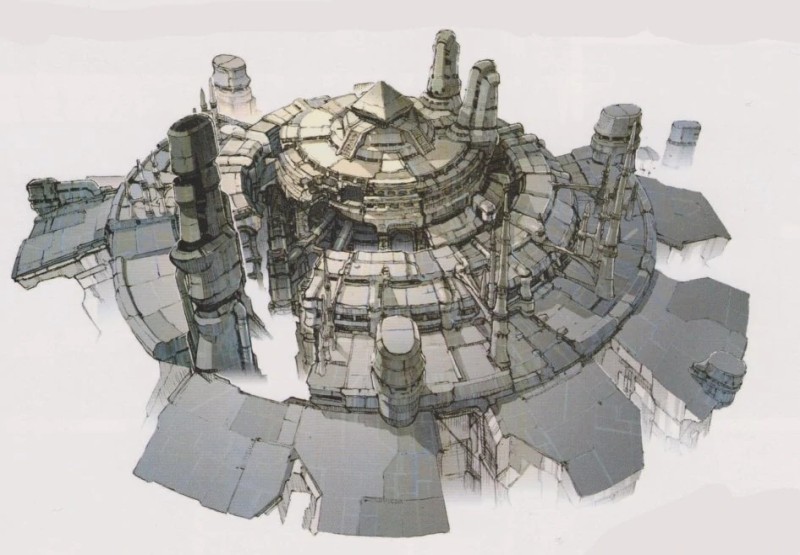
But what it IS time for is to return to Russia and sort out the


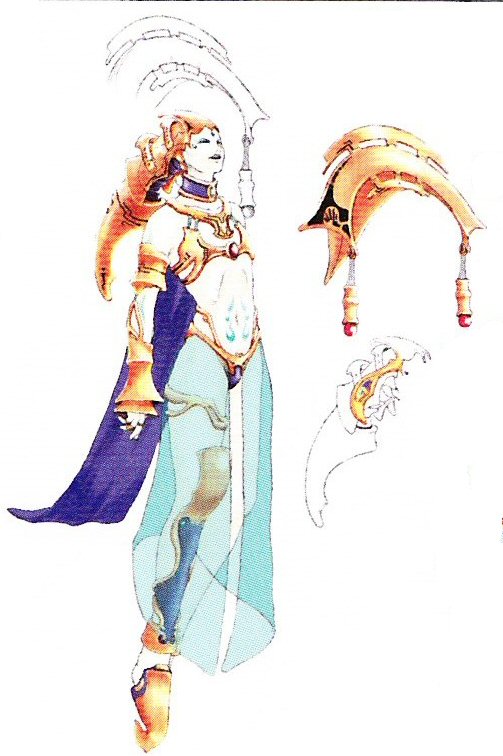
Misteria Fusion Concept Art - Mainlining the Light Element will get you high as FUUUUUUCK!