Part 3: Chapter III: Johnny Mnemonic
MusicSo, someone mentioned that I should post the music, and I'll be doing that right now, as I enter a new area, I'll post it's music along with it's map. So far we've been in
Redmond Barrens
The Jackals Lantern
The Jump House
III: Johnny Mnemonic
So, before we can do anything with Tabitha or Caleb first we've got to grind quite a bit of money. The sad thing is, you're not going to be making any money in Redmond Barrens, but it's good for Karma, if you're stuck for cash though? You need to be running the Matrix, which means nows a good time to explain that whole thing. See Shadowrun has another Game System attached to it's run-a-round shooting mans thing. This other system is the Matirx, and it works more like a traditional RPG, in fact when I first played it I was reminded of Chrono Trigger. There's only one place you can sell info from the Matrix though...
__!__068.png)
and that's in Downtown Seattle. See the thing is about the Seattle area, is that it's actually 3 maps connected, The Renraku Arcology is to the right, and to the left is the Penumbra district. This is where you go to make the big bucks. While the Puyallup Barrens is where you go to spend them.
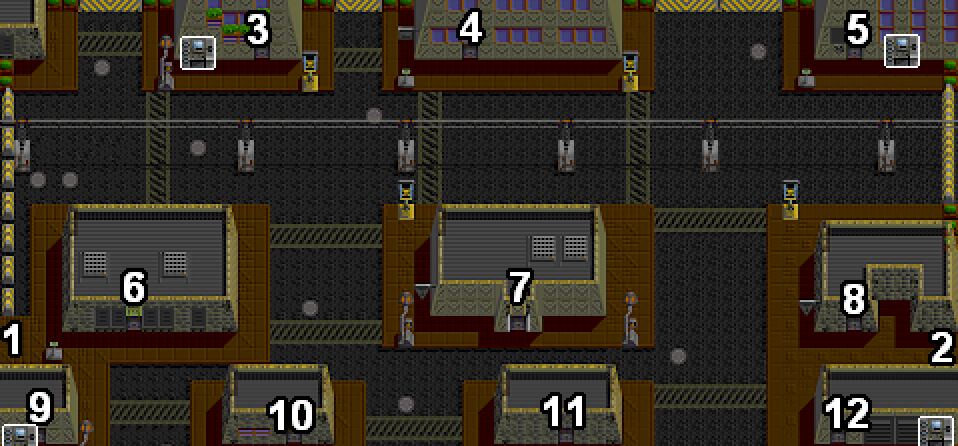
1) Connects to the Penumbra District - Music
2) Connects Renraku Arcology - Music
3) Space Needle You meet a shadowrunner here named Trent, who gives you a free contact. He's a decent mage, but there are better.
4) Gates Undersound: This is a hotel just like the one in Redmond, except it costs 75 Nuyen to rest here.
5) Fuchi Industrial Electronics: When doing Corp runs, this is one of the places you'll be breaking into, this is the easiest place to do corps runs on though
6) Mistuhama Computer Technologies: This is another place you'll break into
7) Matchstick: You can't get in here without paying either 150 nuyen, or having a reputation of 6. Inside you'll meet Rianna, who is the best decker in the game (currently
 ) and Julius Stouther, one of the higher paying Johnson's His Bodyguard and postman runs go for about 200, and he can give you missions that will go as high as 2,600 (but that's only for matrix runs.) Music (There are only three bar songs, so you'll find a lot of them are recycled)
8) Icarus Descending: You've got to have a reputation of 6 to enter her. Period. Ontop of that this place has the highest paying Johnson in the game, who even for his CHEAPEST run, gives you 1.4k and for his HIGHEST? You'll be getting around 6,000 Nuyen. You only come to this guy when you've got the best gear, the best team, and you know you're ready to kick shit in. When we get stronger we'll be dealing with Caleb exclusively. Music
9) Roscoe - But until we can do jobs for Caleb, and are geared out to be able to do runs for Julius, we need to hire runners and get gear. So we're going to Roscoe's hut. He has a data Terminal we can jack into right outside, and most files we find on the matrix we can sell to him. As our board gets better, we'll be able to download more files, and get more cash from him.
10 & 11) Abandoned Building
12) Seattle General Hospital: You can medkits, and cyberware upgrades, I almost never use this place for upgrades, because they're way cheaper in other areas. The only thing they have that's cheaper then anywhere else are Muscle Replacements, and Dermal Plating. (Because we're not a shaman, we're getting both of those. Also, we're getting a lot of our buddies modded the hell out too.
The Matrix
Alright, so we've gone to Downtown Seattle, found a data terminal in some scummy little alley, now it's time to lay int he muck and glide across the web. There are two really good reasons to have a decker on your team. 1.) You will make a shitton of money, in fact most of the time you will earn more then it takes to hire them for life in one or two missions. and 2.) When on corp runs, having a good decker allows you to shut off alarms, unlock doors, find your target easier, and generally just run amok. You should always have a decker on your team if you're doing infiltration or extraction missions. There is no reason not too. There are three things that make a good Decker
Their Gear
Your Cyberdeck, how you interface with the matrix, has it's own set of stats that can help or hinder you. There are two "Base Values" that can't be changed, 4 "Hardware Stats" that can be upgraded by buying better parts, and 4 "Attributes" Which can also be upgraded, but effect different things.
Base Values
MPCP: Stands for Master Persona Control Program. A deck's MPCP rating can never be changed, as it is an inherent signifier of the deck's overall worth. Virtually every function that you perform with your deck uses the MPCP at least a little bit. Perhaps the most relevant piece of information I can give you about the deck's MPCP is that it reflects the potential of your deck. Cyberdecks cannot be upgraded beyond what their MPCP values can handle. That is, if your deck's MPCP is 6, then that's the highest level you'll be able to raise its attributes. Because of the reasons listed here, the MPCP is perhaps the most important deck statistic, and it should be taken into careful consideration when shopping for a new deck.
Hardening: Another important statistic, Hardening is basically your deck's defensive power. Like the MPCP, it cannot be changed via hardware upgrades. Despite some people's strategies, the Matrix is really more about avoiding detection than destroying everything in your path (think about Metal Gear Solid versus CoD). For this reason, Hardening plays a large role in the Matrix, while there is no statistic specifically relative to attack power. Your ability to avoid, absorb, and withstand attacks from hostile ice is of much more use than how hard you can hit with your own attacks.
Hardware Stats
Response: This statistic is pretty broad - it affects a wide range of actions, most of which have something to do with how you perceive and interact with your surroundings in cyberspace. Perhaps most noticeably, a higher Response rating will substantially increase the overall speed of your deck in performing a number of actions such as running, loading, and refreshing utilities.
Memory: Similar to real life computers, your deck has a limit on how much it can do at one time. Each program takes up a certain amount of memory, and a given deck can't load any more programs than can fit within its memory limits. Regardless of memory, though, you can't load any more than five files at a time, period. If your deck is short on memory, you'll find yourself having to unload programs in order to load other ones. This is time-consuming, tedious, and risky, if you're trying to switch programs in the middle of an encounter with enemy ice.
Storage: Unlike Memory, which is how many programs you can have "equipped" at one time, Storage is how much you can carry, total, regardless of what programs are loaded. If you plan on doing a lot of Matrix runs and data sales, you should know that Storage is used not only by programs that you buy for your deck, but also for datafiles that you download from systems in the Matrix.
Load/IO Speed: Whereas Response is an inherent value that has some effect on cybercombat speed, Load/IO Speed is an upgradeable rating that has a direct effect on how fast your Persona operates inside the Matrix. As its name states, Load/IO Speed controls how quickly programs can be loaded into memory while in cyberspace.
Attributes
Bod: Bod is your deck's actual defense rating while in the Matrix. Don't confuse this with Hardening, which is an unchangeable value attached to each deck. If you want to use the analogy of fighting in the real world, you can think of Hardening as your natural toughness, and Bod as your toughness after you factor in what type of armor you're wearing.
Evasion: Evasion controls the Persona's capability to dodge incoming attacks from hostile ice. The higher its rating, the more often your Persona will be able to evade attacks. Even though it is not mentioned in the evasion's description, this stat will also drastically increase the accuracy and effectiveness of your attack utility, making this an important upgrade for barrier and black ice.
Masking: This is perhaps the most important rating of the deck. It affects two important areas: Node detection and the Deception program. A high Masking attribute means that a.)it will take longer for the system to detect your actions and sound alerts; and b.)you will have more success when running Deception. Since these are two very important parts of the matrix run process, it's usually a good idea to invest in a high Masking rating.
Sensor: This attribute only has one use, and it's not even a very good one. Decks with high Sensor ratings will have more success when running Analyze. Whoopee.
Programs
Now I mentioned a few programs above, and programs are basically actions you can do in the Matrix. Without Programs you're not hackin' shit chummer, and even though I find all but 2 or 3 completely uselss, I would be remiss not to tell you what each one does. (Just like I will for spells when I can finally afford a spell slinger.)
 Analyze: This scans the node and it's IC for information. Multiple Analyzes might be needed to uncover Tar Pits and Tar Paper (mentioned later in IC's)
 Attack: You use this to crash an IC, which is your back-up plan when Deception or Sleaze fails. It has 3 "postures" just like you do, and each is used by pressing a button. Pressing the "A" button will attack in an offensive posture, which makes you do more damage but are more likely to miss, "B" attacks in a Neutral Posture, with equal chance to hit, and doing medium damage, while "C" attacks in a defensive Posture, which does less damage but is more likely to hit. I normally just Button mash B, or try not to get in a situation where I have to use Attack to begin with. You can buy the low levels in Reneraku Arcology and the high levels in the Puyallup Barrens.
 Deception: This is your Bread and Butter, you use this to fool Access and IC that hasn't detected you yet. This won't work on Barrier or Black IC though. You can only buy it in the Puyallup Barrens though, so we'll be making a stop over there before we start hacking.
 Degrade: Lowers a Node's Security Rating. I've never really found a reason to use this, but if you want you can buy a level 3 of it from one contact, and a level 6 from another.
 Medic: If you end up getting in a slug-fest with a black IC, you can use this to heal yourself.
 Mirrors: Never use this, as it makes both you and the IC less accurate, which just ends up drawing out the battle.
 Rebound: You put up a kind of shield that lets you bounce any attacks at you back at the IC. It's good if you get into the thick of it. It's like Degrade, you can only buy it from a Contact you find later in the game.
 Relocate: Sends a Trace IC on a wild goose chase, ending the trace immediately. You know what else ends the trace? Crashing the IC. Ignore this, as it's just kind of useless.
 Shield: It's useless against black IC, and doesn't bounce attacks back. It's better just to get Rebound.
 Sleaze: Now this? This is a good program, it's got all the plusses of Deception but it works on any IC, the only bad part is that it doesn't "defeat" the node, as much as let you bypass it. So using it three or four times can get you in a sticky situation. (Nowhere to retreat to forcing yourself to jack-out and possibly burning out your MCPC) Still, I swear by this and Deception.
 Slow: It slows down IC reactions, and does nothing to Trace IC. I find it useless and don't use it much.
 Smoke: Just like mirrors. Terrible.
Nodes and IC's
Nodes come in many different types, with different colors (Blue => Green => Orange => Red) and Security Ratings (1-7). This is important to keep in mind, because a Blue 3 Node is much weaker then a Green 3 node, so when using Analyze, it let's you know ahead of time which programs to load.
Also, each node has a different use and is important for different reasons. When I start doing matrix Runs, I'll get into that more indepth.
CPU: The most vital part of the system, the one most heavily protected (usually), and the one with several good reasons to hack. A supressed CPU may be used to cancel an alert, or it may be crashed- which can make a Run on a corporation much easier, by shutting off their electronics equipment. Luckily there are only 6 Nodes.
SPU: This one is merely a Node to be passed through to get to the good ones. How you do it is up to you.
IOP: This is one of the two Nodes that you will enter the System from. If you're hacking into a Corps' computers from inside their building, this is where you start.
SAN: This is where you start from, when you enter a system from the outside.
SM: These control various functions within a building. Shutting them down can turn off security cameras, unlock doors, etc.
DS: The MEAT of the Matrix. These are where you go to download files. These files can then be sold to a Fixer for cash. Lots of cash, depending on the value of the file. You can also delete a file, if necessary. Lastly, many files may be pertinant to the plot. You can read them in your notebook.
Now back to our main Program.
Ok, so with all that in mind, let's hack our first node. First we go to a data Terminal, and pull up this screen.
__!__071.png)
Then we click Cyberspace, and it does a system search
__!__072.png)
__!__073.png)
It'll plug-in a bunch of random numbers, and then you're in the matrix. Then you load up your board with programs. After that you use the Sysmap to move between Nodes.
__!__078.png)
__!__079.png)
You always start at a SAN node when you're doing free-lance crap. So I tried to mask a few times, but because our skill was so low, well we're just going to have to force are way in, so I switch to using the attack program.
__!__084.png)
__!__087.png)
__!__088.png)
After trading blows with the program, we eventually are allowed access, it looks like we're hacking City Hall. It also looks like it might be a little over our heads. I'm a risk taker, so instead of pulling out right there, I'm going to go ahead and try.
__!__089.png)
This is the Sysmap, it shows where you can go from your current node.
__!__094.png)
So, we can't even attack this other node, it evades all of our shots. Ontop of that, as soon as I poked it it put everything into active alert. This is a pretty good sign to just jack out and try a different system. So that's what I do.
__!__097.png)
Now we're trying a new place, I think this will go a lot better, because they didn't even have a lock on the front door.
__!__099.png)
Heh, then we were able to use mask to get in the first SPU.
__!__100.png)
And would you look at that? We're only a jump away from the CPU. Generally, you don't want to try and hack City hall on your first matrix run.
__!__102.png)
__!__108.png)
We failed our Mask attempt, which forced us into attack mode. That particular graphic is a Trace & Burn IC, and if that little fireball reaches the edge of the screen it forcibly eject us from the system, possibly damaging our MCPC. So let's try to Jack-in again.
__!__109.png)
... Fuck.
Don't forget, I'm still taking votes on whether to visit Tabatha Shale, or Caleb Brightmore First!