Part 4: i. Gameplay Mechanics: Tactical Situations
Gameplay InformationThis might seem intimidating, and if so, don't worry about it. This is going to be a reference to a bunch of mechanics and features that will come up repeatedly.
i. Tactical Situations
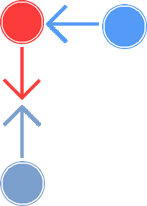
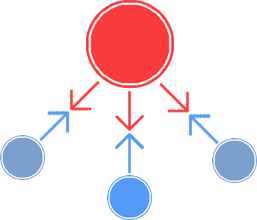
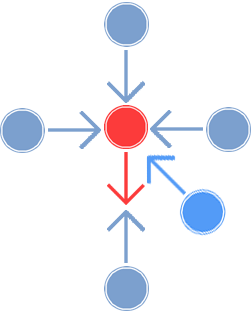
Note: For these diagrams, allied unions are in shades of blue, and enemy unions are in shades of red. Dimmer shades are unions which are required in-place for the situation to happen.
Deadlock

A deadlock occurs when an allied union and an enemy union mutually target each other and meet. Each union can attack the other. This is the most common tactical situation.
Flank Attack
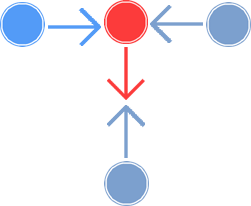
A flank attack occurs when a union is in a deadlock, and another union attacks one of the participants. The flanker can attack the target union without fear of reprisal, and gains a bonus to Morale and attack. It is possible to be flanked by two unions at once.
Interference

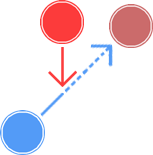
Interference is when an enemy union is targeting an allied union, but a second allied union succeeds in deadlocking it before the enemy union reaches it. It is called Interception when one of your unions targeting an enemy union is intercepted by a second enemy union. Once contact occurs, it is treated as a deadlock, and there is no attack bonus, although the intercepting side gets a Morale boost. The intercepted unit will perform the commands it was following on the intercepting unit.
Raidlock

A Raidlock is a one-turn surprise attack against a vulnerable union. They get an attack and Morale bonus. A Raidlock can be triggered in the following ways:
- A union in a deadlock breaks the deadlock to perform another action (such as healing an allied union), and is attacked by the unit they were deadlocked with.
- A union is on standby and is attacked by another union.
- A union is performing a long-range attack and is attacked by another union.
- A union receives a flank or rear assault command, but at the time the command is actually executed, there are no other unions deadlocking the target.
Raidlocks last until the end of the current turn, after which they become normal Deadlocks, but if another unit attacks a unit that is Raidlocked, it does additional damage.
Rear Assault
A Rear Assault occurs when a deadlocked union is flanked twice, and a fourth union attacks it. I think it can also happen if you break deadlock and are attacked by a unit positioned directly behind you based on the battlefield map orientation (hey, it’s actually used for something?).
(Another possibility – I am not entirely sure about this – if a union attempts to a flank attack on a unit which is in Raidlock. (Raidlock only lasts for the duration of a turn, after which it becomes a Deadlock, and for a rear assault to take place, the Raidlocking unit has to still be alive.) )
Unions performing a Rear Assault get a Morale boost, and a higher bonus to attack than flanking unions. This is a rare occurrence, as most of the time, piling several unions onto an enemy union will kill it before you can pile on a fourth or fifth union (and the rare unions that can survive that can typically perform a Multi-(union)-Deadlock.
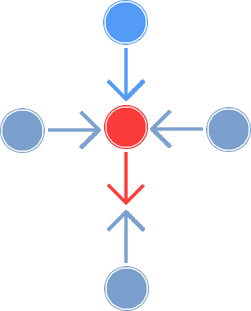
Multi-Deadlock
Multi-Deadlock occurs when allied units are facing a particularly powerful (or just a particularly large) enemy union. That is often (but not always) an enemy boss union. The powerful union can deadlock multiple unions at the same time. It is able to attack each union deadlocked with it. Such powerful unions require more units attacking it to flank. If it can Multi-Deadlock 3 unions, you need to hit it with 4 before you can get a flank attack (there may possibly be an exception for specific battle commands). Only enemy unions can perform a Multi-Deadlock.
This can have an advantage for the player, though: as long as one union remains deadlocked with the powerful union, other unions can disengage from the powerful union without fear of getting Raidlocked by it. This can be used to rotate squads in and out for healing, although it’s not guaranteed, as you’ll still need to get battle commands that let you disengage. It also doesn’t help against AoE attacks that hit the field, which are common for multi-deadlocking unions to have.
Massive Strike
An extremely rare situation, which occurs when a union surrounded by four unions and at Rear Assault stage gets attacked by a fifth union. They receive a Morale boost, and a massive bonus to attack. Very rare because very few enemies can withstand being attacked four times, and those which can usually are capable of a Multi-Deadlock.
ii. Arts
These are the active skills you use in battle. There are three categories: Combat, Mystic, and Item.
Combat arts
These are your weapon skills. Some Combat Arts are shared for all weapon types under a category, but in addition to that, different weapons will get their own specific arts. All combat arts have unique animations. These are virtually all single-target attacks, but some high-level ones can affect more than one target. Mages should turn these off, obviously.
One-Handed (1H) are combat arts for using a one-handed weapon with one hand only. The second hand is either free or using a shield to block. These tend to be faster than power grip arts. These work with Swords, Katanas, Axes, and Maces.
Power Grip (PG) are combat arts for using a one-handed weapon with two hands. These tend to be stronger than one-handed arts. These work with Swords, Katanas, Axes, and Maces.
Two-Handed (2H) are combat arts for using a two-handed weapon. These tend to be slow, but powerful. They work with Staves and Spears.
Dual Wield (DW) are combat arts for using a one-handed weapon in each hand. They tend to be slower than Power Grip arts, but stronger.
Combat Arts – Sovani-Specific
Sovani get exclusive combat arts to take advantage of their four arms. Only Sovani can use these, and they won’t use any of the ones above.
Dual Two-Handed (D2H) is wielding a pair of two-handed weapons.
Dual Power Grip (DPG) is wielding a pair of one-handed weapons in the power grip style.
Quad Wield (QW) is wielding four one-handed weapons, one in each hand.
Mystic Arts
Mystic Arts are your magic skills. There are a few subtypes, each with a specialized role.
Invocations (INV) are your Short-Range damage spells and status effects. Only two of them can be used at long range, outside of a deadlock. It also includes the Double Time buff, which increases a target’s speed, possibly letting them avoid getting Intercepted easier. They are required to get the Blackout and Crimson Flare Arcanas.
Remedies (REM) are the magical healing spells and debuff-clearers. They’re pretty good, and you’ll never risk running out of items, but they get the ability to revive K.O. unions very late. They are required to get the Rejuvenating Water Arcana.
Evocations (EVO) are your Long-Range damage spells. Only one of them cannot be used outside of a deadlock. They have lower damage than Invocations, but inflict more powerful status effects. They are required to get the Whiteout Arcana.
Hexes (HEX) are status-inflicting damage spells that hit entire unions. Some of the better ones can’t be resisted. They’re really good, and all but two can be used outside of Deadlock. In a fresh playthrough, Rush can’t learn them until late in the game. They are required to get the Animalcule Arcana.
Psionics (PSI) are mostly Morale-boosting spells. It doesn’t do little damage on its own, but having high morale is extremely good, so these are great… but it takes a while to get them/party members who can use them. They are required to get the Fatal Eclipse Arcana.
Wards (WRD) are protection spells. They can make a union immune to an attack for one hit, make them untargetable, or make them draw aggro. They’re another mid-late-game thing, though. Few party members can learn these. There is no associated Arcana.
Arcana (ARC) are special group-casting spells. They are automatically learned by an applicable leader once he and two other party members have the appropriate prerequisite spells and levels, and have enough AP to cast the Arcana. They’re extremely powerful arts that hit the entire battlefield.
Item Arts
Item Arts require items to use, obviously, and they come in several flavours. Some components are cheap, others are really expensive (unless you’re on New Game Plus!), and it can be hard to find shops that sell all of what you need. Some items simply are not available to buy until late. They have some good benefits though - they can’t be prevented by Silence or Paralyze status effects and have 0 AP cost to use.
Herbs (HRB) are the lowest level healing item. They’re cheap and common, and you will need these . They get early access to an ability to let you Revive KO’ed unions. They don’t heal much though, but you’ll want to use these just for reviving. The highest level item is actually an attack item, but you’ll probably never use Herbs enough to see it. Sold everywhere, but Athlum has the complete set of Herbs components.
Potions (POT) are stat buffs, and not that good. They can boost Strength, Intellect, Speed, Attack, Evasion by 15%, but you’ll probably find better uses for your AP. Celepalais has the complete set of Potions components.
Lotions (LOT) are full-union status-healing healing items, but the big problem is that lotions first level is an anti-poison one, and poison is rare and easily ignored, so getting this art to level up to gain access to more useful lotions is hard – even though the experience needed to upgrade Lotions is lower than anything else. Elysion has the complete set of Lotions components.
Explosives (EXP) are damage + status effect items, which are close-range only. They cost a lot, so aren’t that practical. They’re also trickier than usual for Rush to learn, as it’s done through a certain guild quest (acquire Dragon Egg * 3), instead of a formal sidequest. Balterossa has the complete set of Explosives components.
Traps (TRP) are debuff and morale-affecting items, but they’re a lot cheaper. Only one trap does damage. Some unique leaders (including a mandatory one) start out with these. Melphina has the complete set of Traps components.
Shards (SHD) are area-effect, multiple-union targeting effects. Rush can’t learn these until literally the second-last sidequest in the game. Even in New Game+ it’s tough because you can’t even buy these very expensive components until Disc 2. Nagapur has the complete set of Shards components.
iii. Classes
iii.1 - Classes: Overview
To put it simply, a character’s Class is determined by the actions they perform in battle. Classes give a bonus to certain stats and skills, and in some cases, can even let you use unique abilities. The basic Fighter’s benefit is +5% Max HP, for instance. Your class is basically determined by the way you play. If you use a lot of items, but basically no mystic arts, you’ll unlock a class which grants benefits to item usage. If you cast Hexes a lot, you’ll move into a class that grants a bonus to Hexes.
On your first time playing, don't particularly worry too much about your class.
There are three focus areas that determine the character’s class: Combat, Mystic, and Item, and combinations of those three (except Mystic + Item) can also determine the class. Mystic and Item arts are considered to be opposing when it comes to determining class. There is a set of conditions which are checked in order, which can be read on the wiki if you care - I wouldn't bother unless you're specifically trying to make Rush a certain class.
There are something like 45 possible classes, but a lot are uninteresting, and at times if a character’s growth changes enough, they can switch to a higher ranked class. It just happens, there’s no way to decline a switch, and control over switching classes is limited and finicky. In a clean save, Rush unlocks arts through the course of the game, so it can be a lot more difficult to move him towards a specific class. It’s much easier on a New Game Plus, with all the Mystic/Item Arts unlocked from the beginning.
Each class has a tier rating – there are seven tiers, and you can only change by moving to a higher tier class. A Marksman (Tier 3), can never move to any of the other Tier 3 classes. Class changes only happen once you reach specific values in STR or INT.
Most classes also have internal upgrades of the format: Classname -> Expert Classname -> Adept Classname -> Master Classname -> Lordly Classname -> Legendary Classname. Those have higher requirements to meet, but grant larger bonuses.
Upgrading and changing classes requires your Strength or Intelligence to reach certain values.
The criteria for changing classes first starts with your current class. You can only get from certain classes to others.
iii.2 - Classes: Leadership Skills
The most important thing certain classes do is to give you Leadership Skills that increase the chance of getting special battle commands. Not all classes can get these.
- Side On – enables the “Strike from the Sides” command without an existing flank attack. Can be used on enemies which would normally multi-deadlock you. Target union still has to be deadlocked.
- Ambush – enables the use of the “Hit ‘em from Behind” command – forcing a Rear Assault on a deadlocked union WITHOUT two flank attacks already in place. Can be used on enemies which would normally multi-deadlock you.
- Hot Blooded – increases the chance of getting Combat Arts commands. Pretty worthless, since you can just disable arts you don’t want.
- Esoteric – the above, but for Mystic arts.
- Survivalist – the above, but for Item Arts.
- Medic – the above, but for Recovery commands. This one is actually fairly useful, because when you need healing, you really want to see these commands.
- Duelist – enables the use of the “Stand your Ground” command. That just holds the unit’s ground, but without the risk of getting raidlocked when targeted.
- Commander – enables the use of the “Wait for a Chance” command. That waits for an enemy to become deadlocked or flanked, and then joins in. If both flank positions are taken, it becomes a Rear Assault.
- Defender – enables the use of the “Defend” command, which increases defense, and the fourth and 5th members will use arts or do a self-heal if not at full health. Not that spectacular.
- Fatal Blow – nullifies a target’s immunity to Instakill abilities. This would seem worthless even if any classes actually had this, which they don’t.
- No Instakill / Safety – immunity to Instant Death attacks. Attacks that deal more than 2.3 times a units max health (Overkill) will still kill them, though.
iii.3 - Classes: Class List
See the Arts list above for what the abbreviations mean.
Combat Classes
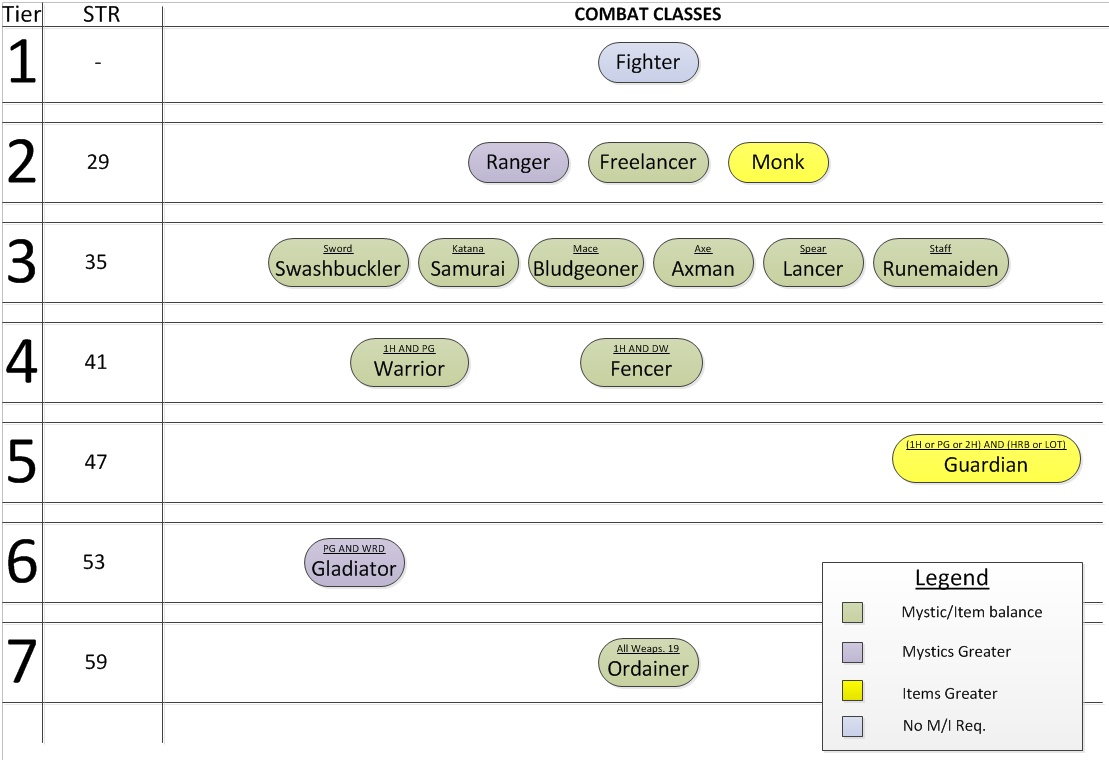
(click for larger)
Changing into one of these classes requires Strength to be the highest attribute and reach the specific value. There are hidden XP counters and levels for your weapons and the style you wield them in, and every combat class from Tier 3 and up requires you to have a dominant weapon or style. Of course, you can’t actually see what level your weapons or wield style is.
- Tier 1
- Fighter is a starting class only - it can't be changed into. It only has one internal upgrade to Expert Fighter.
- Tier 2
- If STR reaches 29 before INT does, you change into one of three possible classes, based on if your Mystics (Ranger), or Items (Monk) are significantly higher, or if they are balanced (Freelancer).
- Tier 3
- These classes all require you to have one weapon skill higher than the others. Swords, Katanas, Maces, Axes, Spears, or Staves.
- Tier 4
- These classes both require you to have one-handed weapons at level 9, and either Power Grip (Warrior) or Dual Wielding (Fencer) at 9 as well. Warriors get a bonus to normal attacks and an increased chance of critical hits. Duelists get extra weapon hits and the Duelist leadership skill.
- Tier 5 - Guardian
- Good luck getting the Guardian class. It requires any wield style except Dual Wielding to be at level 13, AND either Lotions or Herbs to be level 6, and Item arts have to be greater than Mystic arts. The hard part is getting Item significance without changing into an item-class like Scout or Hunter first. Guardians get resistance to both physical and mystic attacks, and immunity to critical hits, as well as the Leadership skill Defender.
- Tier 6 - Gladiator
- Gladiator requires Power Grip style to be level 16, Mystic to be greater than Item arts, with Wards as an important mystic. My first playthrough’s Rush eventually changed from Scout to this. They get the Commander Leadership skill.
- Tier 7 - Ordainer
- Ordainer is the ultimate Combat class, but it will require a substantial amount of grinding, because it requires you to reach level 19 with each and every weapon type: Swords, Katanas, Maces, Axes, Spears, and Staves, AND your Mystic and Item arts have to be balanced. They get the Commander and No Instakill Leadership skills.
Mystic Classes
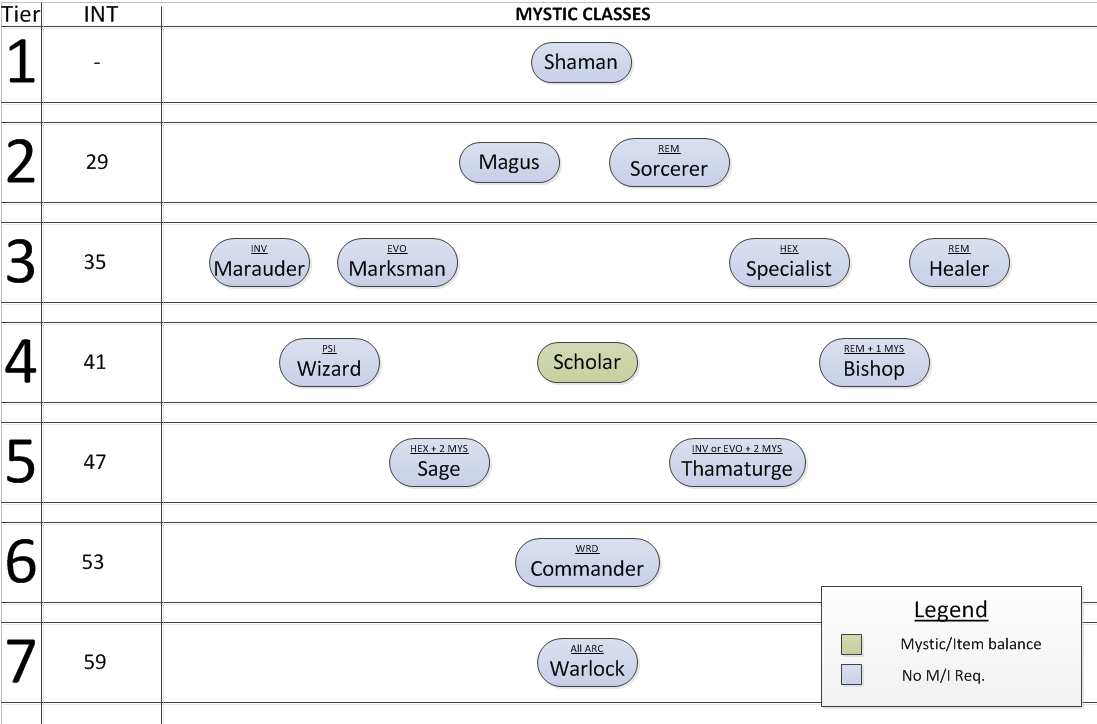
(click for larger)
Changing into one of these classes requires Intellect to be the highest attribute and reach the specific value. There are hidden XP counters and levels for your mystic arts. The highest one will determine which class you change into.
- Tier 1
- Shaman is a starting class only - it can't be changed into. It only has one internal upgrade to Expert Shaman.
- Tier 2
- If your highest Mystic skill is Remedies, you become a Sorcerer. If it’s another mystic, you become a Magus.
- Tier 3
- The class you become is determined based on whether Invocations, Evocations, Hexes, or Remedies is the highest one.
- Tier 4
- Scholars are the lone Mystic class which has Mystic and Item arts in balance – the others don’t care (because a mystic class presumes mystic dominance anyway). Wizards require Psionics to be your highest mystic, Bishops require Remedies to be the highest, AND at least two other Mystic skills to be at level 7+. Bishops get a boost to max AP, and an AP cost cut. Scholars get a bonus to max AP and the No Instakill Leadership skill.
- Tier 5
- The Tier 5 classes require at least 3 Mystic skills to be level 7+, as well as Hexes for the Sage, or Invocations or Evocations for the Thamaturge. Sages get a boost to initial AP, and Tharaturge's get AP Charge on Damage (gain AP from dealing damage), as well as an extra hit with Mystic arts.
- Tier 6 - Commander
- The Commander requires Wards to be the highest Mystic art. They gain the Leadership skill Commander.
- Tier 7 - Warlock
- Another very hard-to-unlock class, Warlock requires you to have learned all Arcana. Learning even one Arcana takes a great deal of focus onto one mystic school, learning all the arcana takes a LOT of work. They gain a bonus to Arcana, AP Charge on Damage, and the No Instakill Leadership skill.
Mystic + Combat Classes
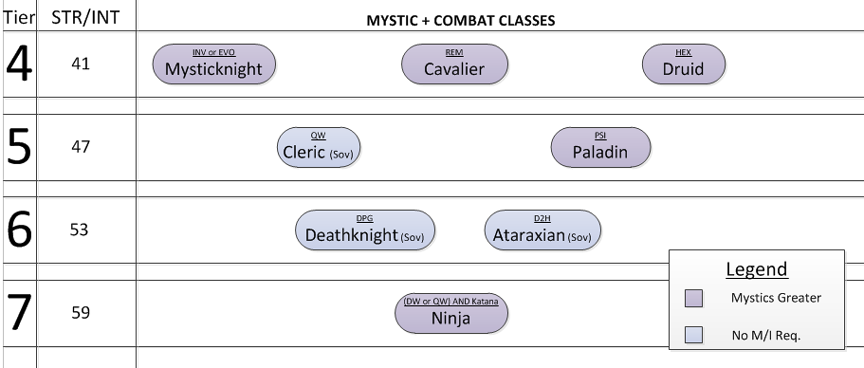
These are hybrid classes, and they start at the mid-tiers, obtained at Tier 4 at the earliest. Three of them are Sovani-exclusive, and the rest all require Mystics to be greater than Item arts.
- Tier 4
- These depend on what your dominant mystic is. Invocations and Evocations become Mysticknights, Remedies become Cavaliers, and Hexes become Druids. Mysticknights gain the Duelist Leadership skill, Cavalier's gain the Leadership skill Defender.
- Tier 5 - Paladin
- The Sovani-specific version is a Cleric, which requires Quad-Wield. Paladins require Psionics as their highest mystic. Both of these classes gain Defender.
- Tier 6
- Both classes here are Sovani-specific. Dual-Power Grip users become Deathknights, Dual Two-Handed users become Ataraxians. Deathknights get Duelist, Ataraxians gain Commander.
- Tier 7 - Ninja
- The Ninja class is more combat-focused than the other hybrids, it requires both Dual Wield (or Quad-wield) at 23 and Katanas at 19. Mystics have to be greater than Item arts, but that’s it, making this notably easier than the other Tier 7 classes to achieve. Ninjas gain the Ambush and No Instakill leadership skills.
Item Classes
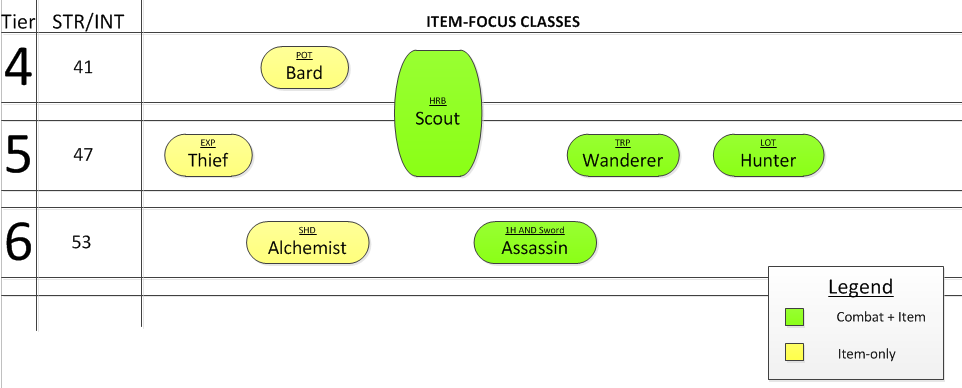
(click for larger)
Note: The legend is different for these classes. Normally, I colour the bubbles based on the Mystic/Item focus, but all of these classes have an Item focus, so instead I coloured them based on whether they were considered Item-only or Item + Combat classes.
Item classes are distinctly less popular than other ones –mostly because they’re a lot less feasible to use, because of the requirements to maintain a supply of consumables. There’s only one class for each type of item art. There also is no ultimate Item class, although the Alchemist with its Shards is a good endpoint for Item users.
- Tier 4
- Item-focused characters who focus on Potions become Bards. Bards get lower Debuff duration. Characters who meet the STR/INT 41 requirement and have Herbs as significant will end up in the Tier 5 Scout class.
- Tier 5
- Explosive-focused Item users will become Thieves, Trap-focused ones will become Wanderers, Lotion-focused Item users will become Hunters, and Herb-focused item users will become Scouts. Thieves gain the Slowdown added effect (delays enemy turns) and the Survivalist Leadership skill. Wanderers gain lower Debuff duration, and Added Effect Occurrence. Hunters gain bonus Speed, increased Buff duration, and the Medic leadership skill. Scouts get an AP cost cut, increased Buff duration, and the Medic leadership skill.
- Tier 6
- The Shard-using Alchemist is the top-tier pure Item user. The Assassin is a hybrid class which requires items to be significant, AND One-handed must be level 15, and Swords must be level 13. Alchemists get Added Effect Occurrence and No Instakill. Assassins gain Speed and the Ambush Leadership skill.
The Scout class is special (as is obvious by the tier-spanning bubble). It was a Tier 4 class on the XBox, but changed to be considered Tier 5 on the PC. However, it retains the STR/INT 41 requirement for a Tier 4 class, instead of requiring STR/INT 47 like the other Tier 5 classes. That makes Scout one of the easiest classes to change into, and one of the harder ones to change OUT of, making it obnoxious and potentially ruining your intended class progression. That's especially problematic on a fresh game.
Herbs are the significant item required for Scout, and Herbs are the only early game way to revive fallen unions mid-battle, and so they will likely become quite high quickly.
iii.4 - Classes: Changing Class
Since all class changes and upgrades have a stat requirement, the process for changing a class starts when Strength or Intellect reaches a certain level.
The wiki says this more clearly than I can, so I’ll just copy what it says.
“Last Remnant Wiki” posted:
Definition of Significant, Highest:
- A stat (STR, INT) is considered significant if it's at least 12% greater than the other one.
- A skill group is considered significant if the sum of its skills is higher than the average of the skill sums (ignoring the wield style group).
- An individual skill is considered significant if it's higher than the average of the skills in its group.
- An individual skill is considered highest in its group if it's at least as high as the highest one.
The first step in class changing is to satisfy the requirements for a class type. While these could be considered as actual class requirements, none of them have to be satisfied to change into a class with a type matching the current one, which makes them more of a requirement to change between class types. The requirements are checked in the order following; if any of them are met the evaluation stops there and the class type is determined, none of the other class types are even looked at. If none of these requirements are met the character cannot change class.
- All Combat classes are checked. If the character qualifies for any, and his Strength is significant, Combat Type is picked.
- All Mystic classes are checked. If the character qualifies for any, and his Intellect is significant, Mystic Type is picked.
- All Combat classes are checked. If the character qualifies for any, and his only significant skill group is Weapons, Combat Type is picked.
- All Item classes are checked. If the character qualifies for any, and Items are among his significant skill groups, Item Type is picked. Unlike the similar Combat and Mystic checks, this does not require both of the other skill groups to be insignificant.
- All Mystic classes are checked. If the character qualifies for any, and his only significant skill group is Mystic, Mystic Type is picked.
- All Mystic+Combat classes are checked. If the character qualifies for any, and has 2 significant skill groups with one of them being Mystic, Mystic+Combat Type is picked.
- All Item+Combat classes are checked. If the character qualifies for any, and Items are among his significant skill groups, Item+Combat Type is picked. This is exactly the same requirement as that of the Item type classes.
- Finally, classes of the same type as the current one are checked. There are no extra requirements here, if the character qualifies for any, the current Type is picked.