Part 11: v. Formations (by Stelas)
v. Formations (mostly written by Stelas) Stelas decided to contribute to the thread. This is mostly all his work. I’ve added images and any comments from me will be in italics.
 Formation Types
There are seven categories of Formations. The game doesn’t tell you this, of course.
- General Purpose: These have no real weaknesses, but don’t stand out at anything either. Most of these give bonuses versus a specific monster type, but those are only worth using if you’re having trouble with a specific encounter. Others give bonuses to attack arts. They generally tend to increase ATK and DEF, but lower SPD.
- Physical Attack: These are for unions focused around using physical attacks. They generally tend to increase STR and ATK, but lower DEF and SPD. A handful boost MYS.
- Mystic Attack: These are for unions focused around using mystic attacks. They generally tend to increase INT and MYS, but lower ATK and SPD.
- Physical Defense: These are for unions focused around defense against physical attacks. These all lower SPD, but raise DEF, and tend to raise M.DEF
- Mystic Defense: These are for unions focused around defense against mystic attacks. These all lower SPD, but tend to Raise INT, MYS and M.DEF.
- Speed: These are for unions focused around acting first (or close to) in a turn. These tend to increase SPD, ATK, and MYS, but tend to lower DEF and M.DEF.
- Recovery: These are for unions focused on healing and supporting other unions. Gives bonuses to using Herbs, Remedies, and Potions. These tend to increase DEF, M.DEF, but lower SPD.
The FIFTY-EIGHT possible unique formations are divided amongst them. That number does not count formations which are an upgraded variant of previous formations – same shape and positioning, but different stats. Count those and you’re up to 94, but since they are basically identical but with better stats and more obnoxious guide-requiring requirements, 58 is the better number to use.
Stelas – Intro to Formations
So the thing is that using formations is actually pretty easy. The problem is that, like most things in this game, if you want to use them to their full extent you basically need an entire reference guide. Once you get the basic information in your head, though, they're a very useful tool both for grinding and for increasing the power of your troops. Throughout the game, be it from sidequests or from treasure chests, you'll uncover formations which will get added to your list. These will either be basic formations - selectable when you first create a union - or advanced formations, which require a little more fiddling to actually access.
Basic Formations
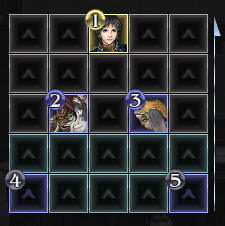
Easy enough. Let's take the Wedge formation (Physical Attack), which has the leader at the top with the other members arranged behind it in a inverted v, like so:
This is listed in the game as:
"Improves attack of lead ranks, but significantly reduces defense and mystic defense of back ranks."
The lead ranks are the top three rows in the 5x5 grid, the back ranks are the lower two rows, as denoted by the different colours.
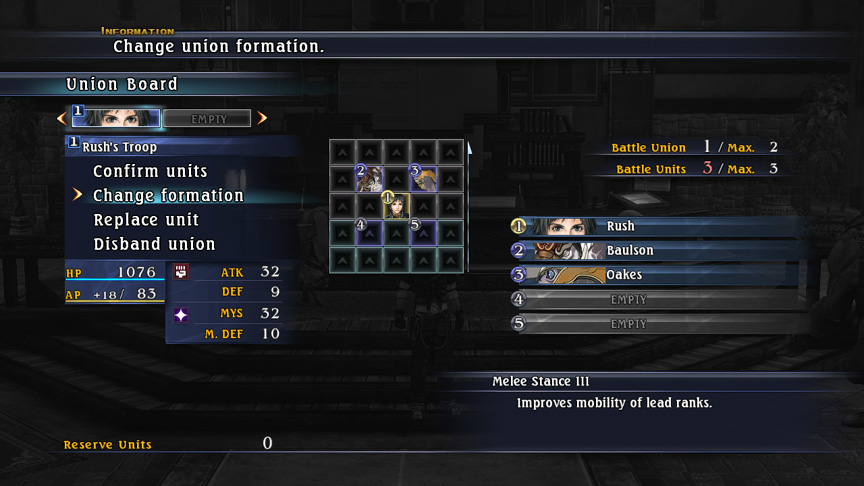
As we can see above, when you make a union, you have 5 spaces in which to put troops. You don't have to fill every box from the top of the union down - the Union leader always has to be in position 1, but Baulson could quite happily go into position 4 or 5 if he wanted to. This will affect what bonuses the troop gets from the formation.
Each position in the formation is subject to a percentage modifier to their stats. In this case, as the description implies, positions 1-3 have their ATK and SPD increased, while positions 4 and 5 suffer massive stat penalties. What it doesn't tell you is that the leader also gets a defence and mystic defence buff, while the middle rank gets a strength boost. To be specific:
Position 1: 102% ATK, 102% SPD, 105% DEF, 105% MDEF
Position 2/3: 102% ATK, 102% SPD, 105% STR
Position 4/5: 30% SPD, 30% DEF, 30% MDEF
Some formations give bonus effects to all its members - Wedge does not. Actually, only three formations out of 94 have no penalties for any member or any position.
The wedge is therefore well suited for a small, fast union, but add a fourth or fifth member and one of them will have to suffer some extremely heavy penalties. Some formations have very skewed stats, and knowing this can be really useful in allowing you to create a tank squad or fast shocktroop.
The penalties for most formations tend to be much, much steeper than any bonuses you get for the ones in better positions. The smallest penalty I’ve seen is 62 percent strength. Bonuses don’t tend to go beyond 130. Since there are no bonuses smaller than 110, I assume that it is not 100% + 110 = 210% bonus, but a total of 110%).
It also becomes nigh-impossible to avoid penalties by not adding a fourth and fifth member because of the union cap.
Higher-Level / Variant Formations
All formations have three levels, and some of them have advanced versions that only trigger under certain conditions. It all depends on which people you put in that formation.
Here's the idea: every character in the game has a series of keywords applied to them. These are invisible, as far as I know, and there's no way to check what keywords someone does or doesn't have. Largely they're pretty obvious - it's usually related to the character's race and gender, not to mention their starting abilities and whether they're a unique character. Rush, for instance, is Special, Male, Mitra, Physical, Mystic, Speed, Recovery, reflecting the fact he can do goddamn anything. A big fat Yama might only have the Male, Yama, Physical tags. Gender-specific tags are quite rare, though I’ve only seen them on a couple formations. That might be because I don’t recall there being any non-mitra females who are unique leaders.
Wedge III requires 3 Physical, 1 Special, and 2 Qsiti tags amongst its members. If you satisfy this you'll get a message saying you've unlocked the variant formation, and all the stat boosts go up to 105%/110%/32% respectively.
Similarly, if you've unlocked the Mattock formation, you need to set up a Wedge formation with 5 Physical, 4 Qsiti, 3 Special, and 1 Not Special. Do that, and you'll unlock Mattock I, which gives 115%/120%/36% and Bludgeon Attack +1 to all members of the union.
Positioning
This is where it gets really fuzzy. There definitely seems to be a correlation between union positioning and how many of its members will get hit by an AOE attack, but it's very hard to pin down for sure. I've definitely seen units that consist of one guy at the front and four at the back tank their way through big attacks because the attack has unexpectedly only hit one member of the union, but this isn't particularly reliable. Generally, the game tends to consider them a shapeless blob in most circumstances.
Specific roles for Formations
Some formations are used for specific things. The Casket formation, for example, makes the leader only 42% as effective at everything, but everyone else gets a boost to STR/INT/SPD, making it more useful if you want to train up a group of people. Comet is the opposite, granting a boost to the leader, and crippling everyone else.
Mystic Seal is a gimmick formation used specifically for training arts. It reduces all attack and speed stats to 0, but boosts DEF and MDEF, so you can train skills without being good at killing things.
Stabbey’s General Thoughts
For the most part in my first time playing, I didn’t really pay any attention to proper formation usage. I picked stuff that had the best stats or attributes listed in the in-game formation guide. This is a perfectly valid way to play. You don’t need to know much more than that.
There are two things that to me, hamper the utility of fiddling with formations too much. The first is that like everything else in the game, the mechanics are obscured and require a guide to fully understand. For instance, I’m using “Hangman’s Noose” for Rush’s union. Nowhere in-game does it say that spaces 4 and 5 have a speed penalty (which doesn’t apply since those spots are empty). Nowhere in-game can you know that you require 5 Speed, 4 Physical, 3 Special, 1 Mitra, 1 Qsiti, 1 Sovani, 1 Yama to get Hangman’s Noose 3. There are 58 basic formations, some of which have other named variants. It’s just way too much to mess around with for such little gain.
The second is that the game will eventually let you field a maximum of 18 units on the field at once – but you can only have a maximum of 5 unions, so your union size at its most spread out will look like 4/4/4/3/3. If the union max was 6, then you could more easily field specialized unions and use positions to fill out only three of the “good” spaces and leave the two “bad” spaces empty. The downside is that your unions would be more fragile.
At this point of the LP, though, we’ll probably end up with unions of 3/3/3, so I can take advantage of placement.