Part 1: The User Interface
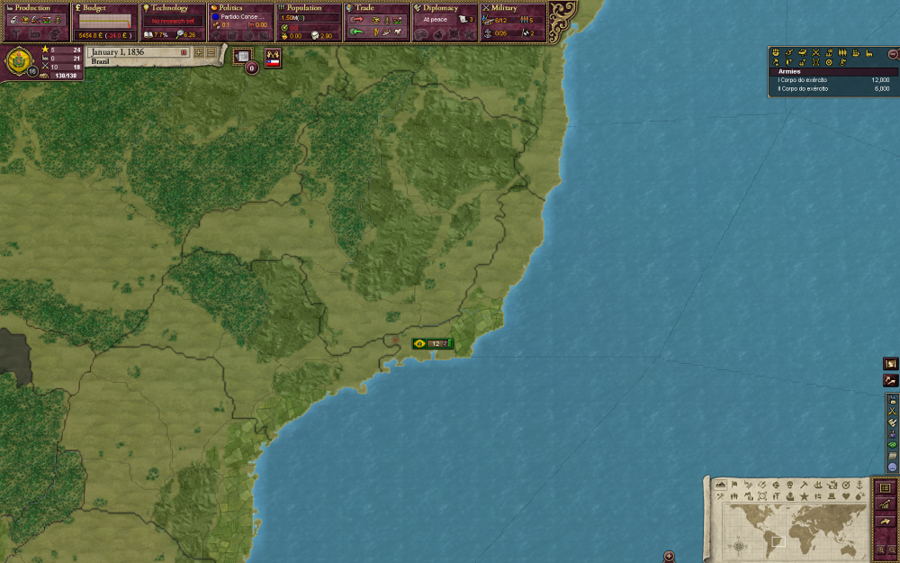
After picking Brazil and starting our game, we're met with the main game screen. We start centered on our capital, where we have a small standing army standing idle. However, before we actually start playing, I want to take a quick look at all of the elements of the UI. And I say quick, but it will probably end up being one or two updates. Just bear with me, and if it doesn't seem like I provide complete detail at first, keep in mind that I will revisit different UI elements as they become relevant during the playthrough. Along the top of the screen is a bar of panels which can each be clicked to reveal the lion's share of information and controls that you'll need to see in order to run and manage your country. This is the first area that we'll take a closer look at.
On the right side of the screen is a semi-opaque panel with a golden border which is called the outlier. The outlier shows other handy information at a glance, such as your armies, navies, buildings and factories under construction, your national foci, and several other things. The outlier can be customized to show or hide whatever you prefer, or hidden completely if you decide you don't need it.
In the bottom corner is the minimap which is topped by buttons to display different mapmodes. The hotkeys for mapmodes are the top two rows of letters on the keyboard. So, the terrain mapmode which we begin in is also the top-left mapmode button: hotkey Q. Political mapmode, where countries are given distinct colors from one another is hotkey W. There are lots of map modes and depending on how you play, you may find some useful that I don't, and vice versa. I'll go through a few more of them later in this update, but feel free to look through the others on your own and determine if they are of use to you. Just above the map in the bottom corner is also a section for alert icons, which I don't actually use, and the battle planner. I don't actually use the battle planner either, but I'll show it off quickly near the end of this update.

Along the top of the screen, there are 8 panels which can be opened by either clicking them, or by pressing F1 through F8: Production, Budget, Technology, Politics, Population, Trade, Diplomacy, and Military. These small panels provide a small, helpful amount of information about your country at a glance. Opening them will display a full screen window which may either simply provide information, or provide you with important options that you'll need to tweak in order to run your country properly. Each one of these screens have a use, and you'll most likely have all of them open at one point or another during your game. Some are used more often than others. For example, you may be able to go through an entire game without opening the Trade panel. Even if you do use it, you may only open it one or two times during a game. The Technology screen, on the other hand, you will pay a visit to each time you successfully research a tech. And there are lots of techs.
Let's take a closer look at the information provided in the 8 primary info panes before moving on. I'll go into more detail on the main windows that these panes open later.
Production
The production pane displays the top 5 goods produced by our nation. You can hover over the icons to see a tooltip with the names and exact amounts, but simply knowing what is most abundant is good information in and of itself. You'll be able to identify the goods by their icons after getting accustomed to them. This production pane shows that Brazil's most produced goods are coffee, fruit, tobacco, cattle, and tropical wood. Below the strip of production icons are 3 greyed, unlit icons. These icons will light up to indicate when you have factories under construction, when your nation has bankrupt factories, and when your nation has unemployed craftsmen. Hovering over those icons will, of course, provide more detailed information. The production mini-pane is useful in showing what your nation's most abundant goods are, which may help you decide what kind of industry would be best for you to build. However, to be honest I haven't found myself paying this pane much attention during my games. The full Production screen which it opens will actually see far more use.
Budget
The budget pane, as well as the screen it opens, are both important and are both worthy of your attention. The histogram line graph gives an indication of how your nation's treasury has changed over the last 2 weeks. If the graph is staying mostly in the middle, that means your treasury is probably relatively stable. If the line is green and mostly hugging the top of the graph, then your treasury is filling up. If it's red and hugging the bottom, then you're bleeding money. The two numbers beneath the graph show your current treasury funds and the change to your treasury in the last day.
Technology
Technology is a big part of this game, and research plays an enormous role in both your military and industrial might, as well as your nation's prestige. This pane gives three extremely important pieces of information, and the window that it opens will be one of the most-visited screens in a normal game. The area which currently says 'No research set' will normally show a progress bar indicating how close you are to finishing research on your chosen technology, and hovering over that bar will give a fairly accurate estimate of when that current research will be complete. The book with the 7.7% next to it shows our nation's average literacy. Literacy is extremely important, and you need to work towards having a high literacy in order to improve your nation's demographics and performance. It isn't out of the question for even the lowest literacy nation to be near 100% by the end of the game, if focus on improvement. The spyglass next to the 6.6 indicates how many research points Brazil generates per day. Each technology costs a set amount of research points to discover. Your daily research point generation goes towards discovering whatever technology you've picked to research until it has finished. If you neglect to pick a technology to research, your nation will store up to one year's worth of research points which will get rapidly pumped into any technology you eventually set to research at a rate of 100 per day until that pool of saved research points is emptied.
Politics
This pane displays the name and political affiliation of the political party which currently runs your nation's Upper House. Partido Conservador is our current party in charge, and the blue dot indicates that it is a conservative party. The boot stomping on a frowny face is how many suppression points that we have. Suppression points are used inside of the main Politics window to break up movements that are troublesome. Movements occur when your populace strongly desires change, but you are unable to give it to them. One example of this might be that you have a liberal populace which desires greater voting rights, but your Upper House is very conservative and won't currently allow you to pass the associated reforms. Another example of what might cause a movement to arise is if you control a large area of unaccepted culture population which is unemployed, angry, and demands liberation. Movements which grow large enough and violent enough can cause armed uprisings to occur, so sometimes it may be a good idea to suppress those movements before it gets to that stage, if you're unable or unwilling to give them what they want. The red flag icon displays how much infamy your nation has. Infamy is gained when trying to justify wars on other nations, and going over 25 infamy will give other nations free reign to attack you and attempt to contain your hostility. The greyed out icons at the bottom will light up to indicate when your upper house is willing to pass a social or political reform, when you have national decisions available which you can enact, if you are currently in the middle of a national election, and whether you have potential or active rebel forces in your country.
Population
The population pane shows, unsurprisingly, your population and current monthly population growth. Population is an extremely important factor to your nation's success in Victoria 2. Good demographics will lead to success, and if you happen to have a high population with good demographics, then you are golden. This pane also shows your current number of national foci. We can see that Brazil has 0 national foci used out of a potential maximum of 2. If you've played Europa Universalis 3, you may recognize the term and think 'Oh, EU3 had those too'. I can't begin to describe how much more important they are than EU3's national focus in this short description. We will make extensive use of them and change them frequently. They are a big part of this game, and it's a good thing that this pane warns us in red text when they aren't all in use. The numbers below the national focus indicate our population's average militancy and consciousness. Militancy indicates how angry our populace is with our regime, or maybe just society in general. Consciousness indicates how cognizant your population is of what's really causing them problems, or what they really want in order to make their lives better. High militancy may lead to armed rebellions. High consciousness may lead to reform. A combination of both may scare an upper house into passing reforms which they would ordinarily refuse to consider.
Trade
The trade pane simply shows your nations top 3 exports and top 3 imports. In this case, it looks like Brazil's top 3 exports are fruit, tropical wood, and cattle while our top 3 imports are grain, fish, and wool. Trade and stockpiling is automatically handled by the AI unless you make changes on the trade window. You can quite easily never look at this pane, never open the trade window, and play a perfectly fine game. I'll be taking a look at the window anyway, and describe how I use it personally either later in this update or in future updates.
Diplomacy
This pane will show who we are at war with, if we are at war. It also shows us how many diplomatic points we have. Currently we have 3. Diplomatic points are spent when doing diplomacy actions with other countries. For example, in the diplomacy window it will cost us 2 diplomatic points to increase relations with another nation, and 1 point to sign military access agreements. Diplomatic points build up over time and cap at 9. The inactive icons at the bottom of the diplomacy pane indicate available colonial actions, the presence of an active crisis (don't worry about crises for now), the potential for us to do sphere of influence related actions, and a warning indicating if we are close to dropping out of great power status. As a great power, you may potentially spend a good deal of time in the diplomacy window managing your attention of your spheres of influence. The same window will generally see much less use in the hands of secondary and lesser powers.
Military
The military pane shows us a few useful pieces of information. First it shows us that our current standing forces consist of 6 regiments out of a maximum of 12. Our naval forces are nonexistent, taking up 0 out of a maximum of 26 naval limits. This doesn't necessarily mean we could have 26 ships, though. A transport or screening vessel may only require 1 naval limit per ship, but larger ships require more. A late game battleship or dreadnought would require 60 or 70 naval limit per ship. The troop icon in the top right of this pane tells us that we can mobilize up to 5 additional regiments. Mobilization is somewhat similar to raising levies in Crusader Kings 2, except gradual instead of instantaneous. Mobilizing will put rifles in the hands of farmers, laborers and craftsmen, spawning them in as reinforcement infantry in various provinces throughout your nation. The final piece of information on this panel is your nation's leadership value. Leadership is a resource built up over time and is used to purchase generals and admirals, which you can assign to lead armies and fleets. By default, the AI is set to automatically spend leadership on recruiting generals and admirals, and to automatically assign leaders to armies that you have created. The military window itself is used primarily for recruitment, and we'll look at it later.
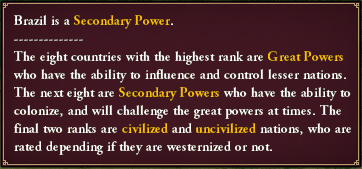
Directly below these 8 main panels, there is a circular flag icon along with rating information on our country. This flag icon can be clicked to open the Diplomacy screen, just like clicking on the diplomacy panel at the top. The only difference in pressing this flag icon is that it automatically opens the diplomacy panel with your nation selected, rather than the last nation you had selected. The numbers next to the flag icon display your current prestige, industry, and military scores along with your ranking compared to other countries. In this screen, we have 5 prestige, 0 industry score, and 10 military score. This actually puts us in 24th place for prestige, 21st place for industry, and 18th place for military, with an overall rating of 16th place among all other world powers. This puts us right about at the bottom of the list of secondary powers. (The top 8 overall scores are considered great powers, the next 8 are secondary powers). Hovering over our rating will say just as much:
Next to the our flag icon and rating information is the date display along with buttons to pause/unpause the game and control game speed. Game speed can also be controlled with Spacebar in singleplayer or Pause/Break in multiplayer to toggle pause, and the numpad +/- keys to increase or decrease game speed. Just to the right of the date panel is the icon for in-game newspapers. The number alerts you to how many unread papers you have. They are an interesting and sometimes humorous way to see in-game news that you might not normally see. And finally, next to the newspaper icon is where icons for diplomatic actions targeted at you appear. This icon is letting us know that Chile is offering us a military alliance.
The Main Game Windows
Production
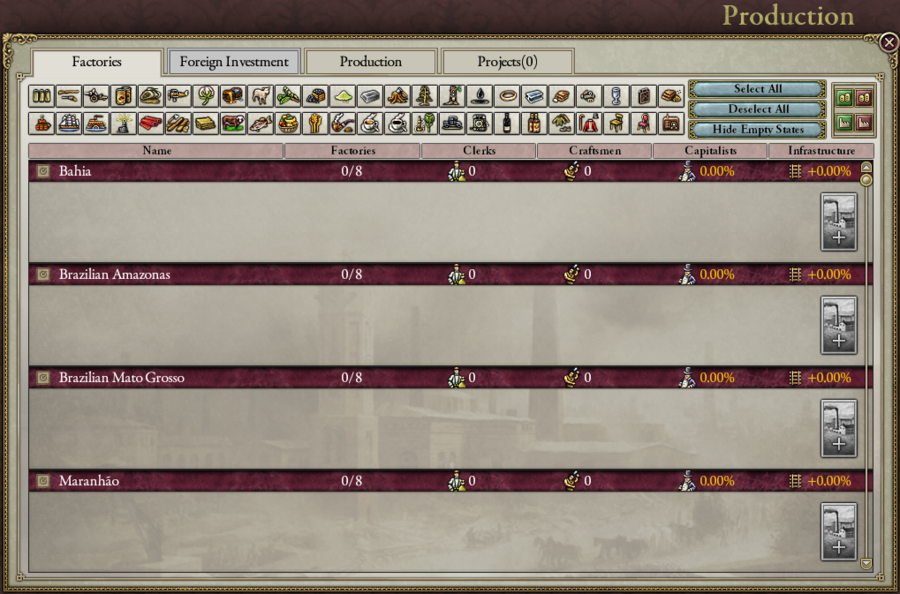
Clicking on the Production pane, or pressing F1 will open the Production window. This window has 4 tabs, and it will always open on the Factories tab. This tab looks a bit intimidating, but it's actually not so bad. All of the icons of different goods at the top allow us to filter displayed factories by a particular good. So for example, clicking 'Deselect All' and then clicking on the first good icon on the top left, ammunition, will show us only a list of states with factories that either produce ammunition (ammunition factories), or use ammunition as an input (small arms factories). This feature can become useful when you have a gigantic empire with dozens of industrialized states, and you are trying to find something specific. If you're a small nation or if you know where you put everything, you may not need to bother.
The list shows each of our states and will display all of the factories present in each state. You can opt to 'Hide Empty States', which means that states with no factories at all will not appear on this list to further clutter it. You can click the headers on the list to sort it by a criteria other than alphabetical by state, such as by number of factories, or the number of unemployed clerks or unemployed craftsmen. Since Brazil starts with no factories, there's little information to be gleaned from this page. If you have a government form that allows it, you can choose which factories you want to build in each state from this screen for yourself. Ours doesn't allow it, so the 'Build Factory' buttons on the far right end of each state's section are all greyed out. We'll revisit this later in the playthrough.
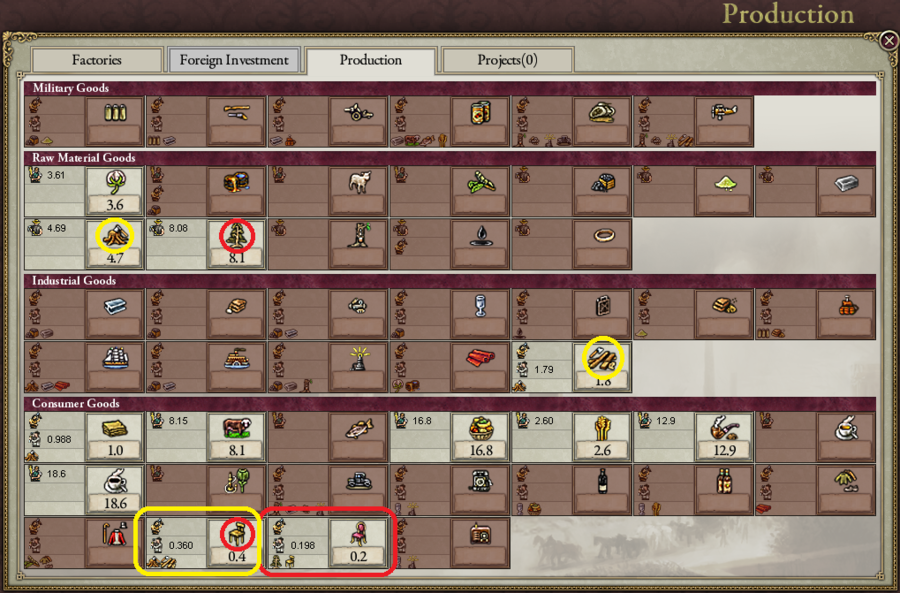
The Production tab of the Production window shows us everything that is produced within our nation. This is purely an informational screen with no options or settings to tweak. Let's take a look at how you might use this to plan ahead.
I've circled Luxury Furniture with a red box. This tab for luxury furniture tells us that we have no luxury furniture production from Craftsmen, and a small amount (0.189) from Artisans. Craftsmen are the demographic of your population which works in factories, and artisans are skilled tradesmen who create things in their own workshops. Below the output number for our artisans, we can see two tiny icons. This is telling us what the inputs are in order to create luxury furniture. In this case, it takes tropical wood plus furniture to create luxury furniture. I've circled the inputs for luxury furniture with small red circles. One is tropical wood, which is a raw material collected by laborers from an RGO (Resource Gathering Operation, similar to a provincial trade good in EU3). The other input to luxury furniture is regular furniture, which is circled in red and in a yellow box. We can see that the inputs for regular furniture are timber, and lumber. I've circled those inputs in yellow. Lumber is a processed good created from timber (again, currently we only have artisans producing this), and timber is simply raw wood collected by laborers.
So what good is all of this information? Well, the important thing is that we have domestic access to all of the things going in to making luxury furniture. This means that later on we can set up chains of factories that complement each other. If we have a highly populated state which contains timber or tropical wood (or even better, both), we can plop down a lumber mill, a furniture factory, and a luxury furniture factory there. Factories located in the same state as one of their required inputs receives efficiency bonuses and can be far more profitable than those which are isolated from their inputs.
Budget
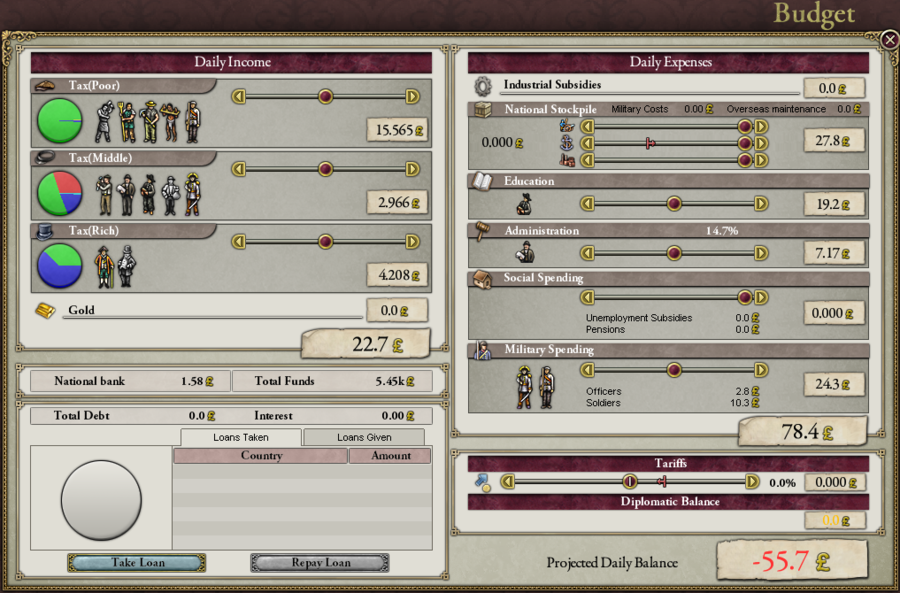
The budget window is where you control your nation's income and expenses. On the left, you can see that you can tax the poor, middle, and rich classes separately. The little icons of people in each tax strata indicates what type of pop is included in that category. The Poor stratum includes craftsmen, farmers, laborers, slaves, and soldiers. The middle contains artisans, bureaucrats, clergy, clerks, and officers. The rich are only aristocrats and capitalists.
The pie chart in each category describes how well the pops in that stratum are providing for their needs. Red means that those pops are getting none of their needs fulfilled, yellow means some, green means all of their living needs are met and they are meeting some everyday needs, blue means all of their everyday needs are met, and teal means that luxury needs are being met. The more fulfilled your population's needs are, the happier they will be. A happier populace can change professions more easily and are less likely to be rebellious or otherwise militant. I'll go over these pops in more detail with the population screen. We can adjust each wealth level's tax rate independently and see how much income that would generate us in a total at the bottom. We can also see that we're getting 0.0 income from Gold. You only receive income from that category if you have a province which has gold as a natural resource - we don't.
On the right side, we see our daily expenses. Industrial subsidies are exactly what they sound like. If we have struggling factories and our government form allows it, we can subsidize them to keep them operating. The stockpile expenses allow you to cut down on purchases necessary for your army, navy, or construction projects. Cutting these categories will reduce your expenses at the cost of leaving your military less prepared to fight, or lengthening the time it takes to gather all the necessary steel, concrete, and other materials needed to construct railroads, forts, and state-constructed factories.
The Education slider determines your funding level for paying the wages of your nation's educators - who are represented in game as clergy. Maxing out education funding will promote the growth of your clergy demographic, improving your research rate and promoting gains in literacy.
The Administration slider likewise controls your payment of wages to bureaucrats. Maxing this slider out will promote the growth of your bureaucrat demographic. Bureaucrats affect the administrative efficiency of your nation. Administrative efficiency does a few things: it affects your nation's crime fighting rate, which in turn removes negative 'criminal organization' traits from provinces, it affects how efficiently you collect tariffs, how efficient your social programs are, and supposedly also affects how quickly your pops can promote into other types of pops.
The Social Spending slider is pretty straightforward. Some of the social policies that you can pass will have costs, and those costs can be controlled with this slider. Since we have none of those policies in effect, we're incurring 0 expenses here even with the slider maxed out.
The Military Spending slider determines how well you pay your soldier and officer pops. Note that this is different from the military stockpiling sliders above. This slider promotes the growth of your soldier and officer demographics. Growing your soldier pops will increase your land force limits, allowing you to field more standing regiments. Cutting spending here will generally result in soldier pops promoting or demoting into other types of pops, reducing your overall forcelimits over time.
Finally, there is a section below expenses for Tariffs and Diplomatic Balance. The Tariff slider allows you to either generate income by setting a positive tariff or incur an expense by setting a negative tariff. A negative tariff will subsidize the purchases of your populace, making it easier for them to purchase goods to satisfy their needs and making it cheaper for our factories to purchase inputs necessary for their operation. A positive tariff will have the opposite effect, but can potentially generate lots of income for the state. Diplomatic Balance comes about from wars. If you defeat another nation in war and include a wargoal in the peace deal which includes reparation payments from them to you, it would be included here. Likewise if you were defeated and you were the one paying, an expense would be displayed here.
Technology
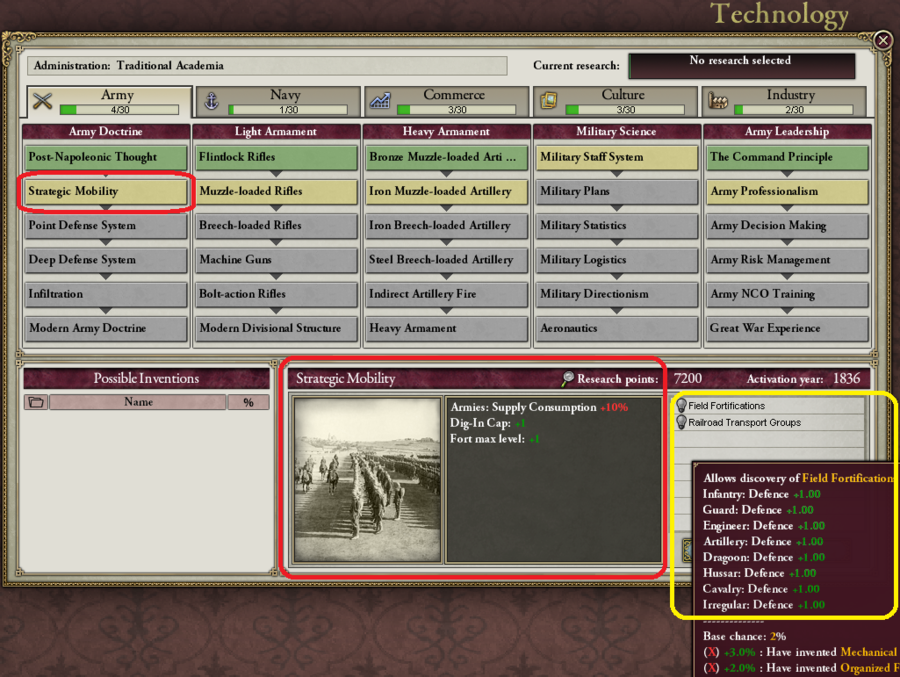
On the technology window, you choose which technology you want to focus your research on next. There are 5 tabs of technologies: Army, Navy, Commerce, Culture, and Industry. Each of these tabs have 5 subcategories of technologies you can research, and you can only research one at a time. Technological advancement is a big part of this game, so we'll come back to this many times. In this screenshot, I have the Strategic Mobility technology selected. It shows us in the bottom center (which I've circled in red) what the effects would be of researching this tech and how many research points it would take to discover this technology. If we complete research of Strategic Mobility, we would immediately gain a bonus to our max fort level and dig in caps. Those are things I'll talk more about when we look at combat. It also causes our standing troops to consume more supplies than they used to. Most technologies that improve your troops also make them more expensive to maintain.
In the yellow box, there is a list of inventions associated with the selected technology. Completing research into Strategic Mobility will allow us to potentially discover these inventions. Inventions are not something that you choose or attempt to research yourself, they are simply bonuses that you have a random chance to discover over time after their associated technology has been researched. In this case, researching Strategic Mobility would give us the chance to discover the Field Fortifications and Railroad Transport Groups inventions. The tooltip shown by hovering over the Field Fortifications invention shows the benefits of discovering it: +1 defense to several unit types. It tells us that we have a 2% base chance to discover this invention per month, and our monthly chance to discover it is increased by meeting other criteria, such as having other specific technologies researched as well.
Politics
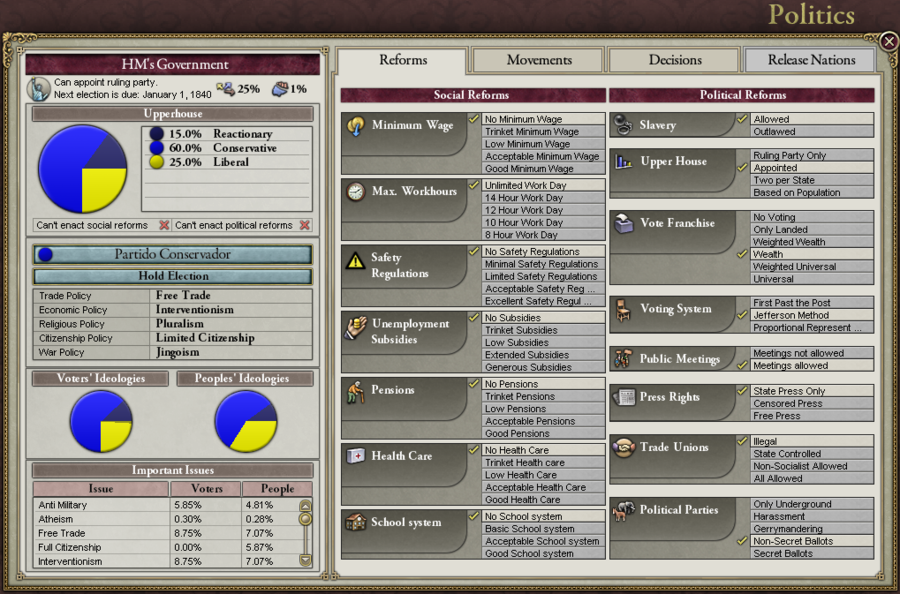
The politics tab is full of information and functionality. I'll be visiting this screen many times throughout the game, so let's just take a quick account of what is on here for now. On the left, we have some basic information about of government. At the top, it tells us that our government form is an 'HM's Government'. This is the most progressive form of monarchy in the game. The other forms of monarchies are Absolute, and Prussian Constitutionalism. Our type of monarchy is decided by our Vote Franchise and Political Parties reforms. Since Brazil begins with strong voting rights, it categorizes us as an HM's Government. There are other government types such as democracies and different types of dictatorships, but in order to swap between the three basic types: Monarchies, Other Dictatorships, and Democracy, you would need to allow your government to collapse under a revolution.
The information about our upper house gives us some insight into how close we are to passing more reforms. With a solidly conservative and reactionary upper house, we are extremely unlikely to have the chance to pass more reforms until either our upper house's composition changes, or our population becomes so violent that the upper house caves in. We have one button which lists our party: Partido Conservador, and another button beneath it which lets us hold an emergency election to attempt putting another party in power. Since we're a monarchy, we can actually just click on the button above Hold Election and choose which party we want in charge of our upper house. The list of policies beneath the Hold Election button tell us what our ruling party's stances are. These stances of our current upper house determine certain limits and capabilities for our nation. For example, the Trade Policy of Free Trade prevents us from setting a tariff higher than 25% and Economic Policy of Interventionism allows us to subsidize our country's factories. The Trade, Economic, and War Policies are generally the most important ones to keep in mind. Religious and Citizenship policies don't play as large of a role in gameplay.
The Ideology information at the bottom tells you what the most important issues are to your population, and whether the issues important to your voting populace match the issues important to your populace at large.
There are 4 tabs which can be viewed on the right. The currently selected one is 'Reforms'. This shows us what our currently selected social and political reforms are. If we have the potential to change a social or political reform, this would be where we do that as well. We can't at the moment, so this is currently just an informational screen. The movements tab will show a list of different groups in our country that have organized to demand social and political reforms, or some other type of change. The movements tab is also where you use your suppression points to scatter organized movements that are becoming too volatile. The Decisions tab contains national decisions that can be enacted by our nation. National Decisions are special case events which you can trigger if you meet their requirements. Some are flavor events which provide cool, unique perks to your specific country, and some are open to all countries on a first come first serve basis, such as building the Panama canal. Finally, the Release Nations tab allows you to divide a section of your country off as a separate nation, though you do retain a high level of influence over them. Our tab is greyed out because Brazil contains no potential nations that it could set free.
Population
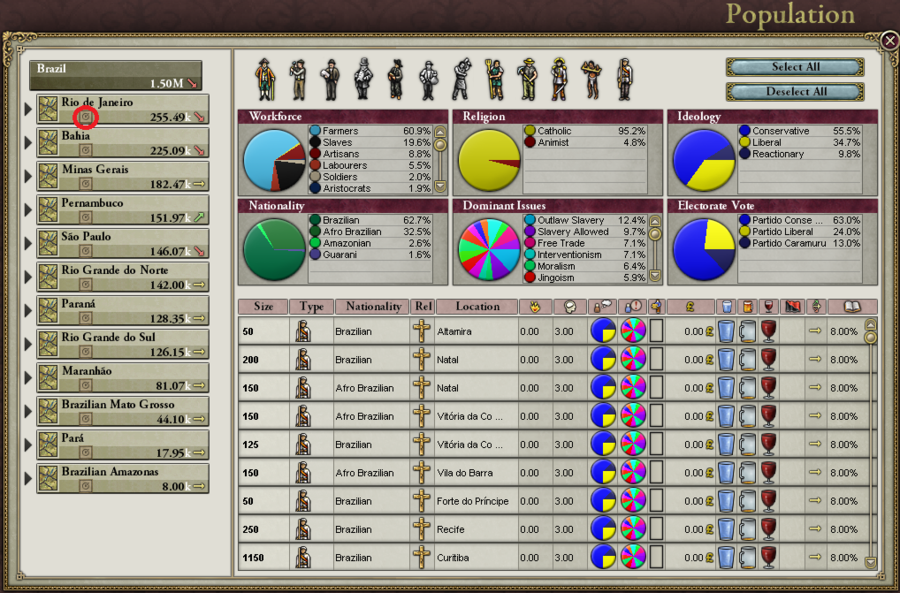
The Population window shows us a list of our states on the left, and demographic information on the right. I drew a small red circle around an icon on the panel for the state of Rio de Janeiro. Clicking on this icon will allow you to set a national focus on that state from this screen. Often times, you'll want to set your national foci to affect your highest population states first, so this is a good screen to manage your national foci from.
You can view demographics country wide, by a single state, or you can even click the triangle just to the left of each state to open a sub-list of provinces in that state to view demographics of a single province. This demographic information shows us everything we could need to know about our population. Each province in our country is populated by people who are split up into 'Pops'. Each pop is a unique grouping of a certain type of citizen. You might have, for example, a group of Catholic Brazilian Farmers, and a group of Protestant German Farmers in the same province. These groups would be 2 separate pops. While they are both farmers and both doing the same job in the same province, they may be affected differently by your nation's policies. A pop which belongs to a culture which isn't accepted by your country is more likely to be upset with your government, for example.
Ultimately though, there are 12 basic types of pops which perform specific jobs within your country. I'll go over each of these pop types now, in the order which their icons appear at the top of the Population window above:
- Aristocrats (Rich): Aristocrats are land or resource owners. Each province has an RGO (resource gathering operation) which produces some type of raw material, and whether that good is mined or farmed the aristocrats of that province benefit from it. Their presence provides a slight bonus to the collection of that material.
- Artisans (Middle): Artisans purchase raw or processed materials with their own money and then turn those into finished goods. They use the money that they make from the sale of their goods to purchase consumer items that fulfill their needs as well as the materials needed to continue their work. Artisans are skilled tradesmen who start to wither away as the game progresses and factories become more efficient, putting many artisans out of business.
- Bureaucrats (Middle): Bureaucrats affect our state's administrative efficiency, which in turn provides beneficial effects to our country. Bureaucrats are paid completely by us with the Administration slider on the budget window.
- Capitalists (Rich): Capitalists share in the profits from factories present in the same state as them. They provide a small bonus to all factories in their state, and if they make enough money from factory profits, they will invest the extra into building projects for new factories or infrastructure.
- Clergy (Middle): Clergy is paid entirely by us with the Education slider on the budget window. Having more clergy in our country (up to 2% of our total population) will provide out country with more research points to put into technological research. Clergy also educates our nation's pops, increasing our literacy gain rate. No matter what country you play, you're going to want to have at least 2% clergy in order to get the full benefit of the research points that they generate. Depending on how low your starting literacy is, you may want more than 2%, though they will only continue to increase literacy gain up to 4% of the total population.
- Clerks (Middle): Much like clergy, having up to 4% of your total country's population as clerks will provide you with extra research points to put towards technological advancement. The main purpose of clerks though is to work in factories alongside craftsmen. Craftsmen make things in factories, and clerks make craftsmen work better. Clerks are a more advanced type of pop, and a pop needs to have at least 50% literacy to turn into a clerk.
- Craftsmen (Poor): Craftsmen will be the lifeblood of your nation's economy later in the game. They work in factories, producing whatever good that factory creates. They aren't picky. If you have a fabric factory go bankrupt and shut down, those newly unemployed craftsmen will walk across the street to the new airplane / fertilizer / wine / machine parts factory and perform just as well. Being a member of the poor stratum means that they are called up when you mobilize for war, however. A prolonged war where you have your population mobilized for a long time can potentially end up with several of your factories sitting derelict and eventually going bankrupt/shuttering. Then, when the war is over and those mobilized craftsmen come home to no jobs, you have an unemployed angry horde that just might revolt.
- Farmers & Laborers (Poor): While they are technically 2 different types of pops, these can generally be thought of as the same. You will never have both farmers and laborers in the same province. The job of farmers and laborers is to work in the province's RGO to collect or generate that province's raw good. You'll have farmers working in RGOs which are farmed, such as grain, and laborers working in provinces where materials are collected, such as coal.
- Officers (Middle): Officers generate a resource called leadership, which is used to 'purchase' new generals and admirals. Having good (and numerous) generals and admirals will inflate your military score, which will in turn raise your nation's overall rank. They are paid completely by the state, with their wages coming from the Military Spending slider on the budget window.
- Slaves (Poor): Slaves perform the same work as farmers and laborers, but are not as efficient. They are not paid. I'm somewhat concerned by the fact that the demographic information above shows that 19.6% of the selected province is slaves, but only 12.4% of the province wants slavery outlawed.
- Soldiers (Poor): Soldier pops have 1 purpose: to be recruited and serve in our standing army. A soldier pop has to be at least 1000 size or larger to support a single regiment. Soldier pops below this size cannot be recruited into a regiment, and soldier pops which fall below 1000 size due to their attached regiment taking too many casualties are in danger of being depleted entirely. Normally, regiments will replenish their losses from the pop that they are attached to, but if a regiment takes so many casualties that it is depleted and it's pop is depleted, the regiment will be lost. Soldiers are paid entirely by the Military Spending slider on the budget window.
Trade
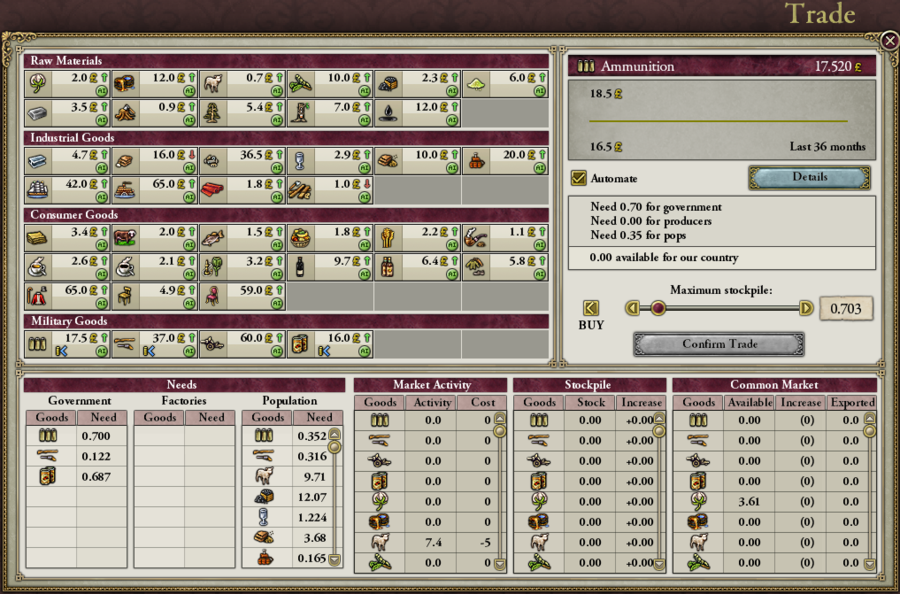
The trade window appears to be a nightmare, but there's really only a couple of things you can do with it. I've said it before, and I'll say it again: you probably don't need to use or even look at this window to have a successful game of Victoria 2. I'll likely use it once or twice during the learning game, so we'll see it more then.
Diplomacy
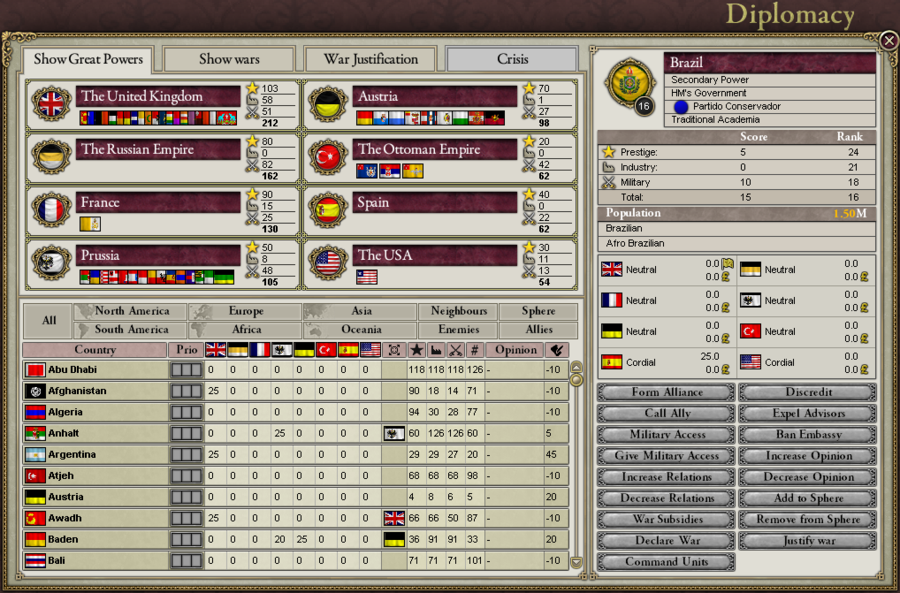
The Diplomacy window allows us to pick any nation in the world from the list at the bottom send them diplomatic offers with the buttons on the right. The 'Show Great Powers' tab of the Diplomacy window will show the current 8 Great Powers in the upper left as well as detailed information about each great power's influence level over lesser nations when selecting a lesser nation. Note that we have ourselves, Brazil selected on the right. It shows us that we have a cordial opinion of Spain and the United States and that Spain has 25 influence with us. 50 influence would allow them to upgrade our opinion of them from cordial to friendly.
If a great power raises your opinion of them to friendly and then builds up an additional 100 influence with you, it will then have the capability of adding you to their sphere of influence or removing you from another nation's sphere. Being in a great power's sphere alters how they interact with your market and vice versa. They essentialy get first dibs on anything that you sell, and you get first dibs on theirs as well. Being in their sphere also means that if you are attacked they can opt to intervene and join the war on your side.
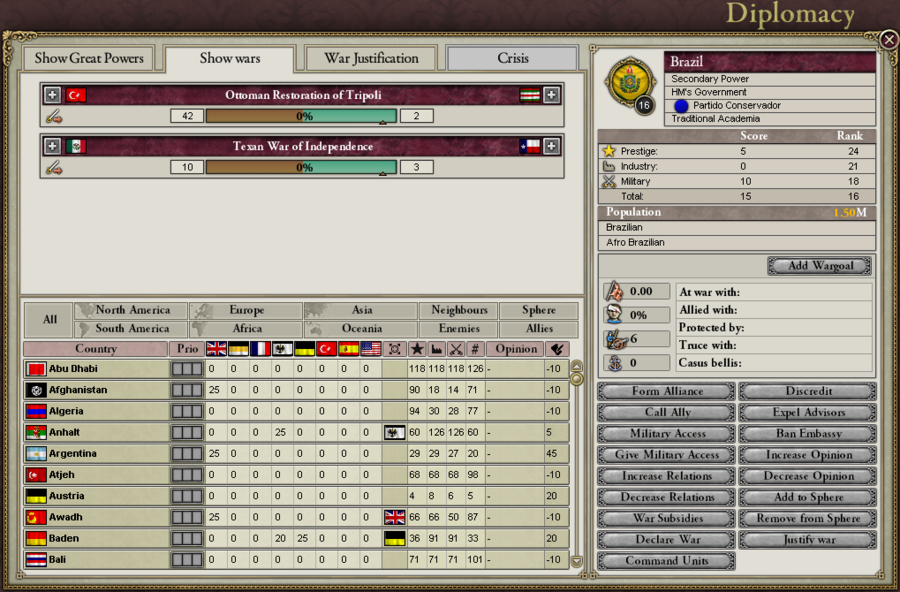
The 'Show Wars' tab does just that, it lets us view the status of every war currently happening around the world and what parties are involved on both sides. There are only two wars in progress at the game's standard start date. Note that we still have ourselves selected, but it shows different information under our nation's info on the right when the 'Great Powers' tab isn't selected. Also note that we can see our nation's primary (Brazilian) and accepted (Afro Brazilian) cultures on this screen.
Military
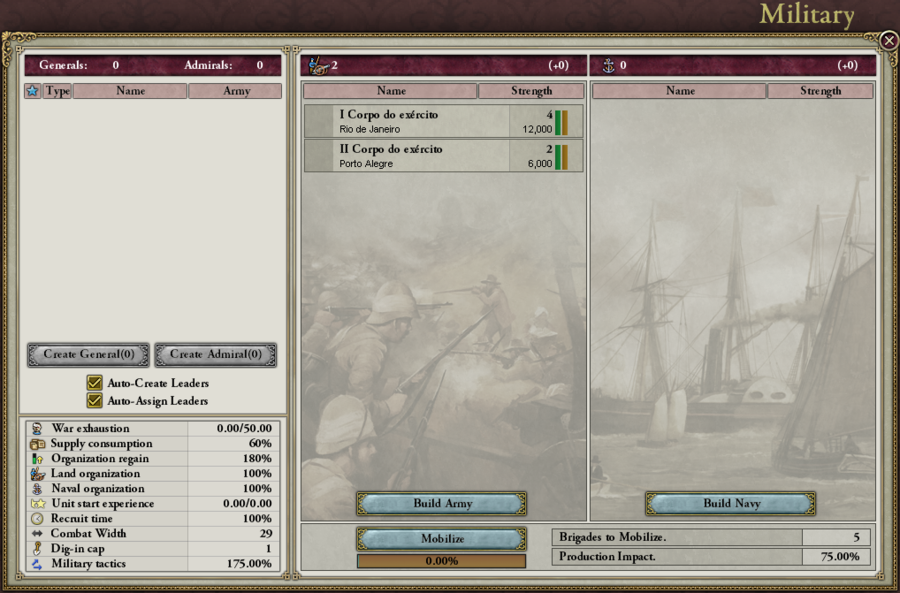
The military screen displays the net effect of all of your researched military technologies in the bottom left, and has an area in the top left for the recruitment and management of your nation's generals. Maybe this makes me a ~bad player~, but I tend to just leave Auto-Create and Auto-Assign on for generals and not bother with that section of the window. The game seems to be reasonably good at switching in better generals to your active armies as they are acquired. The main use I get out of this screen is Army and Navy recruitment, as well as the occasional mobilization.
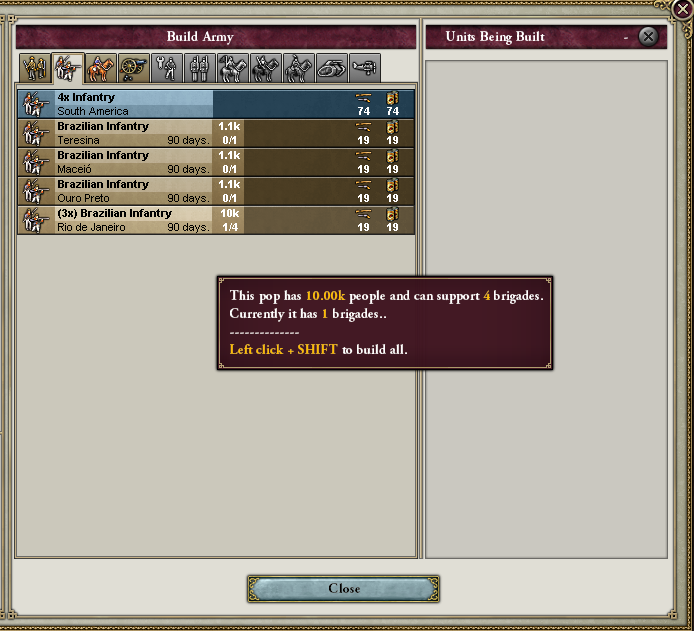
Clicking on 'Build Army' will replace the right side of the military window with this recruitment screen. You can select which regiment type you want to recruit by using the row at the top, and then choose which specific soldier pop you want to recruit that regiment from. Notice that you can see the size of each soldier pop. Out of the 4 available places we have to recruit from, 3 of them only have a 1.1k size soldier pop that can support 1 unit each. Remember what I said about soldiers and replenishing losses: those 1.1k soldier pops will deplete really quickly once their attached regiments start taking real losses. The soldier pop in Rio on the other hand is huge and can support several regiments. These are the best kind of soldier pops to recruit regiments from. They are big and resilient, and even if they take a beating and that soldier pop suffers heavy losses, it's from such a high population area that it can be replenished quickly with a national focus set to promote soldiers there.
Other UI Elements
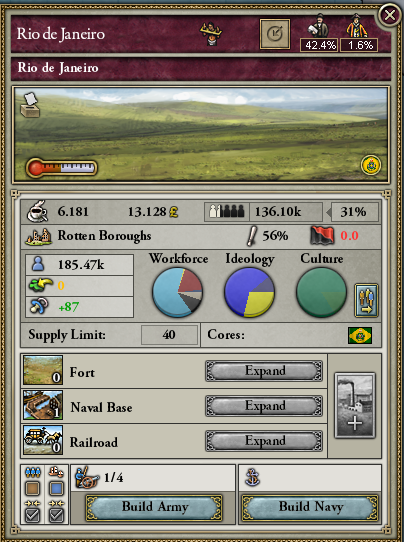
Selecting any province on the map will open the province window in the lower left. This is the province window for our capital province, Rio de Janeiro. It actually mentions Rio twice on this panel, and that's because Rio is both a State (a collection or grouping of provinces), and the name of a single province. The icon of the shackled man to the right of the state's name indicates that this is a slave state. The icon with the arrow pointing at a circle is where you click to choose a national focus to set here. The bureaucrat and aristocrat icons in the upper right display the state's administrative efficiency, and the percentage of aristocrats present (not sure why that was important enough to display).
Below the state and province names, there is a rectangular window with a picture showing the most prominent type of terrain present in this province. You can hover over the picture to see the combat modifiers you would receive from fighting on this terrain. The icon in the upper left of the terrain picture with the paper going into a box can be hovered over to see a report on what the voter's party loyalty is like. That is, it'll show if they are more supportive of liberals, conservatives, socialists, or if they are simply neutral. The thermometer indicates the province's Life Rating. Every province has a life rating, and most provinces are either 35 or 40. This life rating determines essentially how easy it is to live there, and what the base population growth is like. Many of the still colonizable provinces in Africa have very low life ratings, and you need to discover technologies that lower you minimum acceptable life rating to allow survival there before establishing major colonies. The circular flag icon in the lower right of the terrain picture indicates what country is in control of this province. Essentially, if you are at war and this province is occupied by an attacker, it will show who it is here.
The first row below the terrain is information about the province's RGO. In the case of Rio, our RGO is coffee, and yesterday the RGO produces 6.181 units of coffee which were sold for 13.128 pounds. Just to the right of that, we can see that the RGO has 136.1k workers employed in it, probably a combination of farmers and slaves. The RGO is only 31% full, so it has plenty of room for growth.
The next row shows us that there is a criminal activity at work in Rio - Rotten Boroughs. This impacts vote results. Criminal activities have a chance to be exterminated by our crime fighting rate, and we can see on this same row that our crime fighting rate is 56%. We'll probably lose the rotten boroughs modifier relatively quickly. The black and red flag tells us what our chance is of seeing an armed rebellion rise up here: 0.0% - I'm not complaining.
Next, we have some population and demographic data. The province of Rio's population is 185.47k. Considering that our entire nation's population is 1.5 million, that's pretty huge. The green chunk with the yellow arrow slamming into it represents immigrations or emigration, depending on if the number is green or red. In this case, we haven't seen any recent changes due to any kind of migration. The pacifier with the +87 tells us that we've had a population growth of +87 in the last month. The workforce, ideology, and culture pie charts are the same sort of thing we can see on the population window. You can hover over the sections of the pie chart to see exactly what they stand for and what percent they are. We can also see the provinces supply limit (40, which means we can have up to 40,000 troops standing here without suffering attrition), and which countries have cores on this province (only Brazil, in this case). If you aren't familiar with the concept of cores, it represents a rightful case for ownership of that province by one or more nations due to historical ownership, shared culture, or some other reason. For example, there is no Poland on the map at the start date, but there are many provinces with Polish cores, so there is the potential for a country of Poland to come into existence.
The buttons on the bottom half allow us to do things such as construct forts, naval bases, or railroad infrastructure, construct factories (if our economic policy allows it), recruit army regiments, or begin construction of ships. I generally do military construction from the military window though, and not by clicking on individual provinces. The cluster of checkboxes in the lower left allow you to set a province as a rally point for armies or navies and to allow or disallow the merging of arriving units into a single army or navy.
The red box is around the province of Rio de Janeiro. I just wanted to point out again that more than 10% of our total population is in this single province.

This is the army that starts on our capital, and the window that appears when you select an army. This window shows you the army's name, leader, and size. It also displays each regiment in the army, and that regiment's status. All of the regiments in our first army are full and supported by pops that can support at least one unit. If the pops are undermanned, the soldier pop icon becomes yellow or red. The green and brown bars are the regiment's strength and organization, respectively. Strength indicates how full that regiment is, and organization reflects the effectiveness with which that regiment is fighting. Regiments lose organization as they fight, and regain it outside of combat over time. Regiments with low organization will fight poorly, so it is best to keep them out of major engagements until their organization has a chance to recover.
Another important thing to note is the binocular icon, and the small fort wall icon to its right. They both say 0% right now. Those represent this army's level of reconnaissance and siege. If we want this army to be an effective unit at capturing territories, we'll need to rearrange it to at least add some recon. We'll go into more detail about that later.
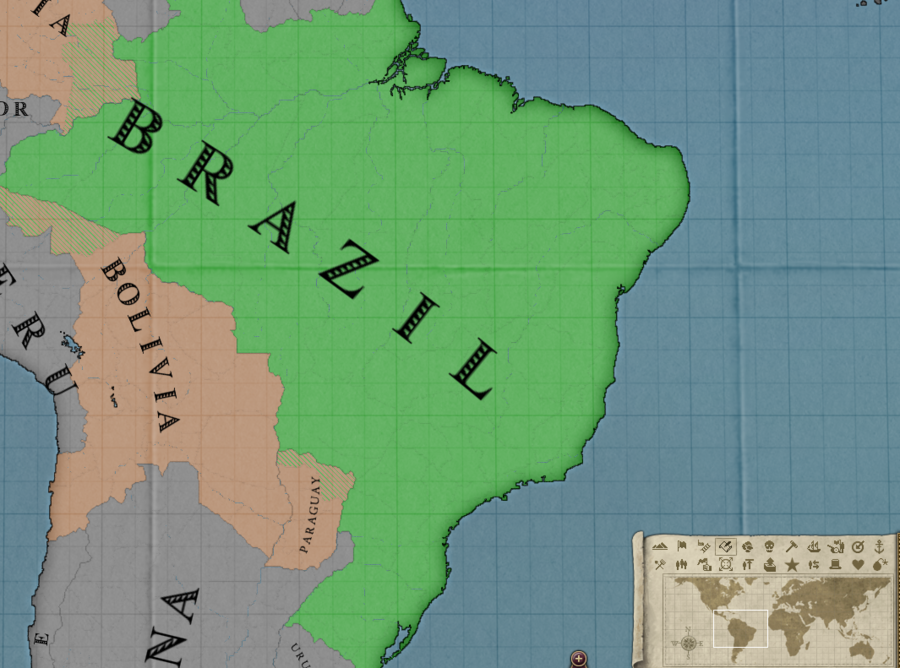
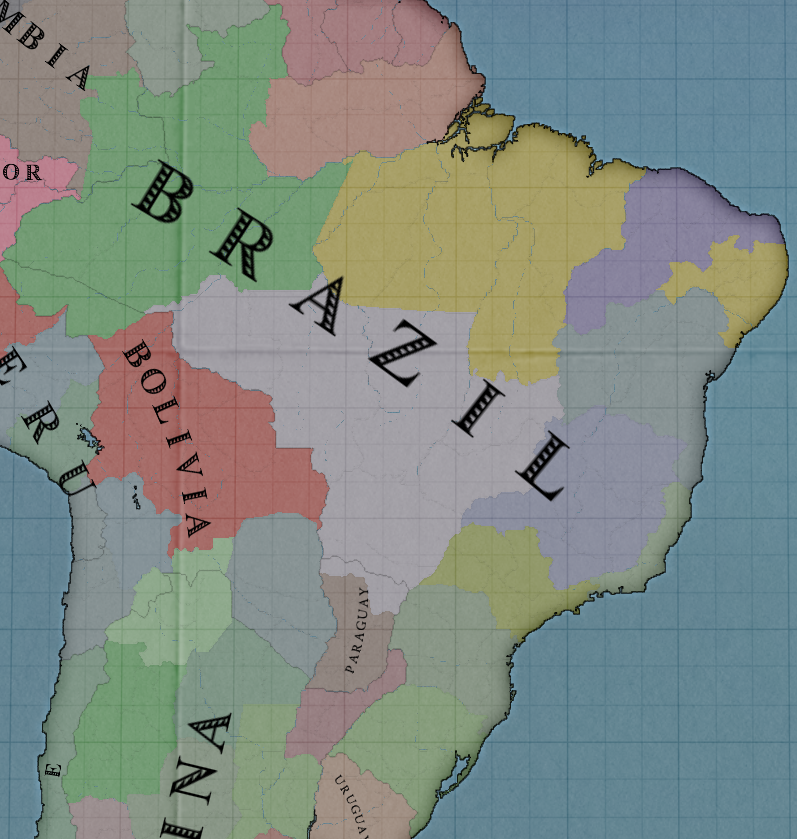
The minimap in the bottom right lets us view different mapmodes. I think I'd be safe in guessing that most people play in political map mode, where each nation has a distinct color to make their territory stand out against their neighbors. There are other useful and interesting map modes, though. This one is diplomatic map mode. This shows us ourselves in green, and nations which we have casus belli (just cause to declare war) against in orange. The striped green bands indicate provinces which have Brazilian cores, but aren't under our control. They just happen to be in the nations which we have CBs on, and that is in fact why we do have CBs on those nations.
This is State map mode. In Victoria 2, provinces are grouped into states. CK2 players may be quick to liken this to counties being parts of duchies, but it's slightly different than that. While each province has its own RGO and its own unique demographics, there are many things that are handled solely on a state level. For example, when you set a national focus, you set it on a state. Every province in that state receives the benefit of that national focus. When one nation justifies a war against another nation to take territory from them, it is generally to take an entire state, not a single province. When you build factories in a state, I don't think they exist in an individual province - they are just 'somewhere' in that state. This means that if a steel factory takes coal and iron to make steel, you can build it in a state where one province has coal and another province has iron, and that factory will get double the bonus for being near two appropriate inputs. Areas are also colonized on a state level. If you successfully colonize an empty area, you will colonize every province in that empty state at once.
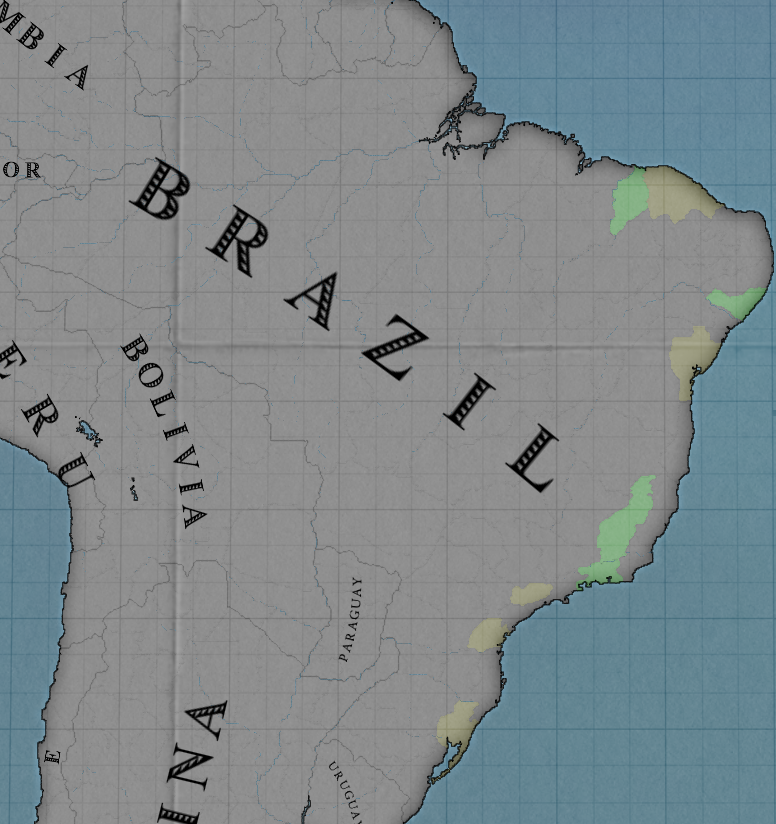
This is recruitment map mode. This map mode shows us where we can potentially recruit from in green, and provinces from which we already have standing units from at capacity in yellow. I think this map mode gives a good idea of how concentrated Brazil's starting populations are along the coast.
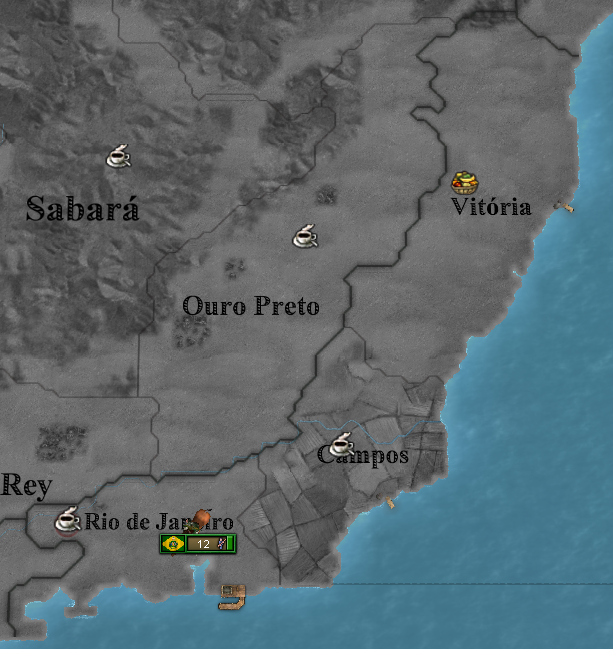
This is the RGO mapmode. We can see the three provinces in the state of Rio here with the slightly darker black border outlining all 3 of them: Rio, Campos, and Vitoria. We can also see at a glance what the RGO is in each of these provinces. Rio and Campos each have coffee, and Vitoria has fruit.
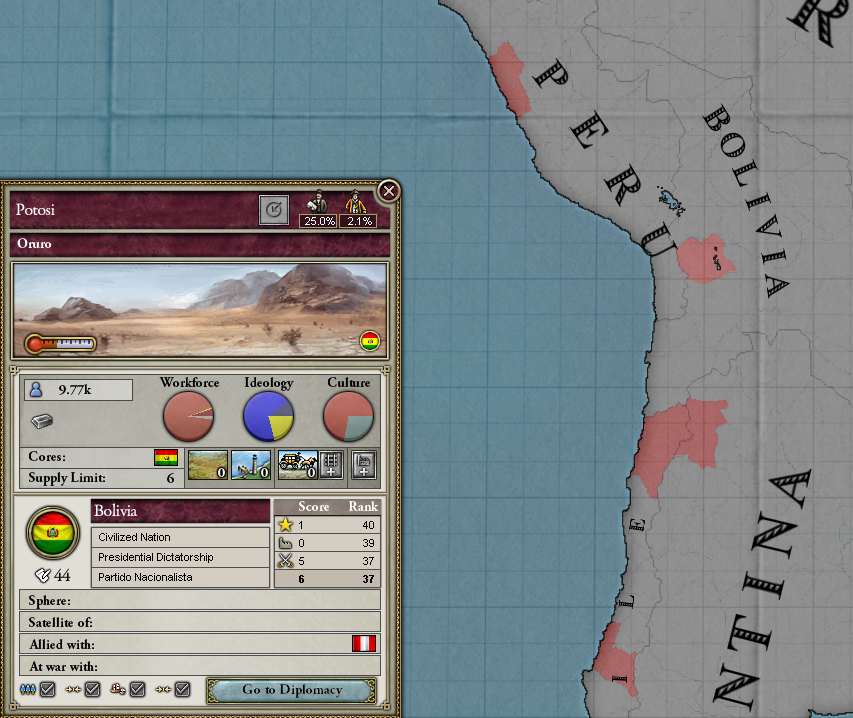
RGO mapmode can be pretty helpful for finding resources that you need. We have no iron, coal, or sulfur, so let's look around at nearby sources. I find a province with an iron RGO in Bolivia and select it. This lights up every other province on the map with iron as well. There's none in our country, and very little in South America at all. It looks like most of it is concentrated on the west coast in Chile, Bolivia, and Peru.
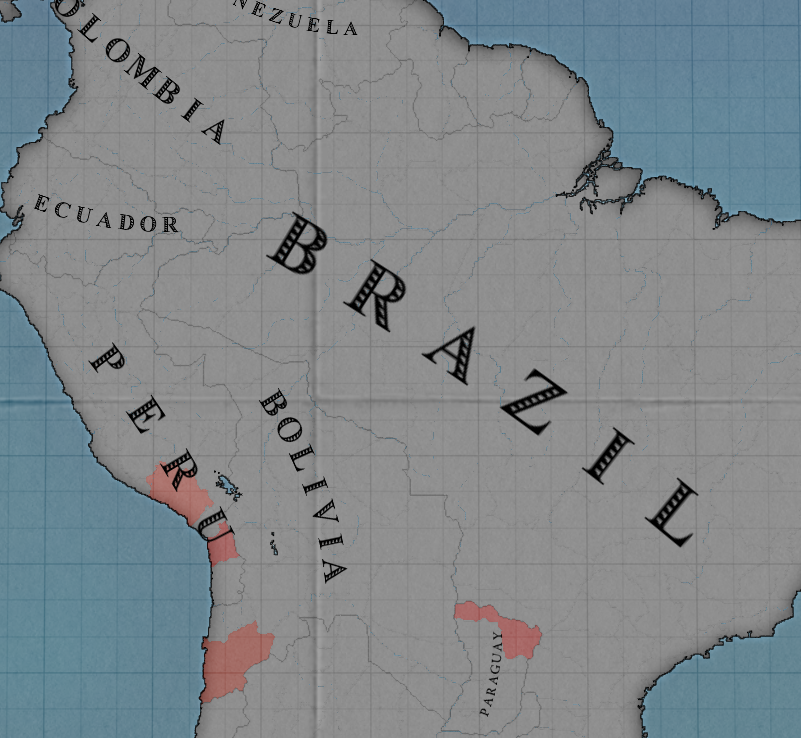
I check for sulfur, too. Sulfur is needed to make ammunition. It looks like once again, it is mostly concentrated on the west coast, but there is one province in Paraguay which has a sulfur RGO. This also happens to be the province in Paraguay that has a Brazilian core, so that's good.
Okay! I always underestimate how much is going to go into a single update, so I'm going to cut off here for now. The next update will start off with actual gameplay.