How and when to use
DScaler
by Kung-Fu Jesus
DScaler
is a program that can capture video from a TV tuner to any lossy or
lossless video format you care to install. Strictly speaking, it
is not as good as VirtualDub, and you should use that whenever
possible. There are only a couple reasons to use DScaler.
1)
You have a Hauppauge! card with a hardware MPEG2 encoder
Hauppauge
cards encode to their own special MPEG2 format. VirtualDub will dump
an AVI file for you no problem, but the video fourCC is HCW2 and no
codec I have been able to find, including generic MPEG2 decoders,
have been able to understand it. DScaler can still record from these
cards! I don't know the details, but it works.
2) You want
full-screen video so you can play your game and record at the same
time
VDub gives you the option to stretch the capture window
to the window size, but there's still that sidebar and the window
border and taskbar. Sort of a silly reason but if you aren't
UStreaming it, why watch it in anything less that full screen? You
can also watch it in an arbitrarily-sized window using DScaler.
3)
Catch-all reason: Vdub just doesn't work
Nothing much to say
about this other than I don't know why this would be the case.
DScaler is another option you have.
Now that we have those out
of the way, let me warn you that DScaler is a finnicky program! It is
old and has not seen active development in years. The interface was
designed by programmers and some functions simply don't work. All the
important things usually work, like viewing and recording.
Getting
DScaler to work for you
1)
Download the latest version
The latest version is DScaler
4.1.17. It adds the option to use a Direct3D surface instead
of an overlay if you would like to UStream it or something.
2)
Open it up and choose your capture card

Choose
your capture card from the Sources menu

And
choose SVideo from this menu, or Composite if you're
using that. I don't know why there's two of them there, but the first
one works for me. Just choose one until you get picture.
Once
you've done that and you can see picture, go back to the Sources
menu and choose Define as initial source to save your
settings. If you don't do that, you'll have to reselect all that crap
each time.
3) Choose a deinterlace setting with negligible
input lag

The
default method is TomsMoComp which is a good deinterlacer... if
you're watching TV or a movie. For playing a game, you want either
one of the Even/Odd Scanlines Only. What also works is any of
the pulldown methods on the left side, but those don't save for some
reason and you have to reselect them every time you open
DScaler.
Note that the deinterlace setting only affects
what you see on the screen. When you record, it will be
interlaced video that is sent to the encoder.
4) Set up
recording options
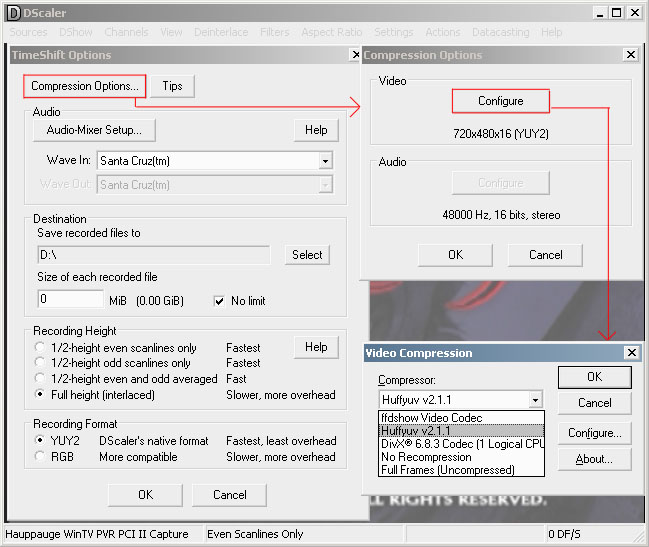
First
off, choose Full Height (interlaced) under Frame Height!
Very important because otherwise you will get a squashed
video.
Compression options lets you choose your video codec.
You have basically two options here. If you're doing a long, live LP
such as Sonic '06 or Kingdom Hearts II, or you don't have a whole lot
of disk space, you can choose a lossy codec. This is going to be
either DivX or Xvid (ffdshow codec). If you're going to be editing
your video and doing nifty post processing, you can still use a lossy
codec and just use a really high bitrate, but a better choice is a
lossless codec. This is going to be either Uncompressed or Huffyuv. I
don't want to get into how to encode your videos too much because
that's another can of worms, but I will give some general
guidelines.
- Huffyuv is awesome for lossless video. It
encodes at realtime speed even on mediocre machines and significantly
reduces hard drive use over uncompressed video. It also works best
with YUY colorspace input which is also what DScaler works best
with.
- Lossless codecs make big files no matter what. I have a
9gb file here that's only 22 minutes long.
- If using a lossy
codec, make sure to tell it to use 1-pass encoding!
- If
you're editing and reencoding your video, but you don't have the
space for lossless, use DivX or Xvid but give it a very high bitrate.
DivX allows a max bitrate of 4,000kbps or so and I don't know if
there's an upper limit on Xvid. For reference, Huffyuv encodes at
about 50,000-60,000kbps and lossless at about 130,000kbps. XYBER
HUGE!
- If this is a one-shot, choose a bitrate around
1,000-1,500kbps and enable the codec's built-in deinterlacer. It may
suck and leave some combing artifacts, but it's a whole lot better
than nothing.
Uncompressed
video, interlaced
DivX,
1000kpps, 1-pass, deinterlace source in the Video tab.
It
looks a lot better in motion and DivX even has the ability to crop
video and do all this at realtime speed on my aging amd64
3400+.
Some notes on audio
- I do not have
experience with running audio through my Tuner card. I have a female
RCA -> Stereo Mini plug adapter that I plug into the Line-In on my
sound card. Then I tell DScaler to use my sound card as the audio
device and in the settings for my sound card I tell it to record from
Line-In. For a live LP, either use Stereo Mix/What U Hear and then
use the sound card mixer (set Microphone way high and Line-In way
low), or use Virtual Audio Cable (costs money but it rocks and
there's a guide somewhere around here).
- There's no way that I
know of to get DScaler to compress the audio on the fly. Take your
video into VDub, choose Direct Stream Copy in the Video
menu, and Full Processing Mode in the Audio menu. Then
choose Compression... from the Audio menu and your codec.
There's VDub guides out there to help you with this including a video
I made that sort of picks up where this guide left off.