Part 10: Spelunking- It's Fun to Say

Before we go on to the caverns, we've still got some unfinished business to take care of. We've picked up a few more levels and some more arm strength, as well as a new tier of weapons, so it's time to try out this optional boss encounter again.

The trick with this one is to be able to do enough damage to break out of the circle. These guys can still pound away more than half of your life on a hit, but when you're facing them one on one it's a lot more manageable. They're also slow, so you can play hit and run with them. Once the first one goes down, it's just a matter of time before you can get the rest.

Our prize, along with some hardening potion. The Shield of Darkness isn't strictly speaking an upgrade, but it will be situationally useful later on. Very much so, actually.

With that accomplished we can go on to explore our new tile set,w which comes complete with one locked door and two that can be explored.

A few steps down the first corridor we can find our first new enemy, the Skeleton Warrior. He's kind of a bigger, stronger version of the Water Demon we've faced down already… although unlike them he's quite happy to get up and walk around given a bit of time, whether or not you're nearby. There's a mobile one to our left, and a temporarily defeated one to our right.
 "And that's for all of you who don't have the sense to stay dead when you're killed!"
Passing by them leads us into a larger open area, which includes our first pit trap of the area. It's actually just in front of us, where that little rock that looks like it might reasonably be a variation of the floor is at. On the other side we get some Gold Bars, so that's also a thing.

Nearby we've also got out first breakable wall. They're actually a bit easier to see on this floor, but the illusionary walls are a bit different. We'll cover those when they come into play. There's a Falchion on the other side, as well as some H. Potion nearby.

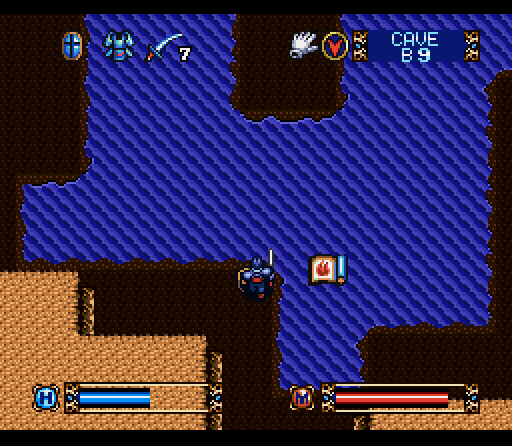
The Cave also has our first water obstacles, which are generally traversed by hopping over rocks. We've also got our first Bats, which are annoying little flitters that will wander around until they find you at which point they'll begin flying back and forth over your head and causing damage with each pass.
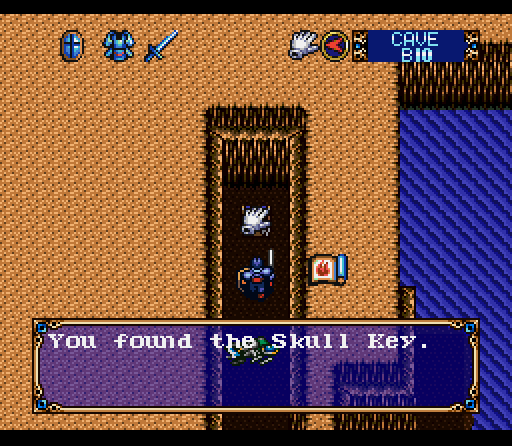
More importantly, the key we've been looking for is nearby. Now I'm SURE they've used the Skull Key before, but I suppose if you're going to make a game that requires more than 50 named keys you'll have to do some recycling at some point.

Just past the locked door we come to our first shop in the cave, which is a wonderful place to dump some loot.
 "Hey pops, what's shaking? I gotta wheelbarrow load of crap here so we've got time to talk while you sort it all out."
 "There's a monster lair around here. And in the den, there's a spring so wonderful you'd never think to find it there." "So…somehow more unexpected than any of the other springs around here?"
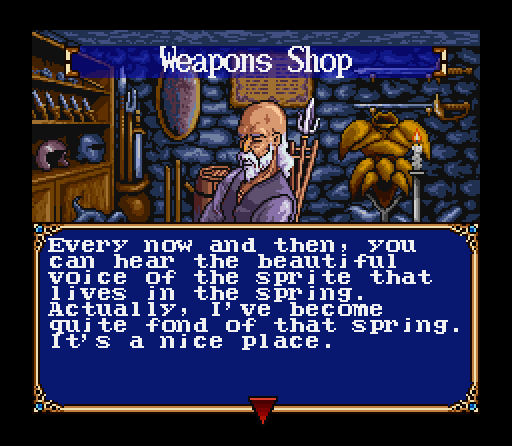 "Why do I have a feeling you're working your way up to something…3…2..1…" "But the monsters don't seem to like it very much and so they're trying to get rid of the sprite. A most uncivilized lot, these monsters." "How unspeakably rude! I shall give them a sound thrashing forthwith!"
This is sooner than you'd think, since the spring he was talking about is quite literally right next door. The sprite is situated pretty much smack in the center.
 "Thanks? It's nice to be appreciated, I guess."
 "First the old man and now you? You're lucky that you're cute and that I'm already going to be passing by that way."
 "If the spring runs dry, we won't survive. I was lost in thought on that very subject when you first arrived." "And then you realized you knew a sucker when you saw one?"
 "Please take pity upon us and accept this task I ask of you." "Fine, fine, I'm going. Now which way is up?"
Our exit is across the water, but there's some treasure to be scrounged. The Sword of Darkness is another item to save for later, but there are also some Gold Bars squirreled away nearby.

After far too much rock hopping we finally reach the exit… although we'll be coming back through it soon enough.
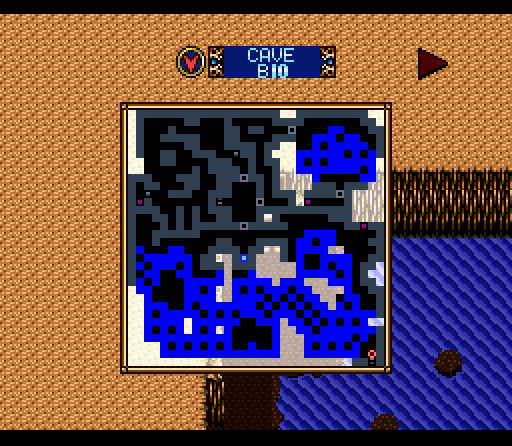
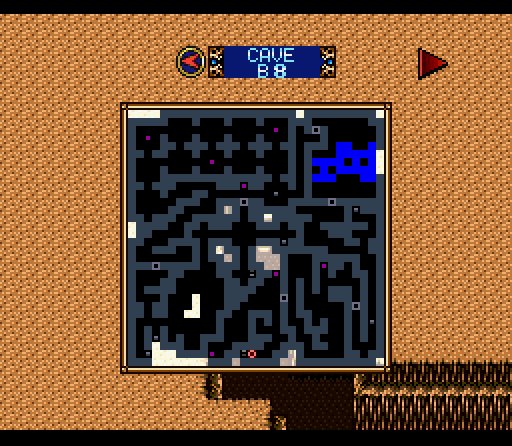
Completing the map on this floor is pretty much an impossibility, as irritating as that is to the soul of a completionist. You can get a general shape of it based on where we could walk amongst the water, but that's all that can be done.

The next floor up is pretty linear at first, with a few larger rooms like this to hold some enemies.

Luckily the enemy was kind enough not to take the sign down that marks the Flood Gate.
"I know I said I was going to listen to signs from now on, but a man's gotta do what a man's gotta do."
We've seen these guys before, and there's no shortage of room to maneuver. Killing both results in one of them dropping the Green Key to unlock that small room in the back. There's a switch inside that opens the flood gates… which has its own problems.
 "See… this is what happens when you don't listen to signs."
This actually looks worse than it is. Although this looks far too wide to jump across, it's actually just fine. I suspect it's a matter of that being really two spaces wide, but with these water being thin strips of land it actually looks much wider than it is. Now that we're done, it's time for some backtracking.
 "I'd make a suggestion, but you're kind of watery and inhuman, even for my admittedly low standards." "I will repay this favor in the near future, I swear it. I will ask the gods to protect you on your…" "Don't sweat it too much, really. Anytime would be fine." "I almost forgot! There's something I must tell you. I'm glad I remembered." "If you're going to keep dancing around the point, you're going to forget it again before you actually tell me."
 "You've probably already found it, but in the room with the spring on the floor just above, there is a hidden room. You've probably already found it, but in the room with the spring on the floor just above, there is a hidden room. If you hit the switch there, you will be able to cross over the spring. " "Sounds like I've already found it, but thanks for the thought."
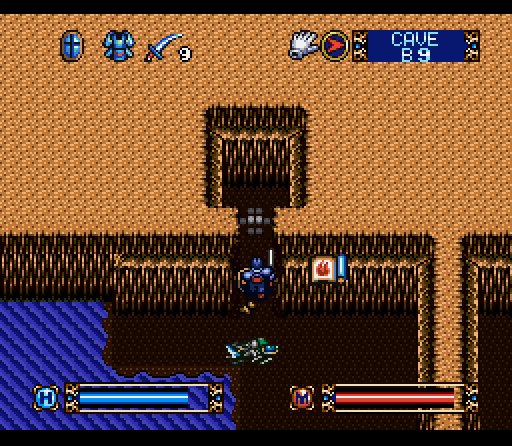
It sounds like she's talking about the switch we've already found, but there's actually a nearby breakable wall that appears to be the actual secret. It's just very poorly worded. This switch brings up some rocks to let us hop across the water you can see to our left and progress, picking up a nearby Saber for our troubles.

Our next stop on this floor is one of the more annoying dick moves in this part of the game, the Room of Wander. There's actually a couple of these, but this is the only one that's marked as such.

It works like this. Here I am facing east, just inside the room.

Take a step forward, and now I'm in the same square I was in, but facing north. The game screws with your perception and spins you around at various spots within the maze. If you don't pay very close attention to your direction and surroundings you can spend a lot of time in here… which isn't exactly unrewarding, as there's some more Gold Bars and H. Potion stowed away in the maze.

To get out, though, we first need to find three switches tucked away in alcoves around the room. Made much more complicated by the changing perspective and the fact that a lot of the room looks the same. You might think you're finding a whole new switch only to find that you're back at square one.
Past the Room of Wander is another subterranean lake, with some land that we can't quite get to yet. This section of the game is a lot more three dimensional than others, and each floor tends to have multiple entrances and exits from both above and below. We've pretty much covered the floor below, so the second entrance here must be above us.

We'll get a chance to look for it pretty soon, since we're right here at the stairs. Just off to our right you can see a door, which is closed from this sound. Suggests that the way down from above is going to be one way.

Nearly complete map, although you can see that the area we can't reach is actually fairly substantial. The Room of Wander is in the northwest corner, to give you an idea of just how big it is.

Coming upstairs we've got a couple of breakable walls right off the bat, with a door we'll leave until later. One of the breakable walls has a switch that opens a door behind the other breakable wall, letting us move on to the rest of the floor… with a quick detour.

It's a bit hard to see based on color, but there's actually a huge freakin' pit directly in front of us.
"Well, I guess there's only one reasonable course of action to take from here…"
Ta-da! Back on B9 in that square of land we could see from the shore. The big fuss for this whole thing is a single Ring of Life, which will be nice when I at some point put it in my main inventory. There's also some Hardening Potion tucked away in a single space wide tunnel off to the side.

Our closed door is closed no longer! Floor complete! Muahahahaha!

Er… excuse me. At any rate, continuing on past the pit we get a handy Yellow Key. Evidently they've decided to just go with colors and bones for key names. This one actually unlocks a door right behind us, which is the closed door we ran into at the beginning of the floor. A lot of keys, switches, and other doodads just create shortcuts to make moving back and forth easier.

Just off to the right we have an entrance into a small teleport maze, with a slight twist. Each entrance and exit of the various rooms is linked to another, meaning that you can actually navigate this one with a bit of trial and error and memorization. There's a couple of enemies wandering around inside (who seem to be immune to the teleporters) but there's also some Gold Bars, another Falchion, and some H. Potion.

After that it's a quick hop across some conveniently placed rocks to continue toward the stairs. This is another one of those places where the gap looks huge, but it's really quite manageable.

In the next room over we get introduced to a new enemy, the Cyclone. No idea what they look like or if they're anything other than just giant clouds of wind, but they attack you with lightning damage when they're right next to you. Swords and magic are about equally effective. Just on the other side of the room there's 1800 gold pieces tucked in a corner, which is a nice payday.

We've found the exit, but something's not quite right. Time to talk about illusionary walls.

There's one not six steps from the exit, and the kicker is that you'd never know if you weren't looking at the map. In the Cave levels, illusionary walls look no different from any other wall. You'll only catch them if you see a monster moving in or out of the wall or if you check your map and notice a gap.

Inside the wall a switch opens a hidden area north of the exit, getting us this Gold Bar and a Large Shield. The Large Shield is yet another free upgrade for us. Seriously, if you're playing this game don't ever buy equipment. Just don't.
Now that we've picked that up, it's time to move on. As you can see, maze like sections are still taking up a huge amount of space. Our path actually started at the center of this screen, wound around to the teleport maze, through the area with the water, and then all the way to a spot just a bit south of where we started.

All the running around and the various new enemies have been pretty good for Varik, and his Arm Strength is getting pretty impressively high. Unfortunately not many enemies in here are good targets for magic, so it's lagging a bit behind.
Next Update: Bisected levels, a misleading grandma, and a surprise boss.