Part 5: Lesson 4 - Strategy 1: Caging
It's time for another..... Blood Bowl 101
Time to start talkin' some strategy
Lesson 4: The Cage
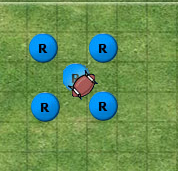
Caging is, very simply, surrounding your ballcarrier with players so that your opponent cannot possibly hit them. There is no one configuration of players that is called "The Cage"
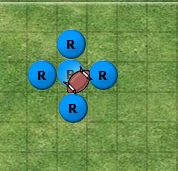
This is a cage
This is a (loose) cage
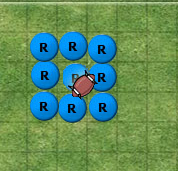
This is a (Cyanide AI, hyperbunker) cage
This is a (sideline) cage
The cage takes many forms, but in every instance there's no way for the opponent to walk past your line of defense and punch your ballcarrier. Well, sure, an opponent could do a dodge and try to get in, but then you're trying to dodge into 3 tackle zones, and for the average player (AG3) that's a 6+ D6 roll. And, even if you get into the cage, you're now standing next to two opponents trying to throw a block. So, if you can't cancel out their negative assists on the block (or if those players have Guard), odds are you'll be throwing a -2db.
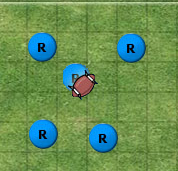
This is not a cage.
Why?
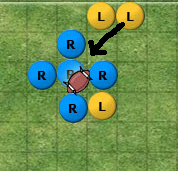
Two opponents to cancel out assists and there's a free blitz on your ballcarrier with no negative assists (assuming neither of the top or right blue players have Guard).
The advantages of caging should be obvious. You protect your ballcarrier and force your opponent to engage with you which can put you in a good position to bop them on the face. If you watched the Orc match, the disadvantages should also be fairly obvious. In fact, rarely will your cage maintain its integrity all the way to the end zone. Often you may cage up for a couple turns, moving forward until you can break through the defense. By then, you may have lost a cage corner to an errant blitz or been forced to use another player somewhere else on the board. However, the point of the cage is simply "Protect Your Ballcarrier". If you know your ballcarrier is safe, there's probably no reason to cage up.
While caging is not a tactic exclusively reserved for bashy, strength-oriented teams, it is typically best employed by them. Standing 5 elfs in a cube like that means they're easier to surround and contain. And, being elves, they are much easier to punch and murder. Caging is also an exclusively offensive strategy. Why would you cage on defense? Who are you protecting? I did a semi-cage during the goblin match to protect my Wolf from getting fouled, but other than one of those rare situations it should be obvious that a defense doesn't need to do caging. Well, unless the person in the middle of the cage is an opposing player who's about to enter a world of overkill pain.
For Orks, Dwarves, and other teams (Necro to a lesser extent), caging is an invaluable tool for success. Orcs don't particularly mind being surrounded by opponents, because that means the opponent is that much closer and that much easier to clobber. And, they make for really resilient cage corners. Sure, they may be slow and unable to dodge away from a player who has them marked, but you only really need a couple players to pull off a good cage. And, in fact, the Orcs being so close to each other and not spread out means they can better assist each other on blocks and make better uses of core skills like Guard to maximize their value.
So, now that you understand the cage, how do you stop it? There's a couple ways, and depending on what team you're playing, some may be better than others. The most obvious one is to attack the corners. When you blitz a standard cage corner (5 players forming an X), successfully knocking down the cage corner means you can stand some of your players next to the ballcarrier, forcing your opponent to try and spring him free. Of course, a team like elfs doesn't really care too much, because they are very good at dodging away and laughing in your face. However, knocking down a cage corner is a very good way to pressure the ballcarrier, which may be more useful than the second basic strategy, the Screen. Screening is going to be the topic of one of these megaposts (probably the next one) but the core concept is that you use your own tackle zones to prevent players from easily walking right past you. You're basically trying to slow down your opponent and force him to use his own players (possibly even cage corners) to break through your defense. If you're screening, you're either trying to force your opponent to come after you and possibly show an opening, or simply slow them down and run out the clock. If none of your own players are standing next to your opponent, your opponent can't throw blocks at them (besides the one blitz). Obvious, yeah? Well, if you can wall off your opponent, often the one blitz won't be enough to clear a path. Without tooting my horn too much, I feel like the Orc game was a good example of simple cage defense. Nothing fancy, just good planning of zombie placement and good decision making, especially when choosing how and where to engage with your opponent.
Be flexible. For example, my Necro team may have built a cage which consisted of the 2 Flesh Golems facing the opponent, and two zombies in the back. An opponent may come to blitz one of my Flesh Golems to try and break the cage. Say he simply gets, pushed, Stands Firm, and now there's some opponents standing next to him. Do I let the cage lose a man and keep going? Do I shift the cage laterally and set up in a way that the loss of a cage corner is negligible? Do I move forward and substitute a player for the Flolem who was left behind? Or do I set up on the sideline and set up a second level of defense to keep opponents from even blitzing my cage itself? There's plenty of options, and often the nature of the board and where your players are at the time will dictate what you do next.
Whatever you do, though, don't sacrifice board position for an unnecessarily reinforced cage. I point out a Cyanide AI Hyperbunker cage above. If you play against the Cyanide AI, they tend to do stuff like this, though often not this extreme. They may put a 5th or 6th player into the empty squares around the ballcarrier. Is this the best use of those players? Maybe sometimes, but often those players are better suited clearing a path downfield or going after your opponent. If 6,7,8 of your players are confined in a 3x3 square, your opponent has most of the board to himself, and he can easily position to defend against your useless death march. Also, it makes the match boring because your slow death march is very easily held off by a human opponent, and you spend the whole half trying to move your shitty pile of worthlessness down the field one square (or maybe 0 squares) at a time.
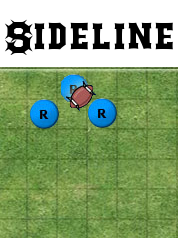
Another important thing to note is that you should pay attention to where your cage corners are. This seems obvious, but when you're in the middle of a match you may only be focused on the ballcarrier and his position, and end up positioning your cage corners without thinking. Go look up at that sideline cage. Sideline caging can be very useful because you use the sideline to prevent the side of your character, meaning you only need two players to act as corners. In some situations, sideline caging is very effective and a huge pain in the ass to stop. However, I have shown pretty effectively that standing an unprotected player (either of the cage corners) two squares from the sideline is a dangerous choice when you have a 9 Movement, Frenzy werewolf. Also, the positioning of your ballcarrier and cage corners may end up that one of your corners is standing next to an upright opponent. Don't do this, unless you really really have to. If one of your corners is standing next to a player, that next turn that player can throw a block and, even if he doesn't knock the corner down, he can potentially free up a path for a blitz on your ballcarrier, rendering your cage useless. In the next match, my opponents the Lizardmen are going to do something like this, and I'll be sure to point it out.
So, there you go, caging in a nutshell (ha!). Feel free to pick this apart and correct me or whatever. Sometimes I feel like I'm rambling when I do these, probably because I don't really plan them out.