Part 6: Lesson 5 - Strategy 2: Screening
Corte posted:
Caught up on the last couple games and was thoroughly entertained, do we know what the next opponent is going to be? Looks like so far we haven't played: Amazon, Dark Elf, High Elf, Human, Nurgle, Ogre, Wood Elf, Chaos Dwarves and Underworld.
So the short answer is "Week to week, I'll never know, but it'll probably be a race we haven't seen yet"
Though in the meantime, we're long overdue for a
 Blood Bowl 101
Lesson 5: The Screen
Like "The Cage", "The Screen" is not necessarily a move or play, but more of a general concept. Screening is simply board control by placing your players in such a way that you prevent your opponent from getting past you easily. This sounds almost stupid, right? Stopping your opponent from getting past you is just basic defense. And, while screening is mostly use defensively, it can also be used offensively to protect your ballcarrier from getting whacked or to prevent your opponent from seeping blitzers or defenders into your half of the pitch.
In many ways a defensive screen is considered the counter to an offensive cage. However, a screen is not necessarily the opposite of a cage. They both borrow a lot of ideas w/r/t spacing, and in fact they can sometimes end up looking very similar. A player who's caging should also be spreading out a bit to avoid getting boxed in, and a player who's screening should bunch up his players a bit to avoid spreading too thin and getting blasted through. However, let's start with the basics.
For all of these examples, we will be playing the part of the Yellow Team on defense. Let's ignore team races, statlines, Strength scores, skills, etc. Each unit will represent, simply, "A Blood Bowl player".
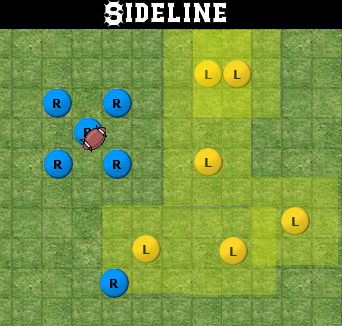
Is this a screen?
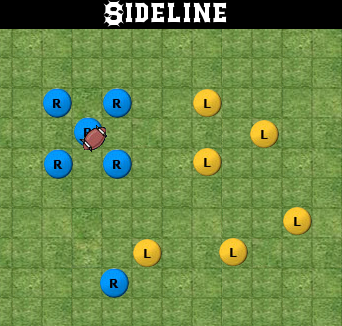
Sure! Like I said, screening is only a concept, not a finite, definite player layout. It's not a great screen, though. Why?

You let your opponent get a hold of the sideline, and now he's moving down the field and messing your stuff up! How do you stop him. Well, it's time to stop thinking of your player as a singular, one square unit. Your player has a Tackle Zone, and arranging the Tackle Zones of your players smartly is the best way to prevent your opponent from sneaking through your line. In the match videos, I always have my opponent's Tackle Zones turned on, you can do this by pressing the G key once the game has started to turn on the grid. However, you also need to consider your own players' TZ's.
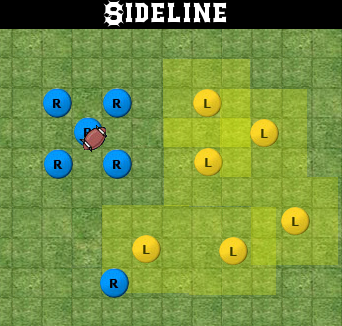
Much better, right? Now you can clearly see that, while we have the middle of the field locked down, the sideline is wide open. So, let's shift that front player over and protect the sideline.
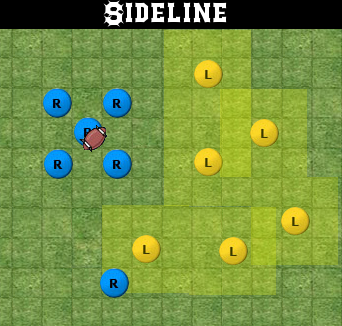
Good luck getting through this one!
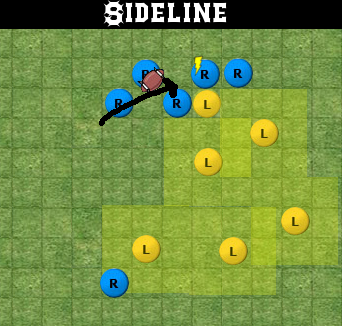
Ah, damn, of course, the Blitz. Blitzing is one of the biggest tools an offense can use against a screen, because the whole point is to block the path of your opponent with your players, and the only way your opponent can move your players is by punching them, or blitzing. If you're not standing next to any opponent players, he only gets the one blitz to attempt to clear a path. Obviously we can't prevent our opponent from using his blitz, but how do we make sure he doesn't set up on the sideline that easily?
Well, we just stack up our players. Now let's see what happens when our opponent tries to take the sideline
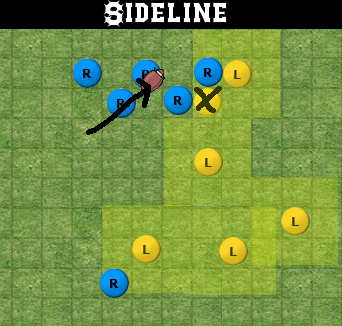
Much better. Even though our front lineman got knocked down, we have a player in position to provide the retaliatory punch. Our opponent has dedicated to pushing down the sideline, but was unable to break through our defense. This means we can pin him up against the sideline.
So, your screen worked and your opponent flailed up against it, putting himself in position to get swatted away with minimal effort from you, while you reposition your players to prepare for the next blitz from your now-panicking opponent. Sure, you could pile all of your players on his players and just start marking the shit out of them, but the screen is working so much better, and it's making it literally impossible for your opponent to break through.
The columns were extremely helpful in stopping our opponent from gaining a foothold. Two-deep columns of players are the most fundamental screen, and are the closest thing to a dictionary definition of a Blood Bowl screen. They're called the "Elf Screen" because they're extremely good at keeping elfs from breaking through your defense, but they can be used against bashy teams just fine. Elfs have an affinity for sneaking through and around tackle zones, and the purpose of the Elf Screen is to make Elfs take really risky dodges and decrease their odds of making it through your defense to go score. Here's an example of what the standard "Elf Screen" looks like.
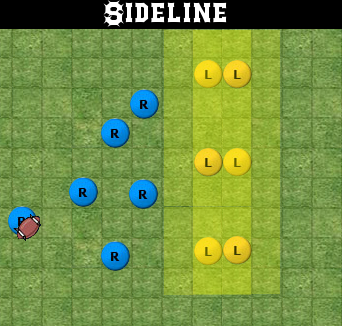
Let's pretend it's turn 16, you're tied against elfs, and you need to make one final formation to block the elfs and keep them from getting past you and scoring. The end zone is just to the right of the screen. Sure, they can dodge right through your screen, but that's going to be a lot of dodge rolls through multiple tackle zones, which is doable, but very difficult. Ultmately, you need to make the odds of success for your opponent as small as possible and hope they don't have godly dice.
There's a couple important things about the Elf Screen which make it the best screen setup for ensuring your opponent has a hard time making it through your death wall.
1. Horizontal Spacing
The side-to-side spacing of your columns (or your players in general) is important for maximizing your coverage. Let's look at some different spacing setups.

Among all of these options, it should be pretty clear that 2 squares of spacing between your columns is the best.
Why? It lets you spread your players out as far as possible without leaving any holes in your wall. Moving too far apart is obviously poor because it eliminates the purpose of the screen, but moving your players too close together could be disastrous, as it could allow your opponent room to simply run right around your wall.
How can this be applied to player positioning in general?
Positioning your players 2 apart in this way is extremely useful in generally keeping fast units from running around you. In the match videos, you might sometimes see me shift zombies a couple squares without really marking anything or punching anybody. Typically, this is to make the best use of their Tackle Zones to block off my opponent from moving around or past me. A lot of the time in a Blood Bowl match, you're simply moving your players around brainlessly. However, if you think about your setup first, you can make use of your own Tackle Zones to keep your opponent from simply walking right into somewhere you don't want him to be. The best example of this is receiving a kickoff. Typically the team which caught the kick will attempt to get the ball and cage up. However, hypercaging early on means your opponent and just sprint right past your and surround you, slowly picking off your cage until it weakens. However, if you use a player or two and position them to block the path with your tackle zones, you can force your opponent to take the long way around, slowing down their retaliation.
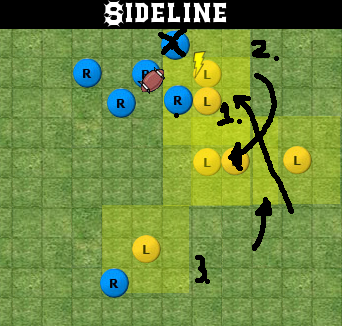
2. Vertical Spacing
In a perfect world, your columns (or screening players) will simply line up totally equally, vertically. However, the reality of the situation may mean that you have to set up staggered columns, or align your players in an uneven fashion. Let's look at some vertical spacings of players and how that can affect the integrity of your cage.
The arrow represents the path of movement to get through the screen, and the numbers on the squares represent the number of tackle zones the player would need to dodge through to make it through. As you can see, the farther away from dead even, the easier it gets to dodge through. You won't even notice this problem if you're using 2 deep columns or filling that gap with another player, though. It is important to recognize the best way to maximize your coverage while minimizing the number of players you have to use to fill a position, though.
Because this is only a 2D game, you only need to worry about horizontal and vertical positioning and spacing (though imagine BB with jet packs, that would be sweet). And, in practice, positioning and spacing becomes second nature and basically instinct. You will quickly learn how to best block off players through experience and through watching opponents stop your players.
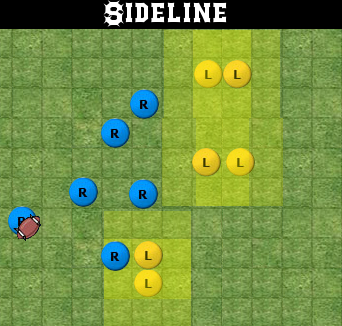
Of course, don't get married to the idea of the "Elf Screen". Don't think "I need to get this player free so I can complete the full Elf Screen as was taught to me, because anything else would be less efficient". Sometimes it just won't be feasable to get the players together to form a screen. Sometimes you might be better served standing next to your opponent's players and punching the shit out of them rather than playing back and screening up. Sometimes a full Elf Screen won't be necessary. Consider this situation.

Do you really need to full Elf Screen? Building two columns would require 4 players, but you might only have three. So, how do you best absorb the blitz? You stick one of the three dudes on the ballcarrier and force your opponent to blitz him off. It eats the blitz while stifling the forward progress of the opponent. And, ultimately, that's the reason you're screening up in the first place.
As always, I welcome any constructive criticism (a.k.a. yell at me if you think I'm wrong) and don't be afraid to ask questions. I tried using more pictures, which are annoying to make but hopefully easier to digest than huge walls of text