Introduction
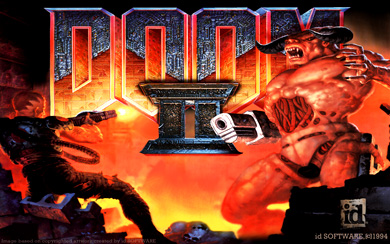
It's Doom II: Hell on Earth! Released on October 10, 1994, a mere ten months after the original game, the sequel offers a slew of new enemies, a powerful new weapon, and 32 new levels (some of which are pretty epic in scale). I'll also be covering The Master Levels for Doom II (released December 26, 1995), a set of 20 exclusive standalone wads created by some of the most prolific wad authors of the time. I will not be covering Maximum Doom, a set of 1800+ wads harvested from the internet and included on the Master Levels CD.
This is a video LP because let's be honest, screenshot LPs are so last year. Or actually maybe just because it's a more suitable format for such an action-oriented game. I'll try to update at least once every other day, but that's entirely dependent on my schedule and the response to the thread. Criticism of pretty much anything is completely welcome as long as you're not a complete asshole about it. It's my first LP, and I'd rather it wasn't a complete failure.
As an alternative to guest commentary (since me and my computer are too stupid to set it up), guests are welcome and encouraged to post their own videos. While Doom II videos are preferable (this is a Doom II thread, after all), other wads are perfectly fine as well, though if this is the case you may want to consider posting in deathz0r's thread (see below) instead. Unless you like me more, then go right ahead. I understand.


Episode 1: The Infested Starbase | |
| Map01: Entryway & Map02: Underhalls | Dailymotion |
| Map03: The Gantlet & Map04: The Focus | Dailymotion |
| Map05: The Waste Tunnels | Dailymotion |
| Map06: The Crusher & Map07: Dead Simple | Dailymotion |
| Map08: Tricks and Traps | Dailymotion |
| Map09: The Pit | Dailymotion |
| Map10: Refueling Base | Dailymotion |
| Map11: "O" of Destruction! / Circle of Death | Dailymotion |
Episode 2: City of the Damned | |
| Map12: The Factory | Dailymotion |
| Map13: Downtown | Dailymotion |
| Map14: The Inmost Dens | Dailymotion |
| Map15: Industrial Zone | Dailymotion |
| Map16: Suburbs | Dailymotion |
| Map17: Tenements | Dailymotion |
| Map18: The Courtyard | Dailymotion |
| Map19: The Citadel | Dailymotion |
| Map20: Gotcha! | Dailymotion |
Episode 3: Hell on Earth | |
| Map21: Nirvana & Map22: The Catacombs | Dailymotion |
| Map23: Barrels o' Fun (featuring MisterDifferent) | Dailymotion |
| Map24: The Chasm | Dailymotion |
| Map25: Bloodfalls | Dailymotion |
| Map26: The Abandoned Mines | Dailymotion |
| Map27: Monster Condo | Dailymotion |
| Map28: The Spirit World | Dailymotion |
| Map29: The Living End | Dailymotion |
| Map30: Icon of Sin & Finale | Dailymotion |
The Secret Levels: Return to Castle Wolfenstein | |
| Map31: Wolfenstein & Map32: Grosse | Dailymotion |

| Attack by Tim Willits | Dailymotion | |
| Canyon by Tim Willits | Dailymotion | |
| The Catwalk by Christen Klie | Dailymotion | |
| The Combine by Christen Klie | Dailymotion | |
| The Fistula by Christen Klie | Dailymotion | |
| Nessus by John "Dr. Sleep" Anderson | Dailymotion | |
| Subspace by Christen Klie | Dailymotion | |
| Paradox by Tom Mustaine | Dailymotion | |
| Virgil's Lead by John "Dr. Sleep" Anderson | Dailymotion | |
| The Garrison by Christen Klie | Dailymotion | |
| Subterra by Christen Klie | Dailymotion | |
| Bloodsea Keep by Sverre Kvernmo | Dailymotion | |
| Geryon by John "Dr. Sleep" Anderson | Dailymotion | |
| Minos' Judgment by John "Dr. Sleep" Anderson | Dailymotion | |
| Trapped on Titan by Jim Flynn (featuring Dukka, MisterDifferent & rocsteady) | Dailymotion (Part I) | Dailymotion (Part II) |
| The Express Elevator to Hell & Bad Dream by Sverre Kvernmo | Dailymotion (Part I) | Dailymotion (Part II) |
| Black Tower by Sverre Kvernmo (featuring Minty, MisterDifferent & rocsteady) | Dailymotion (Part I) | Dailymotion (Part II) |
| Vesperas by John "Dr. Sleep" Anderson | Dailymotion | |
| Titan Manor by Jim Flynn | Dailymotion | |
| Mephisto's Maosoleum by Sverre Kvernmo (featuring Christian Dinosaur, exacerbate, MisterDifferent, Semiru & synertia) | Dailymotion (Part I) | Dailymotion (Part II) |


| Chex Quest! | Dailymotion |
| Nuts2.wad: The 2nd Anniversary Gold Plated Plutonic Alloy Coated Eight Volume Nuclear Donkey Edition (Basically the Same Crap) | Dailymotion |
| Stabbey's SoDding Level: Jar Jar, Jewkillers, and General Jejunity | Dailymotion |
| Stabbey's Folly, Chapter 1: Quest for the Yellow Keycard | Dailymotion |
| Stabbey's Folly, Chapter 2: The Men's Wearhouse | Dailymotion |
| Stabbey's Folly, Chapter 3: Stuck in Switch Factory, Send Help | Dailymotion |
| Stabbey's Folly, Chapter 4: Eleven Cyberdemons and a Baby | Dailymotion |
| Stabbey's Folly, Chapter 5: Sixtitses & Krangs | Dailymotion |

(deathz0r and rocsteady had some shit in here too but the videos blew up)
| MisterDifferent is FUCKING DRUNK OFF HIS ASS (Map09 drunk) | Dailymotion |
| MisterDifferent shows off (Map10 pistol start + keyboard) | Dailymotion |
| MisterDifferent FAILS (Map23 pistol start + keyboard) | Dailymotion |
| Thisisforyoucyraptor.wad - a usermap by the thread's creepiest thirteen year old non-goon (Josh Murphy) played by the thread's second-creepiest thirteen year old non-goon (exacerbate)! Also Christian Dinosaur is in there somewhere. | Dailymotion |

Download my half-finished episode for Doom II! Please? More information can be found here.
MegaUpload download
Mirror #1 (thanks Impossible Odds)
Mirror #2 (thanks MisterDifferent)
Archives Mirror
GUEST LPs of RUBICON:
Map01: The Gatehouse by MisterDifferent
Map09: The Abandoned Labs by MisterDifferent (featuring Dukka, rocsteady & myself)

The Ultimate Doom by Dr. Doji Suave
Doji's doing a fantastic job, and the content of his commentaries are different from my own style; many of his videos provide a lot of useful info on Doom WAD editing. There's also plenty of multiplayer action going on in his thread, which is something I've been way too lazy to set up. His thread is better than mine.
The Dark Side of Doom by deathz0r
deathz0r's thread focuses on the flipside of Doom games: custom WADs. deathzor's playing through the horrible horrible jokewad Mock 2: The Speed of Stupid because he is obviously a masochist. There's plenty of other juicy videos by other Doom-goons (MisterDifferent in particular deserves a mention), too. It should be a pretty interesting thread to keep an eye on.
Final Doom by rocsteady, MisterDifferent, and Mr. Snack
I don't really like Final Doom but here's an LP of it anyway. As I write this it's like 3 days into it and they're halfway done already. Pace yourself, guys!

ENEMIES
Zombieman Health: 20, Damage: 3-15. These guys are pussies. They can't take or dish out damage worth a damn, but they're all over the place. A blind man has better aim. They've got green hair though!
Shotgun Guy Health: 30, Damage: 3-45. AKA Sergeants. The same thing as Zombiemen, but with a shotgun. This makes them a significantly larger threat, but their aim is just as atrocious.
Heavy Weapons Dude Health: 70, Damage: 3-15 per bullet. AKA Commandos. Newly introduced to Doom II, these guys are the single most annoying enemy in the game. They carry a chaingun that they never stop firing as long as you're in their sights, and to make things worse, they're deadeyes (lol pun) compared to the other two zombie flavors.
Imp Health: 60, Damage: 3-24. The most common enemy in the game by far. Their fireballs can do a decent amount of damage if they catch you off guard, but they're slow as molasses and easy to dodge.
Demon Health: 150, Damage: 4-40. Demons are like big, pink bulldogs. They're the only enemy that needs to rely solely on melee attacks. Not much of a threat unless you're totally surrounded. These guys are what the chainsaw was made for.
Spectre Health: 150, Damage: 4-40. Spectres are the exact same monsters as demons, with the added bonus of being partially invisible.
Lost Soul Health: 100, Damage: 3-24. Flying skulls that float around and charge at you. They can be pretty annoying, but if they're in large numbers they tend to attack each other instead of you. They are the only enemy that doesn't make a "wake" noise, making them good stealth enemies.
Cacodemon Health: 400, Damage: 5-40 (fireball), 10-60 (bite). Big cuddly floating heads. They can spit ball lightning which can take a pretty good chunk of health off the player if he gets the full brunt of it. Like Lost Souls and other flying enemies, Cacodemons have the ability to ambush from above.
Hell Knight Health: 500, Damage: 8-64 (fireball), 10-80 (bitchslap). New in Doom II, the Knight is basically a Baron-of-Hell Lite. They look like Barons without a tan and have half the hit points, but all of the attack power.
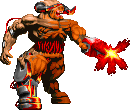
Baron of Hell Health: 1000, Damage: 8-64 (fireball), 10-80 (bitchslap). Barons are essentially just bigger, stronger imps. They have a similar fireball attack, though it's faster, stronger, and greener. They have the most health of any enemy except the two boss monsters.
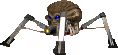
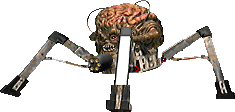
Arachnotron Health: 500, Damage: 5-40. New in Doom II, Arachnotrons are baby versions of the Spider Mastermind boss from the end of the original game. Rather than their mommy's rotary shotgun, each Arachnotron is outfitted with a plasma rifle. Like chaingunners, they won't stop firing until you're out of their line of sight.
Pain Elemental Health: 400, Damage: see Lost Soul. Another new enemy for Doom II. These guys look like brown versions of the Cacodemon, but are infinitely more annoying due to their ability to spit Lost Souls rather than fireballs. And when they die, they explode in a fury of even more Lost Souls! Joy!
Revenant Health: 300, Damage: 10-80 (missile), 6-60 (punch). Yet another new enemy for Doom II. They're the commandos of the demon world - fast, maneuverable, and deadly. They have two methods of attack: they can fire slow-moving missiles of both the straight-shooting and homing variety, or they can just punch your ass. They suck.
Mancubus Health: 600, Damage: 8-64. Another new enemy, these buttertrolls are slow as all hell but pack a pretty mean punch. They've got twin flamethrowers, one per arm, and can fire them simultaneously in a hard-to-dodge (but predictable) pattern.
Arch-Vile Health: 700, Damage: 20-90. The last new enemy in Doom II, Arch-Viles are the mages of demon society. As if their fatally explosive fire spell wasn't enough, they have the ability to resurrect any corpse they come across (except for boss monsters and other Arch-Viles). This makes them top priority in a firefight.
Spider Mastermind Health: 3000, Damage: 3-45 per shot. Originally the final bosses for Episodes 3 and 4 of Ultimate Doom, there are a handful of these guys within the levels of Doom II. They have a deadly accurate rotary shotgun, making them the single most dangerous enemy in the game at long range. However, their size makes them a good target for the BFG's splash damage, and they can be killed in just one shot if you're lucky.
Cyberdemon Health: 4000, Damage: 20-288. Cyberdemons have also graduated from their position as boss in Ultimate Doom, and appear a few times throughout the sequel. They are without a doubt the most dangerous enemies in the game, able to kill even a fully powered-up marine in a single shot (but only if you're really unlucky). He can also take up to four BFG shots to kill. Fortunately he tends to be located near invulnerability spheres.
WEAPONS

Fist Damage: 2-20 (normal), 20-200 (berserk), Ammo Type: None. The plain old fist is totally useless, but once you pick up a berserk pack, it becomes a lot more useful. If you get a running start, you can one-shot any enemy up to Demons/Spectres. Unfortunately, Berserk wears off after the end of the level, so you'll need to re-collect it in each level.
Chainsaw Damage: 2-20 per tooth, Ammo Type: None. The other melee weapon. It's better than the non-berserk fist, and is particularly useful against Demons and Spectres, and to a lesser degree Cacodemons. Fortunately you keep the Chainsaw between levels, making it a decent substitute for Berserk if you need to save ammo.
Pistol Damage: 5-15, Ammo Type: Bullets. A Beretta 92FS pistol. You always have it. It's a useless piece of shit, though, and you'll never use it again after you pick up the chaingun.
Shotgun Damage: 5-105, Ammo Type: Shells. While it was one of the most useful weapons in the original Doom, it's totally overshadowed by the much more powerful super shotgun in Doom II. The only reason to use the shotgun over its big brother is to conserve ammo.
Super Shotgun Damage: 5-300, Ammo Type: Shells. The super shotgun is three times as powerful as its predecessor, firing 20 pellets versus the shotgun's 7. The drawback to this is that the super shotgun uses two shells per shot.
Chaingun Damage: 5-15 per shot, Ammo Type: Bullets. The chaingun does the same amount of damage as the pistol, but has a much faster firing rate. It's useful for mowing through ranks of smaller enemies, and keeps many of the stronger enemies from retaliating.
Rocket Launcher Damage: 20-288, Ammo Type: Rockets. The rocket launcher is among the strongest weapons in the game and is best used for dispatching larger enemies like Barons of Hell,
Arch-Viles and Mancubi. The drawback to its power and relatively fast firing rate is its splash damage, which can hurt the user just as much as the monsters.
Plasma Rifle: Damage: 5-40 per shot, Ammo Type: Cells. The plasma rifle is extremely useful due to its very high rate of fire. Like the chaingun, it can be used to prevent enemies from firing back.
BFG9000: Damage: 49-4280, Ammo Type: Cells. The BFG9000 is bar none the most powerful weapon in the game, buit only if you know how to use it correctly. Its method of attack is ridiculously convoluted and I will probably just explain it in one of the videos so this preamble isn't cluttered even more. Each BFG shot uses 40 cells.
ITEMS
Bullets: Bullets can be obtained from 10-shot clips (5 bullets if dropped by a Zombieman) or 50-shot boxes. In addition, picking up a chaingun gives you 20 bullets (10 if dropped by a chaingunner).
Shells: Shells come in 4-packs and in boxes of 20. Fresh shotguns and super shotguns have 8 shells each, while a dropped shotgun from a sergeant holds 4.
Rockets: Rockets come in single units or in boxes of 5. Picking up a rocket launcher gives you two rockets.
Cells: Cells come in 20- and 100-shot packs. Both plasma rifles and BFGs give 40 cells each.
Stimpack: Gives you 10% health, up to 100%.
Medikit: Gives you 25% health, up to 100%.
Security Armor: Sets armor to 100%, and absorbs 1/3 of damage taken.
Combat Armor: Sets armor to 200%, and absorbs 1/2 of damage taken.
Backpack: Contains 10 bullets, 4 shells, 1 rocket, and 20 cells, and better yet, doubles ammo carrying capacity for the rest of the game after the first time you pick one up.
Radiation Shielding Suit: Protects the player from toxic waste, blood, lava, slime, and any other harmful floors for 60 seconds.
Keys: Keys come in three colors (red, yellow, and blue) and two styles (keycards and skull keys). I bet you can't guess what they're used for!
ARTIFACTS (these count toward the "items" tally at the end of the level)
Health Bonus: restores 1% health up to a 200% maximum.
Armor Bonus: restores 1% armor up to a 200% maximum. They shield from 1/3 damage unless you've already got a combat armor vest.
Berserk Pack: An injection of pure adrenaline that increases your punching damage. Restores 100% health up to a 100% maximum. Lasts until the end of the level.
Computer Area Map: Lets you see the entire map for the level on your automap, even areas you haven't visited yet.
Light Amplification Visor: Sets the level brightness to full for 2 minutes.
Blur Sphere: Gives you same impartial visibility as the Spectre for 60 seconds. It works well against bullet-wielding enemies like zombies and the Spider Mastermind, but just makes projectile enemies fire more erratically, which actually makes it harder to dodge. Go figure.
Invulnerability Sphere: Makes you invulnerable for 30 seconds and turns the screen white.
Soul Sphere: Gives you 100% health up to a 200% maximum.
Megasphere: Sets health and armor to a full 200%, and shields from 2/3 of damage.