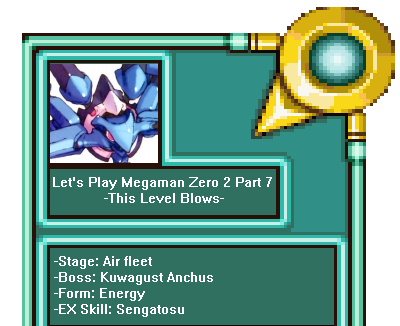
Part 9: Video 7

Just kidding! WE PUT A STOP TO THAT.
Also, TWO WEAPON LEVELS GET! We can now charge our saber slashes, and charge the buster in about half the time.
…Which means that, if I were to so choose, basically every boss could be utterly decimated in under half a minute. The charged Z-saber does a base damage of 8, and with the bonus from elemental weakness applied afterwards this means that you’ll be doing a clean 12 to bosses. And seeing as they only have 32 hp to a bar, you’ll be able to kill ‘em in 6 hits. Oftentimes stunlocking them as you do! Glorious.
Stage notes!
100 pt requirements:
-Clear time: 6:40
-Enemies killed: 110
-Mission: Protect Ciel. Lose 2 points for every hit that gets through to her.
Hard mode honestly makes this stage MORE enjoyable. You can just race through the beginning section, take advantage of the orange Tentolancer’s lack of invincibility frames to buster it to death, and make quick work of whatever comes your way from then on by shooting non-stop. Protecting Ciel still comes down to camping with the shield boomerang, and Kuwagust is still just as annoyingly difficult as ever, just with even LESS room for error and much harder to stunlock. You’ll want to use the charged shield boomerang.
-------
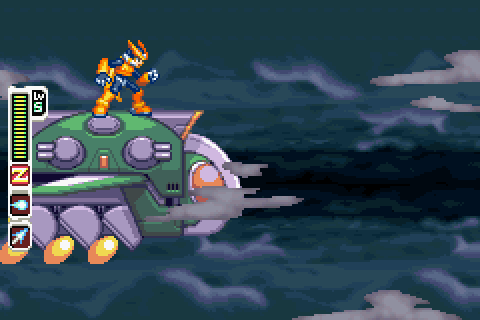
As far as I'm concerned, this level NAILS the atmosphere. The way it flows straight from the last stage, beginning with JUMPING OFF the transport plane, and proceeds to have you platform your way across the enemy’s ships mid-flight. The in-CREDIBLY addictive music and the rushing wind sound effects that abruptly cut off the moment you enter the main ship. Ciel’s first real active role in the games. It really makes you feel like a true badass, and reinforces the bond between Zero and the resistance, particularly Ciel. It’s a stage I really, truly enjoy playing through.
HOWEVER. This is only because I’m familiar with it. Though I have nothing but praise for the setting, parts of the stage design itself are some of the most bullshit nonsense we’ve yet to see.
This is, in large part, due to the aforementioned aerial platforming. See, this is one of a few instances in the Zero series where the limited size of the GBA’s screen reaaaaally works against it. While the section would be ok if the display was about twice the size it is, in its current state it’s literally impossible to know where each of the ships is in relation to each other. There’s an entire separate, lower path that you would never even know about unless you randomly jumped off one of the ships at the right location, and if you take the upper path, there’s one jump in particular that is just complete BS. You’ll come to a ship that just seems to dead-end, and if you take a leap of faith horizontally…
WELP. Say instead we just drop off the edge…
SON OF A COCK.
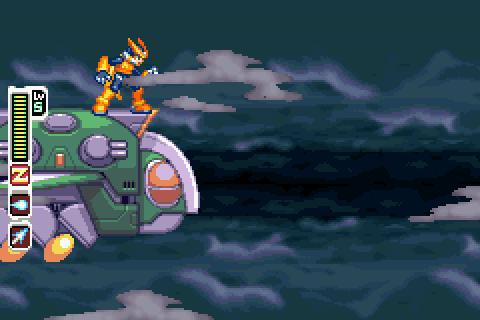
Yes, the stage is designed with moving ships later in the platforming section. Moving ships that are only visible at the veeeeeery extreme leftmost/uppermost part of their flight path. This practically *guarantees* one, or two, or seventeen cheap deaths before you memorize their layout.
COMPOUNDING THE ISSUE, as is actually visible in those gifs, is the fact that the ships (they’re called “Tentolancers” for the nobody interested) shoot bullets at a rather frequent rate. Also visible are the Pantheon hunters riding atop them, adding their own shots to the bulletstorm. Shots fired, more often than not, from off-screen, where your OWN shots can’t reach them. So if the butt platform placement doesn’t get you, this…
This will. I cannot even COUNT the number of times I’ve jumped onto the side of one of these things only to be immediately and unceremoniously shot off by the rider, or by the cannon on its side.
Past that, though, the stage is ok for a good bit. The Midboss is enjoyable, and the pantheons past it are nicely cuttable. And, as mentioned previously, I *love* the transition to the ship’s guts.
The electric generators are pretty easy to get a hang of, with ample time to get where you need getting, save for the secret alt path which requires usage of an elemental attack. It’s an alt path though, so that’s perfectly acceptable.
Moreover, the laser gates they control only do half your life in damage to you as opposed to an instant kill, so it’s perfectly within the realm of doability, especially with subtanks. Enemies are placed cleverly enough that players are forced to plan out a route or risk damage, and finally nailing the perfect path to get through without a scratch is super-satisfying.
Which brings us to the defense segment of the stage. I don’t mind the concept in general, and it’s nice to see Ciel out in the field, but a minute and a half is about 40 seconds too long in a fast-paced game like this. Camping in the corner with the shield boomerang is only fun for so long, devs. Also the green pantheon hoppers like to be unpredictable and unfairly mess up an otherwise clean run and I hate them. The section makes good fodder for getting the erase form if you don’t already have it though so there’s that I guess. And, if you were wondering, no you can’t fail it. I let a hopper get all up in Ciel’s business for practically the whole 90 seconds and nothing but yelps of pain. That girl is built STURDY.
Then the cargo bay and the final climactic jump. The whole thing from start to finish plays like the best kind of action movie, and the changeup from classic platforming, to puzzle platforming, to defense mission makes the whole stage fresh and exciting from start to finish. It’s just a shame they didn’t work out all the kinks beforehand.
Forms!
=Energy Form=

The unlock requirements for this one are somewhat shrouded in mystery. The wiki says “collect 25 large e-crystals”, guides say get 25 energy capsules, my own experience says “get a shitton of pickups in one stage.” I usually have a bunch of trouble getting this one, and this time was no different – it took me a few runs to finally get my mitts on it. So I assume it does indeed require a specific type of pickup, though I highly doubt that type is “large” anything, as you’d never get 25 of the same one. My money’s on 25 health pickups though.
Power-***
Defense-**
Speed-*
The energy form isn’t bad, PER SE, but there’s really nothing going for it either. The change in speed is, as per usual, BARELY noticeable and won’t annoy you too much, and the extra attack is nice enough, but that’s it.
It’s extra effect, “Many extra life energies”, means that enemies will indeed drop more health for you which could potentially be useful for filling up subtanks, but that’s about it; the drop rate is high enough as is, and there are many better alternate forms stat-wise.
Additionally, it messes around with your arsenal in ways I simply do NOT care for; Your buster shot becomes limited to 2 bullets on-screen at once which really crimps the patented busterspam™ technique, and your saber combeo turns into this really odd sequence of second slash-second slash-first slash.
I’d really never used this form before so I had to do a bit of experimentation, and apparently this sequence DOES retain combo values to allow you multiple hits, but the animation just doesn’t flow as well as your normal 1-2-3 slash, and doesn’t cover as much area either.
I also don’t really care for yellow as a color scheme, making this overall one of my least favorite forms to use. Sorry, Energy!
EX Skills!
=Sengatosu=


The Sengatosu, or “Rotating fang thrust”, is the loot received from Kuwagust. Due to its previous master’s propensity for dashing willy-nilly around the stage, it alters Zero’s standard dashing slash into an extended forward thrust. While this conversion sacrifices a bit of vertical range, it more than makes up for it with the sheer horizontal distance gained.
It also goes a fair bit further than the standard dashing slash, meaning that the timing required to successfully bisect the target of your rage becomes much more lenient. You even maintain dashing speed whilst you lunge! Oh, and if you were wondering, this is prioritized higher than the active form’s rolling slash, so if you like that better than just deactivate this ability.
To sweeten the deal even more, should you have the thunder chip equipped, your saber will narrow and become wreathed in electricity, both adding said element to your attack and extending its range a good bit.
This move’s been around for a loooooong time, first in X4 as the Raijingeki, then in Megaman x8 (and Marvel vs. Capcom 3) as the Raikousen. Zero does a little *HUNGH* sound when you use it that makes it fairly satisfying, although not nearly as much as Tenshouzan’s *HYAAAAAAAAAH!*. All in all it’s a cool move that makes finishing foes fast fun and I’m gonna keep it functional for the forseeable future.
Character bios!
Tentolancer
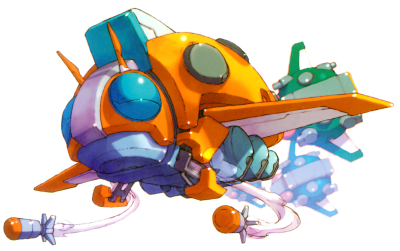
Moveset:
- Missile volley: deploys a trio of missiles from its underbelly, which then shoot off at a low height, then middle, and finally high. All 3 can be jumped over, but the third can also be dashed under.
- Firebomb: Used in retaliation to being damaged, the Tentolancer withdraws offscreen, then dashes across the screen at a high altitude whilst dropping firebombs. Only the area previously occupied by the midboss remains safe and the explosions are too high to jump over, so the moment it withdraws dash to where it used to be.
“Tentolancer” is the overall name for this type of Neo Arcadian attack ship, not just this particular midboss, though this one in particular seems capable of independent action, and is very clearly colored differently.
As far as midbosses go, ol' Tenty here is DEFINITELY not as complex as they get. Should you just sit still, it’ll be content to just fire off volley after volley of missiles at you without a care in the world. However, the slightest damage will cause it to initiate a bombing run, at which point it’ll switch sides and repeat the pattern.
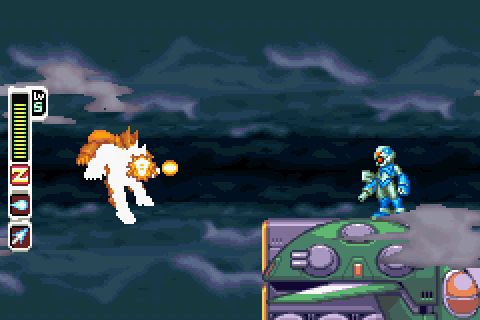
It’s weak to the ice chip, to the point that if you come into the fight with a full charge on your saber and buster you can actually kill it before it even disgorges its second missile, and even if you choose not to take advantage of that it still goes down to a few rounds of attacks. Quite satisfying to finally get to kill one of these buggers after the annoyance that gave at the stage start.
SPEAKING OF BUGS, these things actually appear to be designed after ladybugs, most obviously with this one’s vibrant orange. Designing large, airborne weapons after insects actually appears to be an odd legacy thing in the Megaman games; the X series had the Beebladers, and ZX has the King Flyer. I’m not sure if the classic series has a representative (Maybe Mothraya?) but regardless it’s way too specific to be a coincidence.
Golem ty-WAIT WHAT ANOTHER ONE? Didn't we *just* have a climactic fight against these things? NEXT.
Kuwagust Anchus
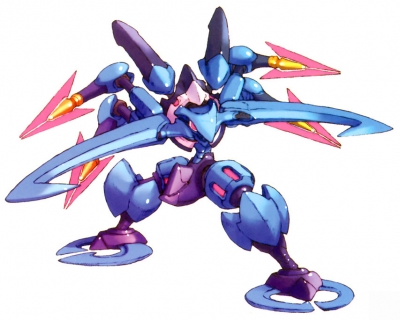
Moveset:
- Dashing grapple: Kuwagust dashes across the length of the transport ship 3 times. If he makes contact with Zero, he’ll be caught between his pincers and continually chomped on until you manage to struggle free through button mashing.
- Pincer vortex: Kuwagust spins his head whilst standing in place, forming a wind vortex that sucks Zero towards him. Fighting against it doesn’t work, but jumping above it allows you to gain some distance from him. If you’re sucked all the way to Kuwa, you’ll be caught for damage, followed by an unavoidable explosive chomp the moment your invincibility frames run out. Should you jump over him, he’ll pause, then turn and continue his vortex.
- Electric quad-lasers: Extends his four spike-tipped arms, charges energy, then fires thin, purple lasers from their tips. Has 6 or more patterns to choose from, and fires 3 times in a row. Patterns all require differing methods of dodging, from short hops, to long horizontal leaps, to quick dashes under the lowermost laser. See what pattern he’s using, then move. Should you jump over him, he’ll pause, then turn and shoot the next barrage of lasers.
- EX Skill: Spinning blade: Will only use once his health is less than 50%. Jumps to the far end of the ship, and spins his head briefly, forming a continuous wind vortex that pushes you towards the edge. He’ll then jump off-screen, and quickly dash back towards you whilst continuing his head’s rotation, attempting to crash into you. He’ll also leave a trail of electric orbs in his wake that take a while to dissipate and prevent you from simply jumping over him. Can only be dodged by deflecting him; this can be done either with a *perfectly* timed chain rod attack, or by pressing up towards him until the instant he starts charging and then allowing yourself to be pushed back by the vortex whilst shooting with your buster as fast as you can.
Kuwagust Anchus is an interesting one. Visually designed after a stag beetle, it also inspires his name: “Kuwagata” is the Japanese name for stag beetle. He’s actually one of a pair: his brother (referenced in his death quote) is a boss from the first game named “Herculious Anchus”, himself designed after the Hercules beetle. This pairing of beetles is actually pretty common in Japanese media, and they’ve even got the whole red-blue thing going on, so it’s a nice continuity nod to the last game.
He and his brother both share a love for dashing at high speeds and shooting things out of their arms, but Kuwa here is significantly faster, and in my opinion FAR more challenging. He’s incredibly mobile and requires precise timing, and his quad-lasers involve some pretty advanced dodging techniques, like dashing TOWARDS them to slightly lower your height and scoot under them.
However, he’s rather lacking in the number of attacks he has at his disposal, and also ALWAYS jumps back to the middle of the ship you’re on between attacks. Moreover, his weakness to ice is rather extreme, and knocks him out of EVERY move he has, provided you hit him early enough. Should you try it during one of his dashes, watch out – those horns of his will block attacks, and you’ll need a well-timed charged saber to break through. This comes together to make a boss that is difficult, but manageable…up until you get him down to half health.
His real distinguishing feature is UNDOUBTABLY his EX skill. Spinning blade is honestly probably the hardest-to-dodge EX skill in the *entire* game bar none. The trick to it is that he’ll always launch into it as soon as possible after getting to half health, and there’s a window a second or so long where you can attack him with Ice and preemptively put a stop to it.
Should you fail that, though, you’re honestly probably going to get hit. The general strategy for his previous dashes, simply jumping over him, will get you hit by his trailing electricity; conversely, try to knock him out of it with ice, and you’ll find that he’s become ENTIRELY invincible.
In order to deflect him, you have to either hit him with a whoooole bunch of shots (which requires very careful positioning), or hit him with a pixel-perfect chain rod (which you’re unlikely to be using, and requires very careful timing). Neither of these are at all intuitive, and you’ll likely just end up fruitlessly trying to PERFECTLY time a dash over him only to be caught again and again. It’s kinda unfair, and dampens my enthusiasm for what is otherwise a fairly enjoyable boss.
Extra notes!
Haven’t used this section for a while, but I have a use for it again~
SO. Elpizo. This end of this stage marks a very distinct turning point in the game, where the heavily-foreshadowed separation of Elpizo from the resistance proper finally takes place. This is now going to become the focal point of the next 4 stages, with the sole objective of bringing him home.
I usually don’t speak up during story sections because I think it presents itself quite well without my assistance, but I wanna say a thing here.
I…I honestly really love the way this was handled. From his very first appearance, they made Elpizo out to be bad news; Getting cut off just as he’s about to promise Ciel he won’t go too far, Zero’s refusal to shake his hand, his big SILENCE desk slam before launching his operation, they all point towards him going evil in some way or another.
That’s not what happens, though. Instead, he’s thoroughly broken by his failure. From the beginning, he was hesitant to take on the mantle of leader, asking if they were absolutely sure that he was fit for the position, but despite his inner misgivings performs the role brilliantly. It’s thanks to him that the Resistance is so well-organized, that such thorough preparations were taken, that such precise operations were chosen to be executed by Zero. And, when he’s finally ready to launch his operation and everything is going his way, he’s utterly decimated without accomplishing a single thing. Every single man under his command is presumably killed, and he himself is only rescued because of Zero’s intervention.
All his insecurity comes flooding back; a simple errand boy Reploid really WASN’T fit to lead, he should have listened to Ciel, and now all those deaths are on his head. In his mind, the only possible redemption for his actions is to go off and fix everything on his own. He hasn’t betrayed the Resistance; he’s trying to atone for them. I honestly don’t think his pent-up frustration with his own inadequacies could honestly be summed up better than with this pic:
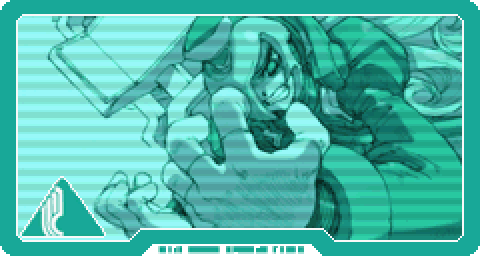
This, plus the music playing, brings SO MUCH personality to Elpizo and elevates him to one of my favorite characters. I adore how that track is titled “spreading darkness”, and yet just sounds incredibly sad. It’s absolutely perfect for Elpizo’s current state of mind.
This whole thing isn’t just a hissy fit either; Elpizo actually knows EXACTLY what he can do here. Sadly, I can’t say any more on that, because it involves a drama track that spoils big elements from the third game, but rest assured that Elpizo hasn’t abandoned his skill for tactical planning.
Music!
Two music tracks this time, and they’re both personal favorites of mine~
Firstly, power bom has a fun name. That is a plus. SECONDLY, it’s amazingly adept at getting your blood pumping and conveying the sense of urgency that a mission against the clock to stop a bomb from killing everyone you love should have. A lot of this stems from the great bass line in there; it’s much more prominent than in a lot of the other tracks, and bass is always good for cranking up the excitement.
As for Spreading darkness, I’ve already written words about that! My only complaints about it stem from the fact that it just doesn’t sound clean; there’s a constant “fuzziness” to it that’s especially apparent at the very beginning. The “Idea” remix cleans it up some, but I don’t really care for how synthesized the strings sound there. Regardless I still think it’s bloody perfect for Elpizo here.
Power Bom
Spreading Darkness