Part 49: Route B Map and Final Party Status
First Misfit update may be 6-12 instead of 6-11! The second half of the run looks like it's going to require more commentary than the first... Though even the first one is pretty big, just by virtue of the number of chapters I'm covering. A new page before tomorrow would be good.Route B Map (Chapters 20-40)
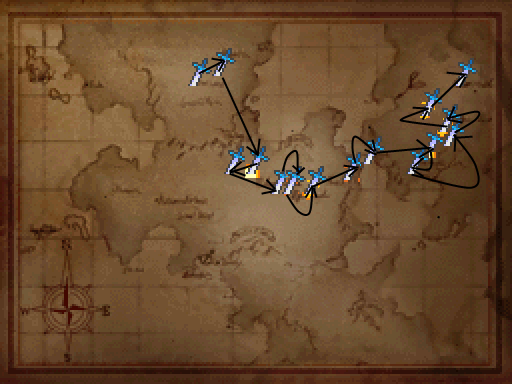
This map starts at 20. There are multiple maps in the same spot during chapters 25 and 26, 31 and 32, 33 and 34, and 38-40. Map 37 has no location displayed at all, because it happens in Serdic's head. (Although, presumably, they stayed in the lab from 36 while he was unconscious.)
As before, arrows are drawn for visual clarity, not as representations of marching paths. Which is good! Staggering drunkenly around the continent doesn't win you very many wars.
Final Character Statuses
Primary Team:

Accessories: +75 defense
Holy Blade: +65 attack, +35 accuracy, 0% critical. Pierces darkness-related defenses. Regenerates 10% of max HP at the start of the player phase.
Invoke Might 2: Adds attack equal to 10% of base attack
Stand Fast 4: Adds defense equal to 24% of base defense
Invoke Life 4: Adds HP equal to 32% of base max HP
Vital Strike 1: Increases critical rate by ??
ZOC 4: Prevents enemies without Anti-ZOC 4 or higher from passing through and inflicts Crazed (all base stats multiplied by 70%)
Frontal Blow 3: Does 118% damage when attacking from a target's front
Frontal Fury 2: Reduces enemy counter chances by ?? when attacking from the front
Melee Guard 4: -16% damage from enemy non-cavalry melee
Arrow Guard 3: -12% damage from enemy archers
Duelist 4: Does 140% damage against single enemy targets
Fearless 4: Does 140% damage against all non-first targets in an attack chain
Seven Sins: OB. Deals (4*Attack-Defense)*1/1.5/2, depending on OB level. 5 Range, single target.
Serdic in his Cold Monarch class is the best character in the game. He has great growths, great skills, a great weapon, a great inherent skill (in a game where those are very rare) and a great Overdrive (in a game where good ones are also very rare). The only area where he's not exceptional is his movement, which is merely average, and which helps keep you from overextending him until he levels up and becomes a real force to be reckoned with.
You pay a price to enter Route B, and Route B is a story about the meaning of sacrifices. The Divine Emperor Serdic's strength is one of the many expressions of that theme, and it's a beautiful merger of gameplay and story.
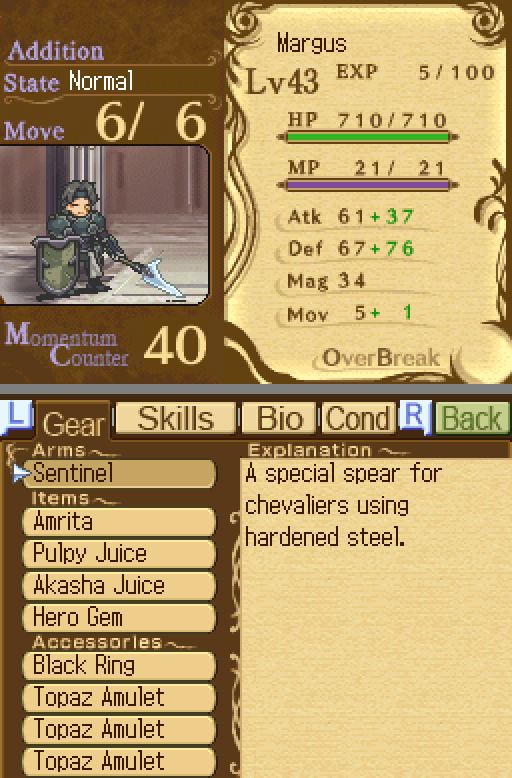
Accessories: +54 defense, +1 Move
Sentinel: +37 Attack, +0 accuracy, 5% critical.
Stand Fast 4: Adds defense equal to 24% of base defense
Invoke Life 4: Adds HP equal to 32% of base max HP
Retaliation 1: Increases counter attack chance by ??
ZOC 1: Prevents enemies without Anti-ZOC from passing through and inflicts Crazed (all base stats multiplied by 70%)
Rook 2: Adds defense equal to 10% of base defense, reduces counter attack chance by ??
Rally 1: Support skill; +2% to allied critical chance
Melee Guard 4: -16% damage from enemy non-calvary melee
Arrow Guard 2: -8% damage from enemy archers
Mount Guard 3: -12% damage from enemy cavalry
Vital Power 5: Regenerates 20% of max HP at the start of the player phase
Abyss Ward 3: Reduces Dark-elemental damage by 12%
Revitalize 2: Activation skill. Restores 120 HP to self.
Margus has an unglorious job, especially in Route B: his survivability rises greatly, but not as quickly as his offense declines. Even before then, he spends a lot of time standing around and letting people hit him. I would have been better-served replacing him, especially if I can't use him in Route A, where he's more useful... But there's something reassuring about having someone around that you know will not, under any reasonable set of circumstances, ever die.
Accessories: +50 defense, regenerates 8% of max HP at the start of the player phase
Raja: +24 attack, +35 accuracy, 0% critical.
Card abilities: Attacks cannot miss (3 Card), Attack formula uses (4*Attack-defense) instead of (2*Attack-defense) (6 Card)
Stand Fast 3: Adds defense equal to 18% of base defense
Sprint 5: Adds +3 Move
Invoke Life 4: Adds HP equal to 32% of base max HP
Vital Strike 3: Increases critical rate by ??
Retaliation 4: Increases counter attack rate by ??
Karma Strike 1: Increases counter attack damage by ??
Lateral Blow 5: Does 135% damage when attacking from enemy's side
Abyss Ward 2: Reduces Dark-elemental damage by 12%
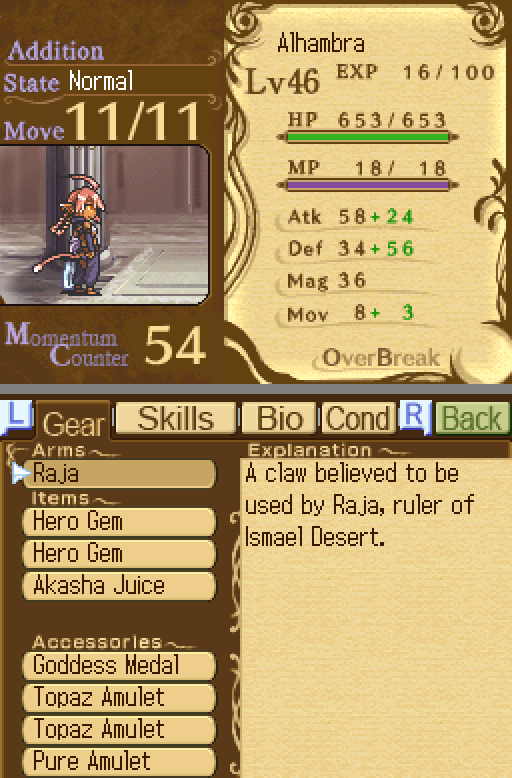
Alhambra exemplifies a problem with the game: there's very serious differences in character strength. Alhambra starts strong, with great stats and great movement, and spending time to get her best-in-game Card abilities only makes her stronger. And once that's done, why even bother using any other characters in her archetype? And she's so high-movement that she's simultaneously invalidating two archetypes at once: rogue-types and cavalry. She's stronger than most of either, tougher than most of either, and moves faster than most of either, and anyone who beats her in one area loses in the other two. In fact, this holds for basically any melee character that is not Serdic, Margus or Izuna, and that's largely because Serdic has plot behind him and the other two have non-smashing advantages. There's no reason not to throw her in every party unless you're purposefully limiting yourself.
That's a problem in the abstract, though. In practice, Alhambra is very fun to use, held back only by poor growths, a ridiculously late promotion, and a lack of Null ZOC. She zips around the battlefield, murdering anything that does not counter her, and survives the few hits she does take. It's nice to have such an utter death machine on your side, sometimes.
Accessories: +14 Magic, -20 defense +1 Move
Nifle: Cannot attack.
Card Ability: Dark Magic MP costs -20% (3 Cards; not factored in below)
Invoke Mind 2: Adds magic equal to 8% of base magic and multiplies spell power by 108% (not factored in below)
Wisdom Lock 4: Adds magic equal to 20% of base magic and multiplies spell power by 120% (not factored in below), decreases defense by 16% of base defense
Torus Spell 4: Regenerates 16% of max MP at the start of the player phase
Abyss Shard 1: Multiplies dark-elemental damage by 105%
Ignite Lore 2: 24 MP, 2 range diamond around caster, affects all in range, 70 spell power. Fire-elemental.
Sedna Prison 4: 100 MP, 7x7 square around caster, affects all enemies in range, 95 spell power. Ice-elemental.
Storm Rave 2: 30 MP, X-shape 4 tiles out in all directions, affects all in range, 50 spell power. Lightning-elemental.
Abyss Gate 4: 92 MP, 9 range, single target, 95 spell power. Dark-elemental.
Seven Menace 5: 150 Mp, 8 range, single target, 150 spell power. Dark-elemental.
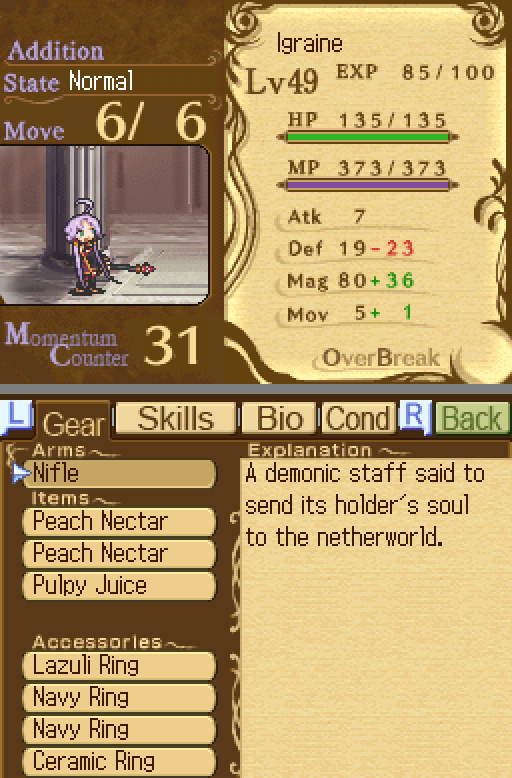
Igraine is probably the best conventional mage, on the balance of things (by which I mean, "not counting Cotton"; Cotton is less a mage and more a tank on a broomstick). Sure, she wastes entirely too many skill points (9.5 levels on one Ward and two bad spells is painful) and her durability is utterly awful, but essentially any mage (who is not Elmer) coasts through her rough early period by virtue of Sedna Prison+Martyr. And once she levels, she takes off. She promotes to third tier earlier than anyone who isn't Aegil and gets massive boosts out of it.
Mages are useful! Sedna Prison is the game's only real crowd control, a number of the high-level spells have exceptional range, and enemies tend to have much weaker magical defenses. There's no magical equivalent to ZOC, either, not in terms of Crazed or the way you're forced to rethink your strategy. MP and the "move or cast" limitation are both problematic, but there's ways around each, and you're usually not in much of a rush. Mages make you safer, and success in Rondo largely depends on acheiving safety.
Compared to Selmer, she avoids the truly painful period that comes before his first promotion and gains access to non-Lightning non-Ice spell schools. Compared to Arios, she's faster-moving, trades a lower max MP for regeneration, gets the powerful Yumil Magna much earlier, and gains access to the very good Abyss Shard instead of the middling Flame Shard. And unlike Elmer, she is a mechanically worthwhile character in which to invest.
She's also adorable. Seriously, her little swaying idle animation?

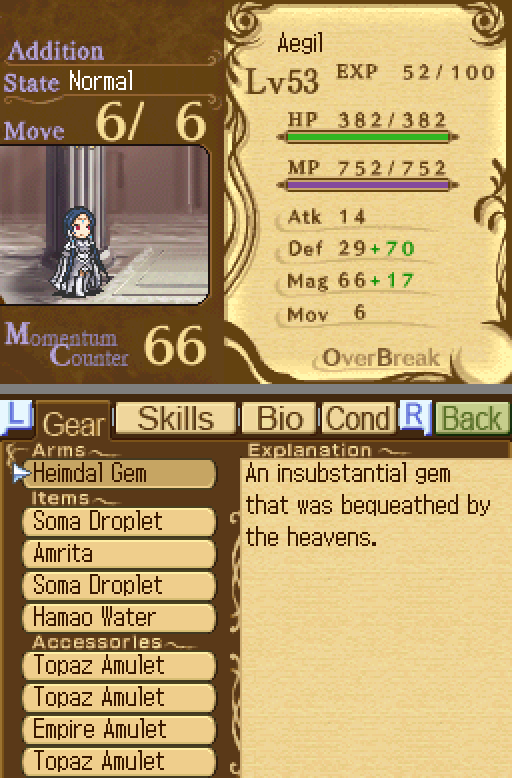
Accessories: +73 defense
Heimdal Gem: Adds MP equal to 20% of base max MP. Cannot attack.
Invoke Mind 3: Adds magic equal to 12% of base magic and multiplies spell power by 112% (not factored in below)
Invoke Mana 3: Adds MP equal to 45% of base max MP
ZOC 1: Prevents enemies without Anti-ZOC from passing through and inflicts Crazed (all base stats multiplied by 70%)
Wisdom Lock 3: Adds magic equal to 15% of base magic and multiplies spell power by 115% (not factored in below), decreases defense by 12% of base defense
Arrow Guard 3: -12% enemy arrow damage
Magic Guard 4: -16% enemy spell damage
Vital Power 3: Regenerates 12% of max HP at start of player phase
Abyss Ward 3: -12% enemy Dark-elemental damage
Arcane Light 3: -18% Light-elemental MP costs (not factored in below)
Prowess 3: Multiplies all experience gain by 115%
Cure Drop 4: 40 MP, 7 range, single target, restores HP equal to 65% of max HP. Light-elemental.
Oratoriorae 5: 150 MP, 8 range line, affects all in range, 150 spell power. Light-elemental.
Great Blessing: OB. 3 width 4 length rectangle centered on a square adjacent to Aegil, may be pointed l/r/u/d, that heals all in range by 20/50/80% of max HP.
Appropriately enough, Route B is designed to let Aegil really shine. The sudden loss of Marie makes finding some other healer very important and weakens mages, and Aegil can step easily into both roles. She's durable, mobile, packs a decent punch, is the best offensive healer, and has a strong claim to the title of best at healing, thanks to easily-available Great Blessings. Sure, she's not as simple to use as Marie, but when properly leveled and used, she's a close second to Cold Monarch when it comes to "most fun" character.
Other than that... Well, I think this run has spoken for the power of Laser Pope, hasn't it?

Accessories: +10 MC, +10 Attack, +10 Attack -20 Defense
Tsukuyomi: +35 attack, +99 accuracy, +15 critical. 7 Range (before True Arrows).
Vital Strike 4: Increases critical by ??
Lion Strike 5: Multiplies all OB gain by 150%
True Arrows 5: +3 Attack Range
Daredevil 4: Adds attack equal to 20% of base attack, decreases defense by 16% of base defense
Mana Break 1: Reduces target MP by 10% of max MP
Divine Seal 5: Activation skill. 2 range diamond centered on caster, affects all in range. Reduces incoming spell damage by 50% for three turns.
Hero: OB. (5*Attack-Defense)*1/1.5/2, depending on OB level. 15 range, single target.
Naji would be an amazing unit if he joined much, much earlier, or if he was on the other route. Mages become less and less common past the point where he joins up in Route B, making his mage-killer status less and less useful. Divine Seal is great, but you have few opportunities to use it. Without his anti-mage abilities, Naji is an Ansom who trades amazing offensive ability for a little more safety and a better OB.
That said, once you get late enough in the route, or if things get bad enough, then Naji can pop a few Gem items (or, better yet, have someone do it for him) and one-shot targets from over twice their movement range away. Naji is damn scary any time you take the safeties off.
Secondary Characters

Ryunoagito: +45 Attack, +5 Accuracy, 5% critical rate.
Card abilities: Multiplies OB gain by 150% (3 Card), Normal attacks use (4*Attack-defense) instead of (2*Attack-defense) (6 Card)
Invoke Might 5: Adds attack equal to 25% of base attack
Sprint 5: Adds +3 Move
Sharpshoot 3: Multiples accuracy by 1??%
Charisma 4: Adds to Quest success rate by ??
Basara Flash: OB. (2.5*attack-defense)*1/1.5/2. 5 range linear, affects all in range.
Ansom is one of only two Archers, and he's objectively the better one. Even without his Card abilities, he does good damage at good range and does a lot to neutralize the mages that make up the bulk of the game's serious threats. With them, he can kill or severely weaken just about anything. On top of that, he's surprisingly durable, his movement goes from "good" to "great" with Sprint, and his range+ skill on third tier only makes him safer. You really can't go wrong with Ansom.
Comet: Cannot attack.
Invoke Mind 3: Adds magic equal to 12% of base magic, multiplies spell by 112% (not accounted for below)
Invoke Mana 4: Adds MP equal to 60% of base max MP
Flame Shard 3: Multiplies fire damage by 115%
Storm Shard 1: Multiplies lightning damage by 105%
Blessing 1: Multiplies all healing item effects by 120%
Fire Dragon 4: 100 MP, 5 range, single target, 140 spell power. Fire-elemental.
Thunder 3: 30 MP, 5 range line, affects all in range, 90 spell power. Lightning-elemental.
Faerie Fire 5: 150 MP, 7x7 square around caster, 130 spell power. Fire-elemental.
Lucky Time: OB. Heals own HP and MP equal to 20/35/50% of each.
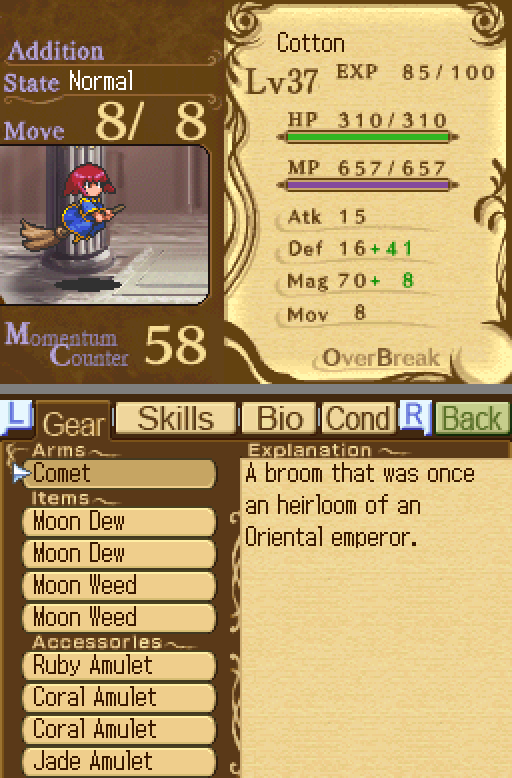
You've seen a high-leveled Aegil's ability to face-tank relatively well and murder in return. Endgame Cotton is basically that turned up to eleven. She has two abilities, "blow up target five squares away" and "blow up everything within a 7x7 square," and she does both quite well. She's not the most well-rounded character, but she doesn't need to be; her offense is incredible, she's very tough (if in an unconventional way, and if not immediately), and she makes up her lack of range with movement. Using her and ignoring other non-healer mages entirely is a pretty fair decision!
Amaterasu: +50 Attack, +20 Accuracy, 5% critical rate.
Sprint 5: +3 Move.
Vital Strike 2: Increases critical rate by ??
Lion Strike 4: Multiplies OB gain by 140%
Null ZOC 5: Ignores all ZOC skills level 5 and below (so all ZOC)
Blind Rage 3: Adds attack equal to 15% of base attack, decreases accuracy by ??
Mount Guard 3: -12% enemy cavalry damage
Arc Charge 3: Activation skill. Increases OB meter by 0.28.
Fog Plume 3: Activation skill. Increases evasion chance by ??.
Ragnarok Dusk: OB. (3.5*Attack-defense)*1/1.5/2. 13 range line, affects all in range.
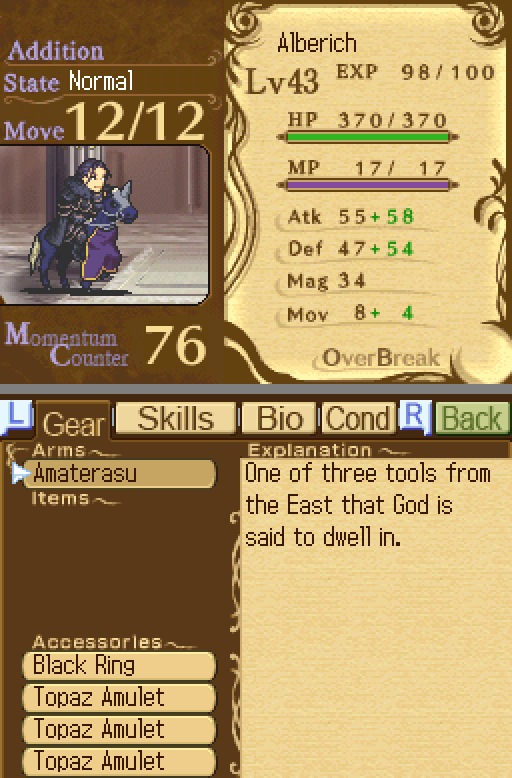
Alberich is basically a Fire Emblem prepromote: he comes in his final class, and though he's weaker than most characters raised to an equivalent level, he's also useful right off the bat. On the other hand, Fire Emblem prepromotes do not generally let you murder every single thing in a 13-square straight line, so there's that.
He's very plug-and-play, and Ragnarok Dusk is in the OverBreak top 3, no question. Most parties can find a good use for him, if simply as a sub on a map with one particularly irritating enemy.
With gameplay done, I need to make something clear now: finishing out Route B, playing past the ending at Chapter 37 (The Successor), is the Bad Ending. If you proceed, then you do so having not learned what the game wanted to teach you, and the consequences of that follow naturally. Yes, if Serdic leaves, then Aegil dies still waiting for his return... But Route B never claims that sacrifices do not happen or that there is a perfect solution to all problems.
By the time of the ending split, Serdic has succeeded in his stated goal: he has broken the back of Grand Meir, weakened them enough that they will never pose a threat to Bretwalde or Verona again in his lifetime. Even if Gauss lives, his army does not, and it is unlikely that an emperor who ruled through strength will endure after such a crushing defeat.
Why continue onward, then? Serdic admits as much to himself, in a conversation with Aegil in Chapter 35: he is fighting because he wants to make Marie's death mean something. He hates himself for lying to everyone, he hates himself for being cold-blooded enough to make the responsible choice, and more than that, he hates himself for making that sacrifice and being wrong, because he's discovered that the Holy Blade could have been purified, even without her sacrifice. He's suspected as much for a long, long time, and having that fear confirmed hurts. Serdic has no one he can be honest with; he feels unworthy of Igraine's pity and Aegil only understands how to lead people, not how to comfort them. So he fights, even knowing that it's futile, in hopes that he'll find meaning in it some day.
And you know what? Everything Igraine says in Stage 37 is true. It's not too late to stop. Sometimes it's okay to run away. All of this isn't his fault. He doesn't need to fight any longer. His task is done; he's accomplished everything he can accomplish with the Holy Blade in hand. And she's never lied to him before that. The right decision is to trust her.
Either way, Serdic finds some measure of peace in learning about himself. But if you continue onwards, Serdic continues to fight with his eyes set on his sunk costs instead of what's best. He has spent all of this time fighting to find a way to live with the guilt of taking his sister's life, someone who cared for him dearly, even if he had the best of intentions. So if you do not understand that this is futile and draw the right lessons, then the point is driven home in the clearest terms: the Holy Blade kills Igraine, the only family he has left--the only family he's ever really had as himself, not as Serdic's shadow.
The game doesn't guilt you for it, because no one wants to be told they're a bad person for continuing to play a game. Even so, continuing onward is a mistake. He ends the epilogue with one more heavy sin to shoulder, but it's still a happy ending, because he's finally in a place where he's willing to accept that and move past it. And that's why the ending at chapter 37 is the happiest ending: because Serdic comes to a place where he can step off his self-destructive track with no more deaths at all.