Part 135: Episode CXXIX: Dog Days
Episode CXXIX: Dog Days.jpg)
What do you say we give Kurando a chance to... do anything for a couple of sidequests? Today's activities take us back to the quaint Inugami Village.

Music: Field of God-Dog ~ Village of The Dog God
.jpg)
Specifically, we want to return to the Inugami Estate of Inugami Village to have Kurando Inugami speak with his mother Saki Inugami. Inugami. Inugami.
.jpg)
 An errand?
 I've been getting a bad premonition coming from the Dog Shrine lately. We have to protect it. Could you check? The Dog Shrine? That sounds serious. Yes, we'll have a look.
 The Dog Shrine? What's that? Are there going to be like... dog monks? In little dog monk robes doing dog monk ceremonies and stuff? I... might be interested in seeing that. N-Not exactly.
.jpg) A shrine, huh? And a legendary sword is in it? Yeah... I can see where this is going. Yes, but it's actually like a maze. It's built to keep strangers out of its inner recesses. Are you sure we're not going to get lost in there? You've been there before, right? <folds arms and looks down> Uh, no... I've heard about it, of course, but I've never actually been in there. Then what about you, Aunt Saki? Tell me you've been inside, at least! No, never. Kurando's father has been there a few times, though... You're joking, right? What kind of sacred shrine has barely anyone visit it? This is just going to be another musty old dungeon that's going to annoy me, isn't it? Oh, I know! Wait a minute... I know it's around here somewhere... ...Here it is! Take this with you, Kurando. What's this?
A shrine, huh? And a legendary sword is in it? Yeah... I can see where this is going. Yes, but it's actually like a maze. It's built to keep strangers out of its inner recesses. Are you sure we're not going to get lost in there? You've been there before, right? <folds arms and looks down> Uh, no... I've heard about it, of course, but I've never actually been in there. Then what about you, Aunt Saki? Tell me you've been inside, at least! No, never. Kurando's father has been there a few times, though... You're joking, right? What kind of sacred shrine has barely anyone visit it? This is just going to be another musty old dungeon that's going to annoy me, isn't it? Oh, I know! Wait a minute... I know it's around here somewhere... ...Here it is! Take this with you, Kurando. What's this?.jpg)
Saki proceeds to shovel a whole armful of crap into our Key Item inventory.
.jpg)
Such as a map of the Dog Shrine. Just one glance is enough to tell we're in for some real bullshit puzzle dungeon tomfoolery in the near future.
.jpg)
.jpg)
.jpg)
.jpg)
.jpg)
Especially, given the fact we're also handed five stone tiles with directions associated with them. Hey, did I mention I just went "fuck this noise" to this dungeon when playing the game the first time while lacking any internet access?
.jpg) You should be fine as long as you have that map. Just follow that and avoid the guardian beasts and malevolent creatures drawn to the power of the Mumerio. I'll be sure to tread lightly. Oh, your father once told me the shrine also gets haunted from time to time. It's been some time since an exorcist cleansed the area, so be on the lookout for that as well. ...I see. It'll all work out, I'm sure, once you get in there!
You should be fine as long as you have that map. Just follow that and avoid the guardian beasts and malevolent creatures drawn to the power of the Mumerio. I'll be sure to tread lightly. Oh, your father once told me the shrine also gets haunted from time to time. It's been some time since an exorcist cleansed the area, so be on the lookout for that as well. ...I see. It'll all work out, I'm sure, once you get in there!.jpg) *sigh* There isn't anybody like that on the Inugami side of the family... Hey! You saying it comes from my side of the family?!
*sigh* There isn't anybody like that on the Inugami side of the family... Hey! You saying it comes from my side of the family?! ...I couldn't agree more, Kurando.
  Tch. Whatever you say. Let's go punch a ghost dog or whatever the heck and get your ultimate weapon.
.jpg)
We have our new task ahead of us. Now we just need to exit the village.
.jpg)
And a new location, the Dog Shrine, appears on the map. The Japanese title of this location is "The Dog-Cage of Kurama" which... doesn't exactly roll off the tongue. But it does place the Dog Shrine on Mount Kurama a real location to the north of Kyoto.
Music: In Darkness of a Labyrinth ~ Dungeon
.jpg)
.jpg)
Naturally, Kurando is a mandatory party member. Ironically, we'll let our good boy Blanca sit out the visit to the Dog Shrine and go with Karin, Yuri, and Joachim for The Monks Team. With the Wolf Bouts concluded, we don't need to keep Blanca training as often. Joachim, on the other hand, still needs to maintain his work out regiment for future, manly events.
.jpg)
Now there are one of two ways this dungeon can go. Before we get to that, let's go inside and take a look at what gimmick we'll be dealing with first.
.jpg)
Inside we find a strange pedestal in the center of the room and a locked door past it. Also, apparently, this shrine is built directly above a river of lava. That red texture on the floor is a moving lava flow, not just some decoration. I don't think Mount Kurama is an active volcano with magma just feet below the surface. But I also don't think there's a puzzle maze shrine housing a mystical sword on the mountain either. So what do I know?
Anyway, let's take a look at this pedestal.
.jpg) This is a pedestal for placing stones. If we place the stones just right, we can create new paths. Create new paths? That's right. Here, let's take a look at the map.
This is a pedestal for placing stones. If we place the stones just right, we can create new paths. Create new paths? That's right. Here, let's take a look at the map..jpg) The grey areas are blocked. We can open up paths to these areas by placing stones on the pedestals. There are nine stones altogether. They each open up paths in different directions. What do you yellowish-green, stick-like thingies mean? Those symbols represent connections that can be made between areas. In other words, if we place the stone just right, we can open paths from one symbol to another. I dunno. Sounds pretty complicated...
The grey areas are blocked. We can open up paths to these areas by placing stones on the pedestals. There are nine stones altogether. They each open up paths in different directions. What do you yellowish-green, stick-like thingies mean? Those symbols represent connections that can be made between areas. In other words, if we place the stone just right, we can open paths from one symbol to another. I dunno. Sounds pretty complicated....jpg)
OK. So remember how all those tiles had directions in their descriptions? Well, now they have shapes on them. Except for the special colored rooms with the animal symbols, this dungeon is composed entirely of nearly identical-looking rooms which can be shifted by placing the stone tiles we've acquired. The tile shapes will alter the layouts of rooms when placed on the board. So the tile pictured above will result in a room with a door to the north and south. Exits to the room must connect to something otherwise it just results in a dead-end room. The white rooms on the map are connecting rooms we can enter assuming we have a tile with an exit leading to it placed.
Our ultimate goal is to reach black uhh... what the hell is that even supposed to be? A turtle, maybe...? That's usually what it is in this mythology, right? Whatever, the black room in the center two tiles up from the bottom room where we begin. The trouble is we need a specific tile to place on that square on the map to reach the treasure in that room. That's right there are more tiles to be found in the dark corners of this dungeon! And the game didn't indicate this, but we basically need to hit up all the other special rooms first to gain additional tiles to reach other rooms. Oh and it kind of needs to be done in a set order of clockwise starting with the area to the west.
Long story short: This is the part where you go to GameFAQs, a rambling Youtube video, or whatever your preferred methodology is of looking up a goddamn guide and find the solution because fuck doing this via trial and error. It's not incredibly hard but you can easily beef it using the wrong stones to get to one part of the map and be unable to proceed to the other. It's just a pain in the ass. Full stop.
.jpg)
We're going to hit up the Red Phoenix room to the west. So we'll place these tiles to reach that connecting room as so.
.jpg)
I hope you enjoy rooms that look actually identical except for shuffled doorways as that is the entire dungeon. At this rate, we're going to get to a dungeon that is just a straight line of untextured polygons that takes 20 minutes to walk down with a random battle every five feet.
.jpg)
When we reach the corner connecting room we find another pedestal. That's right there are multiple pedestals for tile shuffling as well.
.jpg)
Tile is already starting to stop sound like a real word. So let's pick up another one!
.jpg)
.jpg)
This pedestal only has two slots as it only controls the two rooms above it connecting to the Red Phoenix room. Technically we don't need to go to the Red Phoenix room. It's just got some loot in it. The only noteworthy bit of it being the rare Strongoids item for Joachim. But it's worth a quick trip.
.jpg)
.jpg)
After that, we're going to turn around the way we came and go straight back to the start. BUT, do remember to take those tiles with you. They must be manually removed from the pedestals to be returned to the inventory. Wouldn't want to have to backtrack while backtracking, now would we? They are at least nice enough to have a Remove All Placed Stones option. Except it's one of those dick options where there's a secondary "ARE YOU SURE?!" prompt with "NO" being the default option and it's very easy to mash through and get kicked out.
No, owl. I don't want to hear the goddamn tutorial again.
.jpg)
Our next goal is the Blue Dragon room to the north. So we'll use these stones to blaze a trail in that direction to the connecting room.
.jpg)
.jpg)
And yet another stone, JIN, is hanging out here. We'll add that to our collection.
.jpg)
The pedestal in this room has four spaces for the four rooms above the connecting room. We'll use these tiles to create a winding path to the Blue Dragon room wherein we'll find a mediocre Xbox360 launch title.
.jpg)
We might also find random battles. This dungeon does have random battles in it. But the encounter rate is extremely low by sheer virtue of each room takes three seconds to navigate before loading up a new room and as such random battles just seldom get a chance to even trigger. The entire dungeon I believe I had three encounters total.
Music: Deep in Coma ~ Battle in Japan
.jpg)
Fittingly, the Dog Shrine has a Dog Guardian a Dark elemental enemy with 852 HP. They bite, being dogs and all, and can cause Delay in the process. That's just about it. Monster dog. What more do you want?
.jpg)
Next, we have this ridiculous nightmare crab. How do you even eat with eyeballs in your mouth, you knucklehead? This is a Waira an Earth elemental critter with 355 HP. It likes to throw rocks at people and cause Special Attack Down by biting them with its eyeball mouth. What if you bit Blanca, crab dude? You'd have hair in your eyes and nobody wants that!
Waira is the name of a fictional yōkai. As in it's from period literature and not any actual folklore origin. Non-canon yōkai! Fanfic yōkai!
Wikipedia on Waira posted:
Click here for more.
It is depicted with the body of a giant ox and thick sharp claws growing on each of its front legs. Each of these emaki have no explanatory text besides their name, and furthermore there do not exist any documents recording any folk legends about them, so it is unknown what kind of yōkai these were intending to depict. All of the pictures depict only the upper body, and there have been no pictures found that depict its lower half, so it is unknown what its whole body looks like.
Starting in the Shōwa and Heisei periods, yōkai-related literature and children's yōkai picture book references started to give three kinds of explanations, that they are a yōkai of unknown true identity, that they are a large yōkai that live in the mountains and use the large claws on their front legs to dig up small animals like mogura (moles) to eat, and that they are a large yōkai in the mountains that attack and eat humans, among other explanations.
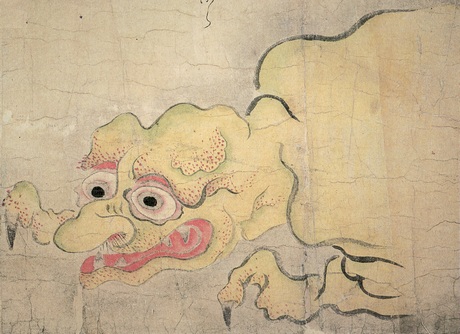
Or they could be a crab thing with a sideways mouth filled with eyeballs. Who's to say with these bootleg yōkai?
.jpg)
This last enemy I had to go out of my way to find in a random battle capacity. As in I had to return to the dungeon and force an encounter since I looked up the list of enemies in the area and whoops missed one. This is an Otoroshi a Wind elemental creature with 348 HP. This err... cloaked floating brain with several bonus eyeballs including one growing out of its err... brain fills a support role and will cast Arc Barrier, Surge or Shield on its comrades.
Like the Waira, Otoroshi is another yōkai that doesn't have any actual folklore basis and cropped up in illustrations in children's books from the 1700s.
Wikipedia on Otoroshi posted:
Click here for more.
They are portrayed covered with long hair and with some hair hanging down in front of the face. There is no explanatory text besides their name, so it is unclear what kind of yōkai they were intending to depict.
In yōkai-related literature and children's illustrated yōkai reference books starting in the Shōwa and Heisei periods, it is often explained that when they find people who do imprudent or mischievous things at shrines, they would suddenly come falling from above. Also, in the Tōhoku Kaidan no Tabi by the author Norio Yamada, under the title of "Otoroshi," there is a story about how in Fukushima Prefecture, when the unfaithful who have never even once visited a temple go to their mother's funeral, upon passing under the temple gates, they would suddenly be seized by a thick arm and hoisted up. Kenji Murakami did not find any legends that followed this explanatory text and posits that this is nothing more than a made-up imagination based on Sekien's otoroshi picture in the Gazu Hyakki Yagyō (where it perches atop a tori.)
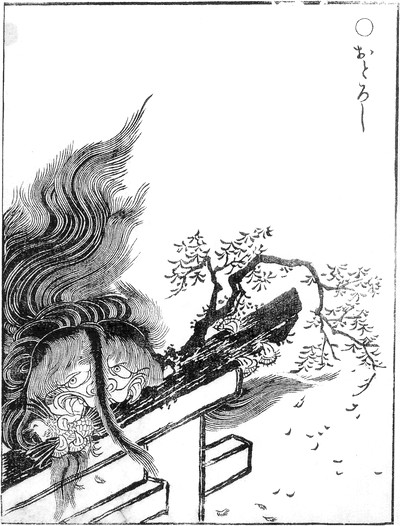
No idea how you went from hair monster to brain with all the eyes.
Music: In Darkness of a Labyrinth ~ Dungeon
.jpg)
.jpg)
Back to it. The Blue Dragon room contains the ZAI stone which will always us to continue our tile shifting shenanigans.
.jpg)
But first, we need to return to the initial room, remembering to take all the stones we placed with us. I have definitely not exited out of the Remove All Stones prompt by accident multiple times at this point. No sir.
.jpg)
This time our aim is the White Tiger room located to the eastern side of the Dog Shrine. We'll use this configuration of stones to blaze a path to the connecting room to that segment of the dungeon.
.jpg)
.jpg)
In the connecting room, we find another pedestal where we can slot up to four tiles. But... we only need to go to another connecting room two squares over. So this will do. Plus we don't even have four stones left.
.jpg)
.jpg)
Besides we need at least one more stone that can bridge the gap in the corner leading to the White Tiger room and it must be a tile with north and western entrances.
.jpg)
.jpg)
And this leads to the ZEN Stone. Which, if we read the description, is the last damned stone and will lead us to the Dog Shrine's treasure.
.jpg)
...At least it will after we backtrack all the way to start. Technically we could probably ditch those stones we left on pedestals on the way here. But, I took them anyway. Just in case. So I can smash them into powder with a sledgehammer, maybe. I want a JRPG where you can just break the shit out of key items at the end of the dungeon. Take a sliding block and push it over a cliff into the sea. Drop that bullshit emblem into a volcano. Fuck yo dungeon! Ain't no one doing this shit again!
.jpg)
The final configuration is as follows. We need to put the ZEN stone over the Black Whatsit room on the map which will unlock the final room of the dungeon and our ultimate reward.
b.jpg)
If all this tile crap was hard to follow or your eyes glazed over reading it, this is the path we took to get to each room. Now take that knowledge and remove it from your brain so we can finish this... perfectly fine if you're following a guide dungeon. I was out of this place, boss and all, in less than 40 minutes. It took longer than that just to go talk to human Henri revisiting Tiffauges Castle. I'll take it. That's how low my dungeon standards in this game are now.
.jpg)
The ZEN tile reveals another copy and pasted room (you're not fooling me because you rotate the angle of the room and change a symbol on the wall's color, game) with a solitary generic treasure chest. You'd think a shrine with magically shifting rooms protecting a legendary artifact would have more... elaborate décor for its protected treasure and not the same chest from the wholesale chest factory.
.jpg)
.jpg)
Investigating the chest reveals Mumeiro -- the ultimate weapon for Kurando with +219 Physical and +178 Special Attack Power. That just leaves Anastasia without her ultimate weapon and hers requires looting the final optional dungeon and ugh... Solomon's Trials. So that one's got to wait. All that aside, it's worth noting that Kurando automatically equips Mumeiro as soon as he obtains it because we're jumping straight into the boss from here.
.jpg) Oh, Kurando! You did it! It's incredible! I can feel the power surging out of it... Hmm... funny. I'm suddenly feeling a cold chill down my spine and a feeling of... an obnoxious aura... Huh?
Oh, Kurando! You did it! It's incredible! I can feel the power surging out of it... Hmm... funny. I'm suddenly feeling a cold chill down my spine and a feeling of... an obnoxious aura... Huh?.jpg) Hey... We've heard that disgusting laugh before...!
Hey... We've heard that disgusting laugh before...!The party turns around to find...
.jpg)
 What do you mean, "pillow ghouly guy"?! Oh no, it's Baby Head. I don't know. It looks more like he's Baby Dead to me. Grr! Heh. You know, you're right. I guess he doesn't need that pillow to float anymore? Eww... He stayed all wrinkly and gross as a ghost. At least he's transparent so I don't have to see all his oily pores.
.jpg) That bad premonition Aunt Saki was talking about must've been this guy. This is a sacred Inugami shrine. If you leave quietly now, we won't have to get rough with you. Oh ho ho! Such threats! Do you really think you can make me slink away? Now you're doomed! This time, I'll throw you into the depths of hell! You already did that. Twice! It didn't work. Yeah, you died last time. Give it a rest. Fools! I'll show you I'm more powerful than ever. Yuri, have you ever punched a ghost baby? Yes... ...Really...? It happens. But I have not punched an old man that looks like a baby and is a ghost. You don't see that combo a lot. Let's add that to the punch list.
That bad premonition Aunt Saki was talking about must've been this guy. This is a sacred Inugami shrine. If you leave quietly now, we won't have to get rough with you. Oh ho ho! Such threats! Do you really think you can make me slink away? Now you're doomed! This time, I'll throw you into the depths of hell! You already did that. Twice! It didn't work. Yeah, you died last time. Give it a rest. Fools! I'll show you I'm more powerful than ever. Yuri, have you ever punched a ghost baby? Yes... ...Really...? It happens. But I have not punched an old man that looks like a baby and is a ghost. You don't see that combo a lot. Let's add that to the punch list..jpg)
Music: Hardcore to the Brain ~ Mid Boss in Japan
.jpg)
The boss of the Dog Shrine is the ghost of Garan, Hotoke Garan. Hotoke being a term in Buddhism for a dead person's soul. So, you know. It fits. Ghost Garan is still a Dark elemental enemy with 6980 HP.
.jpg)
He's also accompanied by an Otoroshi (the flying brain and eye guys) which, as you'll recall, is all about casting buffs and defensive spells. So we want to nuke that thing off the board immediately.
.jpg)
The spectral Garan is identical to the previous two encounters only stronger and with higher-end spells of every elemental flavor and he retains a very high magic resistance even in death. And... something very peculiar happened when fighting him. His AI just... broke.
.jpg)
As in the previous two battles against Garan, he likes to use Mind Assault to wipe the MP of a single party member. In this case, he targeted Karen immediately. This was annoying because, having only two Crest Magic users, Karin was the one I had equipped with Arc Rage which I wanted to cast to make this battle go faster since everyone is stuck doing physical attacks. So I threw here a Mana restorative item. Which made Hotoke Garan just kind of shit the bed. As he just spent the rest of the battle casting Mind Assault on every member of the party.
.jpg)
.jpg)
The battle lasted four rounds and all he did was steal MP before being punched into being double dead. I could not replicate that behavior reloading even from the turn where he started doing. I have no idea what triggered that.
Music: Result ~ Victory
.jpg)
.jpg)
Which, you know what? Fine! Fuck it! Garan doesn't does deserve a more dignified final battle than his AI shitting the bed and wasting every turn before ingloriously dying a second time and nobody acknowledging his re-death. Here lies Garan. He lived as he died. Immediately forgotten.
Music: In Darkness of a Labyrinth ~ Dungeon
.jpg) ...It wasn't my doing. It was the power of the Mumeiro. Now I understand why it's been sealed away in the Dog Shrine all this time. It's too powerful for ordinary use... Are you going to put it back? Well... Oh no! After all that stone tile map crap you equipping that stupid sword RIGHT NOW and hanging onto it! He's right. That was kind of a huge pain.
...It wasn't my doing. It was the power of the Mumeiro. Now I understand why it's been sealed away in the Dog Shrine all this time. It's too powerful for ordinary use... Are you going to put it back? Well... Oh no! After all that stone tile map crap you equipping that stupid sword RIGHT NOW and hanging onto it! He's right. That was kind of a huge pain.  Plus you earned defending me beating up that crusty old man ghost. Did we defeat him for good this time? Pfft. Who cares? Seriously. R-Right. That takes care of the errand. Let's go back and see Aunt Saki. <nods> All right.
.jpg)
We are now transported back to the World Map. Let's return to Inugami Village to get a debriefing from Saki and close out this quest. As well as perhaps set the trigger for a follow-up quest we'll cover next time.
.jpg) We purged the Dog Shrine of an evil spirit, Mother. And I have the Mumeiro here safe with me. <nods> Yes, I know. I was watching. You were? How? Hee hee! I was dying to find out what was going on, so I peeked into the Fountain of Sukune. <jumps back in surprise> Yikes... You mean you were watching the whole time...? You were magnificent, Kurando. What a fine young man you've become! Somewhat of an anti-climactic battle against that sorcerer's ghost. Why did he keep stealing your magic energy and nothing else? No clue. I do. That dweeb was a stupid idiot and only got stupider since he died. ...Yeah probably that. I couldn't have done it without everybody's help. That way of thinking of yours must be what made the Mumeiro allow you to pick it up. That sword chooses its own master. It won't allow anyone unworthy to wield it. I'm proud of you, Kurando. Mother... I'll allow you to take the Mumeiro with you until your journey is through. Knowing you, I'm sure you won't let its power go to your head. <nods> I won't! Well, I guess we'll be continuing our journey now, Mother. All right. Be careful out there!
We purged the Dog Shrine of an evil spirit, Mother. And I have the Mumeiro here safe with me. <nods> Yes, I know. I was watching. You were? How? Hee hee! I was dying to find out what was going on, so I peeked into the Fountain of Sukune. <jumps back in surprise> Yikes... You mean you were watching the whole time...? You were magnificent, Kurando. What a fine young man you've become! Somewhat of an anti-climactic battle against that sorcerer's ghost. Why did he keep stealing your magic energy and nothing else? No clue. I do. That dweeb was a stupid idiot and only got stupider since he died. ...Yeah probably that. I couldn't have done it without everybody's help. That way of thinking of yours must be what made the Mumeiro allow you to pick it up. That sword chooses its own master. It won't allow anyone unworthy to wield it. I'm proud of you, Kurando. Mother... I'll allow you to take the Mumeiro with you until your journey is through. Knowing you, I'm sure you won't let its power go to your head. <nods> I won't! Well, I guess we'll be continuing our journey now, Mother. All right. Be careful out there!The party departs.
.jpg) Can you see him, my husband? Ever since he met Yuri, our son has grown so much, and so quickly too.
Can you see him, my husband? Ever since he met Yuri, our son has grown so much, and so quickly too.Tune in next time as Kurando might continue to grow. And lose a lot of clothing in the process... It'll make sense.


Can you believe it? We've almost burned through all the optional dungeons! I still can't see a light at the end of the tunnel. But one day...
Monsters:
.jpg)
Only *I* have the brains to rule Lylat!
.jpg)
Worship me or I'll set your shit on fire!
.jpg)
Pfft. I'm dead. What do I care if my hellhound runs amuck after I'm gone?
.jpg)
You'll just have to take our word on it since he had text-only speech for his afterlife encounter.
Characters:
.jpg)
Yeah, Henri is looking great for his '90s. Garan was actually only 37 and look at that trainwreck of genetics.

Dog Guardian Concept Art - Woof.