Part 35: Intermission the Second
 : Intermission time! Hee ho!
 : Normally I'd say that's a dick move, but I guess this gives me more time to make up my mind.
*: Well it's not like you're just standing there for several-
: You know what I mean.*: Gotcha, chief.
1. Music
We haven't quite heard all the music in the game yet, but here's the round-up for every track that played since the last intermission.
Mantra Troops
If I remember correctly, this would be the theme for the Mantra Headquarters.
Masura
And here's Gozu-Tennoh's theme.
Kabuki-cho
Hmm, this must be from some part of Kabukicho Prison that slipped by my notice. I was rather focused on navigation at the time!
Rescue
This song plays at the top of the Obelisk, as we were giving Yuko's freedom back to her. Before she promptly gave it away again, of course.
Puzzle Boy
I'm sure a great many people around the world are eternally grateful to IKelley for his step-by-step instructions!
Isamu
This is of course Isamu's theme, but unlike Chiaki, whose song was playing when we first reunited with her, this one only plays once Isamu has become the self-styled master of the Amala Network.
Reunion with Master
This plays when we catch up with Yuko in Yoyogi Park. I suspect the original Japanese title for this track would have been more along the lines of "Reunion with Sensei", in which case it probably would have been better translated as "Reunion with Teacher".
Lord Aladia Advent
And this one is for when we give Yuko the Yahirono Himorogi, and she gets possessed again for a moment. It's also the only inclusion of Aradia's theme on the soundtrack.
Hijiri
There's definitely a tension to this piece, but it's one of the few pieces with a warm, friendly feel to it, which is appropriate for Hijiri for... well... most of the game I suppose.
Large Map ~ Last Area
Good Lord I couldn't say enough good stuff about this track. Daaaang. You don't get to hear it very much for how badass it is, unfortunately; it only plays on the top segment of the overworld once the final dungeon is unlocked.
Yahiro no Himorogi
This is the short piece that plays after the Samael fight, where Ms. Takao appears for the last time to entrust us with the Yahirono Himorogi and all the hope she's got left.
TALK
Very clearly inspired by the music that plays in SMT1 before any given random encounter turns to violence, this track plays before every Fiend fight.
Fiend Boss Battle
This is... well. Right. It's very, very different in flavor than the standard boss theme, that's for sure. It feels like it makes you want to take the battle seriously, which you should, really.
Warp Field
This would be the music the Labyrinth of Amala shortcut minigame. It's a cool enough piece, but I don't have a great many fond memories of success associated with it. :3
Reminiscence
Ah, this one is for the cutscenes you get as a reward for completing each Kalpa.
Joint Struggle
This is for when you finally have a chance to join up with Dante.
Dante Boss Battle
Aaaaaaaaah holy crap it's so rad. It's so damn good. Almost too good.
Law
This is a reprise of the Law theme from earlier in the series. As much as I'm not a fan of the Law faction generally, as far as I'm concerned they got the best music.
Metatron
I can't imagine a better piece for this battle. It's so gloriously pompous! And the way it incorporates the Law theme is just magnificent.
Chaos
And of course this is the reprise of the series' Chaos theme, played just before the Beelzebub fight.
Beelzebub
Man I wish I had more to say than "welp, another perfect track". But, hmm. Welp, another perfect track.
2. Random observations/errata
***: The word "Kalpa" has a very interesting meaning. In Buddhism, it essentially signifies one instance of the cycle of reincarnation, the period of time a soul spends between birth and death. Considering each successive Kalpa in the Labyrinth looks more decrepit than the last, you might think that the soul it symbolizes is accumulating sins and general negative karma from life to life. However, Lucifer waits at the bottom with his own take on the way to escape the repeating ordeal of the Vortex World, so it might be considered as a sort of reverse enlightenment!
***: For most of the playthrough, I've been using Saleh Jamal's invaluable Heretic Mansion application to avoid having to look up fusion tables for race combinations. If you're playing along or think you might play yourself in the future, I highly recommend it!
***: I mentioned a while back that Matador's Red Capote gives him four stacks of Agility buff, but in fact it gives him eight. The maximum is still four, but it allows him to counter any amount of Sukunda or Fog Breath stacks he might have been afflicted with.
***: The status ailments have been pretty self-explanatory, but I didn't quite detail the difference between Bind and Stun. Bind makes you skip your turn and waste an icon, just like being Asleep does, except you don't recover any HP or MP. It also wears off after several turns or at the end of the battle. Stun instead causes any action that has an accuracy check to miss practically 100% of the time. You can still heal, cure ailments, apply and remove buffs and debuffs, and use non-attack items as usual, but everything else will probably just miss. On its face, Stun is significantly less nasty than Bind, but it does not wear off by itself and will persist between fights.
***: As a nice touch, if you jump from the top of the Yosuga HQ with Dante in your active party, he takes no damage. This of course mirrors his entrance cutscene before his first battle, where he leaps down from that same spot and clearly doesn't start the fight with only one HP left.
***: I've probably been making the game look a lot easier than it really is. If you know what you're doing and what you're up against, vast swathes of the Normal difficulty mode are... I don't want to say trivial, but, well, pretty easy. Of course, on the other hand, if you don't know what to expect, things are quite a bit rougher. It's really a question of player knowledge. At any rate, if I were to play the game again on my own time, which is entirely possible, I'd definitely stick with Hard mode.
***: You might think that focusing on Strength is the only way to go for a physical-inclined Demi-fiend, but focusing on Vitality is also a viable choice, on account of physical skills that scale off max HP. Not only does it make Heat Wave much more effective for the long period of time where it's your only group-hitting move, but Deathbound is a spectacular endgame skill in its own right and can outdamage the likes of Spiral Viper even on a single target if it lands at least two hits. This is especially worth considering on Hard mode, where a deep HP pool is much more valuable on its own merits.
***: Turn order and Agility have a major effect on your strategy that is easy to overlook. Simply put, your fastest ally will get extra turns from crits, Pass actions and weakness exploits much more often than your slowest ally; getting even one crit, Pass or exploit will give your fastest ally an extra move, while your slowest ally only gets to act twice if you've managed to halve all of your icons. On top of that, misses will prevent your slowest allies from acting at all. With that in mind, it's easy to see the pitfalls of having a Demi-fiend with low Agility, even beyond the obvious accuracy problems. Acting first and often is super important, considering how much more flexibility you get for summoning, using items, and engaging in conversation. You don't want to know how it feels to summon a healer with your last icon and to have to endure a whole round of enemy attacks before you can get your Dia on. A good rule of thumb is to have just a smidge more Agility than your most agile demon, though coming in second place isn't too bad, since you'll still get to act even if your first guy misses. Third place is a lot riskier, and fourth place is Bad Times.
***: Dang, I almost forgot. I put up a video of the trippy spinning hallway in the Nihilo HQ, and didn't link to it in an official update. So here it is!
3. Genealogy
I've been keeping track of who's part of whom all along the playthrough. It's... probably a little obsessive, but I think it's cool to look at and it was fairly low-effort once I got it started. Our roster is likely to change again before the end, but this is a good place to take stock anyway.
code:
Evolution or other transformation: ---
Fusion: -+-
Sacrifice -X-
Deathstone fusion: -#-
Fusion accident: -@-
The chart is not keeping track of Mitama fusions.
Any demon without an arrow pointing to it was recruited, summoned at the Cathedral, or purchased at Rag's.
Pixie ---> High Pixie -+-> Uzume -+-> Unicorn -+-> Kikuri-Hime -+-> Sarasvati -+-> Horus ---> Pixie
Angel ---/ | Blob -X-+ | Valkyrie ---/
Choronzon -+-> Isora -+-> Nekomata ---/ Taraka ---/ |
Lilim ---/ | Principality ---/
Sudama ---/
Kodama -+-> Apsaras -+-> Nozuchi ---> Gui Xian -+-> Naga ---> Raja Naga -#-> Black Rider
Hua Po -X-+ | Nekomata ---> Senri ---/ Bicorn ---/
Pixie ---/ |
Will o' Wisp ---/
Shikigami -+-> Bicorn -+-> Incubus -+-> Kushinada -+-> Dionysus -+-> Odin
Mou-Ryo ---/ | | | |
Zhen -+-> Forneus ---/ | | |
Angel ---/ | | |
Momunofu ---> Arahabaki ---/ | |
Koppa -+-> Sarutahiko -+-> Okuninushi --/ |
Chatterskull ---/ | Mizuchi ---> Long -X-+
Dis ---> Valkyrie ---/ Orthrus -#-> White Rider ---/
Sarutahiko ---/
Badb Catha -+-> Succubus -+-> Sparna ---> Garuda -+-> Futomimi
Eligor ---/ Nue ---/ Shiki-Ouji ---/
Badb Catha -@-> Troll -+-> Sati ---> Parvati
Eligor ---/ Senri ---/
Gogmagog ---> Albion
Onkot ---> Hanuman ---> Wu Kong
Titania
Black Frost
Sarutahiko -+-> Phantom -+-> Sakahagi
Succubus ---/ Aquans ---/
Dante
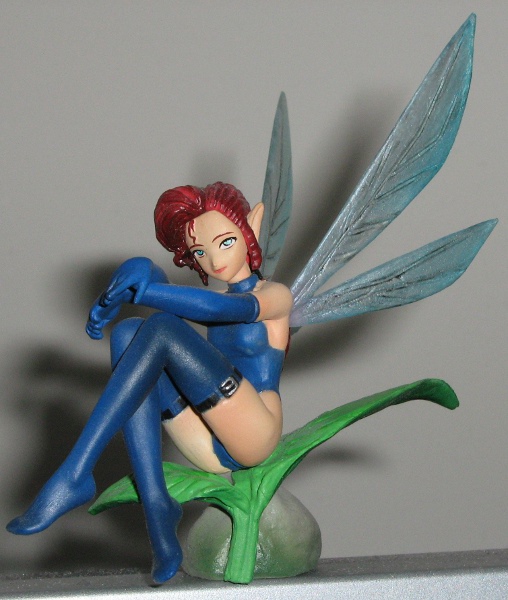
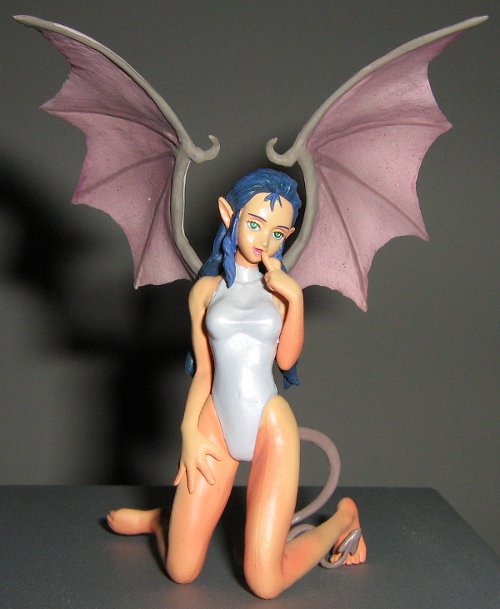
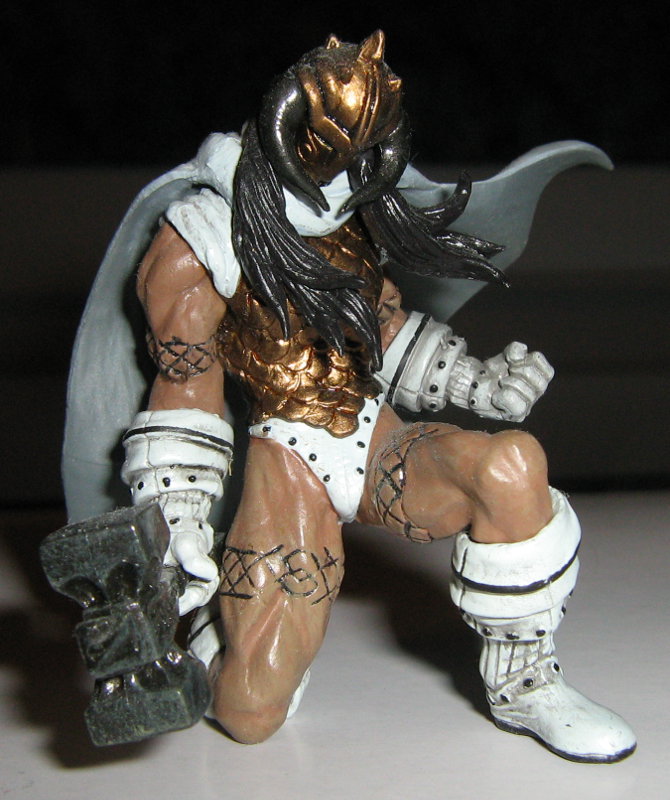
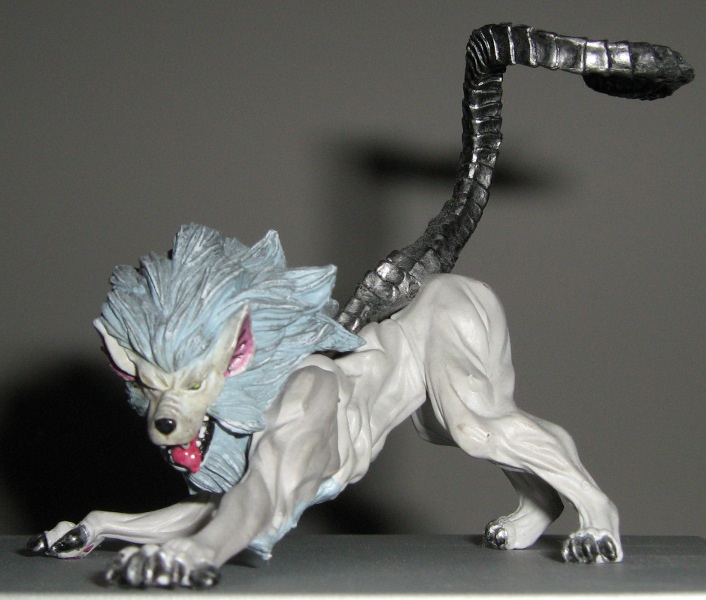
Titan ---> Died in Shige's tunnel.There is something I did for my previous LPs that I somehow completely forgot to do for this one. I happen to own a number of SMT figures, and I used to post pictures of them as we encountered them in the games. Considering they were being compared to 16-bit sprites, they represented quite the leap in graphical fidelity, so to speak. Anyway, it slipped off my mind for Nocturne, so hey, I might as well take this opportunity to catch up. So, in order of appearance...


(You can get Beelzebub's bottom half, but I don't have it.)
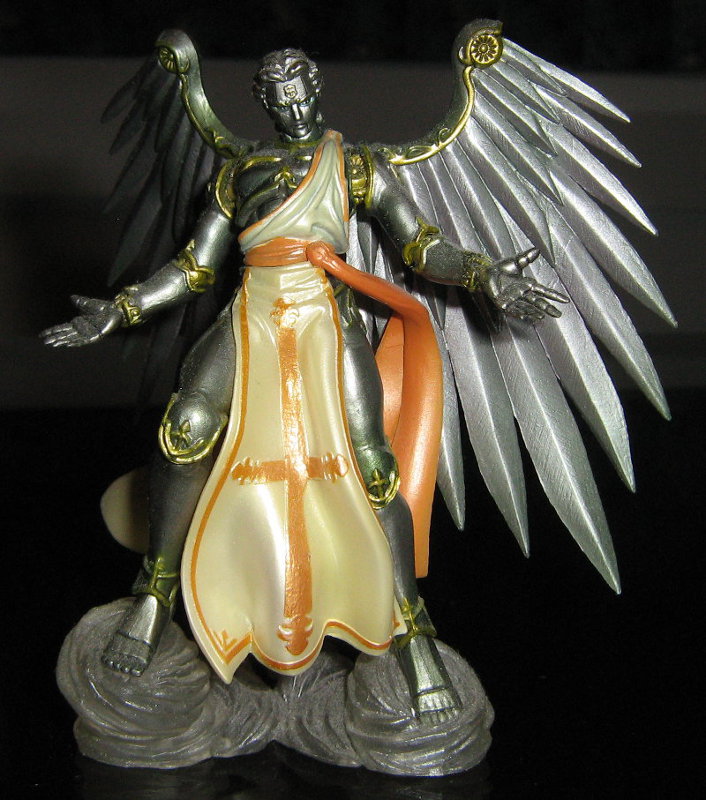
(Come at me, bro.)
5. High-resolution pictures
Aight, same as last time, but more so: http://imgur.com/a/QvqMH/all. Same warning applies: these are 200-odd 1440x1080 PNGs, weighing in at up to two Mbs each. That said, even if you're not going to take a look at the whole gallery, at least check out this mofo. This is a PS2 game from 2003, which you could be forgiven for forgetting.
6. Geography
I was doing to do this section like last time, but it turns out all the locations are so tightly packed it would either be an unreadable mess or an ungainly large image, so I'm changing my approach.

So, from the beginning...
1- Yoyogikoen Station, in the southwest of Yoyogi Park.
2- Shinjuku, where the hospital is located.
3- Shibuya, where we met Chiaki at the club.
4- Ginza, where Nyx's Lounge is located. The Nihilo HQ is a little southwest from there.
5- Ikebukuro, where the Mantra HQ is located.
6- This would be the Kabukicho area, where we freed Futomimi.

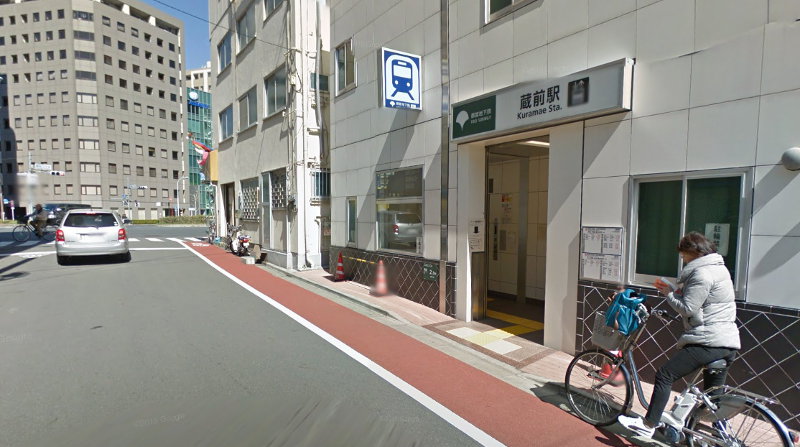
We then took Ikebukuro Station in eastern Ikebukuro...

...travelling underground to...
7- Kuramae Station.
8- This is Asakusa; the Manji symbol on the map is Nakamise-Douri and Senso-ji.
Hijiri gave us the scoop on Ms. Takao's location, so we entered the back door to the Nihilo HQ and emerged in Marunouchi...

...which is just east of...
9- The Imperial Palace, which was obliterated during the Conception and replaced by the Obelisk.
Upon freeing Ms. Takao, we returned to Asakusa, where we learned of an evil force in Yoyogi Park. To get there, we entered...
A- Yushima Station.
...to emerge from...
B- Gaien-Mae Station.

Once Sakahagi was taken care of, we returned to Asakusa once more. We followed Hijiri and Isamu through the Amala Network, emerging south of...
C- The Sannou area, where the Amala Temple is located.
On Hikawa's trail, we returned to ...
D- Yurakucho Station, which we had taken a look at long before.
...and took a tunnel to reach....
E- Kasumigaseki Station, close to the Diet Building.

Aaaaaaand that's it, all the non-Labyrinth locations in the game fit in there. The Vortex World is tiny!
7. Conclusion
Aight, that should be all for now. I'd have liked to be more regular with the intermissions, but, well, it turns out I wanted to play the game instead! Who would have thought?
The poll is less even by now than it was after the first day or so, but I'm still giving it another day or two, and I'll use that time to take a bit of a breather and psyche myself up for the final stretch. Regardless of our decision, we'll clear out Hell's Vault and investigate Bishamon's quest line at some point, but we'll have reached partway through the final dungeon before we do so, for reasons that will become clear in time.
Whew, there we are. Hang tight folks, we're not out of the woods yet!