Part 1: Turn 1
Turn 1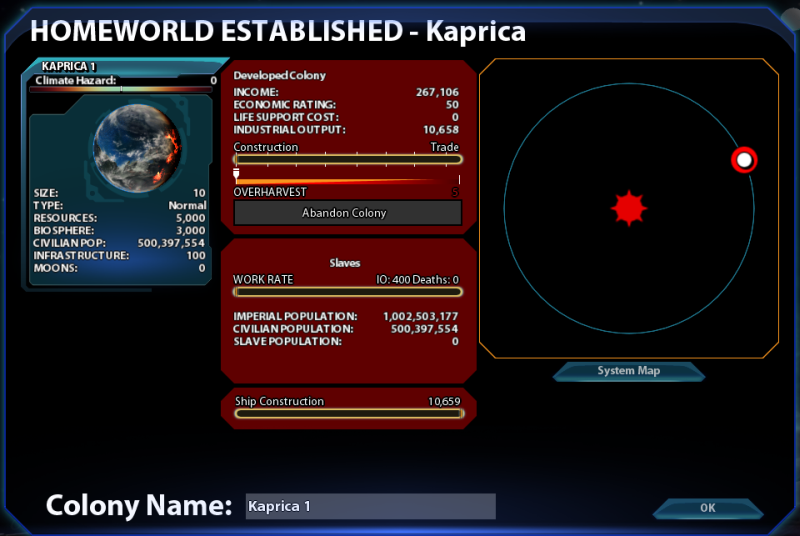
Upon starting the game, you're immediately greeted with the news that you've founded a colony on your homeworld. In this single screenshot are hundreds of years of Space Kangaroo history, compressed into a single picture of a planet that looks pretty much identical to Earth. 'Kaprica 1' is a dumb name for the glorious throne of the Kerberos though, so we're going with something much more in keeping:

Much better.
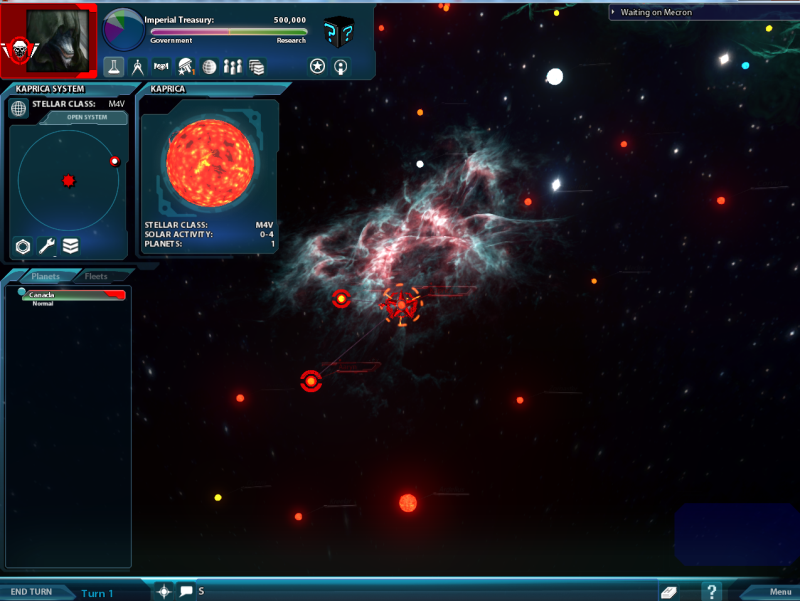
Welcome to the screen you'll be spending most of your SOTS 2 career staring at. Rather than take another infodump all over your face, I'll be dealing with each UI element as we come to it. Because of (sigh) a few design particularities, the first turn takes quite a while.
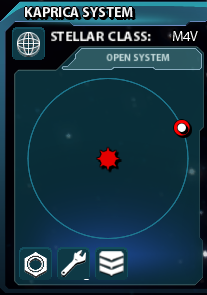
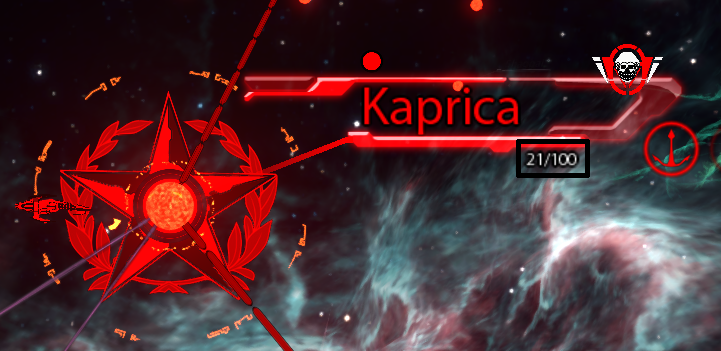
This is our home system, with a central M-class star around which orbits the lone world of Canada. Systems in SOTS 2 can have multiple worlds. Of our first three systems, Mogo only has one planet, but Aaryn has another habitable world and a gas giant. Gas giants do nothing beyond sit there looking pretty.
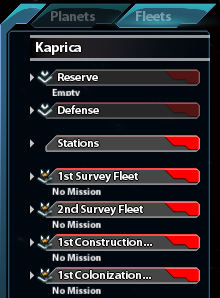
We have several fleets of ships at Kaprica based on default crappy designs. Because ships are so expensive these fleets are going to be our workhorses for the early game. I'll go into fleet movement and so on in a minute, because first of all we're going to learn the basics of ship design. We have to do this on Turn 1 because of the prototyping system even though we won't actually be building the majority of the ships we design for a while. What is the prototyping system, Aethernet? I'm glad you asked, Internet, because it's a fantastic example of how game design can go badly, badly wrong.
In the first SOTS, a great big lump of the fun was designing your ships to counter your opponents' designs. In SOTS 2, the design intent is for ships to have long heroic histories and to have players getting attached to particular ships that've done amazing things. Unfortunately for this intent, players insist on playing the game their way, and can't be relied on to role play by themselves. So, instead of SOTS 1 where ships were pretty much disposable bags of guns you could swap in and out when you got a new toy, in SOTS 2 you're meant to consider very carefully when you introduce a new design. The gimmick that Kerberos introduced to enforce this is exceptionally higher (like 5-10 times) costs for the first ship of any given design. However, because having very high prototyping costs doesn't make any sense at the start of the game when your species has already been in space for ages and is quite familiar with all the technologies you begin the game with, Kerberos implemented a patch wherein any designs you make on the first turn don't have to pay prototyping costs.
This is a great example of how Kerberos are the central planners of video game design: when players don't act how they expect them to, they introduce a regulation designed to force them to do so. When that regulation causes some things which don't make sense, they introduce another regulation to cover up the flaws of the first one, and so on ad infinitum. Truly, they are the godless socialists of the 4X world.
As a result, we're going to design the ships we'll need for the first half of the game right now. Ship design is quite complicated so brace yourselves for more WALLS OF TEXT.
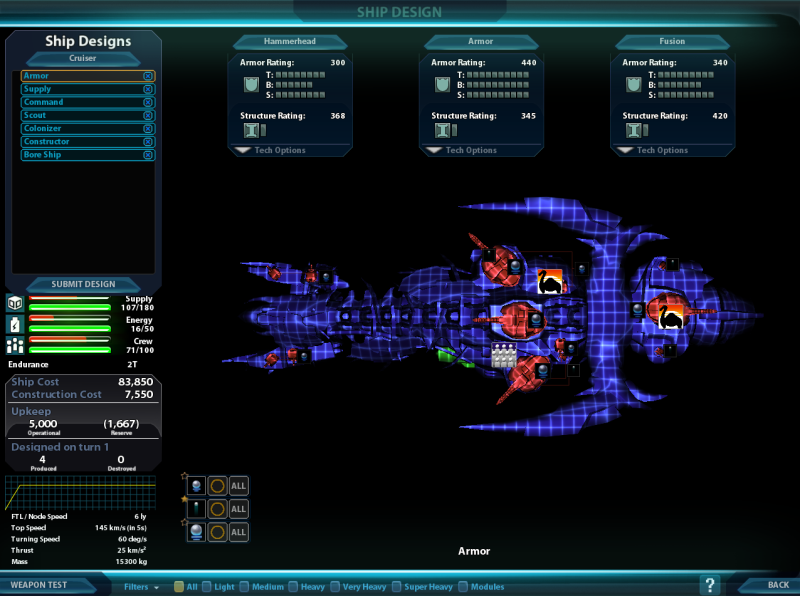
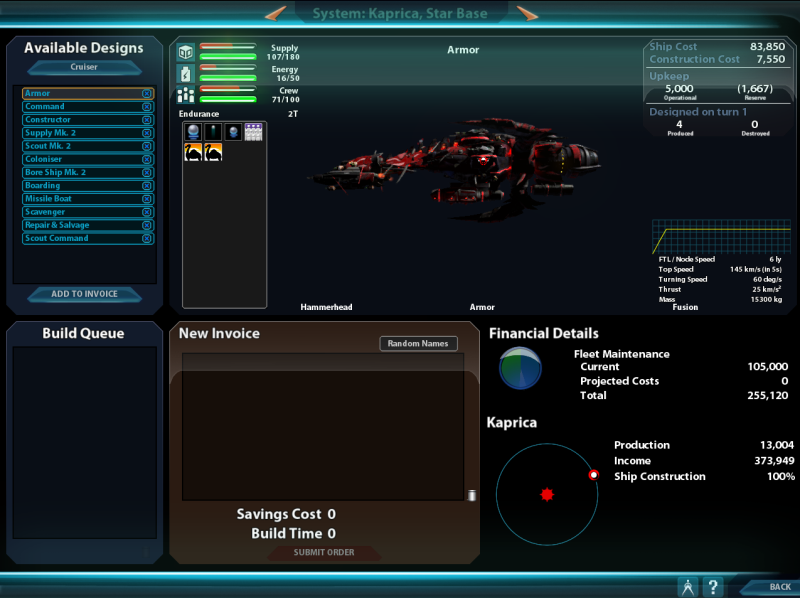
This is the ship design screen, accessible through the little compass icon on the main screen. We're looking at the design for the default Armor class. Unfortunately you can't rename these default designs, so we're stuck with appalling American spelling. This screen is packed full of information and very sparse tool tips. If you're new to this game, most of this screen will be a mystery even if you read the manual. So I'm going to unpack it for you.
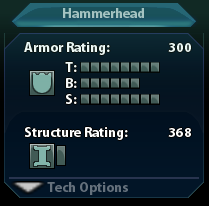
Each section (of which most ships have three) has values for the armour plating on its top, sides and bottom. Once this armour is penetrated, damage is done to the structure rating until the section explodes. When two sections are down, the ship dies. The 'tech options' bit includes various things that increase armour or structure, add stealth or energy/supply when attached to an engine. Of course, you've got to research most of these first. We start with Polysilicate Alloys which can be applied to each section and boosts armour.

Ships in SOTS 2 cost both money and construction points, but the game doesn't bother to distinguish between these values with a symbol or anything. Maintenance costs are given for when a ship is in a fleet or being held in reserve. Ships in reserve can't do anything - even defend a system - and are much cheaper to run.
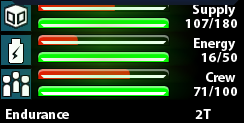
Instead of having separate values for fuel and ammo, SOTS 2 uses a single value: 'Supply'. This doesn't make any particular sense, as it means that a ship that's fired a whole bunch of cannonballs now can't move, but
 . It's affected by a big range of stuff which we will cover at the appropriate time, but it's important because it impacts on how far a ship can travel, which is measured in Endurance. Basically, this means the number of turns a ship can travel away from its base before it has to come back. You'll note that in the above picture the ship consumes 107 units of supply per turn out of a total available of 180. You might think this would translate to an Endurance of 1, and indeed if it was 107 out of 150 you'd be right, but and it's 2. Endurance is particularly important when you're sending ships to lay siege to a system as it determines how long they can stay there, but we'll get to that.
 A ship that has less energy produced than it requires will fire its guns more slowly. Energy weapons require more energy than ballistic weapons, as you might expect. A ship needs enough crew to run all of its systems, and will have a degraded performance with lower amounts of crew. More crew means a better chance of fending off boarders and repairing critical systems, and if they're all dead the ship is dead in space.
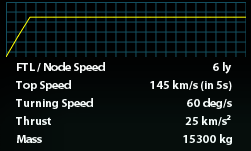
The little graph shows the ship's acceleration rate to its top speed, also detailed in the figures below. FTL speed is given in ly/turn, meaning that with its endurance of 2 turns this ship can travel 12ly away from base before it needs to return. However, because of drive mechanics we'll get into later, we won't actually see this speed much during the first part of the game. Turning speed is important in combat and changes depending on which ship sections you choose, as well as particular technologies. Mass determines how the ship responds to being hit with kinetic projectiles. A really light ship will go flying across the solar system if you whack it hard enough.
This incredibly obtuse piece of design is how you dictate how this ship will behave in combat by default. The filled in star on the icon that looks like a sad ball bearing indicates that the ship will try to close to within range of this weapon when set to close to attack. This is actually much more important than it sounds, so luckily you can amend this in combat if you forget to set it here. You can't change it once you've set it, of course.
The circle next to it determines how each type of weapon will fire in combat. You can set weapons to co-ordinate for an alpha strike, spread their fire over time, only fire on the target, fire one after the other, and a couple more settings besides. In practice this makes very little difference except for point defence.
The final setting indicates whether that weapon will fire at missiles and small craft, cruisers, dreadnoughts, leviathans or everything. Again, you'll mostly want your weapons to fire at everything at once.
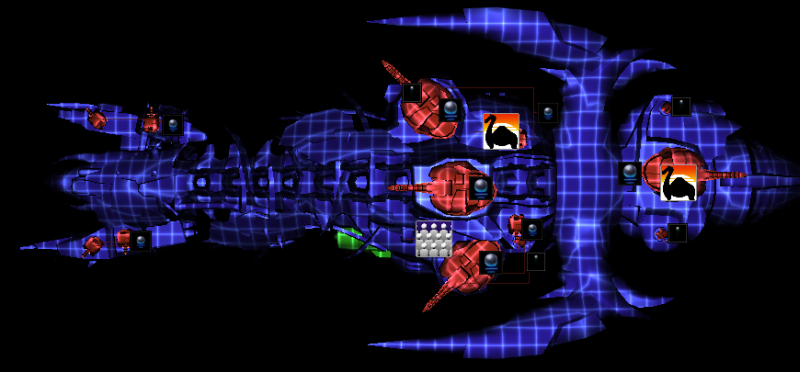
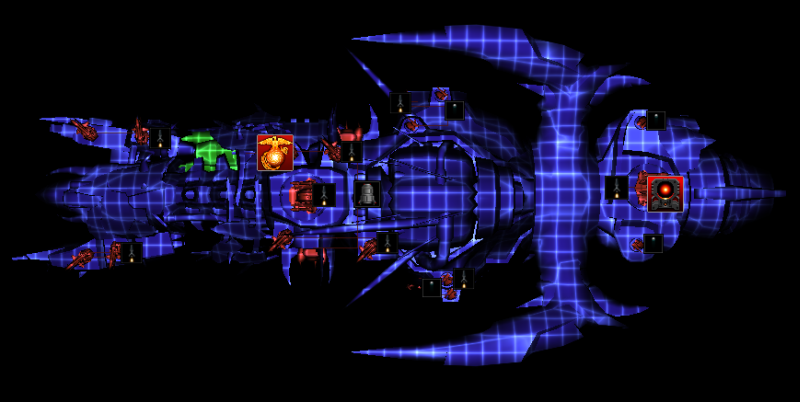
This Armor (shudder) design consists of three sections: Hammerhead, Armor and Fusion Drive. 'Hammerhead' is an alteration to the default front section which gives you more medium mounts and a higher turning speed, at a higher cost and with fewer small mounts. 'Armor' is a middle section designed for combat, with extra mounts and armoUr. Fusion Drive is the bit at the end that you point away from the direction you want to go. Different types of weapons can only be mounted on particular sized mounts, and in particular point defence can only be mounted on small mounts. The big red things are the mounts themselves, and the little ball bearing pictures coming off them indicate that this ship is full of ballistic weapons in small, medium and large varieties. Ballistics are excellent early game 'brawling' weapons, packing a heavy punch (literally) but having poor accuracy unless you're already in an opponent's face. However, because they involve firing lots of bits of metal into space, they also require lots of supply. As a result, they're best for defending bases where you have infinite amounts of cannonballs.
The green thing with a bunch of stick figures coming out of it is a module, which provide various options for customising a ship. The stick figures are a crew module, which provides extra crew. The picture that looks like a camel is a 'Camel' module which provides extra supply points, which are useful on a ballistic ship. Why it's not a 'supply' module is anyone's guess; Kerberos appears to like naming ship modules after human things and spoiling any sense of immersion by having your space insects using modules named after X-Men characters.
The remaining starting designs are as follows:
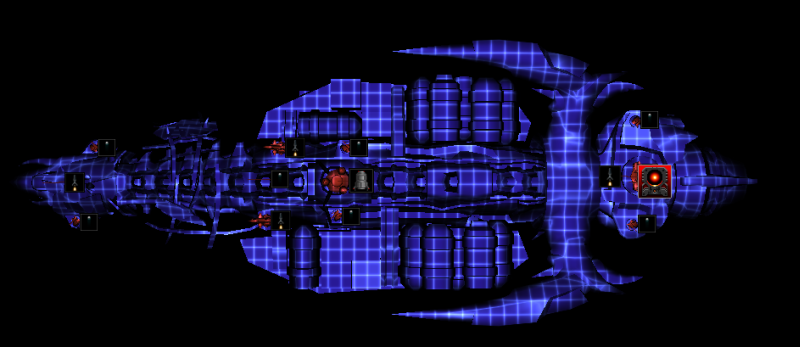
This is a supply ship with a standard command section and a Supply middle section. Supply ships, as the name suggests, provide supply for the fleet they're in, allowing it to go further. This ship has an endurance of 6T by itself. The big red module on the right is a reactor boost, which provides extra energy. This would be great if the weapons on the ship weren't just missiles and ballistics, and it's just causing the design to cost more. Furthermore, because this is a supply ship, having it use weapons that consume lots of supply is self-defeating. As a result, this is the first ship we're going to redesign to this:
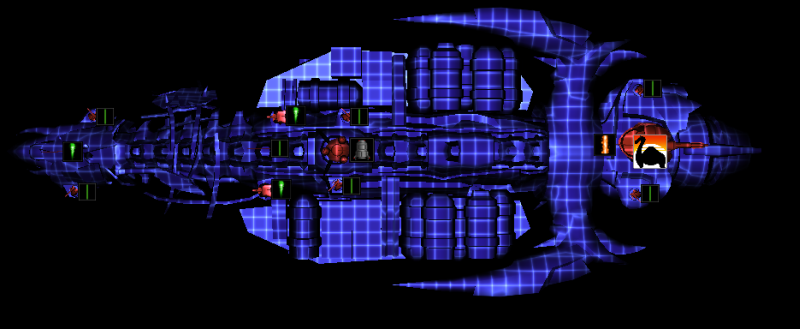
We've replaced all the little ballistics with green beam lasers and the missiles with plasma cannons and a big laser. The ship already generates enough energy without the reactor add-on, so we've swapped it for a camel. The ship now has an endurance of 10T. Unfortunately this doesn't change the fact that our initial fleets are still using the crappy old design and because our new design is so different we can't refit them to the new one. We'll just delete the design instead, and NEVER MENTION IT AGAIN. More on refitting later.
This is a command ship, with a CNC middle section and a Hammerhead up front. You require at least one command ship to create a fleet, and each one can support a fleet up to a given size depending on your technology. Initially, a single command ship can support 8 other ships in the same fleet. This is a terrible design for a command ship - the eagle-looking module is a 'Semper Fi' (sigh) module with puts more marines on the ship, reducing the effectiveness of boarding attacks, and we've got another reactor add-on on a ship without energy weapons. As a result, this ship has an endurance of 1T. We won't be redesigning it until we get refitting technology, which will allow us to take out the existing modules and replace them with less shit ones.
This is a scout vessel with an Extended Range middle section. This gives it extra supply from the get-go, which paired with the two camel modules gives it an endurance of 4T. This design would be useful if the ship wasn't again FULL OF BALLS. Luckily we don't start with any of these so we can change this to a proper design right off the bat:

This ship is now redesigned to reflect its actual role, which is getting out there and scouting the shit out of stuff. I'll also design a Scout Command ship which will accompany these vessels.
The enormous dildos in the middle of this design indicate that it's a colony ship, designed to fuck worlds into submission by firing big balls of carrion containing pregnant Zuul females into a planet. This is how the Zuul colonise. Again, even though you want a colony ship to have lots of range, it's full of ballistics and missiles and can only go out for one turn before having to turn round. This will be redesigned.
The Constructor is a special one-section ship used to build starbases. This can't be redesigned or upgraded, and will be slow as fuck for the rest of the game.

The Boreship is another single-section ship with a very particular use. The Zuul can only travel FTL by ripping holes in the universe between stars and shoving their ships down them. The Boreship does the ripping, and has a fun attack where it points its arse at opposing ship and opens a hole into Nodespace (the bit that human ships travel through naturally and Zuul unnaturally) into which all the opposing ships fall to their doom. It's slow (4ly/T) and any ships travelling with it have to go at that rate. When it's boring new tunnels it travels slower still. This default design has an endurance of 1T. GOSH I HOPE NO STARS ARE FURTHER AWAY THAN THAT. Redesigned, it goes up to 3T.
Now we're going to design some additional ships that we're going to need but aren't prototyped at the start. The first is this missile boat:
It's based on the same hull as the Armor. Missiles are perfectly accurate and are the kings of the early game when no-one has any proper PD or anything that can catch someone kiting them. This design includes green beamers to provide a modicum of point defence, but ideally it will outrun any missiles pointed at it. We probably won't actually use this design much in practice because of this design:
The observant will have noticed an icon on the Command and Supply designs that looked like a little tin can with legs. That indicates boarding pods. The Zuul are psychotic space kangaroos with claws that can punch through steel plate while raping your mind. They're good at boarding. Ridiculously so in fact, to the point where a properly managed Zuul boarding fleet will beat nearly any other fleet in the game. The official forums frequently see complaints about how OP Zuul boarding is, and while there are some specific counters (which handily the AI is too stupid to use), we'll be relying on this design as our anti-ship weapon of choice. Unless something very bad happens.
Once we've cleared out opposing fleets, we'll want something to take out enemy colonies. The Zuul delight in taking slaves by the billions to throw into their enormous Doom Kangaroo factories, and this ship is how we're going to do it. It launches Scavenger disks at a colony, each of which can collect millions of slaves and return them back to base for slaving slavery.
Now that we've got our fill of slaves, we've found that our scavengers are taking ages to actually kill the colony and so we'll need something a bit more direct. These ships carry assault shuttles which murder every living thing left planetside. They'll follow the scavengers and clear the way for Zuul Fuckery.
These are all designs we'll use in the early game (except for something terribly shameful which I'll show you at the right time), so now it's time to move on to running the empire. Firstly, because this is a 4X, what shall we research? We're psychotic evil space kangaroos, so I bet it's an enormous death ray, right?
Wrong.
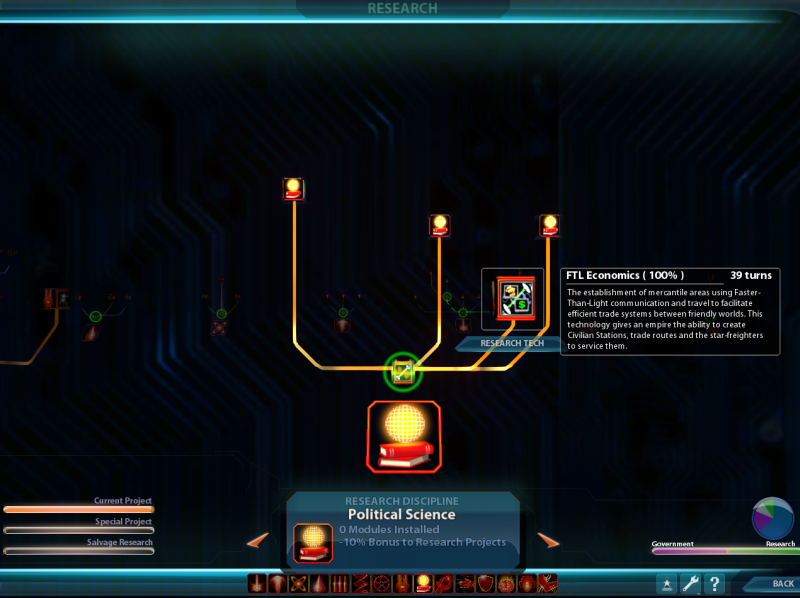
This is the research screen, accessible through the flask icon from the main screen. There are multiple research trees, and we're going to put our Evil Space Kangaroo Social Scientists to work first, on discovering trade. Money is all-important at the start of the game and trade brings in more income - even for Zuul - than any other option. You'll also note that it's projected to take 39 turns. I told you research costs were ridiculous. Precisely because they're ridiculous, we're going to go to the Empire Management screen, accessible through the pie chart in the top left of the main screen, OBVIOUSLY:
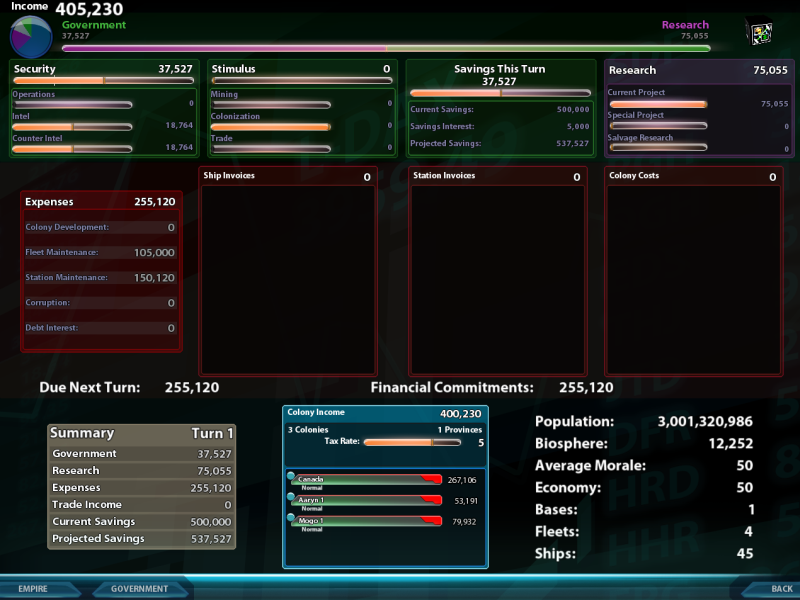
And move any spending on research onto spending on 'Government' instead. We're also going to move the Security tab to the little notch which indicates zero corruption (which it should be on by default but
) and set the tax rate to 7. High taxes result in poor morale effects for other races, but Zuul don't suffer from morale so we can tax them up the yingyang.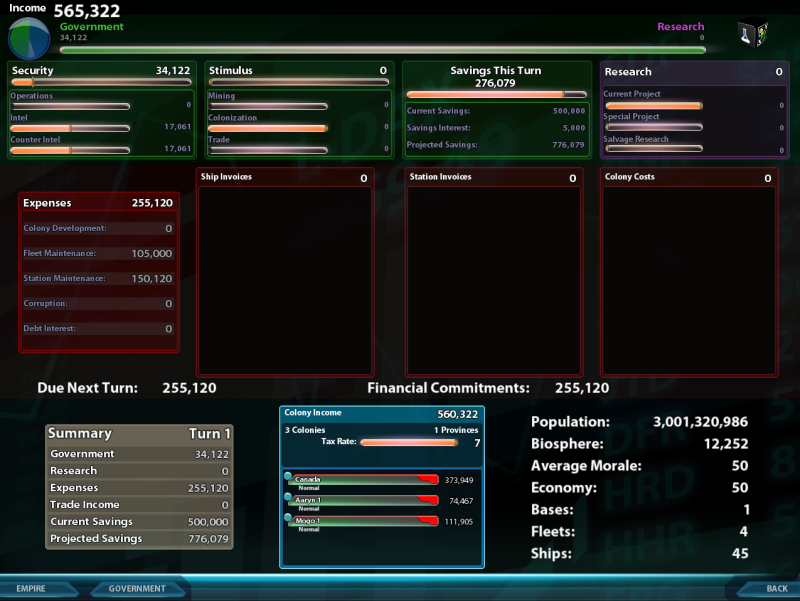
It is literally not worth spending money on research in the early game, because ships will get you more money and resources faster than any early game tech. This is especially the case for the Zuul, who have penalties to research, but true in most cases for all the other races too. DESIGN WIN KERBEROS.
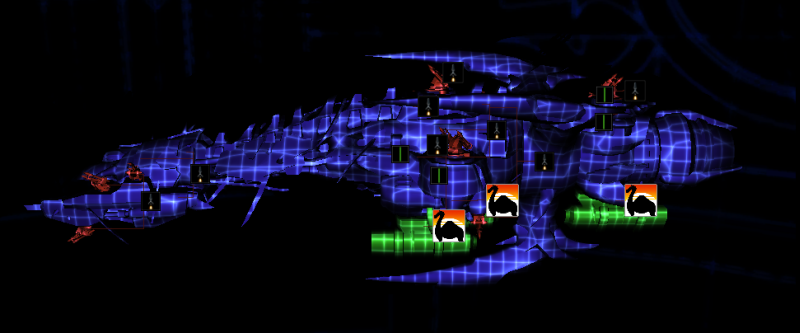
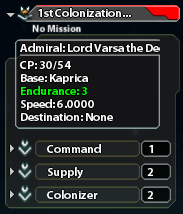
Now that we've got over the early game Design Admin, we can actually start playing. Firstly, we're going to order our first survey fleet, made up of a command ship, two armors, two supply ships and a Bore Ship, to survey the nearby system at Zoraster:
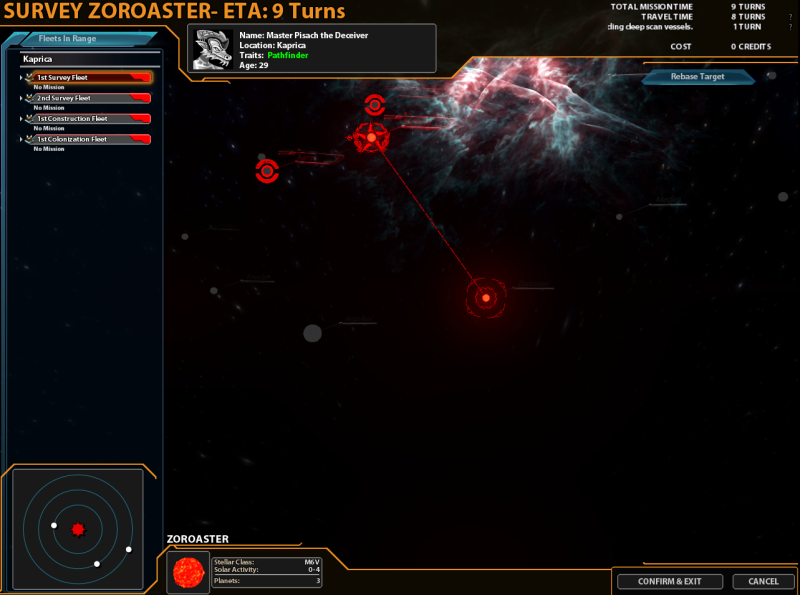
Unlike other 4x games, we don't do this by moving the fleet, but rather by right-clicking on the system we want to survey, selecting 'survey' and then selecting the fleet we want to use to survey it. This is known as the 'Mission System' and while it takes a bit of getting used to it's not as bad as it's been made out. It doesn't really do anything for cutting micromanagement (the ostensible design intention) except in very particular circumstances late in the game when you want to order a bunch of fleets to attack the same star at once or colonise lots of planets in the same system with lots of different colony ship simultaneously, so it's not a design disaster so much as a waste of design time. In a patch, Kerberos introduced the ability to right click on a fleet and allocate it a particular mission, so you can always do that if it feels more natural.
The 1st Survey Fleet is off to investigate Zoraster and will do so about one turn after arriving there in four turns. It will then take four turns to get back. Along the way the Bore Ship will bore a tunnel, making any subsequent journey faster. You'll note that it appears to be able to travel further than the average 3 turns endurance of the fleet would suggest. This is because the supply system isn't complicated enough, and so naval stations project a bubble of supply out into space, which if a ship is in means that it consumes supplies at half the rate. The combination of both of these systems means that most of the time you're mostly guessing at what endurance will get you where.
The 2nd Survey Fleet is sent to survey Salusa. The colonisation and construction fleets sit there for now - I could colonise the world at Aaryn, but it has a very high climate hazard and would cost a great deal. Zuul can normally ignore this cost because they reduce it very quickly, but right at the start of the game it'd be crippling.

I'm sending my initial survey fleets towards the galactic core, to acquire more information about the worlds that are likely to be fought over earlier. The systems behind my starting position I can survey at my leisure, but competition is likely to be fraught for the systems towards the middle.
This is our existing colonisation fleet. 'CP' stands for Command Points - the number of ships supported by that fleet's Command Ship. Each cruiser takes 6 command points. There's five ships in this fleet, so we're going to fill it up with additional colony ships in order to colonise worlds like Aaryn more quickly.
This is the build screen for the Kaprica system, accessible through the icon on the planet display that looks like a nut. You don't just build ships in SOTS 2; in your role as intergalactic accountant you submit invoices for ships to each planet, which then builds them. This does allow you to save generic invoices for repetition later on, which is handy in certain cases. We're going to queue up four of our redesigned (and properly spelled) Coloniser ships:
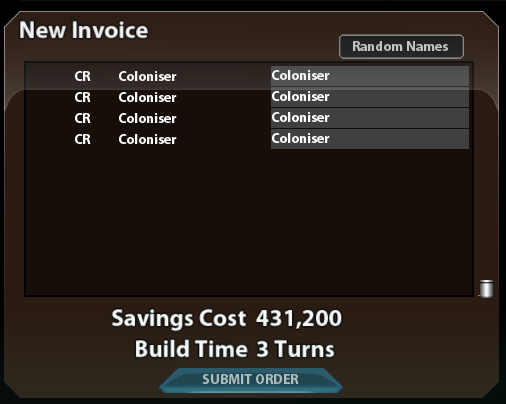
These will be complete in three terms, after we hit the 'Submit Invoice' button. I'm getting fiscal tingles just thinking about it.
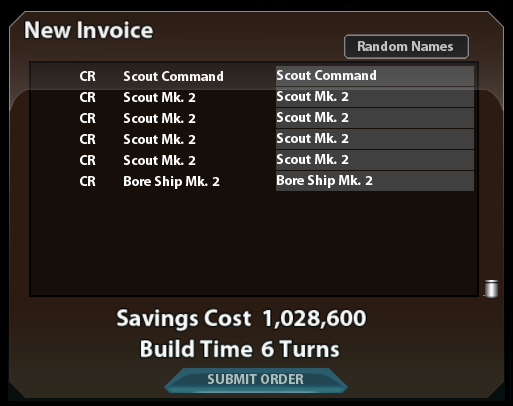
We also want to build more scout ships on our other two colonies, but we're not going to be building full fleets. This is because of this number, only visible when you zoom in really far on the galactic map:
Each system can only be a base for a certain number of ships, expressed in 'Cruiser Equivalents' - i.e. Kaprica can support 100 cruisers because of the stonking big naval station there. However, Aaryn and Mogo can only support 6. Each colony gives you 6, so when we colonise a second world in Aaryn it'll be able to support 12. Initially however, we're going to build a small scout fleet on each world:
And that's (finally) it for the first turn. The mighty imperium of Kerberos Interactive is ready to stretch its hand out to the stars, and force them to like its videogames. Word has it that even now, in his mighty palace on the desolate hell-world of Canada, Greatfather Mecron's smugness levels are already rising.
