Part 20: Behind The Fangs: Part I - RPG Maker Basics: The Database, Part I
Behind The Fangs: Part I - RPG Maker Basics: The Database, Part I♪ BGM: File Select ♫
Alright, welcome to the first proper installment of Behind The Fangs, where I take a look at what makes this game tick. If you're wondering what I mean with "proper", I edited the part about non-essential party members into a "Part 0" some time after posting it.
Anyway, to start off, I don't think many of you actually really know how RPG Maker games are really built, so we're going to be taking the first three parts of this bonus feature to look at the three core components of RPG Maker games:
- The Database
- The Maps
- The Events
To start off with, we need to take a look at the database. Fair warning, these updates will involve copious Snipping Tool usage because I am fat and lazy and don't want to have to put effort into cropping. Also, this will take a while, and will retread ground I've already covered, with the idea being that everything I want to go over will end up in these Behind The Fangs chapters, which will be the basics of RPG Maker, a fair share of Marlex's dirty tricks, and maybe stuff from other games as well. I will be going greatly into detail as a way to show you just what you can do with RPG Maker 2003, because if you know how, you can do a lot of things, even if it seems like you can't at first. In the end, you should be able to go grab a copy of RPG Maker 2003 and make your own game, and maybe even do some nice things! Also, this will be handy for me to refer back to in case I need to in another RPG Maker LP - or other people can refer to it as well if they wish!
One additional thing which will make this interesting is that RPG Maker 2003 is the most advanced version of RPG Maker to not allow the creator to use some kind of programming language. Every RPG Maker iteration past this one either uses Ruby (RPG Maker XP and RPG Maker VX) or JavaScript (RPG Maker MV)... wait, RPG Maker now allows you to use JavaScript? Man, how times have changed... regardless, this makes RPG Maker 2003 the last one to really require you to get creative with your creations when it comes to implementing things that were not meant to be implemented. Creative programming is what separates the wheat from the chaff, and the required programming is even more creative by virtue of being chained to a proprietary and often somewhat clunky system. It's more of a challenge. Challenge doesn't necessarily mean you're better than others that use newer RPG Makers, but it can be fun to work within confines, and can work well as an exercise in lateral thinking.
Anyway, let's go into the database first.

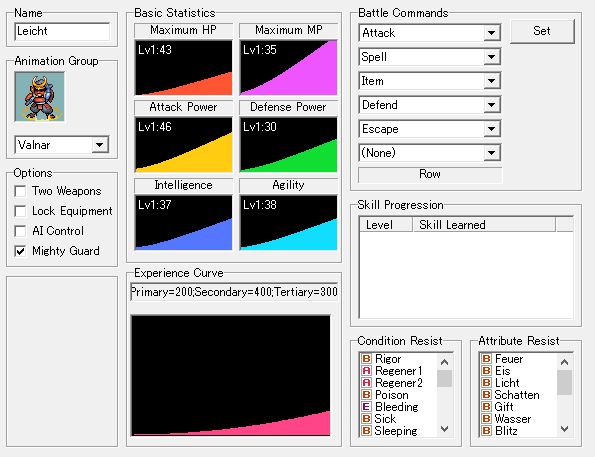
These are all the categories we're going to be going through in this update - or maybe multiple updates, I'll figure that out later and then forget to edit this part so it only says what I decided upon. Let's start with Hero.

Now, we've already gone over many options from this part back when I talked about the experience curve, but let's go through it in a bit more detail.
- Name: You probably figured this one out.
- Title: This too. This only gets displayed in the menu.
- Critical Hit Chance: And this one too. You can go from 1% critical hit chance to 100% chance.
- Min. Level & Max. Level: This one should also be self explanatory. These go from 1 to 99 - no triple digit levels here.
- Class: We'll go over classes again when we're in their own section.
- Starting Equipment: This is also self explanatory. You can only give equipment that a character can actually wield, so there's some degree of a sanity check already built in.
- Options: There are four options to pick here, one of which you should already know about.
- - - Two Wpn: This simply replaces the "Shield" inventory slot with a second weapon slot. Grandy from Unterwegs in Düsterburg had this.
- - - AI Control: This makes you unable to control the character at all, leaving it to the whims of the AI, which is not a good idea.
- - - Lock Eqp: This makes you unable to remove or change inventory items on this character. Vincent Weynard in Vampires Dawn 1 had this.
- - - Mighty Grd: This improves the "Defend" option in combat, taking it from lowering physical damage by 50% to lowering physical damage by 75%. This is pretty useful, since usually, the "Defend" option is pretty much never worth it apart from some very specific situations.
- Character Graphics: This should again be pretty simple to work out. "Face" is displayed in the menu, "Sprite" is what's showing on the map, and "Battle Sprite"... well, I still don't know how this works. Normally, the battle sprite is what's shown in battle, but VD2 seems to somehow avoid this system and uses some other system to make its battle animations work. We might figure this out as time goes on, but for now, I do not know.
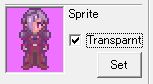
Also, here's what the "Transparnt" option does. Neat!
- Base Statistics: Here's where we make the stat curves happen. Let's look at one in more detail:
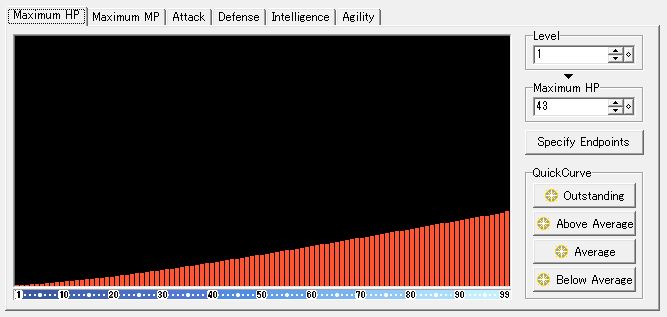
We have a curve that represents the number the stat will be at at every level. Stat bonuses are applied on top of the base number, so you don't end up losing stats on level-up because it just snaps back to the curve. Note the "QuickCurve" setting - this allows you to use four predetermined curves for stat growths if you don't want to put much work into things. There's also the "Specify Endpoint" button, which allows you to set the stat point at level 1, the stat point at level 99, and whether the curve should grow the quickest early, late, or be balanced. You can also manually set stat points by clicking into the graph. There is no sanity check here that says stats have to grow, so this is entirely legal within RPG Maker:
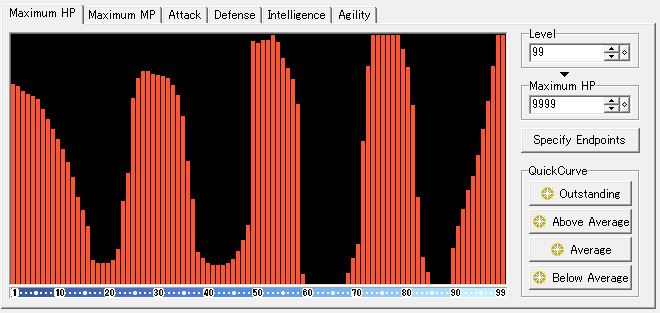
I dare somebody to make a game with this kind of curve and still have it be fun.
- Experience Curve: I've already gone over this before, but let's just look at it again:
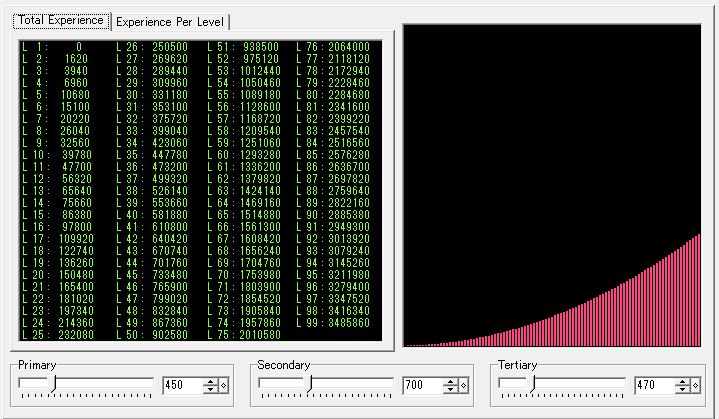
And now, let's just copy and paste with some slight changes. The experience curve is based entirely around three numbers: Primary, Secondary, and Tertiary. These numbers each affect the amount of experience you need to reach the next level, and they do it as follows:
XP to next level = Primary + (Level * Secondary) + Tertiary
So, let's just say we want to go from level 10 to level 11 with Valnar on this experience curve. This means we need 450 + (11 * 700) + 470 = 8620 XP. Note that this experience curve is not used ingame, since the class system takes over here. More on the class system in a bit.
Astute mathematicians will have noticed something rather interesting about this system - since there are no factors attached to both Primary and Tertiary, they could have just as well been rolled into a single number. If you set Primary to 500 and Tertiary to 0, you will get the same results as when you set Primary to 250 and Tertiary to 250. The system is incredibly rigid, and even then, it makes you believe you have three factors to control, when in reality, you only have two. Brilliant. I still have no idea why they did that, by the way.
- Unarmed Battle Animation: Another self-explanatory option.
- Skill Progression: This is kind of interesting. Valnar only gets a single spell: Blood Sucking. The reason behind this is that the system for learning spells is completely different from what RPG Maker allows you to do with the basic system, so Marlex just totally bypassed the RPG Maker basics here. We'll probably look over that system when it comes up. Anyway, you might remember that Valnar and Alaine started with spells when we first met them in Thyrik, but they're not here. Why is that? Well, of course it's because you can't really do what Marlex wanted to do with those spells with this system. If you put these spells at any level, you will be able to unlock them in regular gameplay, and that's not what Marlex wanted. So instead, just before you gain control of the characters, he adds the skills manually, then later removes them. You'll also note that we have absolutely no opportunity to use those spells, and they're actually dummy spells that don't really work in gameplay, since they're never supposed to be used. But I'll show you that later.
- Condition Resist & Attribute Resist: Oh jeez, this'll be the third time now. Anyway, copy and paste, here we go.
So, weapons and spells can have attributes, and they can inflict conditions. For instance, we can have a spell that has the Ice attribute ("Eis" in this case - note the internals staying untranslated for reasons of "nobody is going to see this"), and can inflict the Poison condition. Every attribute and condition has a set of resistance levels attached to it, ranked from A to E. Let's take both Ice and Poison as an example:
Ice:
A: 150%
B: 100%
C: 50%
D: 0%
E: -50%
Poison:
A: 100%
B: 80%
C: 60%
D: 30%
E: 0%
This percentage modifies damage and condition inflicting chances. So you'll see that Valnar has B for many of his elemental resistances, which means that when somebody casts an ice spell on him, the damage is not modified, it's just the regular 100%. And that's the basics of resistances. And that's all for the Hero part of the database! That only took forever to get through! Let's move on to another part that will go quicker, Class.
The reason Class goes by quicker is that basically everything we've already gone over in Hero. Now, classes are assigned to characters, and the main thing they do is allow base stat changes during gameplay. So for instance, you can have a Wizard class, and then when the character hits level 25, they can change class into either an Archmage for more spell power or a Battle Mage for better armor and melee attacks, and you can change the stat growths accordingly. This wouldn't be possible with just characters, since you can't change base stats within events, but you can change classes.
So, much like with the Hero, we can set the Animation Group, Options, Basic Statistics, Experience Curve, Skill Progression, Condition Resist and Attribute Resist here, but there's one additional thing that can be goverened by class.
- Battle Commands: Battle commands are relatively simple, but here, they only get assigned. In order to define them, we have to go into the "Set" menu, so let's head there.
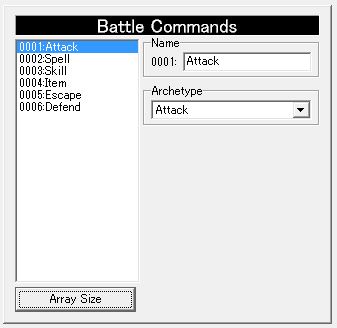
Now, there's only a few battle commands defined in this game, though you can make things a lot more complex if you wanted to. The important part here are the Archetypes, of which there are 7.
- - - Attack: This simply makes the character attack using their Attack stat and weapon at no MP cost.
- - - Skill: This allows you to pick from all skills the character knows. More on skills later.
- - - Skill Subset: This allows you to pick from a specific subset of skills. What the subset consists of will be set in the Skills menu. So for instance, you could have a "Black Magic" and a "Light Magic" menu that have different spells in them.
- - - Defend: This makes the character defend, taking either 50% less physical damge or 75% less physical damage if Mighty Guard is activated.
- - - Item: This allows the character to use items in battle. So if you wanted to, you could only make certain characters able to use items in battle at all.
- - - Escape: This rolls to see if the party is able to escape from combat. I haven't found anything on exactly how this is calculated, but I assume it's to do with the party's and the enemy's Agility stat.
- - - Link To Event: This basically allows you to make certain things happen in battle if a character uses this particular battle command. We'll go into this in more detail in the Monster Groups part, since that's where the magic happens.
Finally, you'll notice the battle command "Row" in the class menu. This is a fixed command which allows characters to change their row from front to back and vice versa during combat. No idea why this is fixed, really. That's it for the class menu, let's move on to Skill.
There's a fair share of things to set here too, though most of them are simple.
- Name & Description: These are just descriptions used for menus.
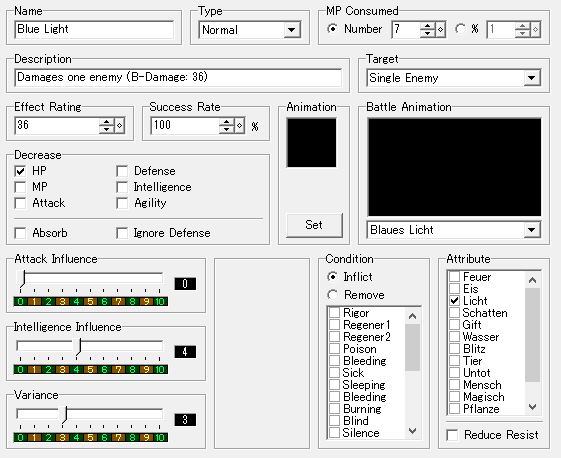
- Type: There's a couple types available here:
- - - Normal: This is just a regular skill that has a battle effect. We'll go over what we can do with these in just a second. Almost all the options beyond MP and Description are only for these skills (or the ones in the subsets).
- - - Teleport: OK, this is a bit complicated, and we'll come back to this in the events, but the basic gist is that you can use events to set "teleport locations", which are points on different maps. Then, when you use the skill that has this skill type, you get a menu that shows the different map names for which you have set teleport locations. Then you can teleport back to those places. This isn't how Refuge worked in VD1, it used an event capability that lets you mark and recall a certain spot. That'll come later too.
- - - Escape: This is essentially the same as the regular Escape function. The reason this is here is because you might want your escape command to cost MP.
- - - Switch: This does exactly what you'd expect it to do - it flips a switch, and then things happen depending on that switch. These skills can be set to be usable in battle, in the field, or both.
- - - *Skill Subset Name*: This is where the subgroups mentioned in the battle commands come into play. If you have defined Skill Subset battle commands, they will be available here, and will only show up in the subset battle command menu.
- Target: Pretty self-explanatory. Can be set to "Single Enemy", "All Enemies", "Self", "Single Ally" and "All Allies". Depending on whether it's focused on the party or on enemies, the effects listed below will be made to be either beneficial or negative, respectively.
- Effect Rating: This is the base effect rating for the skill, which will be later modified according to influences and variance.
- Success Rate: The success rate sets the chance for the skill to hit and inflict its condition. Because of that, condition success chances are often manipulated as well with the resistances.
- Decrease/Increase: So here we can set some different parameters. As you can see, we can set the skill to decrease (or increase when applied to allies) different attributes of the characters - HP, MP and the four attributes. Furthermore, we can set the skill to "Absorb" - so for instance, Blood Sucking reduces the enemy's MP and absorbs it to our character - and skills can also "Ignore Defense", which should be pretty simple.
- Animation: This needs a bit of explanation, because it opens a new menu.
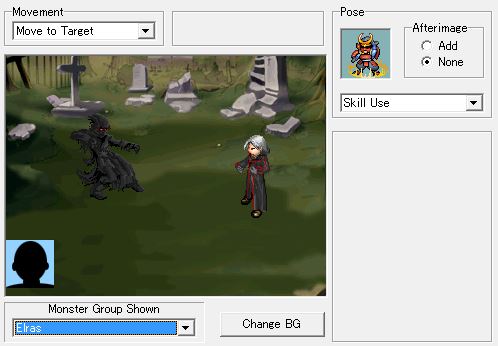
- - - Movement: This sets the way the character moves during use of the skill, with the options being "None", "Step Forward", "Jump Forward", and "Move to Target". So for instance, Blood Sucking uses Move to Target and the regular attack has Jump Forward.
- - - Pose: This sets the type of pose used when using the skill. Poses are something we'll still need to define later, but for now, we have stuff like "Skill Use", "Damage", "Defending", "Idle Stance" and similar things. I dunno what "Afterimage" is. I couldn't figure it out.
EDIT: Thread to the rescue!
vilkacis posted:
As the name suggests, it adds an after image when the character moves.
Like so. But I think that only works if you use the default animation type (but if you're using battle animations, as VD seems to, you're clearly capable of adding your own after images anyway).
I think I ended up trying to test this with an attack that didn't move the character from its current spot, which seems a bit dumb, in retrospect. Anyway, now we know.
- - - Monster Group Shown: This is basically just for looks, letting you set a particular enemy group to display.
- Battle Animation: This sets an animation separate from the regular one - basically, Animation is what the character does, and Battle Animation is what shows up over the enemies. Battle animations have their own section we'll get to later.
- Influence and Variance: These numbers allow us to play with the effect range of skills, which are affected by these numbers as follows:
- - - Attack Influence: Skills affected by Attack Influence have their damage calculated like this: Base Damage + (Attacker's Attack / 20 * Attack Influence) - (Target's Defense / 40 * Attack Influence).
- - - Intelligence Influence: Skills affected by Intelligence Influence have their damage calculated like this: Base Damage + (Attacker's Intelligence / 40 * Intelligence Influence) - (Target's Intelligence / 80 * Intelligence Influence).
- - - Variance: Damage dealt by this skill can vary by Variance * 10% in both directions. So for instance, Variance 5 means the skill will swing between 50% and 150% of the main damage.
- Condition: This allows us to either remove or inflict stats effects with these skills based on the success rate. Since conditions can be both positive or negative, all kinds of spells can inflict or remove them.
- Attribute: This sets the attribute of the skill, making it subject to resistances. Furthermore, skills used on opponents can reduce resistances, and skills used on allies can boost resistances.
And that's about it for skills. This is already going on quite a bit, so we'll cut things here and resume with the other parts later.
By the way, if you have any questions or want me to go into more detail on something, by all means, ask! If you want to know whether you could do X with RPG Maker feature Y, just ask, and I'll see if I can work that out! I really want to take the tearing apart of the game to the next level with this LP, so what better way than to completely go over the source? And if you have any corrections, go right ahead - I don't claim to be perfect, though I try not to fudge things intentionally. When I don't know something, I do test it out in-engine, but I still might miss some things.