Part 30: Behind The Fangs Part V: - RPG Maker Basics: The Database, Part IV
Behind The Fangs, Part V - RPG Maker Basics: The Database, Part IV♪ BGM: Biotope ♫
Now, time to jump back into RPG Maker for a bit and continue our seemingly endless trek through the database. The main part of this will revolve around terrain and tilesets, which will slightly delve into maps, but not too much.
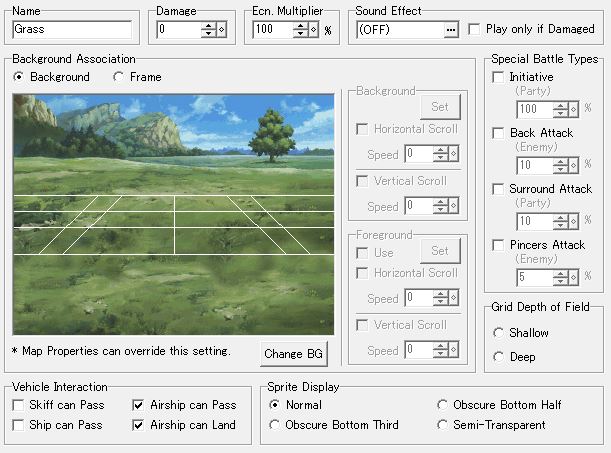
First of all, we have the terrain. This basically defines what terrain is like for the game, both in battle and on the overworld map.
Name: This is entirely internal.
Damage: This will either inflict damage or heal it depending on what you set. The maximum number here is 10 in both directions. You might wonder if the sunlight hurting us in the desert is done with this, but no, because this is just global damage - you can't set this damage to be disabled with certain items.
Enemy Encounter Modifier: Yeah, that's what "Ecn." stands for. This will manipulate the rate random battles happen at - not that VD2 uses the default random battles, anyway.
Vehicle Interaction: This sets how the different vehicles interact with the terrain, mostly just passing through, but also landing for the airship. A "skiff" is a small boat, by the way.
Sprite Display: You can change how the battle sprites are displayed here. If you're fighting in snow, you can have the sprites slightly obscured to make them look like they're partially buried in it, and if you're fighting underwater, you can make the sprites partially transparent to show the water is surrounding them. Neat!
Background Association: This sets the battle background for this terrain. You can either use a straight background, or you can use two backgrounds, one as an actual background, one as a foreground. These can scroll at different rates. This could be used for... say, fighting on a train, I guess?
Sound Effect: Here, you can have a sound effect play if you step on this terrain. The "play only when damaged" box confuses me. According to the help file, if it's ticked, the sound effect only plays if the "damage" part is set to something other than 0. So... why do you need this then? The damaging isn't modular, the tile either does damage 100% of the time, or doesn't do damage at all. So what's the point of having this box? Weird.
EDIT: We have an answer!
vilkacis posted:
I don't have my 2k3 with me, but I guess if the entire party is protected from terrain damage, it doesn't play?
This is in fact correct. The help file was written in a confusing way, and the intuitive way this should work is how it indeed works.
Special Battle Types: Here you set the different probabilities for random battles to have the special conditions applied to them. I guess we can go over these now:
- Initiative: Here, our party has initiative, and enemies have a lower chance to escape.
- Back Attack: Here, the enemies have initiative, and our party has a lower chance to escape. Our party appears on the left, and enemies on the right.
- Surround Attack: Here, our party has initiative, and enemies cannot escape. Our party appears both on the left and the right, and enemies in the center.
- Pincers Attack: Here, the enemies have initiative, and our party cannot escape. Our party appears in the center, and the enemies both on the left and the right.
Nothing all that complex, but handy.
Grid Depth of Field: Here, there are two standard settings for those white lines in the background image. These determine how the sprites are placed in battle, with you also being able to change them manually by clicking and dragging the lines yourself.
So, that's about it for terrain. Let's move on to the tilesets and see how they work together with the terrain.
Tilesets are what makes up the core of the maps. We'll go over the graphics for this when we take a look at the resources you can import, but for now, let's see what you can do with the tilesets.
Name: Again, internal.
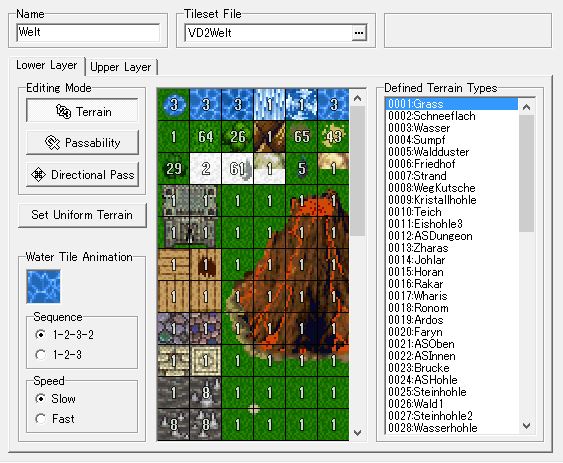
Tileset File: Here, we just select the file to be used for the tileset from the resources.
Water Tile Animation: "Water" is unique in RPG Maker, because it's the one map tile that is allowed to be animated directly. Note that it doesn't have to be water - you could use this for anything that is animated, but
EDIT: You get more than one!
vilkacis posted:
You get a couple!
The water-ish stuff in the top left corner is all animated. The top three-wide-by-four-tall groups and bottom left part are all separate animated tiles which "autotile" - meaning you can basically draw any shape with them and they'll automatically get surrounded by a border so they look nice with certain other tiles. The ones on the bottom right are all standalone animations. So that's six different animations on one tileset. (The lower left 3x4 might be made to go inside one of the top ones and not work well outside that? I don't remember, and as said, don't have rm right now.)
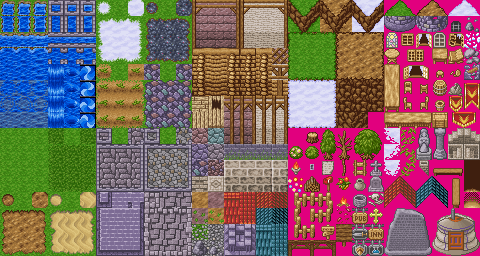
This is indeed all correct. Here's a GIF with the different animations for the default basic tileset, and also showing off the water tiles that have borders with a white color instead of a green one.
Lower Layer / Upper Layer / Editing Mode: Here, we get to set the primary options for tilesets. Right now, we're in the lower layer editing mode for terrain. Here, the different tiles are assigned numbers, which correspond to the numbers of the terrain in the menu we just looked at. So for instance, we can tell that the forest tiles are associated with terrain types 26 and 29, which are two different types of forest! You can also use the "Set Uniform Terrain" button to set every tile to a certain type of terrain. Here, we see that a lot of tiles, a lot of which is either impassable or will never have combat on it, have terrain 1 as their type. Now, let's look at the different things we can set.
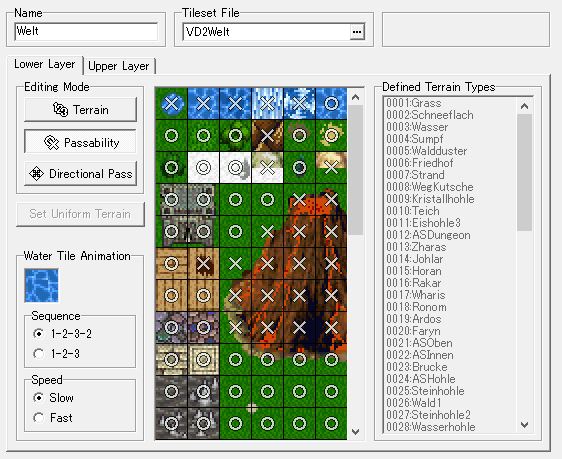
In the "passability" menu, we can set certain tiles to be either passable or not passable for our party. So for instance, water and the volcano are set to be unpassable. Pretty simple! You can also set tiles to be passable with the characters moving behind the tile instead of in front of it. There's also the ability to set a tile as a "wall tile", which is not passable except at the very top and at the very bottom, to sort of emulate a wall stretching over a tile visually but not blocking that tile at the end.
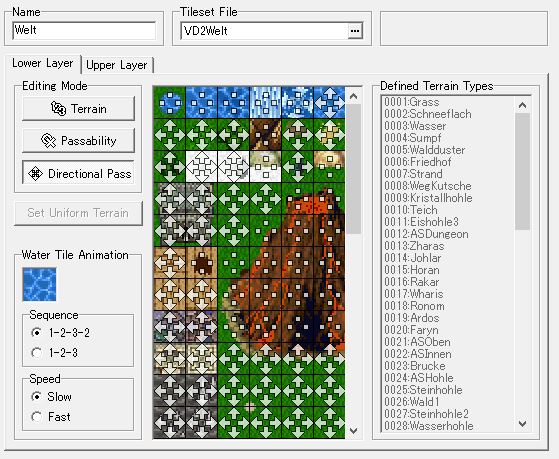
In the "directional pass" menu, we can set certain tiles to be passable only in certain directions - so you can have secret walls that allow you to pass through in one direction, but not back, for instance.
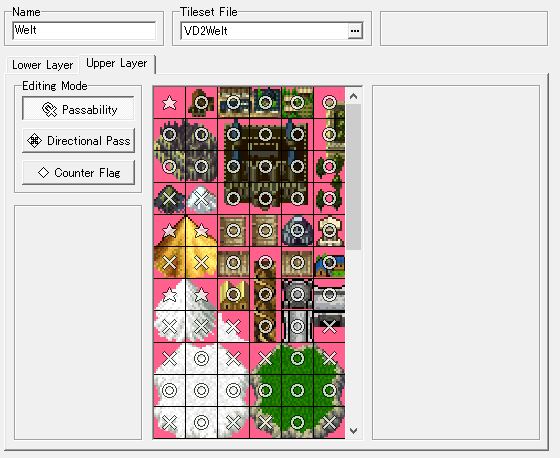
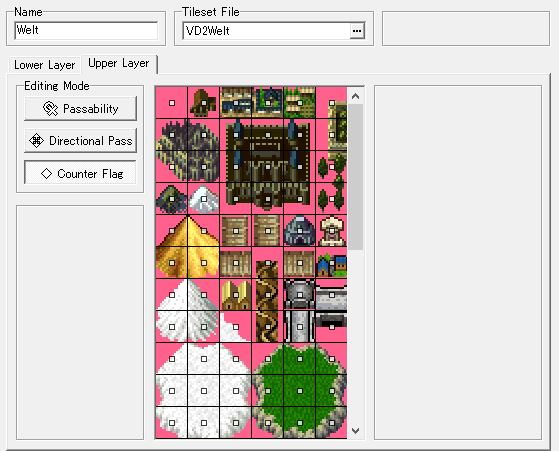
The upper layer consists of the stuff that isn't the basic map, so things like castles, villages et al. that are supposed to be on top of map tiles are put into here. This layer also has the passability and directional pass settings, but there's something new, called a "counter tile".
What is this? Well, it's kind of interesting - it allows the player to interact with an event through the counter tile as if it were the event. So basically, imagine something like this:
X
Y
Z
With X being an event taking the form of a character that opens a shop window, Y being an impassable counter tile, and Z being our party, facing up towards the counter tile. If we hit the action key there, it will trigger the event X despite the party not being next to the event. The question here is "why don't you just put event X on the counter tile instead?", and I don't have an answer. VD2 does shops this way, and I instinctively did it as well when I made a testing shop in my playground game. But I guess the option is nice to have?
EDIT: We have a reason!
vilkacis posted:
Because if you have an npc who's talkable to from the side as well, you'd then need multiple events to represent them, and depending on how the map is laid out, it could get really messy - especially if it's also a moving character. Counters are situational, but can save a ton of work when you do use them.
Yeah, I guess that makes sense. I've just never encountered a situation where this was used, I think.
Anyway, that's it for the tilesets. I hope this was somewhat comprehensible. If not, and you have questions, ask away - maybe I can make a video demonstrating things to illustrate things better. For now, let's move on to the strings.
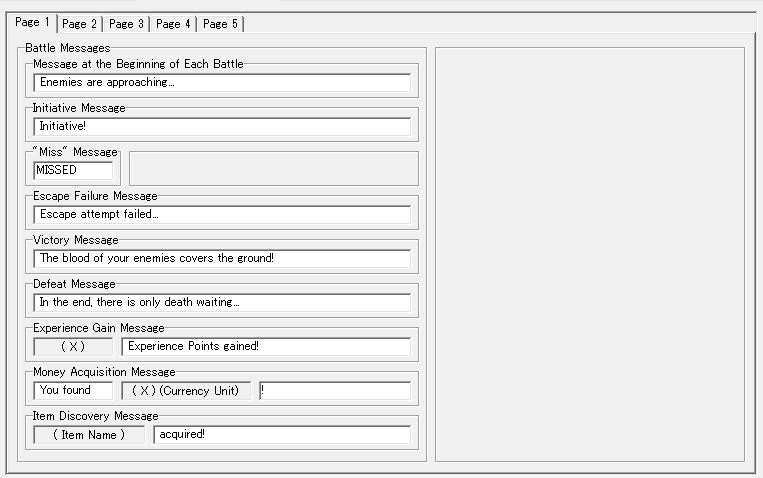
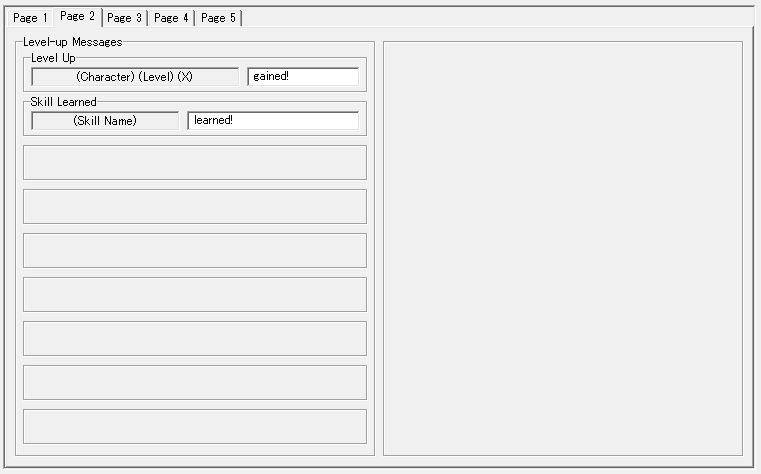
The strings are incredibly simple. Certain situations in game need text, and here is where you set the text.
There's some questionable usage of menu real estate here.
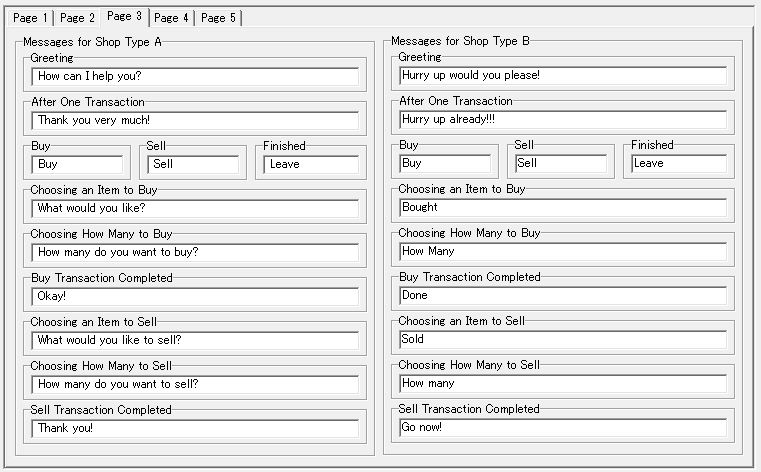
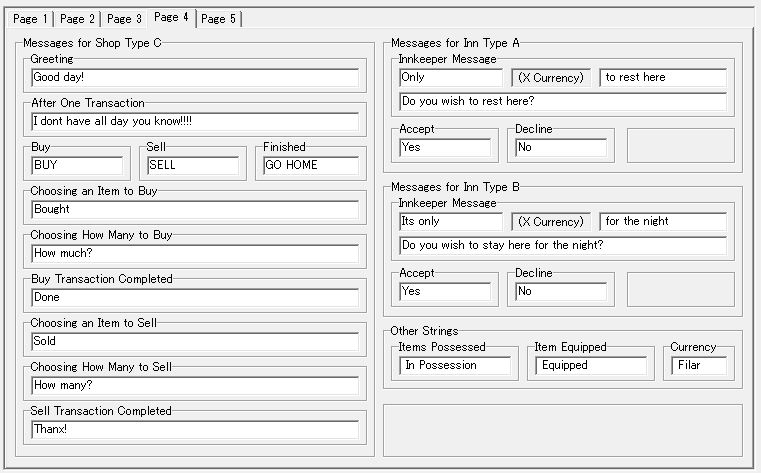
We get some varieties of shop and innkeeper messages, which is nice. Kind of a bummer you're limited to 3, though.

Finally, we have some basic stuff. Here's where we turn magic points into blood points. I don't think we need to go over this in detail, because, well, what detail is there to go over? Let's move on to the system settings.
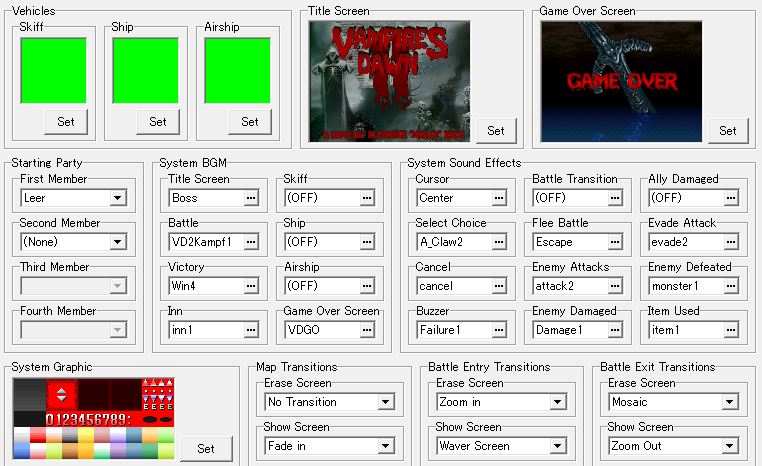
Page 1 of the system settings is a pretty simple affair. We can set up title screen and game over screen graphics, vehicle graphics, system graphics, the starting party, BGM and sound settings for basic gameplay stuff, and finally there's over a dozen different transitional effects to be selected for map and battle transitions, like "Horizontal Blinds", or "Screen Moves Right", or "Quadrasection". They differ from the map and battle transition categories, too. There's two more detailed menus here for us to look at.

First, we have the system graphics. We can select a certain type, set a display option for the background (tiled or stretched) and set the font.

Here's a little sample of what MS Mincho looks like!
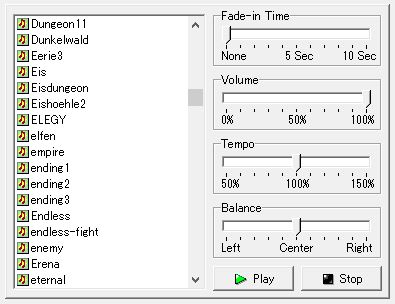
Secondly, we have the menu for setting the BGM. Here, we can pick a music track (or a sound effect in the case of the sound settings), and we can shift volume, tempo, fade-in and balance. Useful, but not exactly worth dwelling on.
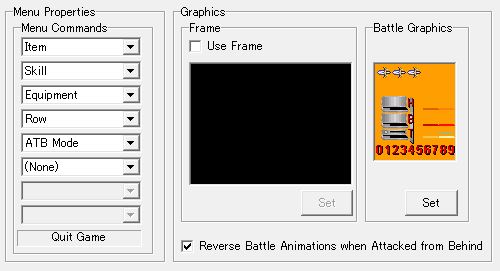
The second page of the system settings doesn't have that much to set. We have battle graphics we can set, we can have a frame surrounding the screen during gameplay if we want to for some reason, and we can set the commands we have available in the main menu during gameplay. The options we have for the commands are "Item", "Skill", "Equip", "Save", "Status", "Row", "Order" and "ATB Mode". I don't think we need to go over those different commands either - they should all be self-explanatory. If they aren't, just ask! But now, we're going to move on to the final part of the database! Excitement!
The final part of the database is the common events. I've already gone over this in the zeroth part of this romp, but I'll just copy and paste what I said here, because it does sum up the common events just fine.
There's a thing in RPG Maker called "common events", which are essentially global functions - code snippets that are available at all times that you aren't in battle. For an example... well, remember how we could select the text box we wanted and how it will appear in the beginning of the game? That's actually not something the engine can support, so Marlex had to find a workaround for that. He did that with common events - he made a common event to display a text box, and a common event that makes the text box go away. Then he has to put that in every time a text box is supposed to appear and disappear, which happens every time the speaker changes in dialogue. It's a lot, basically.
Now, there are three types of common event - "call", "auto start" and "parallel process". Furthermore, common events can have a "trigger switch". To sum up quickly:
- "Call" is only activated when the code explicitly calls for it. Hence the name. An example would be the process that is called whenever you find a secret - it generates a random item for you to find.
- "Auto start" is activated the moment the trigger switch is set. For instance, the item we use to open the menu actually only flips the switch for the menu, and then the common event takes over.
- Finally, "parallel process" is constantly active whenever common events are available if the trigger switch is set. If the process doesn't have a trigger switch, it just runs constantly (except in battle).
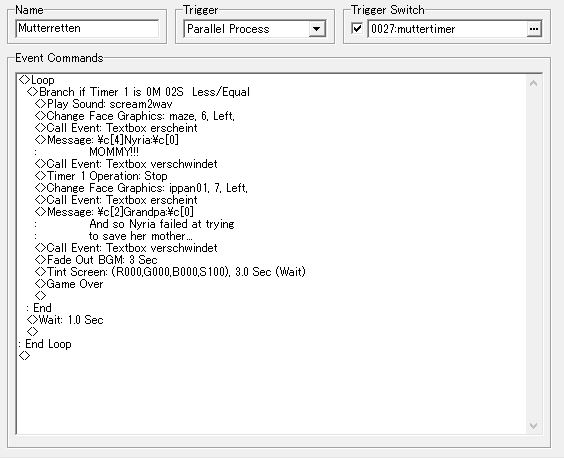
So here, we have a basic example for a common event - back when we were trying to find Nyria's mother as young Nyria, there was a timer running, and this event handles what happens if the timer runs out - it's just a short little event that brings us to a game over. We'll get to all the shit you can do with events down the line, so we'll just stick to what makes common events unique from other events for now.
And with that, we've actually made it through the entirety of RPG Maker 2003's database! Next time, we'll actually start building our own little testing game! I figured it might be easier if we go through the process a bit, have a little hands-on example to refer to. After we've done that, we'll start building maps for our game and see what we can do with that.