Part 41: Behind The Fangs, Part VIII - RPG Maker Basics: The Events, Part I
Behind The Fangs, Part VIII - RPG Maker Basics: The Events, Part I♪ BGM: Caesar III - Soundtrack ♫
Alright, here we go. This is where shit gets real. So, to start with, let's ask a simple question: What are events? But to answer that question, I'll ask a counter question: What can you do in an RPG Maker game without events? The answer is simple:
- You can make a map that players can walk around in.
- You can have them fight random encounters.
That's pretty much it. Everything that actually, like, does anything is controlled by events. And now we're going to see all the things we can do with events... well, over several parts anyway. There's way too much to go through in just one part. To start, let's place an event.

We start off on the event layer. We double-click on one of the tiles, and presto, we've placed an event and are thrown into the event editor.
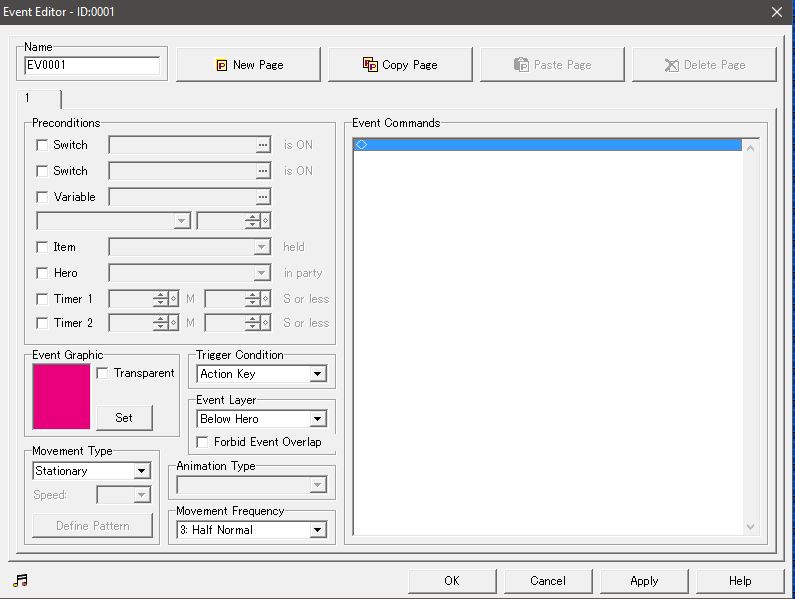
The meat of events lies in the commands, but before that, we have to set some things up.
- Name: This is internal. It helps to give a descriptive name, because if you later do an event search, you're only going to get the name displayed with no jump-to function. Yes, I've found this out the hard way, why do you ask?
- Page Option Buttons: You can set up events to do different things depending on the prerequisites. You accomplish this by adding pages, and the buttons let you make new pages, copy, paste and delete them. Handy! An important note on pages here: The page with the highest page number that has its prerequisites met will be used when the event is triggered. This is very important when ordering pages, especially with automatic events.
- Preconditions: This is how you set up the different requirements for the event to do the commands on that specific page. You're allowed to screw with different factors.
- - - Switch: You can set two switches as requirements for an event. Note that you can only check whether a certain switch is ON, not whether a certain switch is OFF. That's an oddly specific restriction, I would have figured it should've been possible to check for a switch being OFF here as well. Anyway, you get two switches to use in the prerequisites, which is handy.
- - - Variable: You check for the state of a certain variable as well. You can do the standard number rigmarole - equal, greater, less, greater/equal, less/equal, and not equal. Nothing too special here.
- - - Item: You can check for whether a certain item is in your inventory. Again, you can't check for the inverse - the lack of an item, which is something that could be useful, but alas.
- - - Hero: You can check for whether a certain hero is in your party. Once more, you can't check for the lack of a particular hero.
- - - Timer 1/2: OK, so this is kind of interesting. Basically, you can have two timers going at the same time. You manipulate them with - what else - events. With events, you can set timers to certain times and start and stop them, and then you can use them as a prerequisite for other events, depending on the time left on it.
To note, you can get around some of these restrictions regarding checking for things like not having an item or the like by using the event commands. But anyway, that's the main prerequisites for events, and they're primarily used to distinguish between different states. A primary example would be that there's one version of an event that is a character that gives you a quest. The quest being enabled then flips a switch, which fulfills the prerequisites for another page, which has a different set of dialogue for the character that is related to the quest. Then you have another version for when you solved the quest, and then another after having turned in the quest. Simple! As a side note, if you have a set of pages that all have prerequisites that are not met, then the event will simply not be visible or tangible at all.
- Event Graphic: The event can have different types of graphics. You can either use tileset graphics of the second layer, or use charset graphics. So you can have a character be an event, you can have a second layer item be an event, so like the village and tower graphics I placed on our little sample world map, or you could also have the event not have any graphics of its own at all. This is a very common choice as well, since that's what you're going to need for basically everything that's supposed to happen without being explicitly triggered by the player pressing ENTER at a specific place.
- Trigger Condition: You have a few options as to how the event is triggered.
- - - Action Key: Here, you need to press ENTER to interact with the event. Where you need to be in relation to the event depends on its event layer, which we'll get to in a bit.
- - - Touched by Hero: Here, the event just needs to be touched by the player. Again, where you need to be in relation to the event to trigger depends on the layer.
- - - Collision with Hero: Here, the event can either be touched by the player, or the event can touch the player. That second part does not happen with Touched by Hero. Same on the layer thing.
- - - Auto-Start: Here, the event is automatically started once the prerequisites are met. Furthermore, as long as the prerequisites are met, the event will be repeating endlessly, so remember to put in a way for the event to terminate, like a switch that gets flipped at the end of it that then allows a higher numbered page to trigger, which has no commands (so the event just sits silently and does nothing).
- - - Parallel Process: Here, the event is automatically started once the prerequisites are met, and as long as they are met, it will run endlessly. The difference between this and the Auto-Start is that events on Auto-Start cancel out other events. Events that are Parallel Processes run in the background. Again, though, you need to remember to work out a termination method.
- Event Layer: This is pretty simple. This sets the relation to the player's sprite for the event, meaning that the event is either below the player (so he passes over the it), on the same layer as the player (so he cannot pass through it), or above the player (so he passes under it). Events that require you to hit ENTER or touch the event will trigger when the player is above, next to (with the player being required to face towards it in the Action Key and Touched by Hero cases, and the event being required to face towards the player in the Collision with Hero case), or below the event, respectively.
- Disallow Event Overlap: Pretty self-explanatory. Regardless of which layers events are on, if this box is checked, they cannot overlap.
- Movement Type: This is how the event moves, if it moves at all. We get a few options.
- - - Stationary: The event doesn't move at all.
- - - Random: The event moves around completely randomly.
- - - Vertical: The event moves up and down. If it hits another event or an impassable tile, it turns around and goes the other direction.
- - - Horizontal: The event moves left and right. If it hits another event or an impassable tile, it turns around and goes the other direction.
- - - Toward Hero: The event moves towards the player's position.
- - - Away from Hero: The event moves away from the player's position.
- - - Custom Pattern: The event moves exactly the way you want it to. What options do you have in making it move?
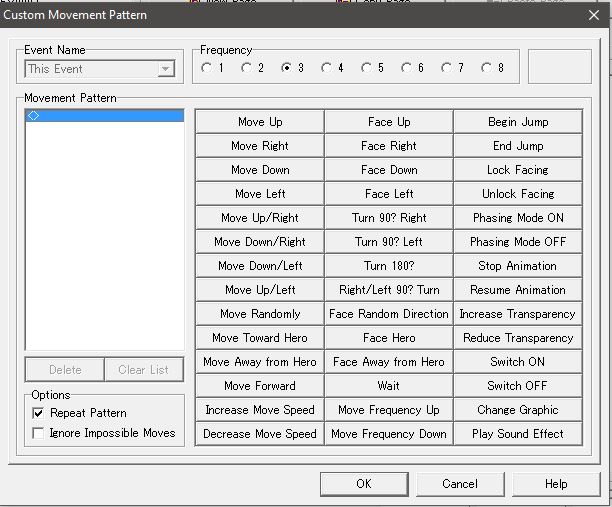
A fuckton. I'm not going to go over every option here, but here's the important bits:
- - - Frequency: How quickly the event executes the each step of the pattern. Not to be confused with speed, which is how quickly the event goes between the different steps of the pattern. We'll have frequency and speed with the regular events as well in a bit.
- - - Begin / End Jump: This sets the event into a jump state. You then have to make the jump direction by using the movement options, then end the jump. That will then come together into one full jump.
- - - Phasing Mode ON/OFF: Phasing Mode allows the event to pass through impassable tiles.
- - - Start / Stop Animation: This governs whether the walking animation, if there is one, will play while the event moves.
Otherwise, the rest should be fairly self-explanatory. If not, just ask and I'll explain those too. Now, back to the main event settings.
- Speed: Can be set from 1 to 8. The higher the number, the less the delay between actions.
- Animation Type: There's a few options here as to how the event animates (if it has animations).
- - - Non-Continuous: The event will cycle through its three animation frames while moving.
- - - Continuous: The event will always cycle through its three animation frames.
- - - Fixed Direction Non-Continuous: The event will cycle through its three animation frames while moving, and always face the same direction.
- - - Fixed Direction Continuous: The event will always cycle through its three animation frames, and always face the same direction.
- - - Fixed Graphic: The event will not animate at all.
- - - Spin Around: The event will cycle through its four directions clockwise.
- Movement Frequency: Can be set to different speeds, those being One Eighth Normal, One Fourth Normal, Half Normal, Normal, Twice Normal and Four Times Normal. This determines how fast the movement of each single step is.
Honestly, I think somebody fucked up at some point, because speed should be frequency and frequency should be speed, given their effects. But whatever. Anyway, that's the different things we can do when setting up an event. Next time on this show, we're going to get into the hell zone of Event Commands.