Part 59: Behind The Fangs, Part XIV - Blood Sucking
Behind The Fangs, Part XIV - Blood SuckingAlright, folks. Are you ready?
♪ BGM: Grabbag ♫
Let's rock.
This is where it all comes together - we've gone through all the basics, and now it's time to make something work with it. It's time to look at some actual code from VD2 and see how it all works, and in this first part, our example will be the system of blood sucking.
Before starting, let's remind ourselves how it all looked:
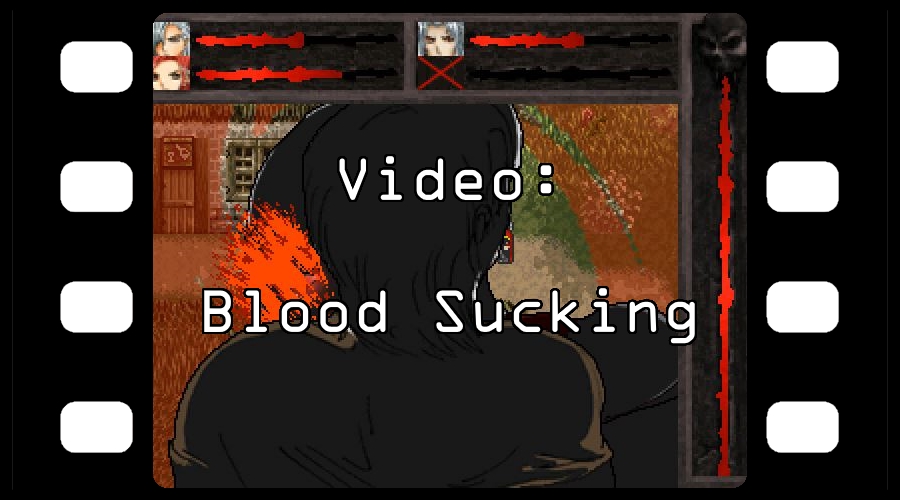
I recommend having this video open while reading the update, and preferably setting it to a lower speed to see the different parts happening a bit more closely.
Now, in this case, we're skipping the menu part and just going straight into the part that happens after we select to suck blood from a human. But before that, a few things we need to set up before we execute that code. Here's the things that need to be set before this code:
- Variable 0364 "AussaugenBLUT" is set to a specific value based on a variable which stores the amount of blood a person currently has. This is stored on a per-character basis for 109 different humans.
- Variable 0608 "AussaugenBlutMax" is set to a specific value based on a variable which stores the maximum amount of blood a person has. This is also stored on a per-character basis for 109 different humans.
- Variable 0369 "BlutsaugenGeschlecht" is set to either 1 or 0 depending on whether the person is male or female. This will determine the graphics for the victim.
And now, without further ado, the code!

...oh jeez. This is gonna be some work. Well, thankfully, all this stuff doesn't have any jumps, so we can take it in small blocks and make our way through this code. Let's take it from the top.
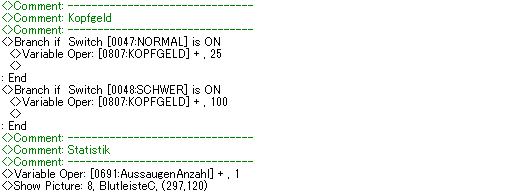
So, in our first block of code, we deal with two separate things.
First, we have the "Kopfgeld" (bounty) section. You can see here that if the switch for normal difficulty is set, sucking blood from somebody gives adds 25 Filar to your bounty. On hard difficulty, it adds 100 Filar instead. On the easy difficulty, there is no bounty system. Note, we have not yet encountered the bounty system, and I'm pretty sure it's going to bite me in the ass when we do run into it. For now, I've just silently been racking up this shit without even knowing it by constantly using blood sucking as a free blood refill. Fun.
Secondly, we have the "Statistic" (stats) section. This simply adds 1 to the variable that counts the number of times you've sucked blood from a human, which is shown in the status menu.
Finally, we begin showing pictures. This will slowly make up the interface for the blood sucking, so let's take a look at all the images to see how it all comes together.

This is BlutleisteC, the first image that is drawn. Marvelous, it's a black bar. This is the background that shows the empty part of the victim's blood level.
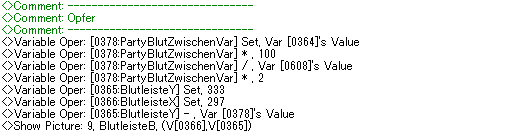
This section draws another part of the victim's blood level. But first, mathematics occur. This code is a good example as to why you're going to be using a ton of variable work when you make an RPG Maker game - variables let you do mathematics, and that lets you do all sorts of useful things. In this case, we use mathematics to calculate the ratio of blood the victim still has remaining (so, for instance, a possible result would be 55 for 55% of blood remaining), then multiply that by 2 because the blood level gauge is 200 pixels high, and with that we can directly figure out how much of the gauge needs to be displayed.
We then use this temporary variable and some constants to calculate exactly where the next picture should be displayed:

This is BlutleisteB, and it represents the filled part of the victim's blood level. We take the constant value for a Y coordinate that would display none of the image at all (because it would be hidden behind the rest of the images) and subtract the pixels we calculated earlier, which in essence moves the image up to display the amount of blood the victim has remaining.
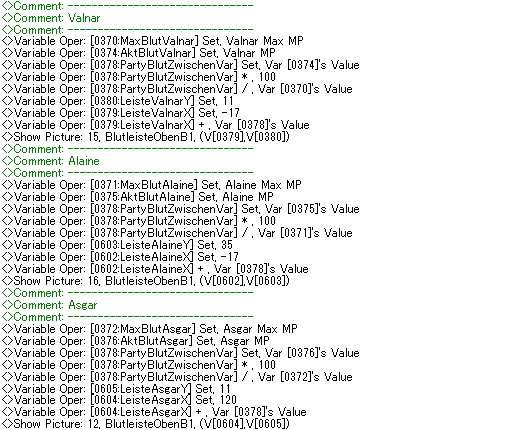
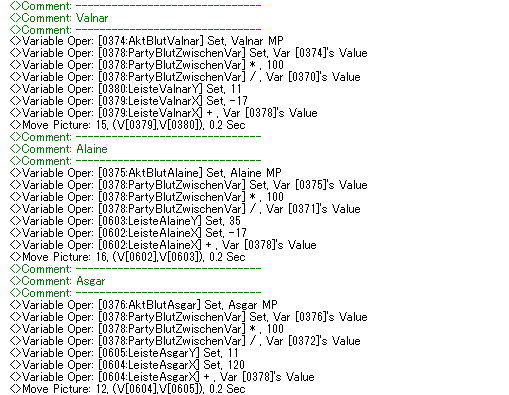
Next we have the same thing three times, just slightly altered. We use temporary variables called "MaxBlut" (maximum blood) and "AktBlut" (current blood) in a similar fashion as above to calculate the ratio of our main characters' blood levels, except this time we don't multiply it by 2 because these gauges are only 100 pixels in size. Note the nice and even pixel numbers for these gauges - RPG Maker does not work with floating point numbers, which is also why you need to multiply by 100 before dividing rather than doing the multiplication later. After that, we do some more calculations with constants to calculate out the right places for the different blood meters, and then employ a new picture.

BlutleisteObenB1 is basically the same as BlutleisteB, except half the size and flipped 90 degrees. That makes it fit nicely into the smaller gauges we'll be seeing later. Anyway, we place those at the appropriate coordinates.

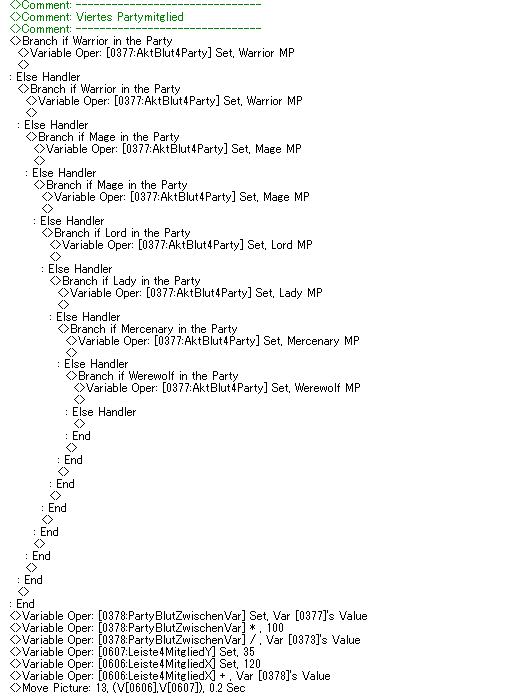
This is a long one, but it's simple, because it's about figuring out what the fourth party member is. First, we have a large group of conditional branches checking for every possible fourth party member, setting the MaxBlut and AktBlut temporary variables accordingly, and then displaying the correct small image for the fourth party member:


If we don't have a fourth party member, the space will not be filled yet and instead will be dealt with when we insert the base image.
Finally, we go through the same process we went through three times before to set the blood gauge correctly.
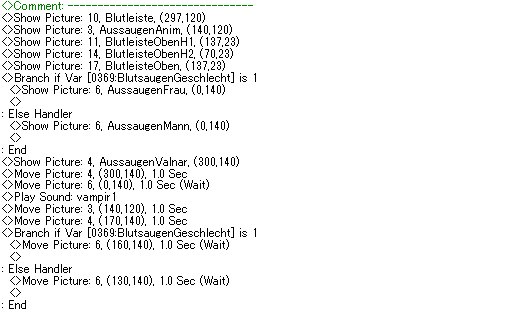
Next, we do a whole bunch of picture setup. Let's go through them in order.

Blutleiste is the graphics that make up the rest of the victim's blood level. These are placed over the other parts to complete this area of the interface.

AussaugenAnim is the animation that plays in the background during the blood sucking. At this point, however, it is placed with 100% transparency, making it currently invisible, and it is also placed with rotation at speed 3.

BlutleisteObenH1 is a black box! This one covers the entire top area of the interface, giving a background for our party's blood levels.

BlutleisteObenH2 is another black box! This one is smaller, and simply covers the left side of the interface. It might not be apparent just what this is used for, but basically, this ties in with what I said earlier about the blood meters simply being moved in one direction to reduce the amount of it being seen on screen - consider the blood meters for Asgar and our fourth party member. What would happen if they were very low? It would mean that the image for the blood meters would bleed into - if you'll excuse the pun - Valnar's and Alaine's blood meters. So this black box is layered in such a way that it is layered below Valnar's and Alaine's meters, but layered above Asgar's and the fourth party member's meters, which causes Asgar's and the fourth party member's meters to not be visible on the left side. This is a glimpse into the wonderful world of fuckery that is picture manipulation.

BlutleisteOben is what completes our interface - the rest of the graphics that make up the party's blood level display. Much like Blutleiste, it is placed over the other parts to complete that area of the interface.


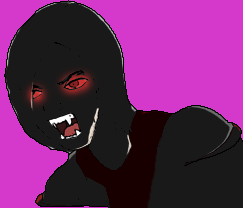
Finally, we're going to build the main graphical area of the interface, the part with the victim and Valnar. So in order to do that, we use the determined gender of the victim to pick between AussaugenFrau and AussaugenMann, which is then placed onto the screen with 100% transparency. We'll make them visible in just a bit.
And then, we have one more image to be drawn - AussaugenValnar. This is also drawn at 100% transparency to begin with.
Now, to bring the attention back to the code, we've just gone through all the lines up to Show Picture: 4, AussaugenValnar, (300,140), about in the middle of the image. The next lines go as follows:
- We move the picture of Valnar to the same location, however this time with 0% transparency. This essentially causes a fade-in.
- We do the same for the picture of the victim. This and the previous fade-in will have to complete before the event continues.
- We play a vampire sound.
- We then fade in the animation that plays in the background, having it rotate around while at 60% transparency.
- We move Valnar's picture more to the left.
- And finally, we also move the victim's picture over to the right so it lines up nicely with Valnar's image. This moving has to finish before the event continues processing, and it does so like this!
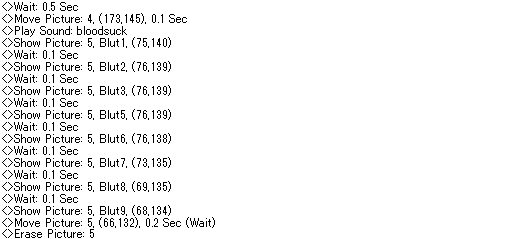
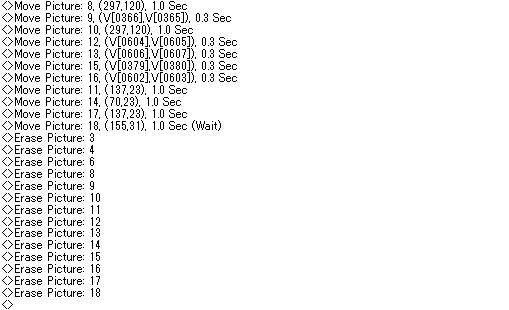
Here, we wait a little bit, and then Valnar's image moves a small bit down and to the right to simulate the "bite" happening, which is then accompanied by an appropriate sound playing. And after that, we have an animation happening:


So, these are Blut1 through Blut9, with Blut4 being strangely absent. These are placed one after the other to create a frame-by-frame animation. Now, you might ask yourself: "TheMcD, why are you doing this to me? I don't understand a word you're saying!" And I wouldn't have an answer to that. But you might also be asking yourself: "TheMcD, why would Marlex use this complicated setup to make an animation when he could just use a battle animation?" And I do have an answer to that, mainly because I just asked myself that question. And the answer is this: Layering! The blood effect is supposed to layer under the graphics of the victim, and you can't do that with battle animations. Battle animations would just layer above the pictures, and that would look terrible. So that's why!
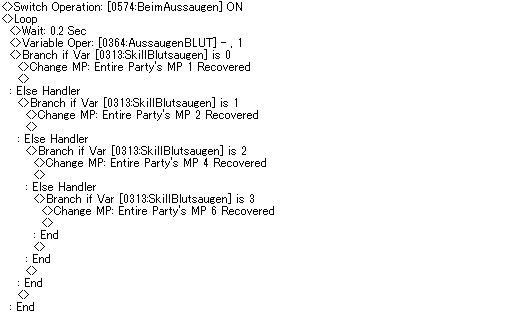
Next, we're going to turn on the switch that tells the game that we're currently sucking blood. This will become relevant at the end, because this event is not the only one that figures into the blood sucking process. After this, we enter a loop, so let's just kinda make that official:
---ENTERING LOOP---
The first thing we do in this loop - after waiting a bit - is checking the skill level our party has as far as blood sucking is concerned. Depending on that level, we recover either 1, 2, 4 or 6 BP.
Next, we essentially re-run the code from earlier that set up the blood meters for our party. So this part of the loop updates the positions for the blood level meters with the new values after the increase in BP.
We then do the same thing for the fourth party member, again with the avalanche of different conditional branches.
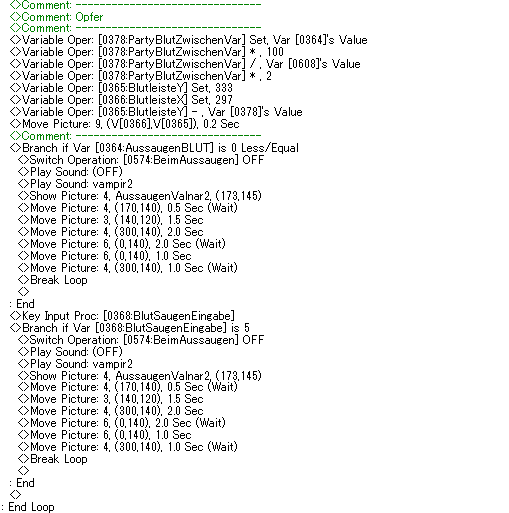
We also rerun the code that did the blood level meter for our victim and update that. Next, after that commented line of dashes, we have the code that handles terminating the loop, which is of course something you're going to need with any loop. There are two ways this loop can terminate - either when the victim's blood runs out, or when you press the ENTER key, which is handled by the Key Input Processing line and checking for the value of the pressed key. Regardless, when the loop is terminated, we go through some minor motions.
First, we turn off the switch telling the game that we're currently sucking blood. We then stop all currently playing sounds (this will also make more sense when we look at the second event that plays into this process) and then play another vampire sound. After that, we swap out the image of Valnar with a different one:
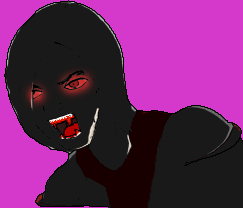
AussaugenValnar2 here is the same image, just with Valnar now having blood on his fangs, which I suppose is appropriate. After that, some more movement occurs.
- Valnar's image moves slightly up and to the left, basically undoing the "bite" we did earlier. This movement has to complete before the next step.
- After that, both Valnar's image and the victim's image move back to their original positions while the animation in the background begins to fade out again. This movement has to complete before the next step.
- Finally, both Valnar's image and the victim's image are faded back to 100% transparency.
And with that, we've successfully terminated the loop! If we did not fulfill either of the two conditions for breaking the loop, it would begin from the top again and just keep going until one of the conditions applies.
---EXITING LOOP---
Finally, we have some cleanup. The entire rest of the images is first faded out to 100% transparency, and then all of the images are erased. And with that, we've completely gone through the event! But that's not all! What we've just gone through was common event #19, "Aussaugen".
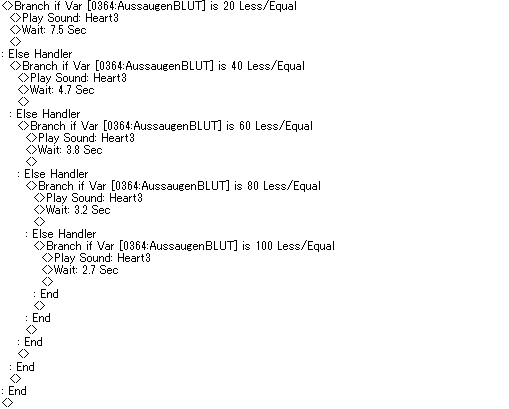
Now, meet common event #20, "HerzschlagAussaugen", which, as the name implies, deals with a heart beat during blood sucking. "Aussaugen" was an event that needed to be called, but "HerzschlagAussaugen" is a parallel process with a trigger switch, which in this case is switch #574, "BeimAussaugen", the switch we turned on and off during the other event. So while this switch is on, we have one big conditional that's running. It checks how much blood the victim has remaining, and depending on how much it has, it plays a heartbeat sound at a slower and slower rate. So that's what the previous event was doing when it forced all currently playing sounds to stop - after turning off the switch that makes this event run, it just kills the heartbeat sound instantly instead of letting it play out.
And that's it! That's one complete rundown of the blood sucking system in VD2. And this was probably one of the simpler systems. Anyway, next time on Behind The Fangs, we'll be checking out something else! Again, I have no idea what it'll be, I'll probably just let inspiration strike me!