Part 6: Finding the Rock, Capella System, Gemini Sector (Gameplay)
7th August 2668, Capella System, Gemini SectorEpisode 1, Mission 3 - Finding the Rock
The Lionheart emerges on the other side of the jump point, and runs straight into a swarm of pirates patrolling their side of it. The Stiletto wing is scrambled in response. Yes, I did say there were no scrambles. I don't think it really counts given we're the attacking force in this engagement.
Pre-mission cutscenes:
There are no cutscenes before this mission, which makes a certain amount of logical sense since it follows directly on from the previous one.
Mission Briefing:
Briefing Video (Youtube)
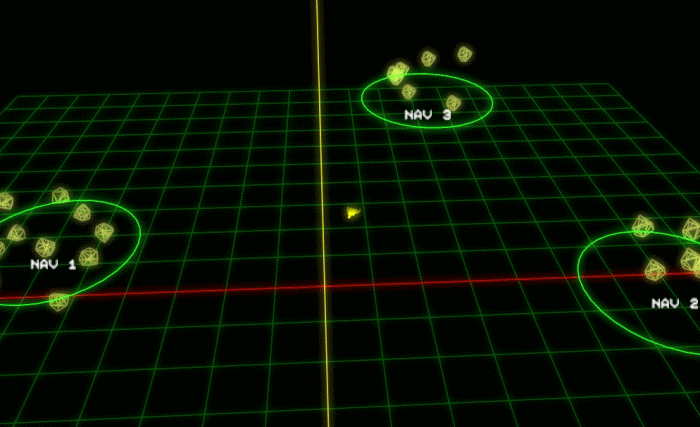
Defend the Lionheart (sort of...the enemy don't have any ships that can seriously hurt it), then set off on a three-point patrol to find the pirate base; once found, do not engage but instead hightail it back to the destroyer, so it can close in on the enemy.
Mission Video (Youtube)
Kills this mission: 9
Tactics Corner
Enemy forces:
10x Talon medium fighter
5x Tarsus light frieghter
1x Sabre heavy fighter (at Nav 1)
3x Talon medium fighter (at Nav 2)
1x Pirate Base (at Nav 3)
3 or more x Talon medium fighter (at Nav 3)
Friendly forces:
1x Stiletto light fighter
1x Gilgamesh-class destroyer TCS Lionheart
6x Gladius heavy fighter
1x Stiletto light fighter (launches ~20 seconds, joins player's wing)
1x Stiletto light fighter (launches ~35 seconds, joins player's wing)
1x Stiletto light fighter (launches ~1 minute)
Situation:
Sometimes, Tactics Corner has lots of screenshots where I explain how the mission evolves as multiple waves of enemies arrive. Other time, one screenshot accurately sums up the major challenge of a mission. This is the latter case, and here is the screenshot, with helpful annotation to highlight the crux of the issue:
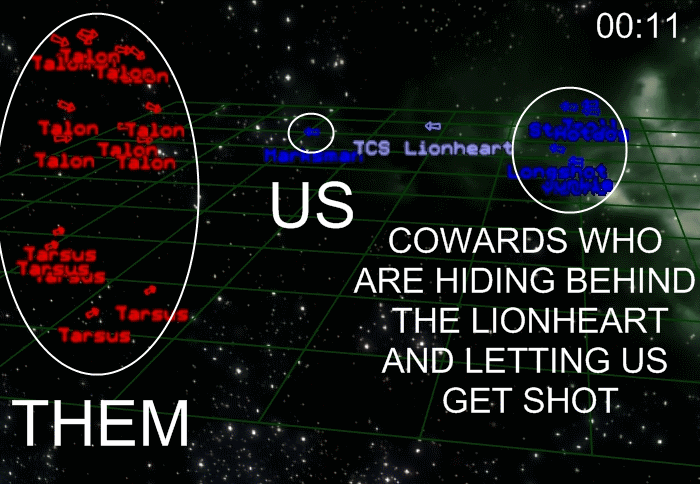
Survive the horrible situation you've been thrust into at the start without too much damage and you're pretty much set for the mission. There's two choices for what you do here: either turn around and afterburner back to the Lionheart, or try and fly a sufficiently evasive course through the Talons until the Gladii and your first wingman reaches them about thirty seconds in. The first is probably the smarter option though the second feels like what you ought to be doing. The enemy fighters here don't have anything that can really hurt the Lionheart - no torpedoes - so it doesn't really need protection (another reason this mission is hardly a scramble) and there's no real problem with hiding behind it. Theoretically they can scrape the turrets off it without needing torpedoes but I've only ever seen one turret go down in many playthroughs of this mission. The problem with fighting close to the Lionheart is that it isn't any more discriminate with its fire than your wingmen are. Which is to say that sometimes you could swear that it is actually aiming at you. The other problem is that if you're not careful your first wingman will launch into exactly the same problem you had and may not deal with it so well (though the enemy may have broken up to some extent by then). On the other hand, dodging through the Talons is likely to pick up more damage than trying to draw the enemy into where your fighters are.
The other nav points are relatively simple - only one fighter at Nav 1, even if it is a Sabre, and three at Nav 2. You aren't supposed to engage at Nav 3 so just hit the autopilot there for mission accomplished - if you close with the Pirate base it just launches (I think) infinite waves of Talons, and eventually you'll run out of afterburner fuel.
It's a bit of an open question when to use your missiles in this engagement - frankly, you don't really have to use them at all. The Sabre at Nav 1 is a pain to kill without missiles, but it is the only fighter at the nav point and you're in no real hurry or much danger, so you can just wear it down with guns like I do in the video (though to be fair the main reason I do this is to show how much of a pain it is). Overall I think it's probably best to use them at the start, to even the odds as fast as possible (which is what I do in the video, saving one for emergencies).
New characters:
Lieutenant Ewan Freyers

OK, so Freyers is hardly a new character, he's been talking to us for a while now. But since we don't have any actual new characters this mission I thought I'd mention him.
Freyers joined up with Confed as soon as he was eligible to do so, in order to escape the backwater mining colony he was born on. He was discovered to have a knack for cryptography during his time at the Academy and was rapidly shunted down the path towards becoming a communications officer. Assigned to the TCS Winterrowd, he distinguished himself by decoding intercepted Kilrathi messages indicating an impending Kilrathi offensive into the sector, allowing sector command to mobilise forces and stop it short of New Constantinople. This got him a promotion, an inflated ego, and allowed him to survive the first major Confed reduction in force - the Winterrowd was mothballed, but Admiral Terrell transferred him to the newer Lionheart.
Unless my memory is extremely wonky, Freyers doesn't have any scenes outside of missions, nor is he a regular correspondant. I find this a bit disappointing; he's got a good VA and there's some flashes of an interesting personality in his mission dialogue. Still, there's only so much writing and recording time to go around on a project like this, and there is a danger of ending up with several half-developed characters (I kind of think that WC4 did this; anyway, more on that in two games' time). It's also harder to write the comms officer in when most of the cutscenes are in the pilots' lounge. It would have been nice to see a bit more of him, though.
Ship of the day:
Sabre
Class: Heavy Fighter
Length: 23.62 Meters
Mass: 22 tonnes
Max Velocity: 400 kps
Afterburner Velocity: 1200 kps
Maximum Yaw: 80 dps
Maximum Pitch: 80 dps
Maximum Roll: 80 dps
Weapons (fighter loadout): Mass Drivers (2x), Particle Cannon (2x), Dumbfire Missile (2x), Image Recognition Missile (4x), Friend-or-Foe Missile (2x), Turreted Neutron Guns (2x)
Shields: Fore: 100; Aft: 100
Armour: Front: 200; Right: 180; Left: 180; Rear: 200.
Game says: One of the Confederation's heaviest combat fighters, the Sabre performs well both in dogfights and in strikes against capital ships. While its shields leave a lot to be desired, the Sabre makes up for it with excellent armor.
I say: Nightmare difficulty does the heavier fighters no favours, in that fighter durability is halved while turning speeds are unchanged; therefore light fighters, whose protection is speed, do relatively better than heavy ones, whose protection comes from turrets, shields and armour. Still, the Sabre, much as in WC2, comes out OK without being particularly brilliant. The large missile loadout can be used to try and even the numbers at a critical point in a mission, and it's far preferable for capship strikes than any of the alternatives since it actually has an afterburner. The Sabre probably ranks third or maybe fourth in terms of the Standoff fighters you fly during the campaign plot - not much to choose from between it and the Stiletto. As an opponent, it's a problem for the Stiletto because the rear turret can chew through the Stiletto's front armour and shields far faster than the Stiletto's mass drivers will eat away the Sabre's thick armour plating, and front-on is suicide for the light fighter; basically meaning a Stiletto pilot needs either a missile or a lot of patience to take down a Sabre. The Gladius, meanwhile, can't keep up with the Sabre at afterburner, so is almost forced into the head-to-head route.
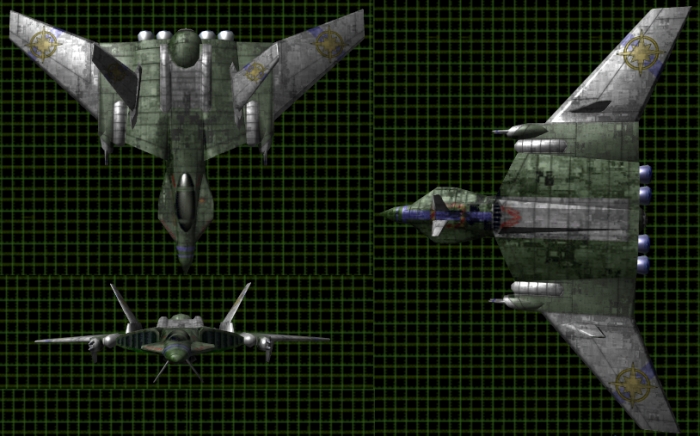
Thread says: Ilanin, why are these images a different format every time?
Err. Well. Basically I take screenshots from Standoff's ship viewer and stitch them together, and see how many angles I can fit into a sensible size. I'm normally aiming for something like the Talon image, but the Sabre is sufficiently wide-bodied and squarish that it makes it very hard to actually fit the four views in a sensible shaps, so you've got three instead.
Total kills (Standoff): 3 missions / 24 kills
Total kills (including previous thread): 116 missions / 946 kills
And finally...
radintorov posted:
Well, it seems they are represented correctly, although going by your post on the Talon, the devs have added a second particle cannon, seeing that in Privateer they carry only one (and the two lasers and HS).
No, this is my mistake, having just loaded up the simulator and checked, the Talon has a single particle cannon. When flying against it, it often seems like the shots originate from different points; I'm not sure why that is. Anyway, corrected.