Part 52: Charge of the Leathernecks, Sol System, Sol Sector (Gameplay only, no story)
Psion posted:
If there's a mission which makes even you give up on a clean sweep, consider me impressed.

Well, this is that mission. I think a clean sweep is theoretically possible, but I'd like to post another video before this thread ends up in the archives. Anyway, hiatus over, the thread should now be back on it's regular lack of schedule.
1st January 2669, Sol System, Sol Sector
Episode 5, Mission 6 - Charge of the Leathernecks
The Firekka's fighters escort the second wave of Marine boarding shuttles to their targets, and if they're really lucky, back again.
Mission Briefing:
Briefing Video (Youtube)
I decided to put Bradshaw's conversation in here because, well, there's not an official briefing but what is this if it's not a mission brief?
 : Captain Bradshaw, any news?
 : News? Yeah, there's news. Get to your planes. The marine shuttles are approaching the cat fleet, and we've got to protect them.
 : Marine shuttles? What are the Marines doing out there?: Planting explosives. They will board and destroy the enemy carriers. : Whoa. And I thought we had it tough.: We will, if the Marines don't make it. Get to your ships and let's go!
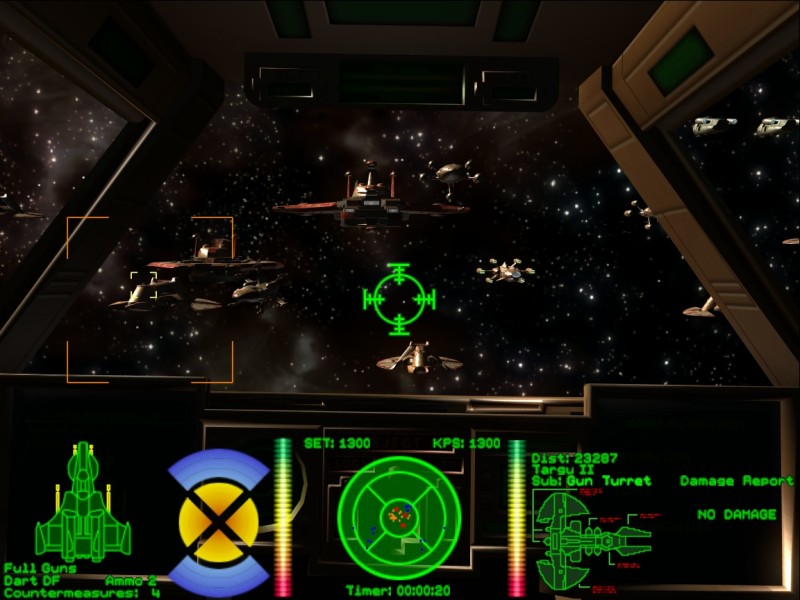
Mission Video (Youtube)
Kills this mission: 17
Ugh. I mean, this mission really isn't intended for you to go for a clean sweep. It's supposed to be fast-moving chaos in which you can barely keep track of what's going on, and it is. Unfortunately the type of LP this is kind of required me to at least attempt the clean sweep, which I did, but it seemed like way too much effort for a single video when at least half the thread just wants me to get on to WC3 already (tough, I want to play the Episode 5 losing track).
Just the one fight, albeit with enough cats for at least two. Unfortunately, I can't really provide much useful commentary about the flow of this mission or the correct way to attempt it, because, well:
Friendly forces:
6x Rapier II medium fighter
6x Sabre heavy fighter
12x Hermes-class shuttle
Enemy forces (that are still intact when we arrive):
1x Hakaga-class supercarrier
1x Fralthra-class heavy cruiser
1x Rigakh-class cruiser
3x Ralatha-class destroyer
5x Targu II-class frigate
3x Drakhai Sartha light fighter
18x Krant medium fighter
4x Jalkehi heavy fighter
4x Hhriss heavy fighter
3x Drakhai Vatari superheavy fighter
5x Sartha light fighter (reinforcements, arrive after 3 minutes)
Yeah, three-to-one odds isn't great even before you consider we've got transports to escort. Fortunately over half of the enemies are Krants. Even more fortunately the transports are reasonably fast and have guns. With 12 transports you can only afford to lose one if you want a clean sweep, but for mission success you can lose up to 7 provided you do actually get one of them in on the Hakaga. Unfortunately, the Kilrathi are packed sufficiently close together (and there's enough of them and of your forces) that the tactical map looks like this:
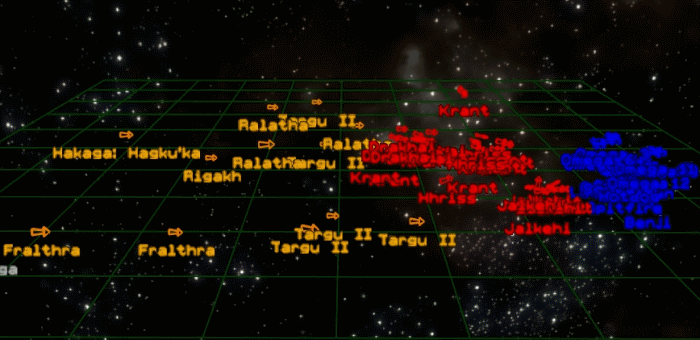
It's already nearly impossible to identify individual ships, and the fight hasn't even started yet. Once the two sides close with each other, there's no chance:
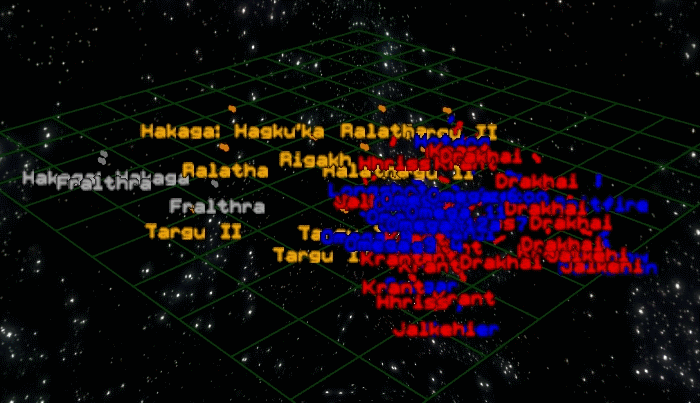
And that's the problem with this mission, and why I gave up on a clean sweep. Part of the reason I love Standoff so much is the tactical challenge - to get the best possible results out of most missions, you have to use the map, work out where the enemies are coming from and who is attacking who, which ones need to die right away and which can be safely ignored for a while. But you can't do that here because the map is useless, so there's no real way to work towards a clean sweep, because it's practically impossible to tell what's going on so you don't know which fighters to prioritise, and in any case fighter wings get sufficiently spread out across the battle that you can't really go after, say, the Vatari without flying around all the other Kilrathi. I did spend a while going after various different types of ship, but I never did any better than just attacking the nearest fighter all the time, so that's the technique I recommend. It's not that hard to pass this mission - I guess I must have made somewhere between 30-40 attempts at it and only failed maybe two or three times. But the clean sweep is much harder. 5 enemy capships left is about par, 4 is good, 3 was a rarity. I have a suspicion that a lot of the time the frigate turrets kill the transports, given that they pack a fair punch and have great coverage, and the transports are doing lowish speed docking stuff.
Ship of the day:
Rigakh
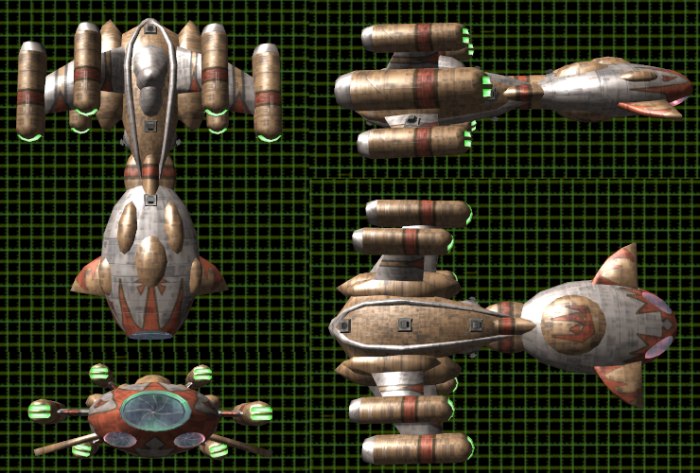
Class: Light Cruiser (Kilrathi)
Length: 422.45 m
Mass: 14,320 tonnes
Max Velocity: 280 kps
Maximum Yaw/Pitch/Roll: 15 degrees/second
Weapons: 11x Dual Laser turret (I think, based on the game files they only have one type of turret)
Shields: Phase Shields
Armour: Not listed, but a Rigakh takes three torpedoes to destroy.
Fighter Complement: Two Squadrons
Game says: The fastest Kilrathi capship currently used, the Rigakh cruiser is a light but very powerful capship capable of fulfilling a very diverse set of missions. One of these ships, the Hhai'fra, has until recently served as Prince Thrakhath's flagship.
I say: You don't see the Rigakh much in the game - I think the idea is that the Kilrathi don't have that many of them - so it's hard to get much of a feeling for it as a capship. I love the model though, even if the way the rear is set up means that getting the right angle for a torpedo strike is a huge pain. We will be seeing them in the losing path though.
Total kills (Standoff): 26 missions / 340 kills
Total kills (including previous thread): 138 missions / 1266 kills
Next time on Standoff:
The Final Showdown (except for the losing path missions).