Part 1: Infantry Basics
BF4 Multiplayer: The BasicsBattlefield 4's multiplayer mode is a pretty involved affair. At any time there are dozens of Heads Up Display (HUD) markers, meters, circles, counts, chat, feeds or unlocks streaming over your screen. This episode is meant to introduce you to the most popular of Battlefield 4's multiplayer modes, Conquest, while providing an overview of the HUD and a quick look at the four classes in the game. Each of the classes will get their own video that covers them in a bit more depth. For now we'll settle for covering some of the more basic elements of the game before introducing vehicles, gadgets and large scale "Levolution."
With each one of these videos I'm going to lay out some things that aren't fully clear unless you know what you're looking at, see below for more information on the Deploy screen, the HUD, Killcams and Loadouts.
Deploy Screen
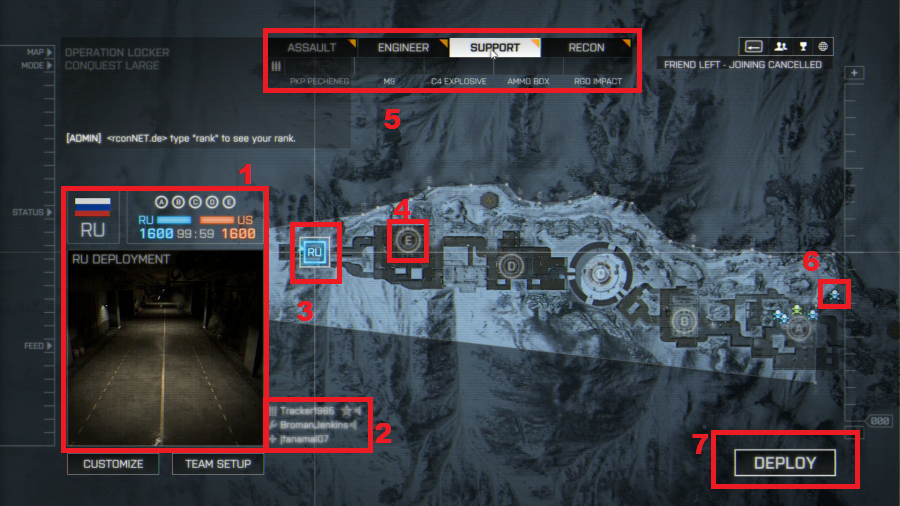
1: The Game Status.
In the bottom left corner of the screen we see a live stream of where you are planning on spawning (large box), above that we have the current ticket count and above that we have the flag ownership on display. No matter which of the three factions you are your team will always be "blue" and the enemy will always be "orange." The circles around the letters indicate that no team has possession of the point. When your team takes possession of a point it becomes a blue square. The enemy team taking a point will turn it into an orange diamond.
2: Squad Status.
Next to the live Game Status box (which becomes your minimap when you spawn) is the squad status area. This tells you which members of your five man squad are alive or dead, their classes and if they are talking. The squad is a vital part of BF4, they are the only people you can spawn on top of and voice communicate with by default. A squad leader can point you to objectives and assisting squad members will give you a few extra points and fill up the squad meter. Once you complete a pip on the squad meter (not pictured) you'll gain a new Upgrade. This can be anything from becoming invisible to motion sensors so long as you don't run to carrying extra explosives.
3: Home Base.
Each map has what is called an Uncap. This is a point that the enemy can't take from you and when all other options are exhausted you can spawn there. It is also where most vehicles will spawn for your team in maps that use them, so there's almost always a reason to go home, so to speak. Most of the time the enemy can't get a clear shot or travel to this point, so it is semi-safe to spawn there even if they are destroying you five steps after you leave the area.
4: Capture Point.
The objective of Conquest is to take as many capture points as you can while keeping enemies from taking any. This usually leads to either complete domination by one team or a bitter stalemate where points are constantly flipped. Locker, the map we're on here, isn't good for that and almost always ends with whichever team captures C and reinforces it first winning by default. On some maps capture points will yield vehicles and in Conquest holding some points will give the team's Commander special abilities (more on that in a later post).
5: Class Choice.
BF4 has four classes to chose from, but there is some good variation inside each class and not a lot of overlap between them. The game only remembers one loadout per class, but you can change it mid game if you need to. If you have new equipment or weapons the class will display a yellow wedge next to the class title.
6: Dead Teammates.
More important as the game goes on, but this shows you where teammates died in the last few seconds. Useful if you have to figure out which area of the map needs attention.
7: Deploy Button.
Select the point or person you want to deploy on with one click and hit this button to spawn in. Or just double click and instantly spawn as if you hit this button.
General HUD
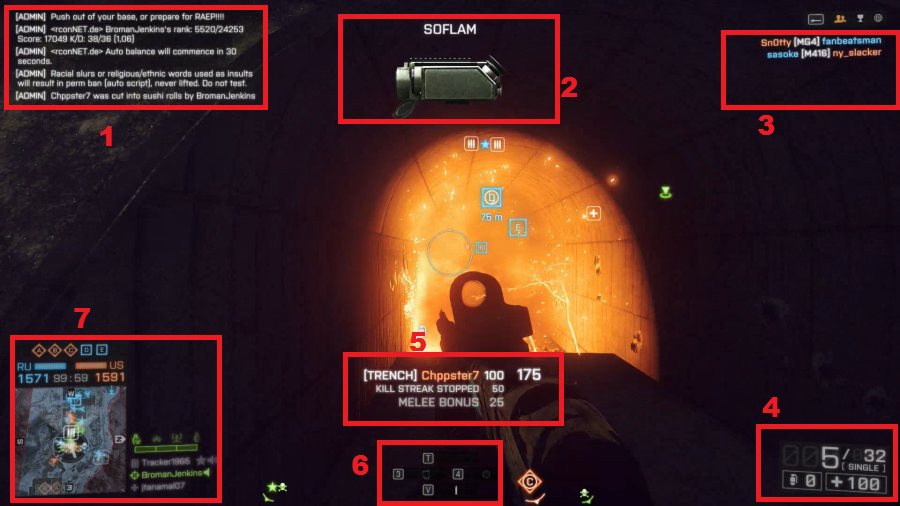
1: Chat
Players talk to each other in the chat, selecting an order or request from the CommRose menu (hold Q) also generates a note in the chat. Useful for taunting people on the other team or asking Admins to ban someone for using guns you don't like.
2: Unlocks
When you unlock a gun or piece of equipment, level up, earn a ribbon, get a medal, take someone's tags or get a Battlepack the game will note it in this space.
3: Killfeed
Pretty simple. This tells you who killed whom with what, sort of like a game of clue where everyone is Colonel Mustard and has a penchant for sniper rifles.
4: Player Status
The box in the bottom left tells you how many bullets are in your magazine, how many you have total, how many grenades you have, how much health you have and the firing mode of your gun. It's an important little rectangle.
5: Points
As this is a first person shooter you want to see numbers go up. This part of the screen tells you whenever you get some points. There are a million ways to earn points. You can heal friends, hurt enemies, blow up tanks, capture points, assist teammates... the list goes on. It is a very busy section of the screen.
6: Guns and Gadgets
This little part of the screen tells you which gadgets you have available (left and right rectangles) and what options you have for your guns (top and bottom rectangles). If you have attachments for your weapons that need activation, like lasers or hybrid scopes, hit T to turn them on or off. V will change the fire mode of your gun if possible. 3 and 4 on the keyboard bring out gadgets depending on what you have in those slots. Unlike BF3, BF4 lets you combine nearly anything with anything in the character class (duplicating item types, like carrying two launchers, isn't possible, though)so play around with what works best there.
7: Minimap
The bottom left corner is occupied by the minimap. There's a lot of information there, as it tells you your field of view,the lay of the land, nearby spotted enemies, nearby friendly units, the direction of capture points and the cardinal direction you are facing. Note that the squads and Game Status aspects from the previous screen are still there.
KillCam
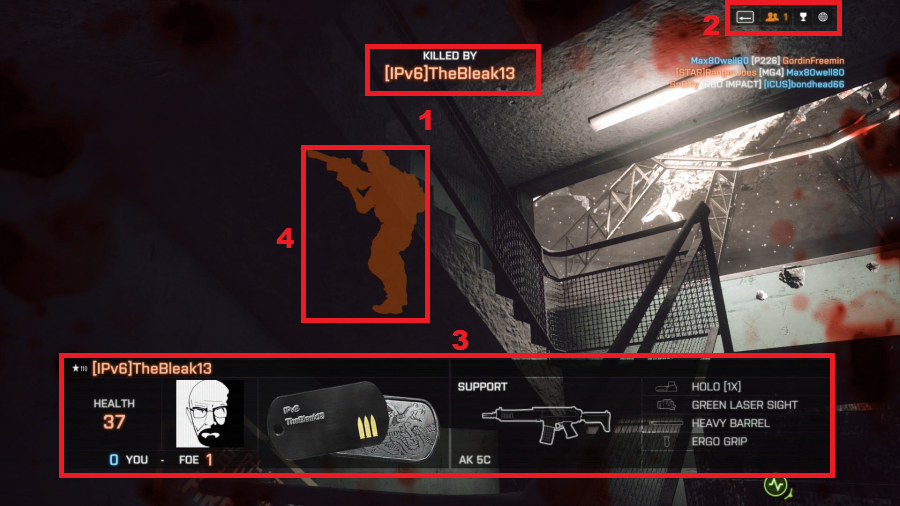
1: Guy who Killed You's name
No need to launch an investigation, we have a suspect!
2: Battlelog
Something I failed to mention is that Battlelog is an ever present part of this game. This little rectangle tells you how many of your friends are playing the game, and can be opened by hitting Backspace on the PC. This allows you to see which maps are upcoming, invite people to the game and see if you have Battlepacks available. Exciting stuff
3: Guy Who Killed You's Information
This area of the screen explains the status of the person who killed you, including their level, the gun they used and their overall character build. It also displays how many times you've killed them and they've killed you and if they have an emblem it will display that as well.
4: Guy Who Killed You
When someone kills you in this game the camera will track them for several seconds and give them an orange glow (your perspective only, no one else sees that). This lets you know if they were waiting in ambush, or if they were just passing through killing people. Also, make sure to call anyone who kills you while in a corner a camper, that never gets old.
Weapon Change Screen
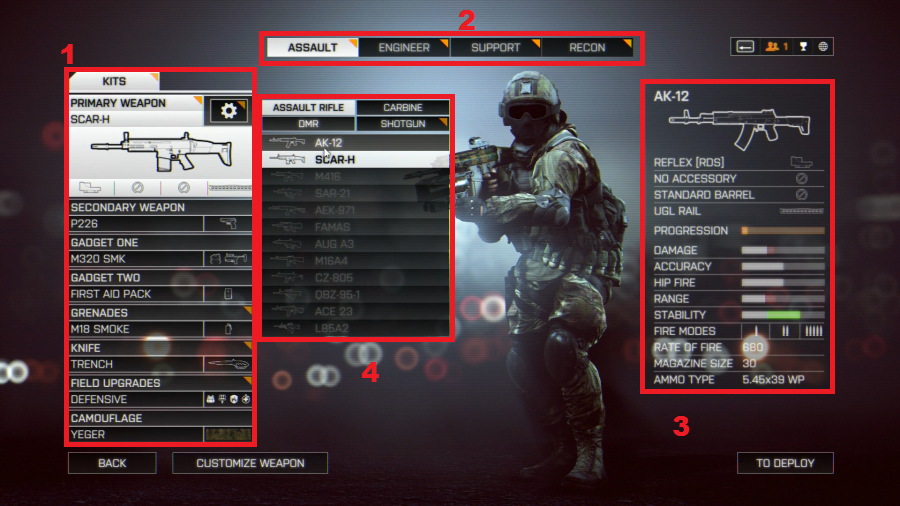
1: Current Loadout
If you decide to change weapons mid game you are greeted by this screen. By clicking on the guns or gadgets you open up further menus (as I've done here) to choose an alternate weapon. If you hit the gear in the corner of the box for an active weapon you can change up the attachments on it. You can also change vehicle loadout here, but only for vehicles that appear on the map. Note that this doesn't just cover guns, but field upgrades and weapon camos as well.
2: Class Selection
Once you enter this screen you can change any class you like, even though you start on the class last used.
3: Current weapon
Pretty much everything you could ask to know about the gun you are mousing over is here. The red ticks on the bars right under the weapon portrait indicate areas the gun is worse than the current weapon. If you modify a weapon and then switch to another one the discarded weapon will keep the attachments you assigned to it last. Keep that in mind when you change weapons in this screen.