Part 41: - Fire for Ariandel

And so we conclude the first DLC, Ashes of Ariandel. A long trek through a variety of snowy landscapes followed what I think is a really great boss fight. Let's have a look at that as well as the items we can find in the DLC.
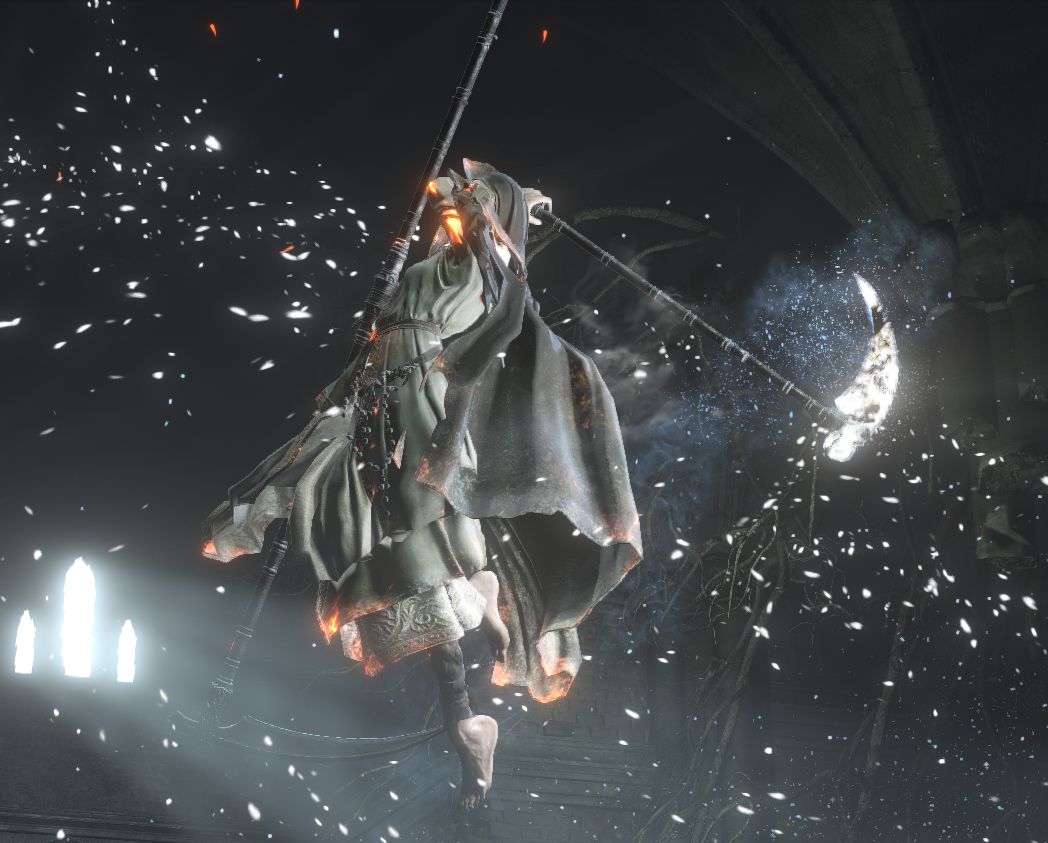
Sister Friede
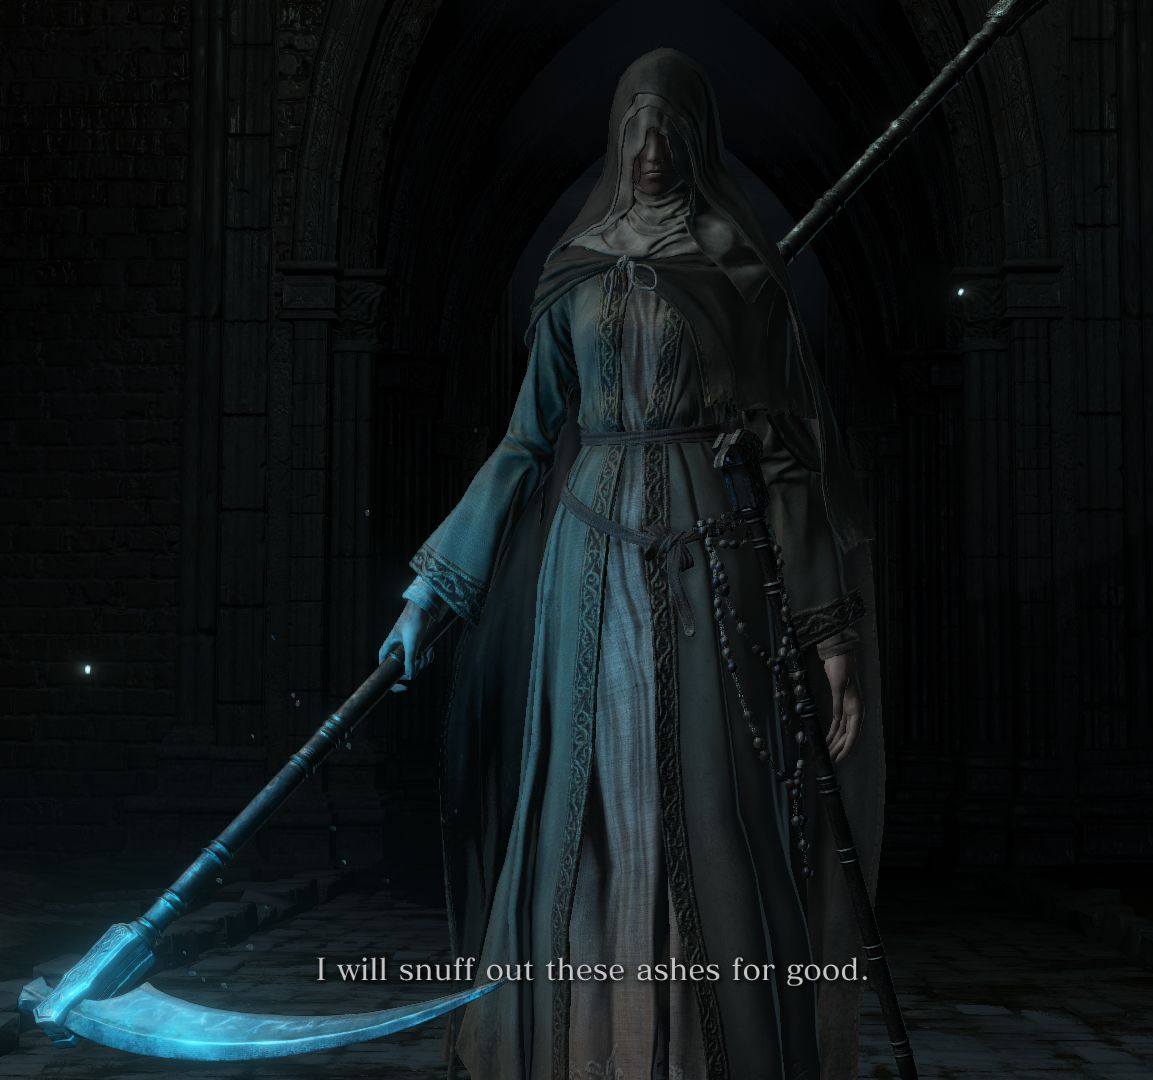
The first phase of this fight has Friede move very slowly, attacking more methodically. Once you figure out her moves she shouldn't me much of a problem to you. She doesn't have much health either. After all this is only the first phase of the fight.
Her attacks mostly consist of various swings with her scythe, which just requires you to learn how to dodge them properly. Additionaly she can also freeze the ground in a staright line in front of here followed by a leap attack. The ice creep will build up frostbite while you're standing on it, and after a short time it will "explode" into icicles erupting from the ground. She can also summon ice creep in a cone shape in front of her. Her most recognizable attack sees her turning invisible and jumping around. She'll often jump behind you so if you weren't able to tell where she landed by listening for the sound of here landing or the dust settling afterward it's worth a shot to just turn around. You'll be able to see her again if you get close. Some people also recommend hitting her with throwing knives or arrows, which will still be visible after Friede turns invisible. If you don't find her for too long she will attack you with a powerful scythe attack, which is probably her most dangerous attack.
It's worth mentioning that, while she will flinch after being hit, she'll just get hyper armor and attack you after a couple hits, so stunlocking her isn't possible.
Sister Friede and Father Ariandel
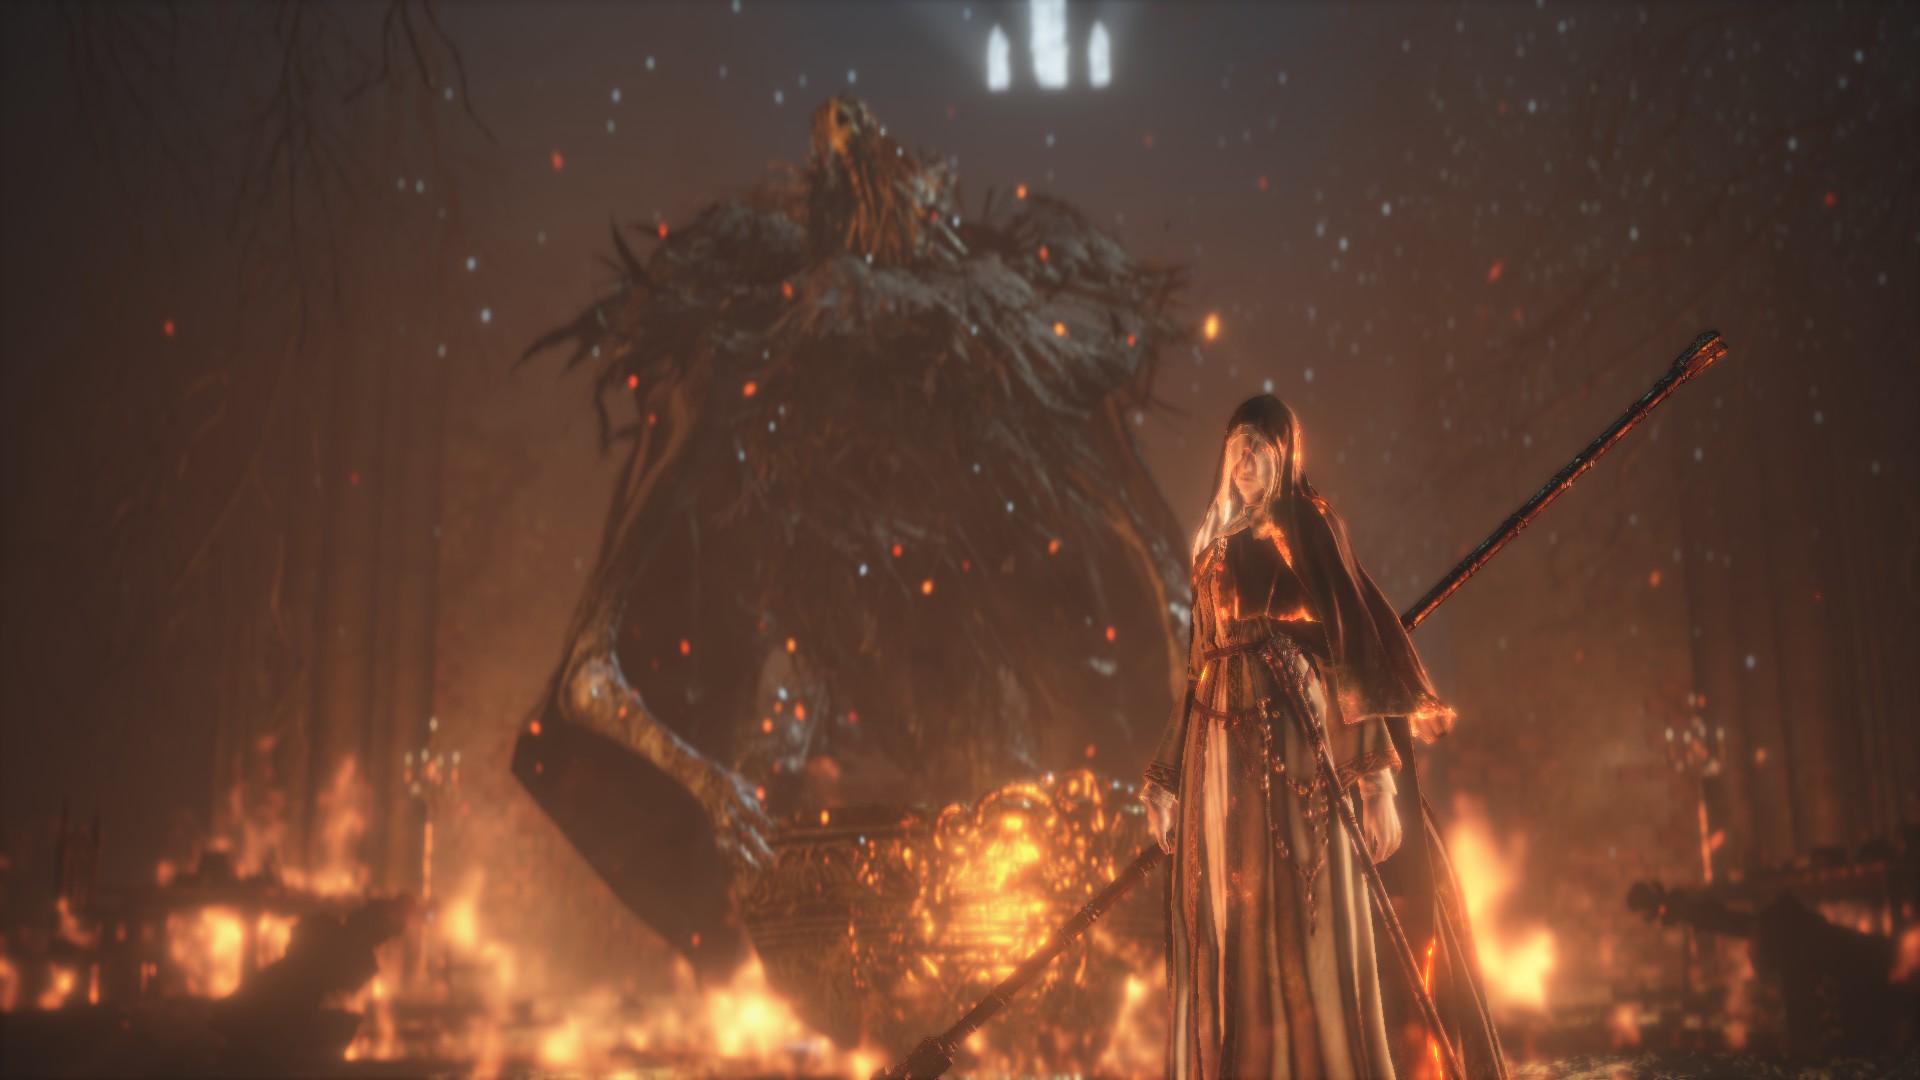
After Friede has been defeated she collapses and underneath her forms a pool of blood which extend all the way to Ariandel, who then goes nuts and just slams his bowl around (some people insist it's the Lordvessel because if Souls Loresters are to be believed everything is somehow related to the Lordvessel, Velka and/or Lloyd). Ariandel sets fire to the place which somehow revives Friede as a Host of Embers, so now we have to deal with both of them.
Friede acts largely the same but is far less aggressive than before. She also has the ability to heal herself and Ariandel. Just hitting her interrupts it immediately. Ariandel is a whole new variable to the fight, though. He has a couple of combos with his bowl, where he'll slam it on the ground repeatedly. Sometimes the third hit will be very explosive and deadly. Sometimes he just swings the thing as well. At a longer range he can also charge towards the player followed by an attack and breathe fire breath has a very long range, so long as you're not in front of him you can get a couple really easy hits in on him that way.
Since Friede and Ariandel share a healthbar you can attack both to win the fight, but it's much easier to focus on Ariandel. He's bigger and easier to hit, he also has lower defenses and takes more damage from most attacks. When hit enough he'll also collapse and you'll be able to visceral attack him for probably the rest of their health bar. If you summoned Gael prior to the fight he will support you during this phase, but not the first. I don't know exactly why this is the way it is but Gael is weird anyway, as you can summon him whether you are Embered or not. He also doesn't count as a phantom, technically, meaning you could summon as many players as you like AND also bring Gael along. He also does not increase the bosses health.
Blackflame Friede
This is a two-phase boss fight with a surprise third phase. Each phase gets its own health bar which pissed some people off, but it's essential in order to make the third phase a surprise. I at least thought it was a cool moment to think I beath Friede and Ariandel only to have the real fight ahead of me still. This really is what put that fight over for me. It's probably the hardest fight in the game. By now I can reliably solo her after a few tries. But the first time I was stumped here for a bit. In my NG+ Bonus run I took this to the extreme and took more tries than ever before for some reason despite already having beat the boss solo before. Of course, there's also people who find this easy.
However, if you're not one of those people you're free to bring Gael along to help you out. I would recommend this over summoning players because players increase the defenses of Friede and she'll take so many hits that it stops being funny.
She will always start the fight with her a Blackflame Explosion thing where she'll jump up to come crashing down with black flames erupting from the ground with trails of more black flames moving from her along the floor. I recommend getting a feel for how close you can get without getting hurt because if you can get in close afterwards it's a good chance to get in a hit or two. She'll also do this attack throughout the fight.
While she has some moves that are similar to her first phase she has mostly new moves. Her combo got much longer. Once you're able to read it and know which is the last hit you can dodge towards her to get in a hit. She has a really mean grab where she rushes towards you. If it connects she'll straight up decapitate you with her scythe. You can, of course, survive this. But it's best not to get hit by that. She also has a more minor grab. She'll just hook you in with her scythe to follow with more attacks. She can still summon ice creep in a large cone in front of her, she usually won't hesitate to attack you after doing it. She can also still turn invisible of course, only this time she'll cause more ice creep in a straight line, jump away again and do it another time, then jump away again to follow with a homing black flame trail. Since it takes a while to charge that one it's a good chance to get in a hit or two.
She has a lot of health, more than either of the other two phases so you should aim to conserve as much estus in the third phase. One trick that never occured to me when playing is also to just use an Ember after the second phase as a free one-time heal and slight health extension.
So, let's have a look a the Dialogue that we can only get when being on our path to the Lord of Hollows ending.
Vilhelm will adress you as a Lord of Hollows, but otherwise his dialogue will be the same. Friede has a couple variations, though.
Meeting her for the first time:
"Lord of Hollows, I know not the missteps which led thee to this painted world. But they duty is all, and thy duty lieth elsewhere. Return from whence thouh cam'st."
Giving the player the Chillbite Ring:
"Ahh yes, there is a thing thou shouldst by rights possess. A remembrance of this cold world, for the great Lord of Londor. May it help thee bear they duty."
Opening the path to the boss fight:
"Be forewarned, eager Ash, Should this world wither and rot, Even then would Ariandel remain our home. Leave us be, Ashen One. Thou'rt the Lord of Londor, and have thine own subjects to guide."
Dying to the boss:
"Return from whence thou cam'st. Yuria surely awaits thee."
"Leave us be, Ashen One. Thou art the Lord of Londor and have thine our subjects to guide."
Then there's Yuria's Dialogue which I actually showed in the video.
"Ahh, our Lord and Liege. Twas the soul of my sister. Elfriede...A poor wench turned to Ash, who would abandon Londor... If thou wouldst, let it nourish they Lordship. And in return, do her one small kindness. Remember those who stayed by her to the end, in the shadows cast by fire... And lastly, my Lord, take up thy rightful mantle, of usurper."

Soul of Sister Friede
Soul of Sister Friede. One of the twisted souls, steeped in strength.
Use to aquire numerous souls, or transpose to extract its true strength.
Friede was the first Ash to enter the painting, but together with the good Father, they chose rot over fire.
Friede's Great Scythe
A great scythe wielded by Sister Elfriede, with a curved blade thinly coated by Painted World frost that easily breaks the guard of shields.
In the painting, the scythe is a symbol of a long-lost home, possibly explaining Elfriede's preference for it.
Skill: Elfriede's Stance - Conjure a magic bladed support scythe into the left hand while the great scythe remains in the right, a stance derived from Elfriede's former swordmanship. Use normal attack to leap forward and swing twice, or strong attack to coat the earth with running frost.
Rose of Ariandel
A flail used by the bulbous Father of the Painted World to shred his own skin, producing blood to appease the flame. Both a weapon and a miracle catalyst.
Ariandel, being the restorer of the Painted World, knew that it was painted with blood, and only blood could protect the secret.
Skill: Awakening - Violently flail oneself to trigger an awakening that temporarily boosts the strength of miracles, just as the good Father used the rose himself.
Ordained Set
Garb of Friede, Sister of the Painted World. A light blue dress sewn with thick fabric.
After renouncing everything, Friede discovered a people that she wished to protect, and assumed the precise form that they yearned for.
Chillbite Ring
One of the bite rings native to Carim. Increases frost resistance.
This ring would never grace Friede's hand, for the painting and it's frost became her home.
Champion's Bones
The charred but warm bones of a champion.
Long ago, an Undead declared a fight. A fight to celebrate their undeath, and so to preserve what remained of their souls. So it was that the Undead Matches were born. The merit of an Undead is measured in deaths. Could there be a greater gift for such a creature, than a fight that has no end?
Valorheart
Weapon once wielded by the Champion of the Undead Match. A special paired set consisting of a broad sword and a lion shield.
The champion fought on, without rest, until he lost his mind. In the end, only his page and a lone wolf stayed at his side.
Skill: Lion Stance - While in stance, use normal attack to thrust forward with shield up, and strong attack to execute a shield bash with a lion's roar.
Vilhelm's Armor Set
The black Armor of Vilhelm, Knight of Londor, and a nice fit for any lean Hollow.
This hollow knight, who served the three sisters who founded the Sable Church, was particularly loyal to the eldest, and was known as a cold-blooded hangman.
Onyx Blade
Elfriede, the eldest amongst her sisters and leader of the Sable Church, bestowed this sword to her knight.
Only, the sword was a farewell gift, and acceptance signified the knight's resignation from Elfriede's service.
Skill: Elfriede's Blackflame - Enwreath blade with blackflame, born of the similarly-hued flame that smolders within her.
Contraption Key
The key to the contraption leading to the attic of the archive found on the edge of the Corvian settlement.
After Sir Vilhelm led a white-haird woman to the attic of the library, he kept this key as if it were his life.
Slave Set
Armor Issued to slave knights. The fine craftsmanship made this a symbol of honor.
Long ago, only the Undead served as slave knights, warriors used as fodder in the bleakest of battles.
They grew decrepit, their skin charred black and their bones twisted. Eventually they went outright mad, but were never relieved from duty.
Millwood Armor Set
Armor worn by knights of Millwood. The charbronze breastplate and the thick black cape are adorned with the symbol of the Ethereal Oak.
When the fabled Millwood forest was discovered it was a vacant ruin. The only thing left was the Ethereal Oak, stood rotting. No corpses were discovered, yet their belongings lay neatly on the ground.
Millwood Battle Axe
Battle axe wielded by Millwood Knights. Its blade is blessed by the symbol of the Ethereal Oak
A hefty axe normally wielded by the mightiest of warriors.
Skill: Warcry - The unique warcry of the Millwood Knights entailed a leap straight toward the enemy and a fearsome roar.
Earth Seeker]
This large twin-bladed axe forged with bronze is a ceremonial weapon normally used in sacred rites.
Millwood is a land of primitive earth worship where chieftain knights served as high priests.
Skill: Earthen Wrath - Thrust weapon into earth with a prayer to trigger explosive tremors.
Quakestone Hammer
A Stonehammer wielded by the Millwood Knights, with a head of naturally-formed stone.
The Knights of Millwood would fight hand-in-hand with the earth itself, and this weapon, among the oldest in Millwood, is symbolic of that relationship.
Skill: Quake - Burrow hammer head into the ground with a great slam, and use strong attack to upheave earth, creating a shockwave that rumbles like a mighty warcry.
Millwood Greatbow
Greatbow crafted with black oak and wielded by Millwood Knights. Only specialized great arrows can be fired from the bow.
It is said that the Millwood Knights used these to face their sworn enemy, the Abyss Dragon.
Skill: Pierce Earth - Fire a greatarrow with a burst of strength and a prayer that violently shakes its target and explodes on impact.
Millwood Greatarrow
Heavy, sturdy greatarrows made of black oak that deal heavy damage but have limited range.
Can only be fired using a greatbow.
It is said that the Millwood Knights used these to face their sworn enemy, the Abyss Dragon.
Ethereal Oak Shield
Charbronze shield used by Millwood Knights that slowly regenerates HP.
This shield appears to be blessed by a great, if faded, image of the ethereal oak.
Skill: Weapon Skill - Equipping this shield in the left hand allows one to perform the Skill of the right hand weapon.
Captain's Ashes
Umbral Ash of the Captain of the Millwood Knights. With this, the shrine handmaiden will prepare new items.
Long ago, when the Millwood Knights lost the forest they called home, they began a journey so long that even thoughts of their sworn enemy washed away, replaced by a vision of a cold and brittle wood.
Crow Quills
Thrusting sword wielded by Corvian Knights, and a special paired weapon. When twin-handed, brandish four thin-edge blades in the left hand.
In their infatuation with Sister Friede, the Corvian Knights swore to protect the painting from fire, and to this end, took to the execution of their own brethren.
Skill: Quill Dart - Simultaneously throw temporarily substantial illusions of the four thin-edged blades wielded in the left hand.
Crow Talons
Talons used by Corvian Knights. Inflicts five perpendicular slashes, causing heavy bleeding.
In their infatuation with Sister Friede, the Corvian Knights swore to protect the painting from fire and to this end, too to the execution of their own brethren.
Skill: Raptor Flurry - Spread right and left talons like a broad set of wings and launch into a tornado of consecutive attacks.
Follower Armor Set
Armor worn by the Farron Followers.
When a warrior of Farron fell to the Abyss, the tall, lean Followers, with their hollowed eyes, quiety appeared in groups to hunt them down.
Farron and its Watchers fell to ruin, but the Followers survived as a wandering pack of Hollows.
Follower Sabre
Great curved sword wielded by Farron Followers. Its great weight enables heavy-handed chain attacks.
The Followers brandish their swords to hunt warriors taken by the Abyss. Their technique is honed to face men, implying those yet to lose their human aspect are their likeliest prey.
Skill: Prying Wedge - A chain attack that wedges below foes and swings upward, breaking their guard. Strong attack can be used to follow up the onslaught with a fatal blow.
Follower Javelin
Light spear wielded by the Farron Followers. Balanced to allow for throwing.
The Followers attack in groups, surrounding foes, shielding themselves, and thrusting their spears at their foes. On a final command, they hurt their spears at their fallen foe, to give the retired warrior an honorable send-off.
Skill: Hurl Spear - Emulate the practice of the Followers by throwing an illusory spear that assumes temporary form.
Follower Torch
An offensive torch used by the Farron Followers. Provides light and doubles as a weapon
Some forms of the Abyss manifest as pus within the body, treated from ancient times with fire.
Skill: Breathe Fire - Spit a combustible fuel across the torch to breathe flame in a front-sweeping motion.
Follower Shield
Standard shield used by the Farron Followers. Crafted with wood and reinforced with metal.
Imbued with a faint resistance to the Abyss.
Skill: Weapon Skill - Equipping this shield in the left hand allows one to perform the Skill of the right hand weapon.
Parting Flame
The pyromancy flame of Livid Pyromancer Dunnel that attracts the echoes of the death.
When Dunnel lost his hideous spouse, he gave his own pyromancy flame as an offering, which transformed into a parting flame. Not long after, Dunnel became a mad spirit, cursed to wander the lands.
Skill: Parting Flame - Release store of death echoes to gain a modest dose of Estus.
Floating Chaos
Pyromancer Dunnel was fascinated by this ceremonial art employed by the clerics of the Smouldering Lake.
Summons a fire-spitting chaos orb.
Chaos burns away in the blink of an eye, but was the primordial life born in the Bed of Chaos, and a grievous symbol of Izalith's sin.
Frozen Weapon
One of the spells left behind by the young sorcerer Sulyvahn before leaving the Painted World. Imbues right-hand weapon with frost.
Sulyvahn was born and raised inside the painting yet had little use for his frigid homeland, since he had not yet experienced loss.
Snap Freeze
One of the spells left behind by the young sorcerer Sulyvahn before leaving the Painted World. Creates a cloud of near-freezing mist.
Sulyvahn was born and raised inside the painting, yet had little use for his frigid homeland, since he had not yet experienced loss.
Way of White Corona
A lost Way of White miracle. Launches a white discus which slices into foes and returns to its conjurer.
Long ago, when the imprints left by the gods were still deep, miracles of the Way of White existed alongside aureoles.
Those who yearned for the long-lost aureoles fully believed that they would return, one day.