Part 2: The Tides of Battle
The Tides of Battle"Send these vermin a message: The rightful owner has returned, and their kind is no longer welcome..."
Combat is the big focus of this game, and you'll be spending a lot of your time participating in the acts of slaughter and bloodshed for the sake of coin, so let's cover the basics of it since I was a bit erratic in the video.
Before we discuss actual combat, its important to know our characters front-to-back. You don't want to go into battle at the Ruins only to discover Reynauld not only fears unholy enemies but also takes more stress damage in the ruins (which is happening in my personal file). In order to look at your character's numbers, simply right click them on the roster or their character in-dungeon to get the details. Let's take a look at Reynauld real quick:
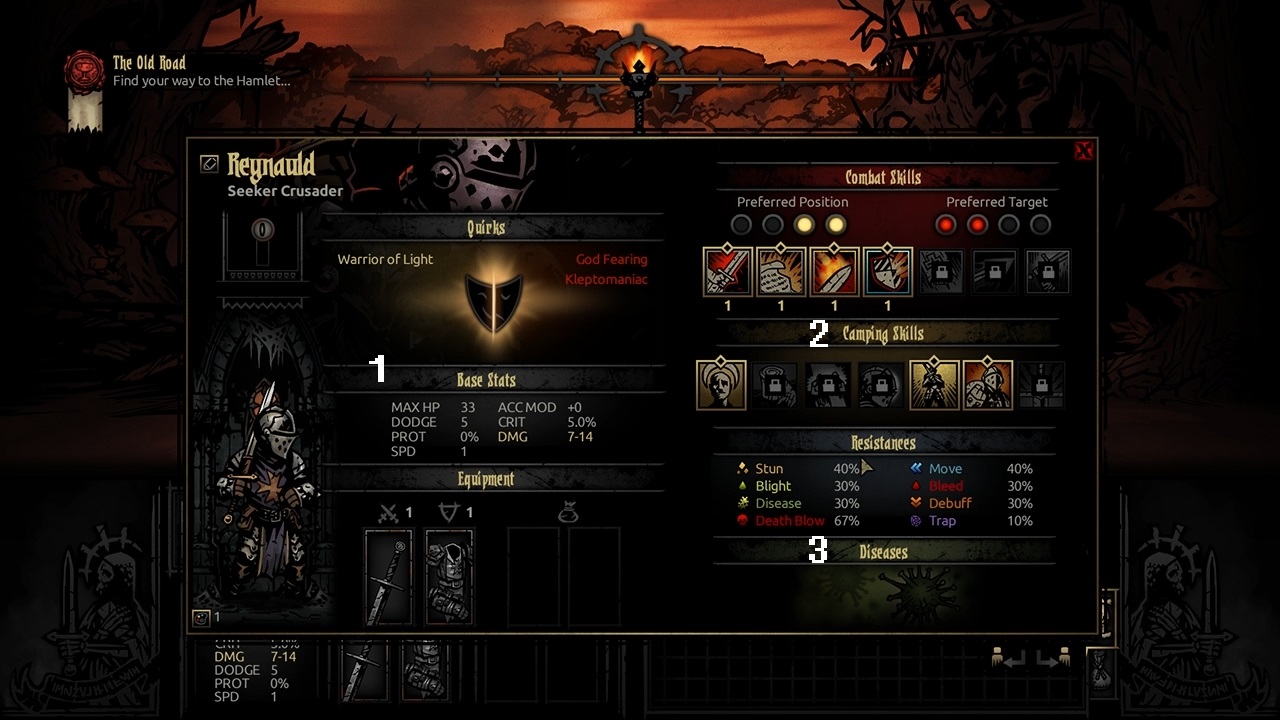
I've taken the liberty of highlighting some key points to make this discussion easier. If we look at [1] you'll see the two most important lists for your character: Quirks and Stats. Quirks are the game's big mechanic, actively defining what your character is good at, alongside all their bad habits and compulsions. Stats are the numbers that you compare to your enemies to see if things work. Any buffs and debuffs from quirks, diseases and equipment are reflected in your stats by a gold/red change in color. On the bottom of [1] you'll see the equipment screen, which isn't really complicated. Your Weapon and Armor are always equipped, and the two empty slots next to it are accessory slots that fine-tune your character's stats. If we take a look at [2], you'll see skill listings. These display the combat skills and camping skills you have unlocked and "equipped." You can have up to four combat and camping skills equipped at one time, and you can change your skills in-town and mid-dungeon so long as you aren't in a combat instance. The camping skills are used when you are in a medium or long dungeon, but we'll discuss that more in a later thing. If you look at [3], you'll see Resistances and Diseases. Resistances govern what your characters can shrug off, and its a linear conflict; Let's say a cultist brawler stabs Reynauld and has a bleed chance, If his chance is 100% chance it would be deducted by Reynauld's 30% resistance, giving the brawler a 70% chance to bleed. The math makes sense when its your status effects vs enemy resistances, however you don't ever see an enemy's status chance toward you so I just naturally assume they have something along the range of 150-200% chance to status since I'm a pessimist. Diseases are basically negative quirks again, however they are much cheaper to remove and subsequently easier to contract.
All of this reflects in actual battle, where your traits and gear are put to practical use:
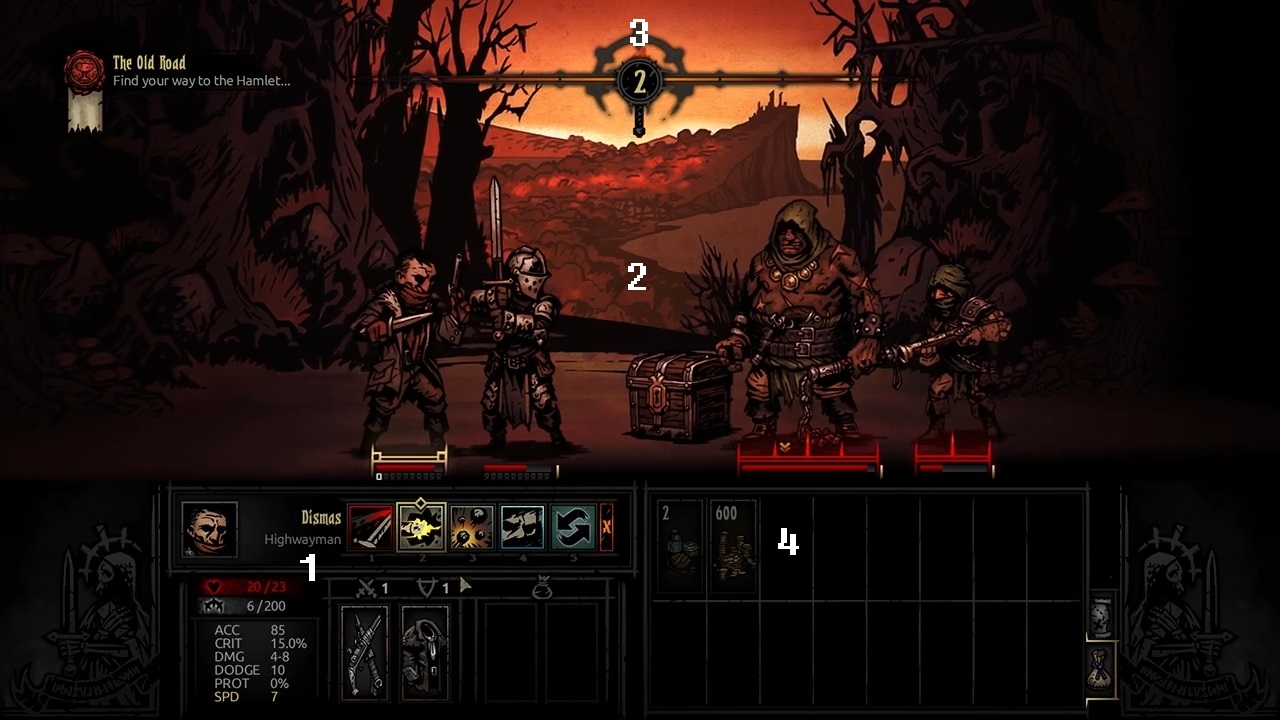
Combat flows in a turn-based instance, much like a classic RPG. Turn order is odd; I'm not 100% sure, but I'm pretty sure it is determined at the start of each turn by a roll of the dice with a character's speed modifier. Your base stats, gear and moves are shown at [1], and your attack modifiers are shown as you hover over an enemy. For example, if Dismas had the Rabies disease(+15% damage, -10 ACC), you'd see his damage changed to a gold tint to show its better and his ACC in the red to show its bad. Your damage range is also changed based on your attack; As shown in the image, Pistol Shot is 4-8 damage however if you use Grapeshot it would be changed to 2-6 due to the difference in damage modifiers. Keeping an eye on these numbers is vital in battle since you can guesstimate the chances of killing an enemy with your damage range and act appropriately to get either better value or heal damage. The main battlefield is shown on [2]; here you focus on positioning and targeting, though not much else happens here. On the top of the screen next to [3] is the Torch Meter. This applies to dungeon delving in general, but it also has a use in combat; The higher the torch, the higher chance you have of surprising the enemy and your heroes take less stress damage in general, however a dark torch gives you more loot in general and higher crit rates in combat. Torch level is pretty vital for survival in general, however if you're willing to take the risk you can manually snuff the torch and enjoy the risks that come with those rewards. Finally over at 4 we have the inventory screen. This is pretty self-explanatory, though you should know that while you can use torches and curatives mid-battle, you cannot use food mid-battle for healing. The important bit about [4] is that an enemy display panel pops up here when you hover over an enemy, showing you their resistances, what attacks they have and what effects each attack carries. This is pretty vital when dealing with crowd control since knowing which enemies are vulnerable to stun, bleed and blight can make or break a run.
On Death's Door & Deathblow
"Now, the true test. Hold Fast...or expire..."
Death in this game is not as simple as dying at zero HP. Once a hero hits 0 HP, they enter a state called Death's Door. Entering the state of Death's Door brings about many consequences: Heroes are generally weaker in terms of ACC/Damage/Evasion, they take a big hit to stress and become more vulnerable to stress, and any loss of health will potentially be a deathblow. Deathblow is an interesting mechanic: Every hero has a 67% chance to resist a deathblow, with two traits and a handful of accessories manipulating that number, and the cap of deathblow resist being 87%. While in Death's Door however, hitting 200% stress as well will induce a heart attack and be a 100% kill even with deathblow resist. To escape Death's Door, simply heal the character in question and they'll be back in the fight, however they will have a milder version of the debuff that comes with Death's Door unless very specific camping skills are used to remove it.
Outside of Heart Attacks, Death's Door can result a form of tanking I like to call "RNG Tanking"; While there isn't any traditional "tanking" in this game, a hero that takes a hit in Death's Door and resists Deathblow is damage not taken on any more important characters. This is the ultimate in risk taking, but it's also a valid strategy. While I am a very conservative player that gets attached to his heroes, keep this strategy in mind.
For those looking for ways to subvert Death's Door in general, there are a few things to keep in mind. The aforementioned heart attack from 200% stress can put you straight into death's door if you are not in that state. Another thing to note is that DoT's such as bleed, blight, and certain unique attacks all contribute towards deathblow procs. Also, while not directly related to Death's Door, enemies that do stress damage have a propensity to aim their attacks on the most stressed person, so that can ramp up into putting a character in death's door abruptly as a mission advances. Avoiding Death's Door is all about risk management, however dealing with Death's Door can be a matter of urgency or a mission-saving gamble amusingly enough.