Part 3: The Darkplace Estate
Our Bleak Inheritance"Welcome home...such as it is. This squalid hamlet, these corrupted lands, they are yours now. And you are bound to them..."
The estate is your base of operations, and its very much an XCOM-esque base. Your rewards from each dungeon run are spent here in order to manage your adventurers, make them stronger & more adept, and get new recruits. For the most part, you will be dependent on money. A variety of things use cash in order to improve them: you need money to improve an adventurer's equipment, an adventurer's talent, to de-stress them, to buy accessories, and to buy supplies for your next adventure. To improve the quality of your hamlet you need heirlooms, and there are four types of heirlooms to look out for: Paintings, Statues, Deeds and Crests. Its important to know what to prioritize during development and when to develop them as you play Darkest Dungeon; You can't ever be put into a losing condition by mis-managing your township, however the difficulty curve can go from a half-pipe to a cliff-face without certain key updates.
We don't exactly have everything updated and ready, so let's look at an alternate reality to show what our town can have.
The Stagecoach
"Word is travelling. Ambition is stirring in distant cities. We can use this."
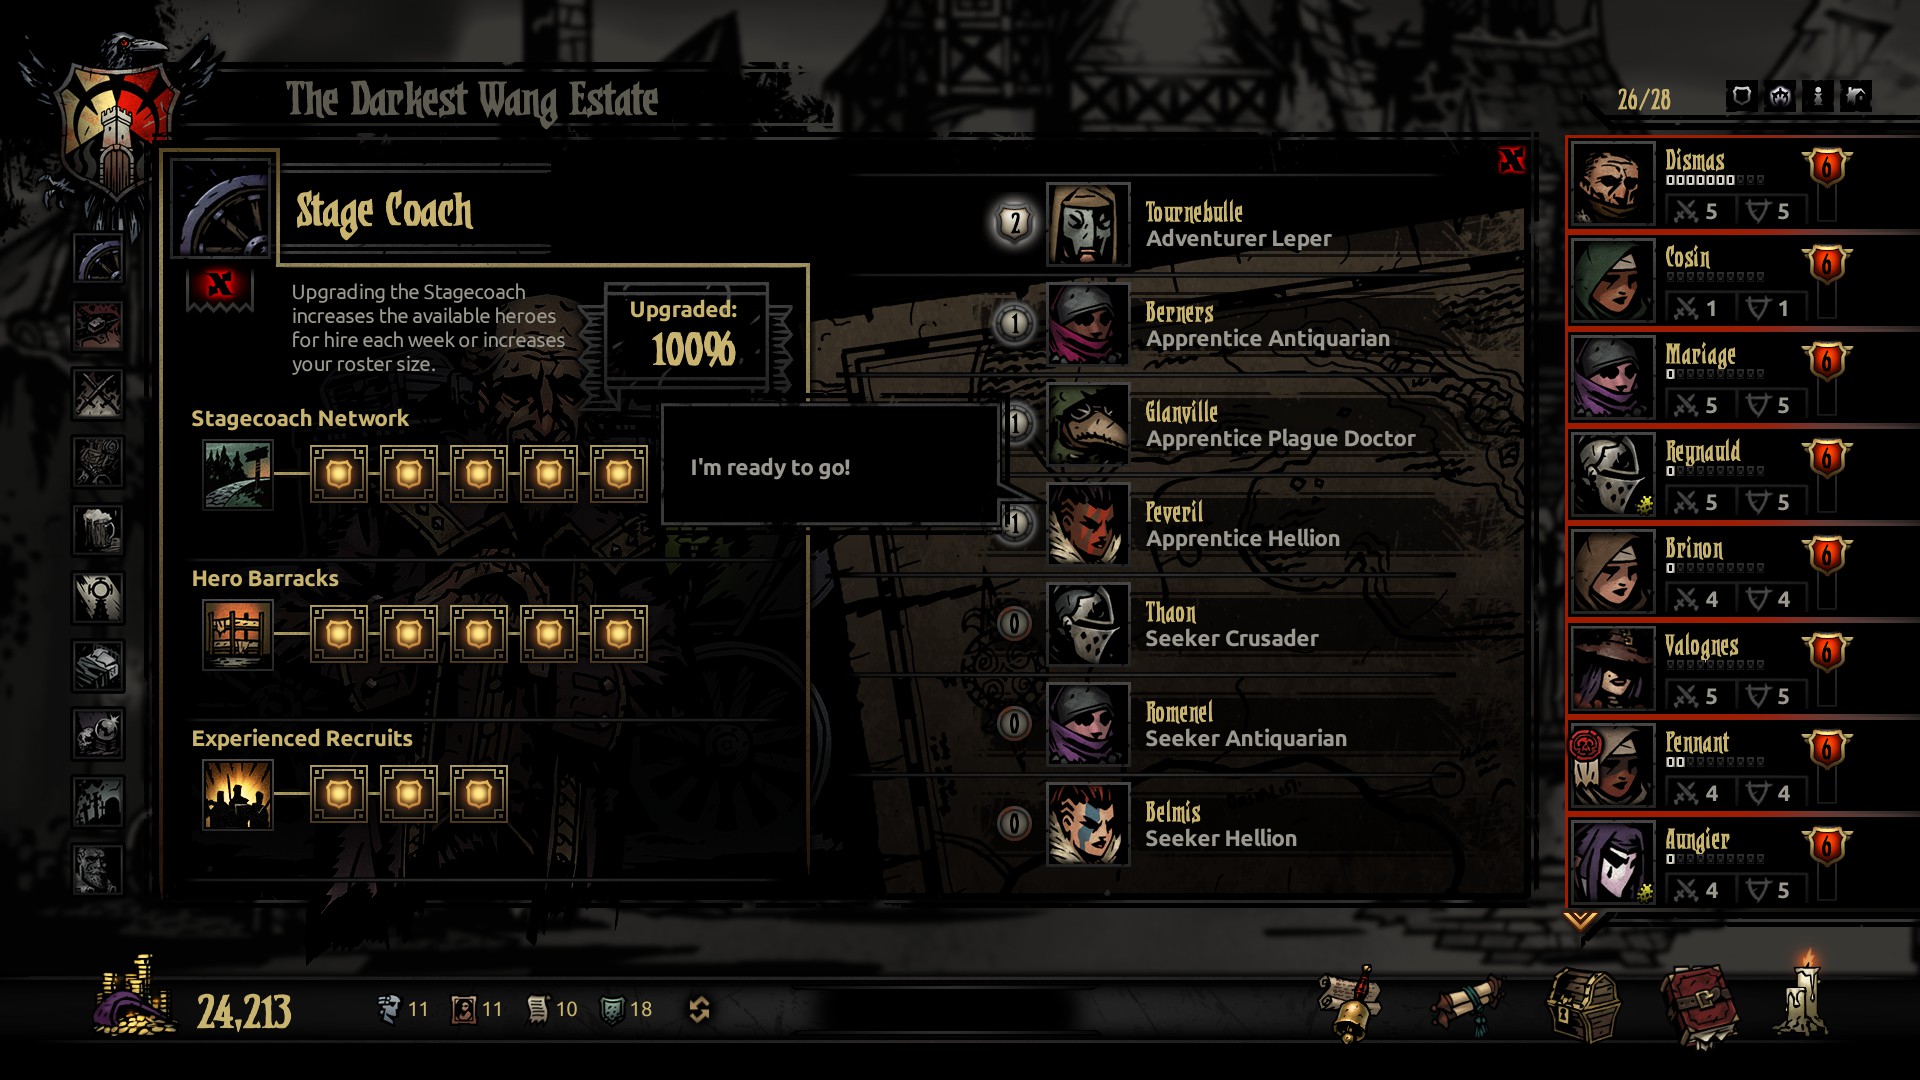
The stagecoach is where you go to pick up new recruits. What you get, for the most part, is entirely random: The first two recruit you get at the start of the game will always be a Vestal and a Plague Doctor, but after that there is no pattern to who shows up in your stage coach. Taking a soldier has no upfront cost and there is no maintenance fee for your soldiers, so feel free to fill up your roster to the brim. However the rub lies in that your barracks are restricted: Depending on how much you upgrade it, the barracks can only hold 4-28 heroes in your town. You can dismiss heroes at any time, so you can clear out any chaff that isn't pulling their weight, however keeping a balance of heroes in your roster is vital in keeping operations going without a hitch. Stagecoach is also the only part of your hamlet that uses every heirloom.
The stagecoach is a fairly important part of your estate just because it affects how many heroes you hold. Most of the service uses Deeds to upgrade so my priorities focus on getting my roster capacity up ASAP then set it aside until I have spare heirlooms.
-Stagecoach Network
The Network influences how many people can fit in your clown-car of a taxi, and it upgrades in a linear fashion. Every upgrade you put into this, you get one extra hero permanently to choose from from the next week onward. The Stagecoach requires Deeds and Crests to upgrade
Stagecoach Network is a nice luxury to have, but honestly its the lowest priority on my list for the stagecoach and just in general. I usually get it to where I have four recruits coming in a day then leave it at that until like the extreme endgame.
-Hero Barracks
The Barracks is where your heroes live at in your estate. Simply put, its your hero capacity. You start with a capacity of 8 and it increases by 4 for every upgrade you put into it. The Barracks requires Deeds and Crests to upgrade.
This is the most important upgrade tree for the stagecoach, and 2nd important in general for the estate. Priorities vary based on the player, however I find it to be one of the top things to upgrade in general. More heroes mean more healers afterall.
-Experienced Recruits
Once you get enough treasure building up and put into the estate, more seasoned adventurers start getting interested in your estate. Each level you put into Experienced Recruits gives you a chance of getting a pre-leveled adventurer in your stagecoach, complete with maximum armor and skill levels for the level they're at. Their skills and traits are still random however. An interesting bit of trivia as well, this was not added until either just before the game's full release or just after, so those who played this game a lot during early access will know how enticing this tree is. Experienced Recruits requires Paintings and Statues to upgrade, and you cannot touch this tree either until you reach certain tiers of the Blacksmith and Guild as well.
Experienced Recruits is a nice thing to have, but I never really focus on it until the endgame. Its a service meant to help bounce you back after a hefty loss later on. However, its also a great way to save money and time training up a new recruit. Getting that bit of a kickstart can help in general if you get a recruit that you haven't trained up at all.
The Tavern
"Fresh kegs, cards, and curtained rooms promise solace to the weary and the broken alike"
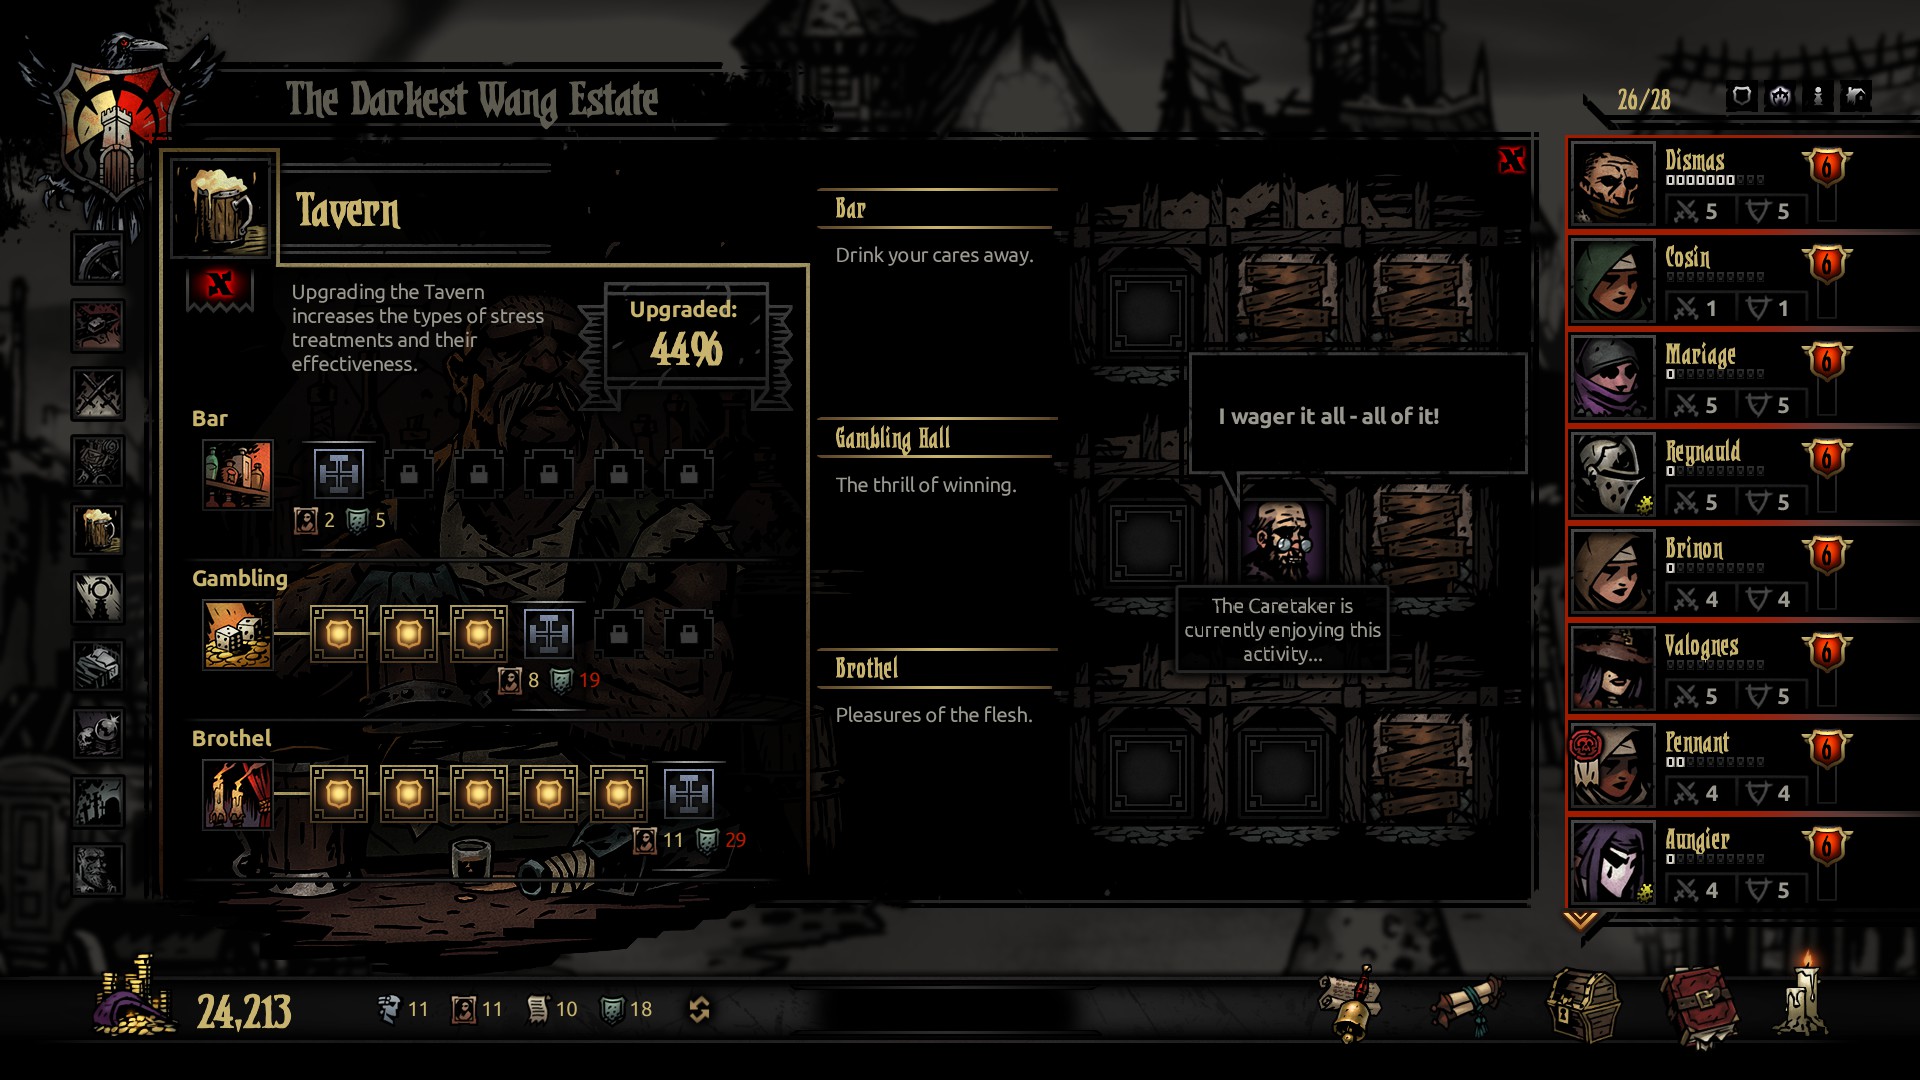
The Tavern is one of your two services that exist to de-stress your heroes. You have three choices when sending out heroes to have a fun time: The Pub, The Gambling Hall, or The Brothel. The services each offer a different amount of stress relief for an increasing amount of coin. Each service also comes with a bit of risk for its use, and some also come with a few benefits that can randomly occur. The Caretaker can also be seen partaking in revelry here, so he can tie up one of the rooms with his fits of madness. The Tavern needs Paintings and Crests to upgrade each service.
In general, the tavern is one of the two things I rarely upgrade if ever. At most, I will get the Brothel to level 3 just to get the second room open and subvert the Caretaker if he decides to hang out here, but honestly I have more important places to put my paintings. For beginners though, this is probably a godsend since upgrading each service reduces its costs and increases removed stress alongside the capacity upgrade, so there's some merit to upgrading the place if you're still getting a handle on this game.
-The Bar
Nothing like several glasses of your favorite alcohol to help forget about the troubles from a hard days work. The Bar is the cheapest service at the Tavern, and also provides the least stress relief. If your adventurer is only a little unhinged, or if your purse is tight, the bar's a good choice to send your soldiers to unwind. Beware though, the tavern's cheapness comes at a hidden cost: It can randomly impart either a temporary debuff on your hero or your hero can gain a quirk of dependence, only ever wanting alcohol to unwind.
-The Gambling Hall
When you're constantly on the brink of death, the thrill of victory is a great way to feel the rush of life once more! The Gambling Hall is the middle ground of stress relief, providing a decent amount of relaxation for a pricier cost. The main draw to the Gambling Hall is that it not only has the most positive benefits, but one of those benefits is basically a rebate on your costs, so there's the off-chance that this will bring back some money when all's said and done. He can also lose more cash as well, it is gambling afterall. Gambling is also an addicting thing however, with this service running the risk of having one of three quirks appearing.
-The Brothel
They say the best way to soothe one's soul is the warmth of another human. The brothel is the best play to remove stress from a hero, however its also the priciest service. If you got a hero that has gone off the deep end, this is probably one of the two services that you will be using to bring him back. The Brothel does give the off-chance of giving a temporary +5 to speed for a hero after a fun night, however that fun night can also be a rip-rousing night and exhaust the hero with -5 speed. The Brothel also comes with the risk of having your hero afflicted with Syphilis, but we have a hospital and a couple heroes that are keen at dealing with such frivolities.
The Abbey
"A man in a robe, claiming communion with god. Madness..."
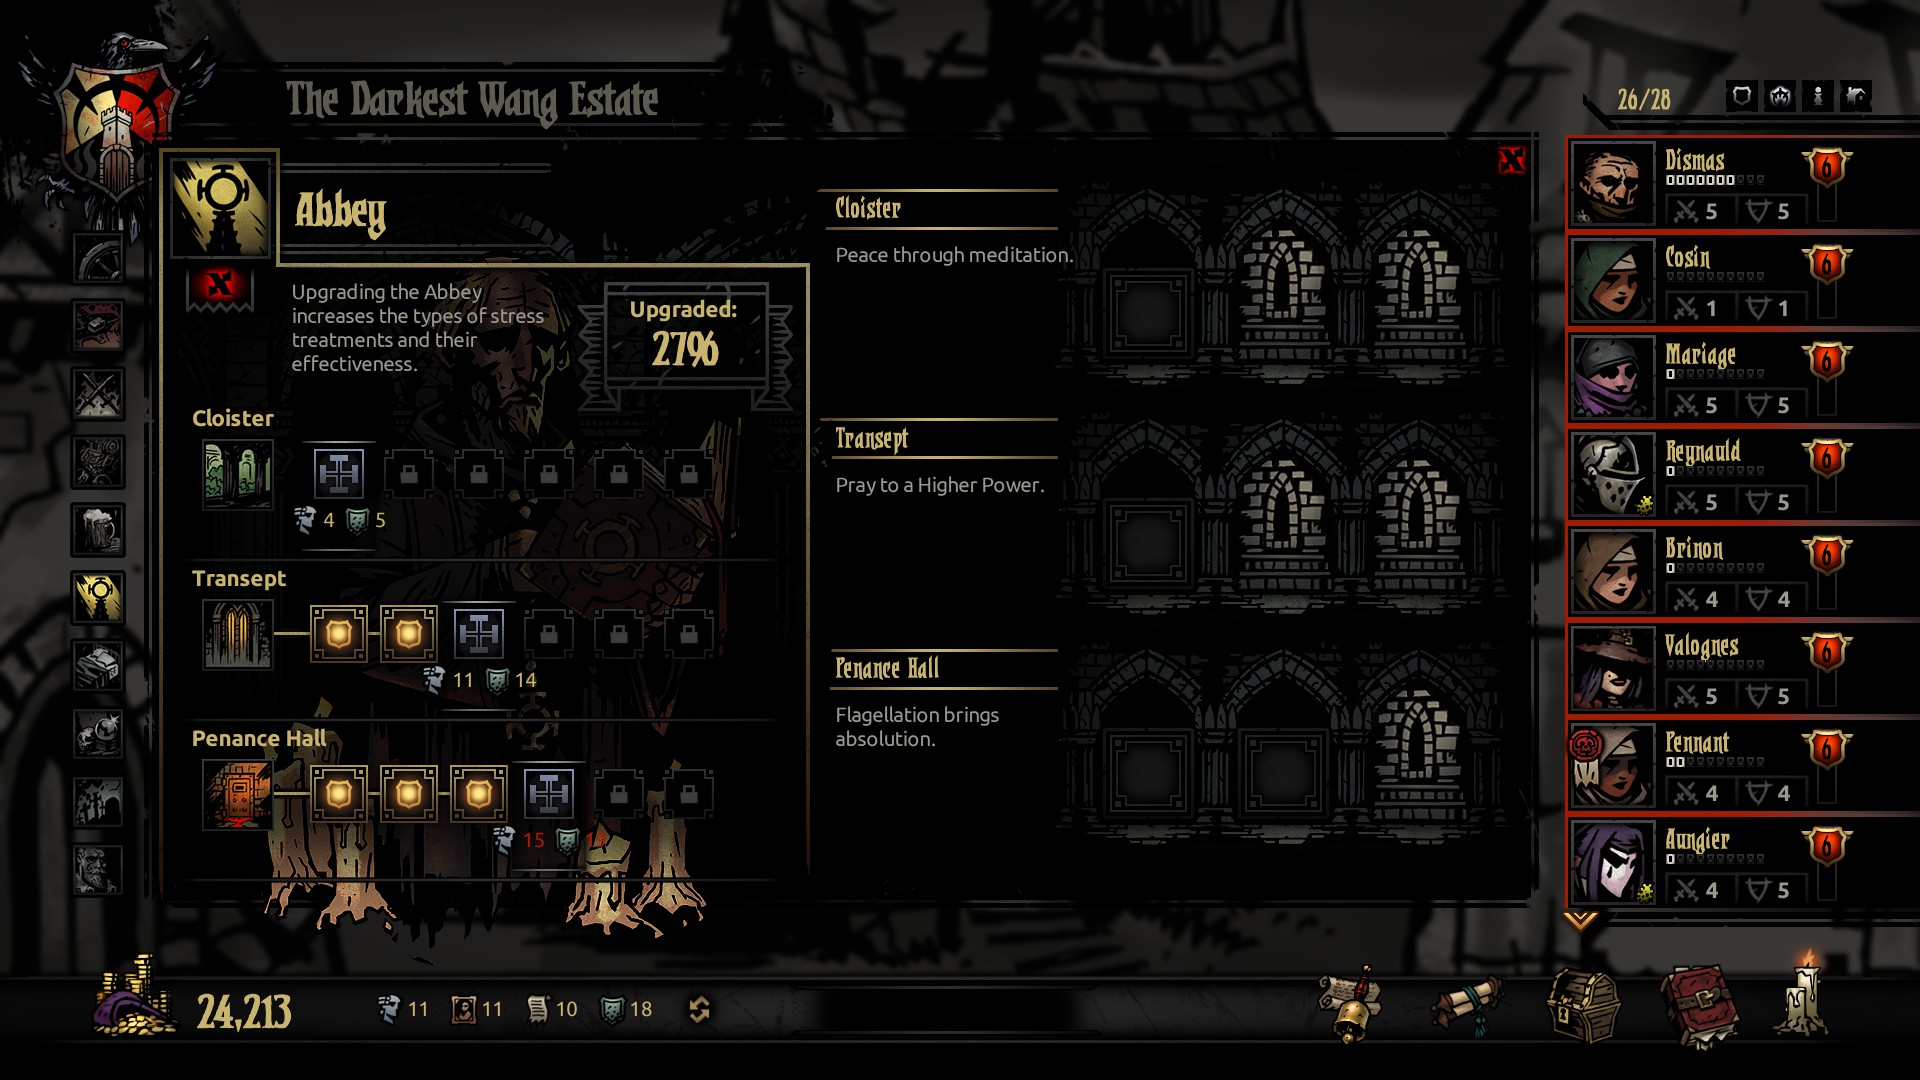
The Abbey is your other local source of stress removal, offering promises of forgiveness and absolution to relieve the weight off a hero's soul. Mechanically, there's no real difference between the Tavern and the Abbey; both services offer variable costing services of stress removal at the risk of dependence or other more intimidating quirks that can appear. The main difference is that the Abbey uses Statues and Crests to upgrade, which technically is cheaper but I have more important places to put my statues toward.
The Abbey, much like the Tavern, is a service I don't focus on. I just unlock the 2nd Penance Hall room if necessary but for the most part it remains untouched. As with the Tavern however, it can help out new players a lot when they're struggling with money or stressed out heroes.
Oddly enough, there are traits that make people dependent or skeptical of the Abbey, however this does not add the "religious/atheist" tag to someone. A missed opportunity imo.
-The Cloister
The cloister is a place where heroes can empty their minds and meditate, dispelling the horrors of their mind and steeling their soul for the trials to come. The Cloister is the cheapest service and offers the least stress resist. This service however is mathematically the best possible service to get in terms of risk: You have the chance of getting two positive quirks from this service, and the negative quirks are often times unremarkable. However, there is the off-chance that your hero donates 1000g after using this, so there's still an element of risk involved.
-The Transept
The Transept is the middle ground of the abbey, providing decent stress removal at a moderate cost. The Transept also has the benefit of having the least negative outcomes from its use, however you can't gain anything positive out of prayer (a metaphor?). Amusingly enough, prayer can make you a god-fearing man, which is the game's way of saying the hero is dependent on prayer now.
-The Penance Hall
The Penance Hall is the best service in the Abbey, providing the most stress removal at the highest cost. Flagellation is interesting because it can empower a hero after overcoming such hardships with +20% damage for a mission, or the blood loss could weaken them with a -20% penalty.
The Guild
"Every creature has a weakness. The wise hero trains for what she will face"
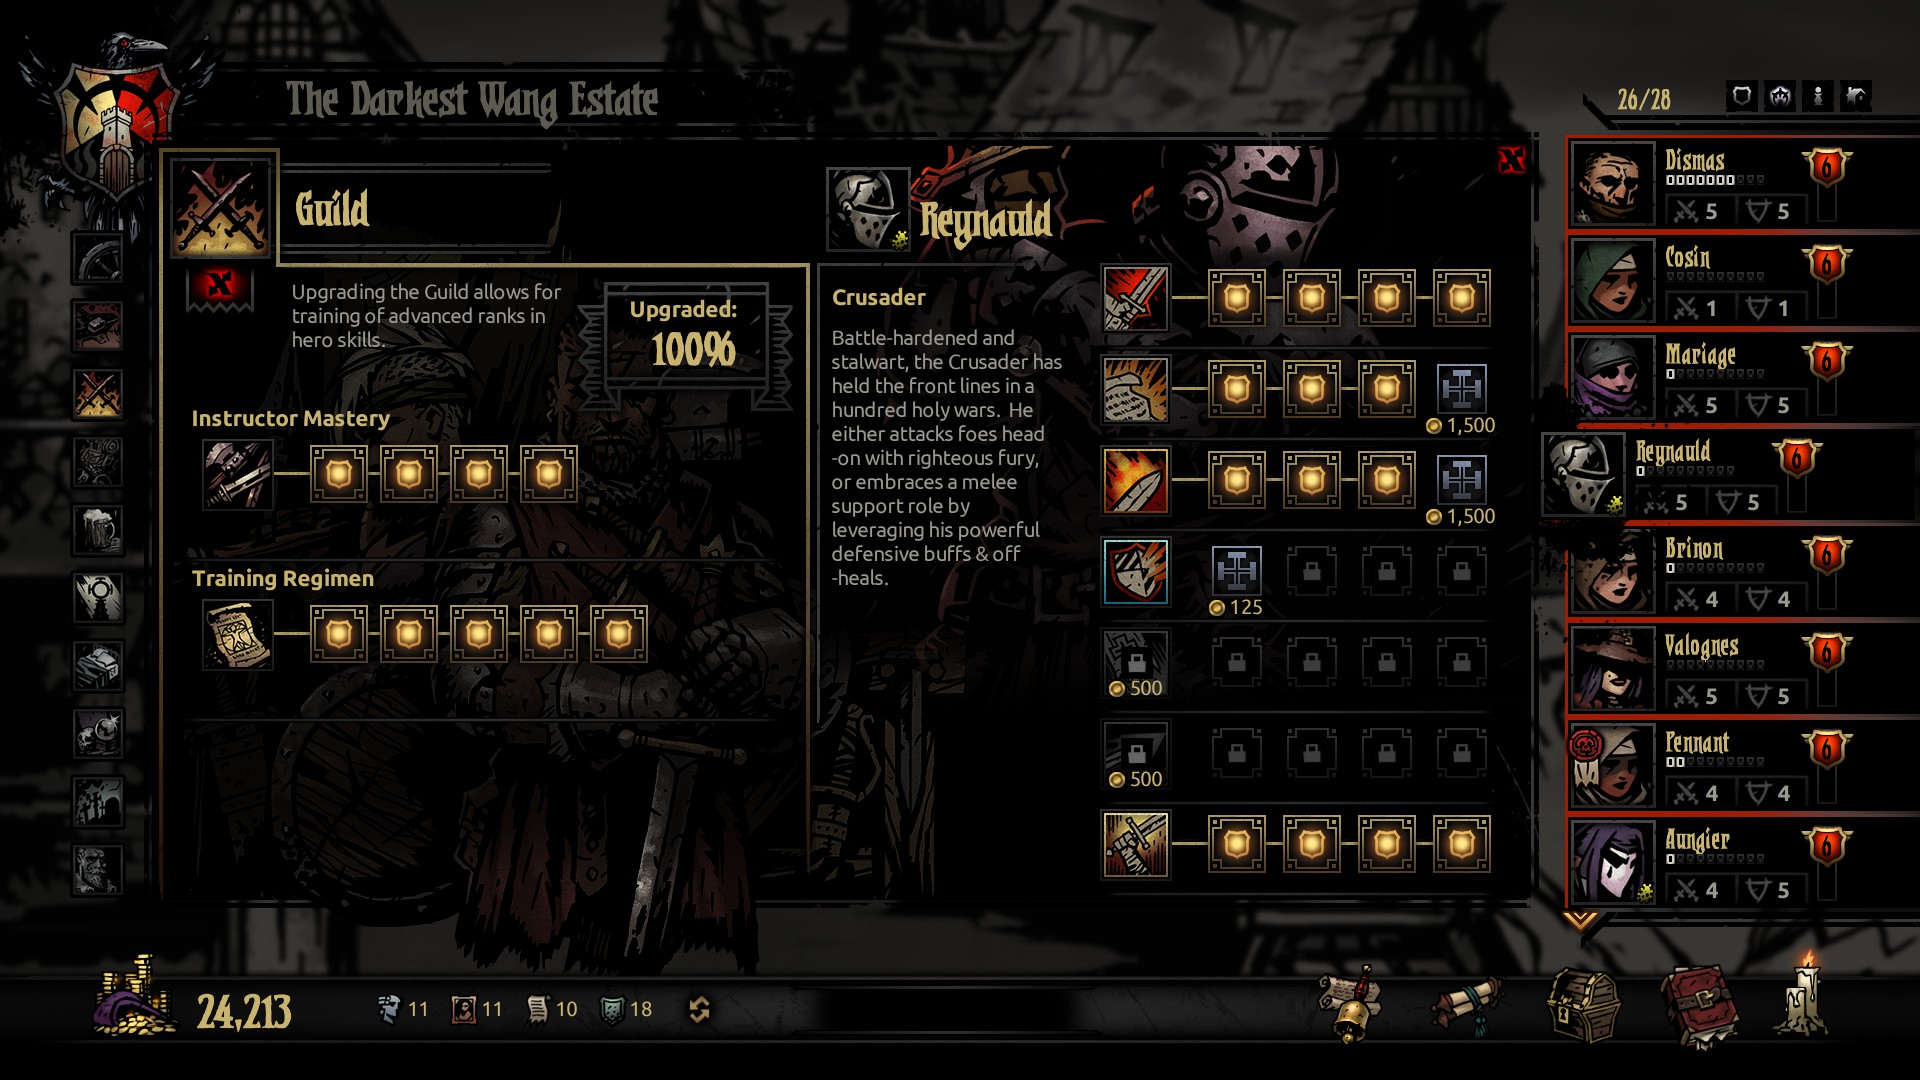
The Guild is where your heroes train in the art of war. For a small cost, you can train your heroes in new skills and make their currently learned skills much better. The Guild takes Paintings and Crests to upgrade, and you only have two trees to worry about when upgrading this service.
The Guild is the second-most important service in this game quite frankly, mainly due to how this game handles stat growth. Darkest Dungeon doesn't do growth and stats like most RPGs; Stats are more dependent on how developed your heroes are rather than how high their "level" is. To wit, a character's accuracy is entirely dependent on what skill and skill-level they use, modified by any traits you may have. Because of this, The Guild becomes a key factor for survival since a higher level skill is more likely to hit the ever-growing strength of the horrors that lie in wait. The skills in general also get better, increasing the likelihood for their status effect to proc alongside providing higher numbers for your heals and buffs. This is where a majority of your portraits should be going. Its directly related to your efficiency in battle afterall.
-Instructor Mastery
Instructor Mastery determines how high your heroes can train their levels, with each upgrade unlocking a higher tier of skill when a hero meets the appropriate level. Focus on this first and foremost. You want your heroes at the best of their abilities afterall, and how can they possibly do that when their instructors got their degree at Phoenix University? This skill is also one of the two skills that unlock pre-leveled heroes in the stagecoach, so its something you want.
-Training Regimen
This upgrade tree reduces the price of learning and upgrading skills, reducing the gold cost by 10% per each upgrade. A nice upgrade, but not necessary if things go well.
The Blacksmith
"Fan the flames! Mold the metal! We are raising an army!"
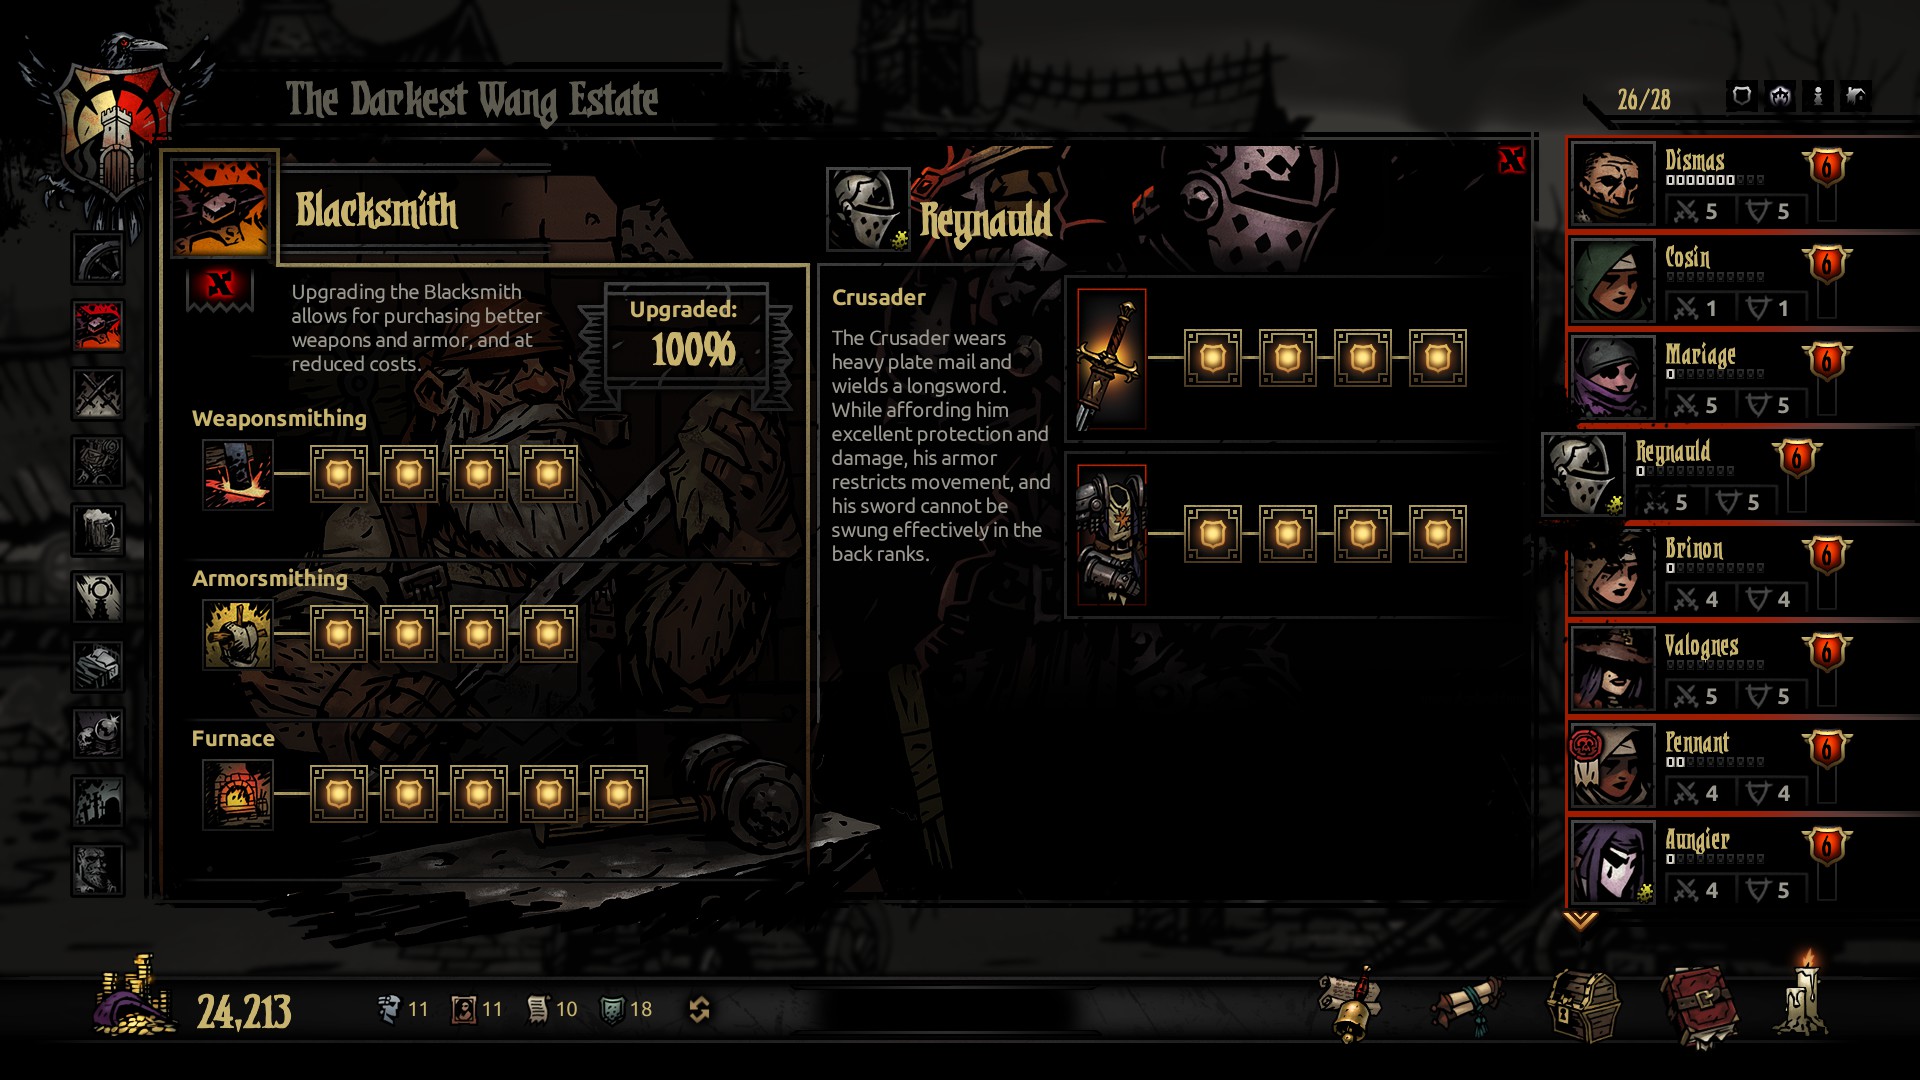
The Blacksmith is where you go to spend coin on gearing up your adventurers. Depending on your hero's level and the blacksmith's upgrades, you can give each hero a better tier of weapon and armor. The Blacksmith takes Deeds and Crests to upgrade, and this service has three upgrade trees.
The Blacksmith is the most important service you can focus on. As mentioned before, adventurer growth is dependent on their development, and the items gained from the blacksmith affect a good majority of stats on a character. A hero's weapon will determine their damage, critical hit rate, and most importantly speed. A hero's armor determines their max HP and their dodge rate. Five key stats of a hero's growth are highly dependent on the capacity of the blacksmith. This is where a good majority of your deeds are going to go, and the first thing you should focus on upgrading in your town.
-Weaponsmithing
Weaponsmithing determines how high a weapon tier you can buy, with each level unlocking a better weapon. As mentioned before, weapons determine your damage, crit rate, and speed in battle. Technically upgrading this affects your survivability in battle, however this tree is second priority on my upgrade list. I feel like armor inches out ahead in terms of importance since its directly affecting survival, but having better damage and speed can end battles faster after all.
-Armorsmithing
Armorsmithing determines how high an armor tier you can buy, with each level unlocking better armor. Armor affects max HP and Dodge, which means you'll be able to dodge more hits and take more hits in general, keeping you in the dungeon longer. I grab this first, because survival is key in storming the Darkest Dungeon and a better shield is necessary for that.
-Furnace
The Furnace reduces costs for upgrading an adventurer's weapon and armor, with each tier reducing the cost by 10%. A nice thing to have, but somewhat unnecessary. Last on my priority list for this service.
Sanitarium
"The front line of this war is not in the dungeon, but rather, inside the mind."
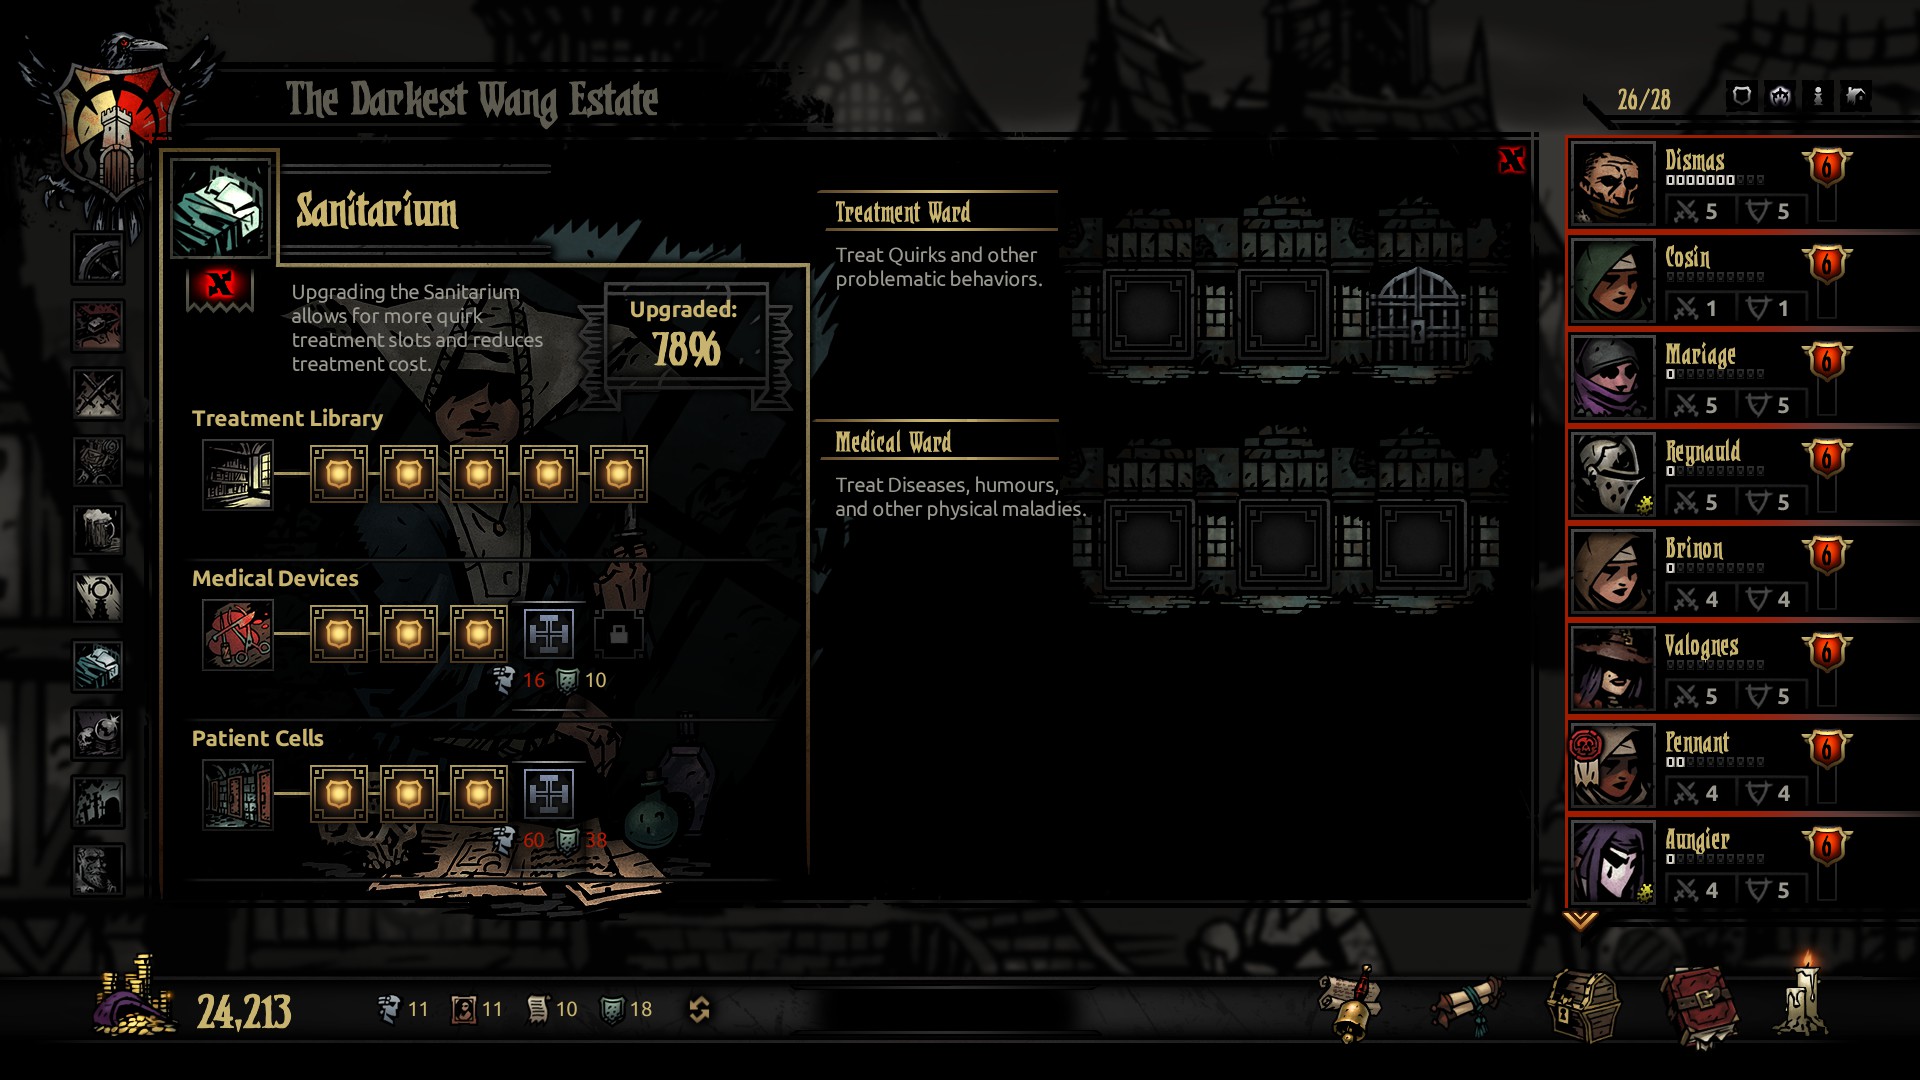
The Sanitarium is the place to go in order to fix your broken heroes, allowing one to remove bad quirks, lock in positive quirks, and remove diseases they may be suffering from. The Sanitarium takes Statues and Crests to upgrade, and there are three upgrade trees to focus on.
This service is a very "take it or leave it" thing to some people, and for me I take this service quite seriously. Shit like Kleptomania, Syphilis, The Black Plague and Slowdraw are things I will spend any amount of coin to remove because of how debilitating they are. Alongside that, I'm the kind of guy that demands the best out of my soldiers, so I will spend that little extra cash to reinforce awesome traits like Quick Footed(?), Irrepressible and Hard Noggin to give my heroes the edge they need to fight off this corruption. The costs are a bit much, however the headaches they save me from suffering is a great price to pay in the long-run honestly.
-Treatment Library
This upgrade tree reduces the cost of Quirk Management by 10% for each level you put into it. If you like to fine-tune your heroes, this will be important since locking in a positive trait or removing a severe negative trait is expensive as hell and this helps. Not my top priority however, but something I focus on.
-Medical Devices
Leveling up the Medical Devices tree reduces Disease Treatment by 10% for each level, alongside increasing the chance of removing one extra disease. Probably the least prioritized tree to me since disease removal has a very low base cost, and some heroes are pretty good at removing a lot of diseases. Not a bad thing to invest in though since it gives you more value for disease removal.
-Patient Cells
Improving your Patient Cells will increase the capacity of the sanitarium's services, alternating between increasing the medical ward and the treatment ward. I focus on this first and foremost since more slots means I can fix more people in their downtime while the main team goes off an adventure. A costly endeavor though, but worth it.
Nomad Wagon
"An increasing stockpile of curious trinkets, gathered from forbidden places."
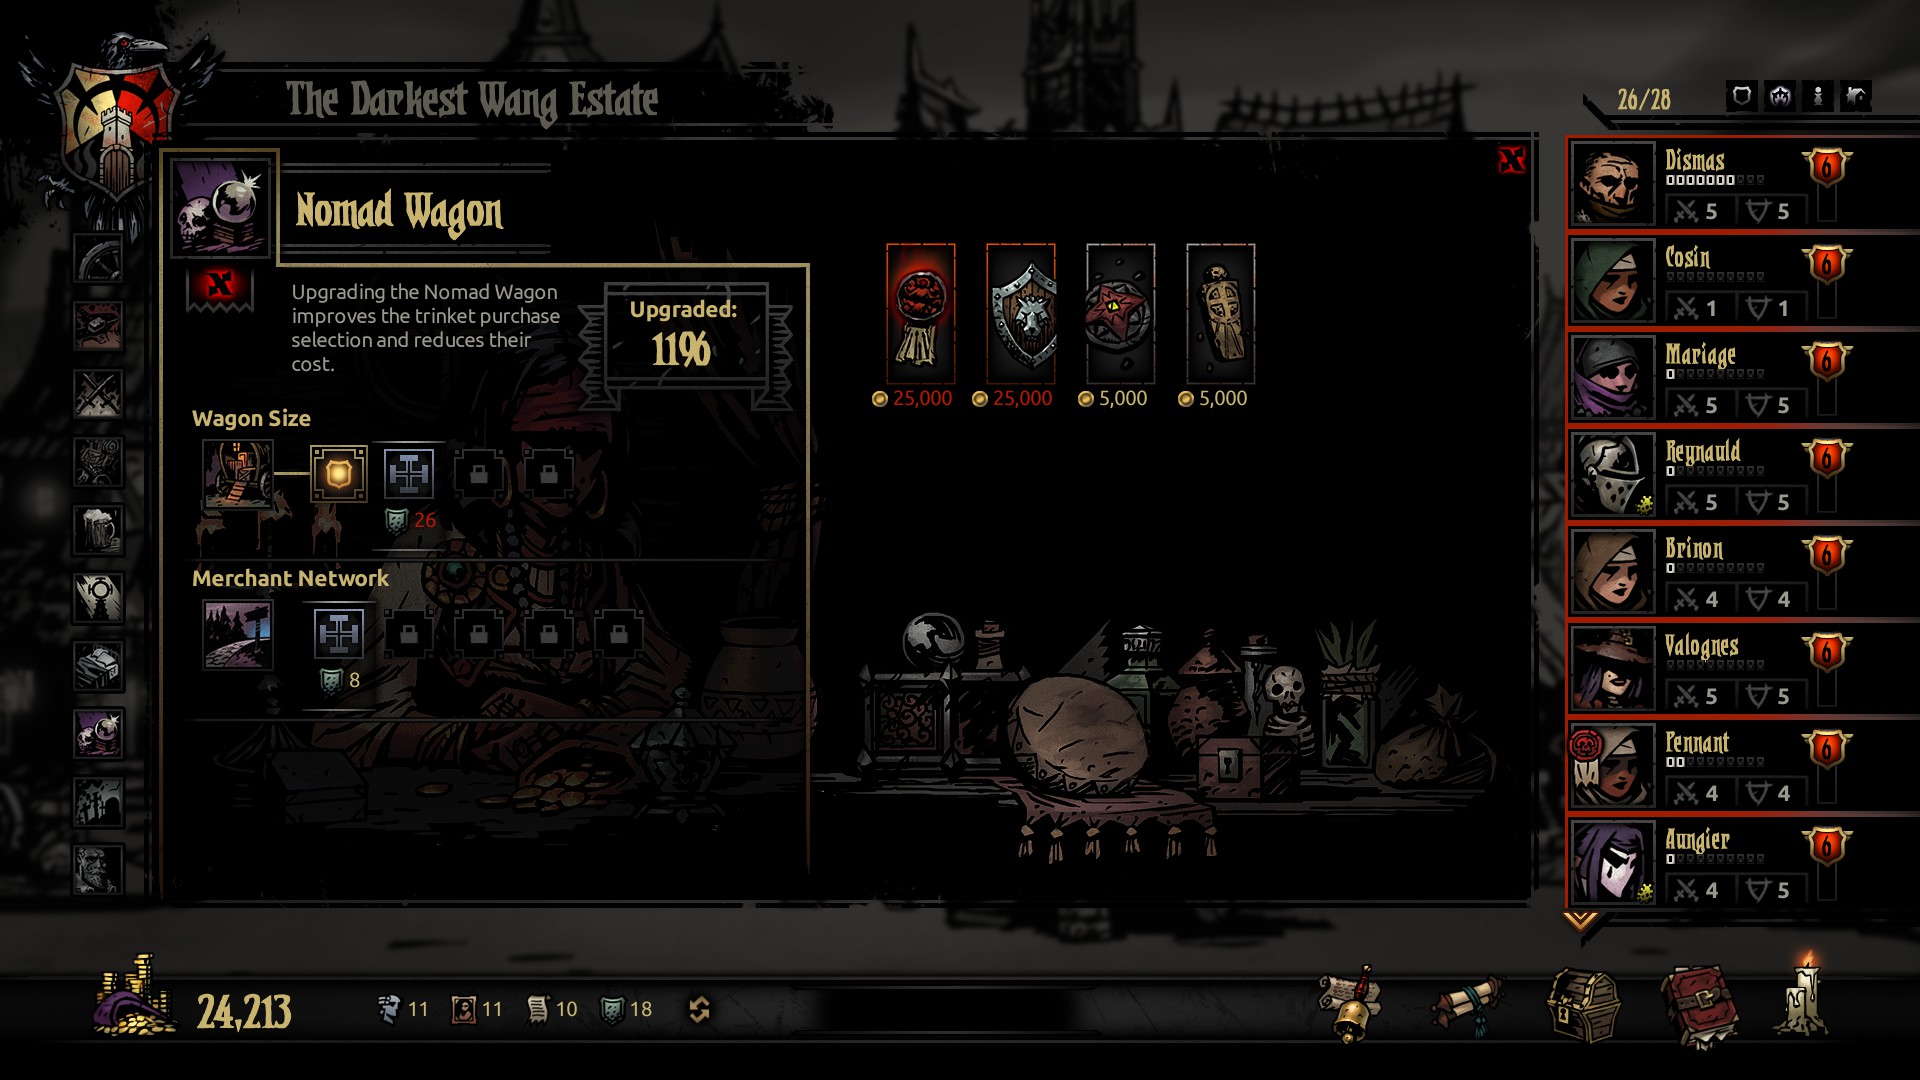
The Nomad's Wagon is the place to go if you want to get accessories, for a nominal fee. Each week she will have a different selection for sale, with each trinket varying in rarity and cost. The Nomad Wagon only needs Crests to upgrade, and it has two upgrade trees to follow.
Honestly, I don't make use of the Nomad Wagon that much, mainly due to how costly an accessory can be. It also doesn't help that you can get accessories easier from adventuring and slaying monsters, so I try to make better use of my cash. However, the wagon does provide a second avenue to get some neat and rare accessories that unlock versatility in a hero, so don't dismiss it as easily as I do.
-Wagon Size
This upgrade tree increases how many trinkets are available for purchase, making two more available with each week. Much like the Stagecoach, this is a nice way of increasing the odds of getting what you need.
-Merchant Network
This reduces the price for trinkets at the Nomad Wagon, reducing prices by 10% per upgrade. A very important upgrade tree to me, just because of the exorbitant prices that the Nomad demands.
Survivalist
"Alone in the woods or tunnels, survival is the same. Prepare, persist, and overcome"
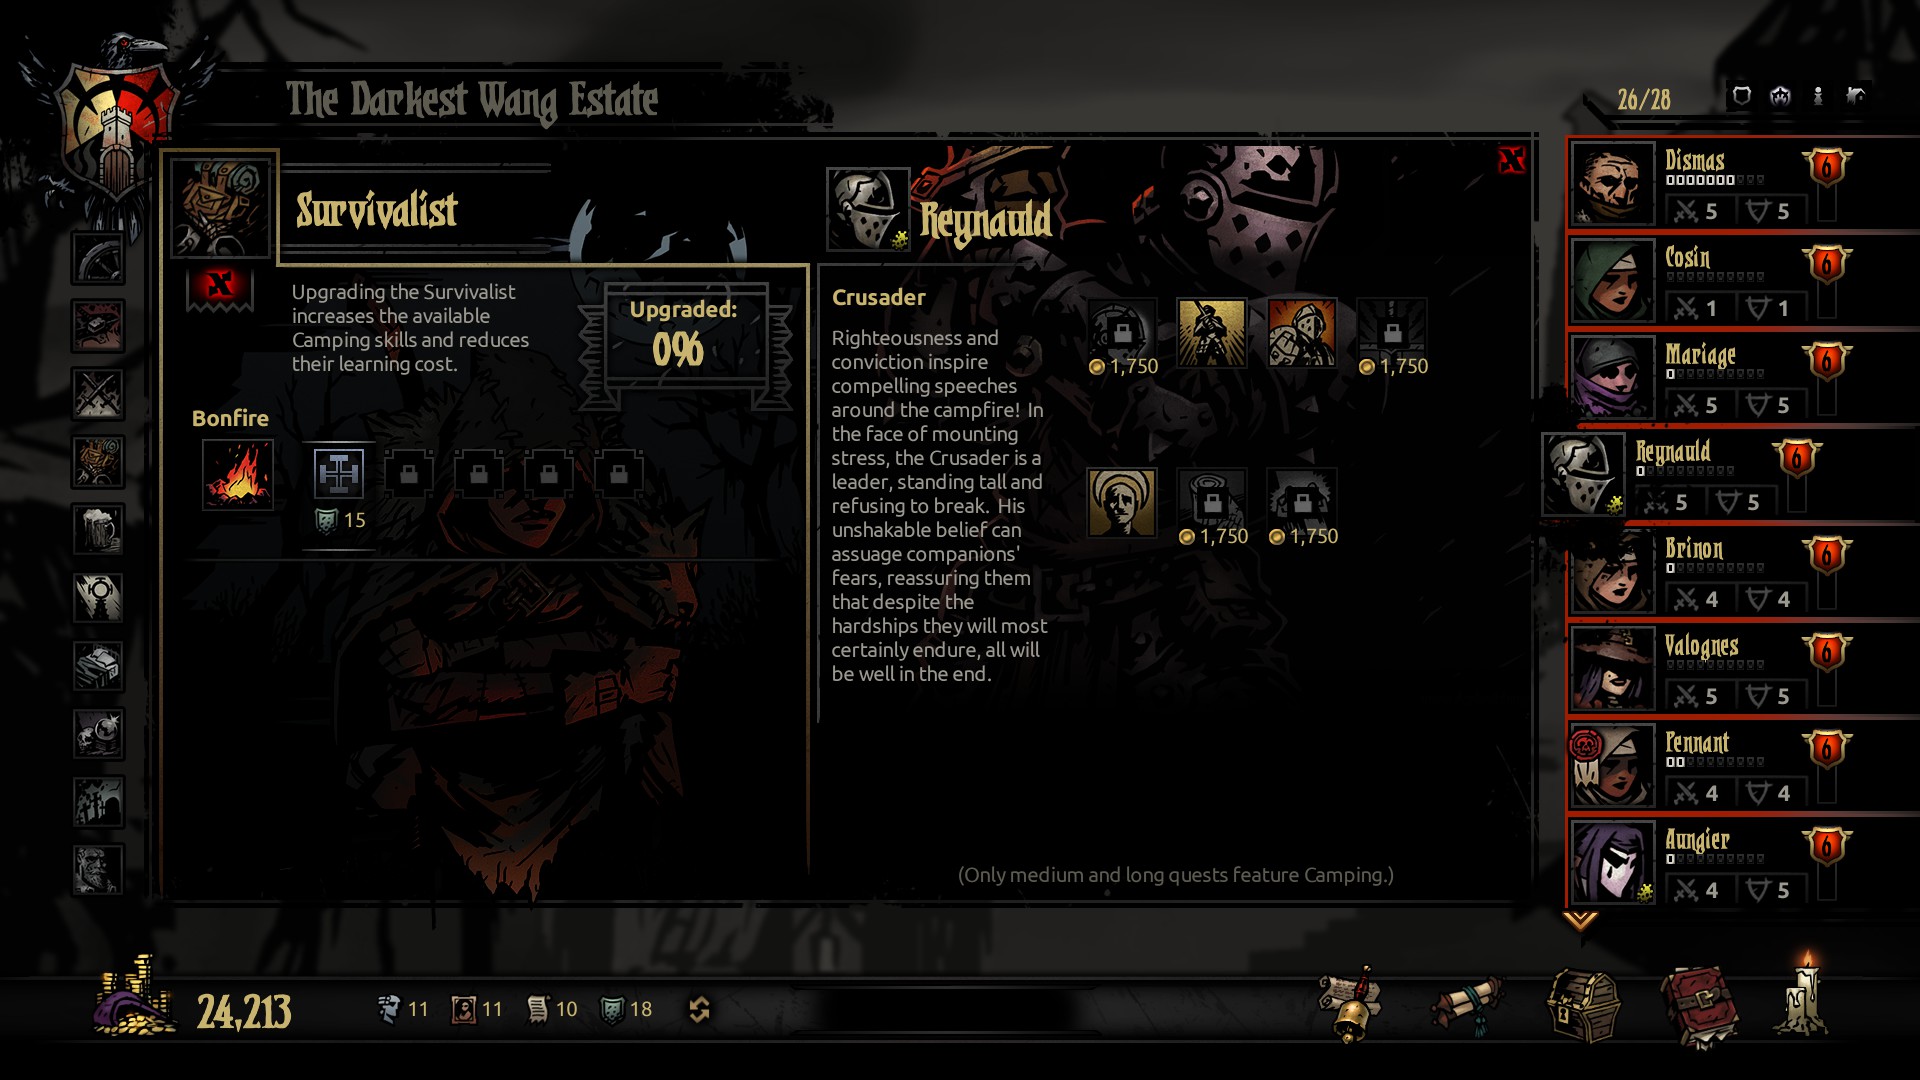
The Survivalist is where you go to unlock camping skills during your medium and long missions. Every hero has 7 camping skills, with 4 being unique to the class and 3 being generic skills available to everyone. The survivalist only needs Crests to upgrade and only has one upgrade tree to focus on.
The Survivalist is probably the most deceptively important service you will never update. The cost of unlocking a skill is relatively low, and often times you can make due with the camping skills most heroes start with. Its nice being able to specialize your heroes further though and the survivalist allows you to do that.
-Campfire
Upgrading the campfire reduces the cost of unlocking camping skills, reducing it by 10% each upgrade. Ultimately unnecessary, but hey its money saved!
The Graveyard
"Most will end up here, covered in the poisoned earth, awaiting merciful oblivion"
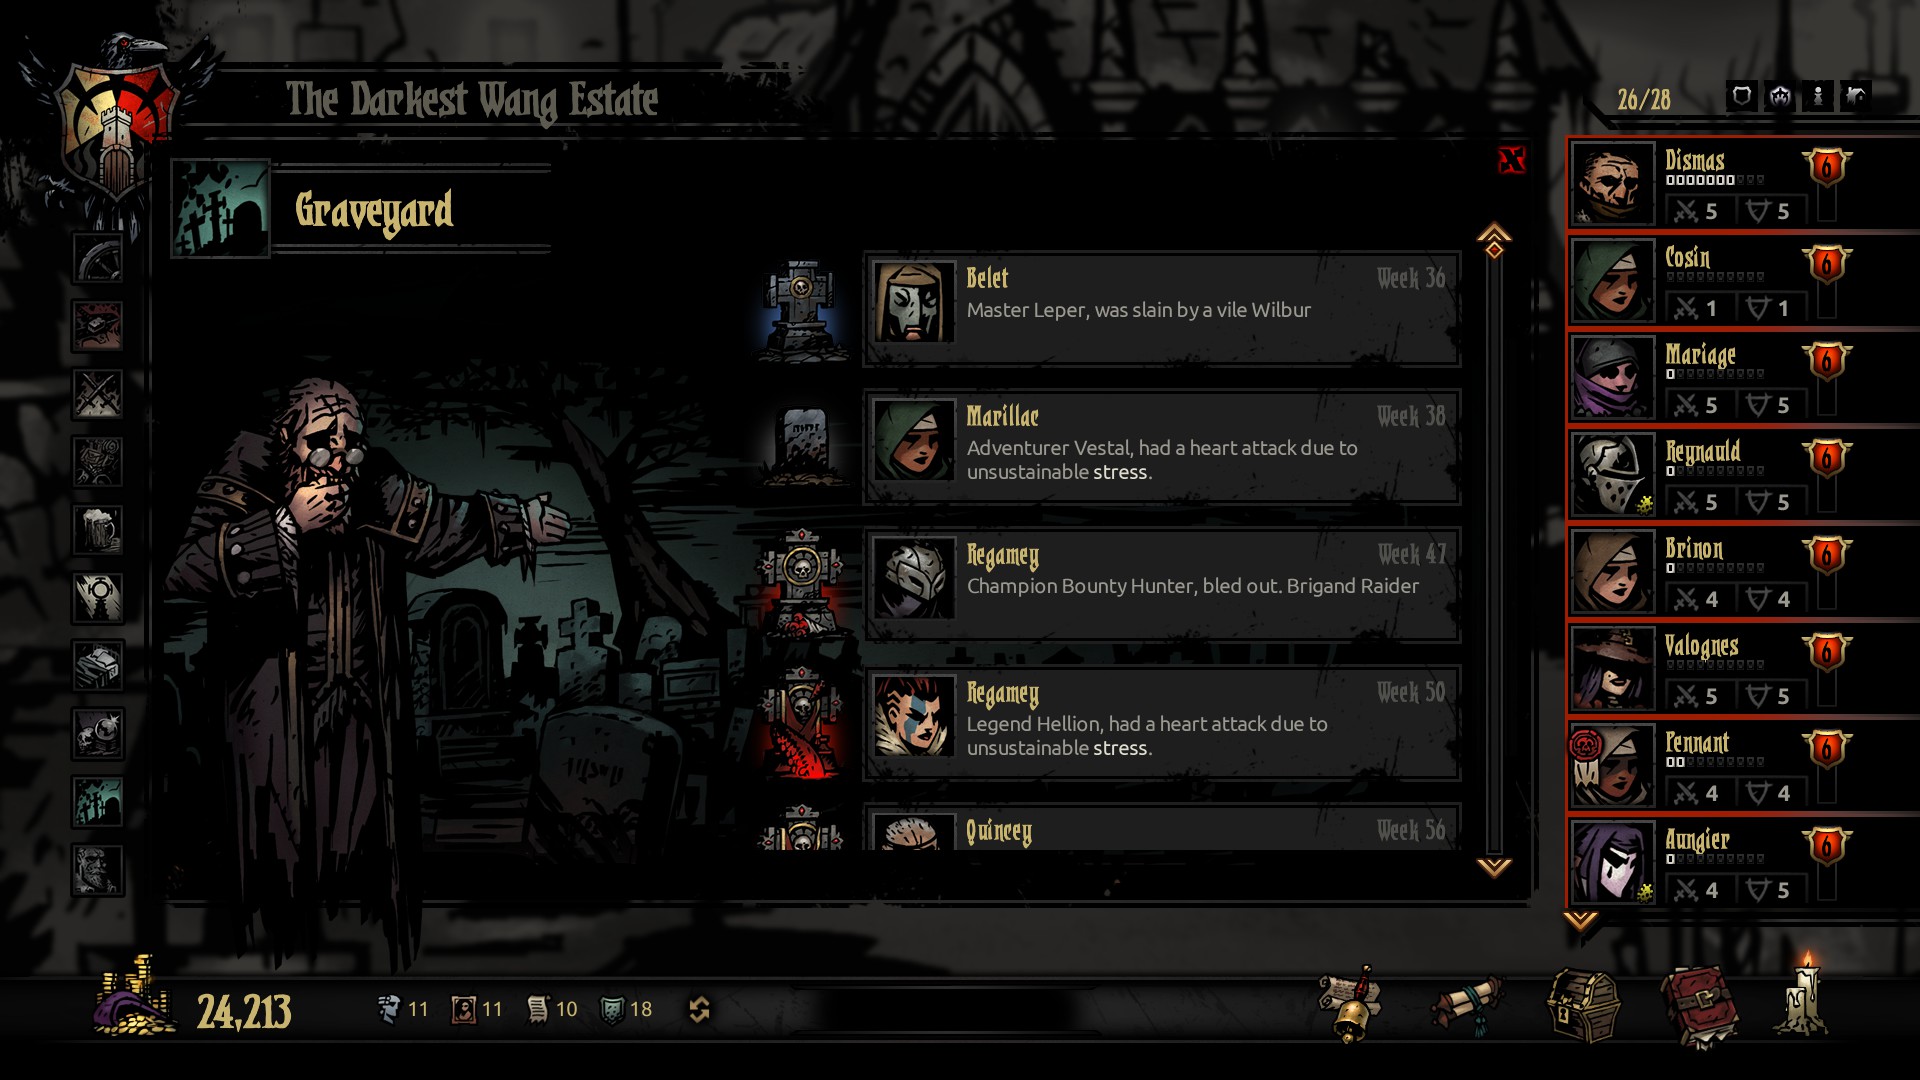
The Graveyard is just a listing of everyone who died, detailing their class, level, and what they died to. A memorial to your wasted time and efforts.
Ancestor's Memories
"In time, you will understand the tragic extent of my failings..."
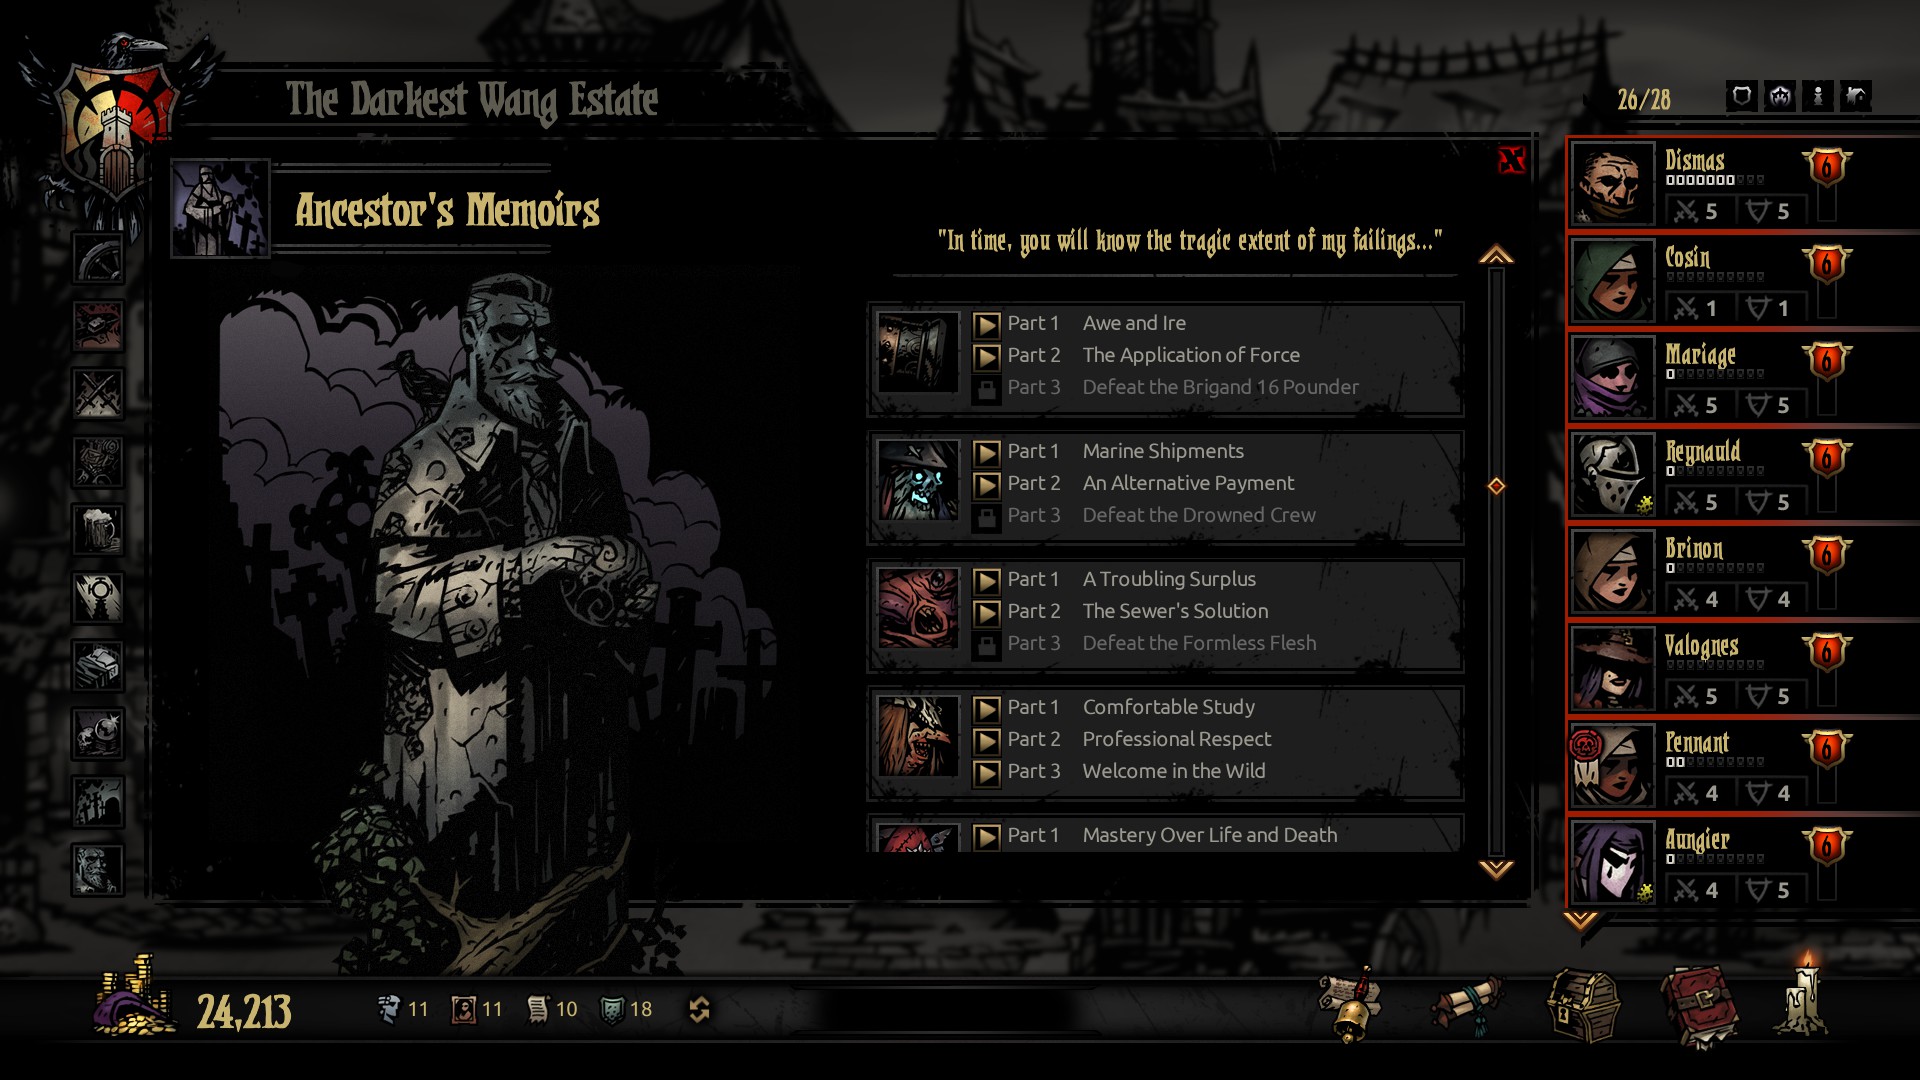
The Ancestors Memories, located in the center of town as a statue, is an archive of the events that have occurred in the game. If you want to re-live the stories of each boss, read up on those journal entries you picked up, or are like me and want to do dumb shit for a LP, this is where you go.