Part 4: Team Composition & Preparation
Team Composition & Preparation"The cost of preparedness - measured now in gold, later in blood."
Darkest Dungeon is a game that has a fair amount of RNG, namely with what heroes you get and what afflictions will send them for a week in the Sanitarium. However, the game also gives you a good amount of control over what you can do, and a lot of that comes down to preparation. Everything you do before town reflects how much you can respond to the bum hands the game can deal you when you go on missions. Today we're gonna discuss a little bit on what you can do as a player to reduce the element of risk that comes with each expedition.
Team Composition
The big factor in surviving a dungeon, naturally, is who you choose to bring along. A team of four Hellions is probably not going to go very far due to a lack of good healing, and if they do it's probably going to take fucking eons. While the game has a lot of flexibility, there is a predictable formula on who to take and where to put someone in a party when determining your party, and knowing this formula is one of the key things to learn for this game. There are a lot of team compositions that I default to in general, however that would take up a huge glut of text and my time so for now I will cover a basic overview of each position, the risks that come with each position, and what I usually put in each spot.
A bit of a notice, a lot of my mindset is based on 200+ years of pattern recognition in regard to AI logic and enemy priorities, and its mostly theory bullshit. I can't say my tips in this regard can be considered fact, however its a good assumption.
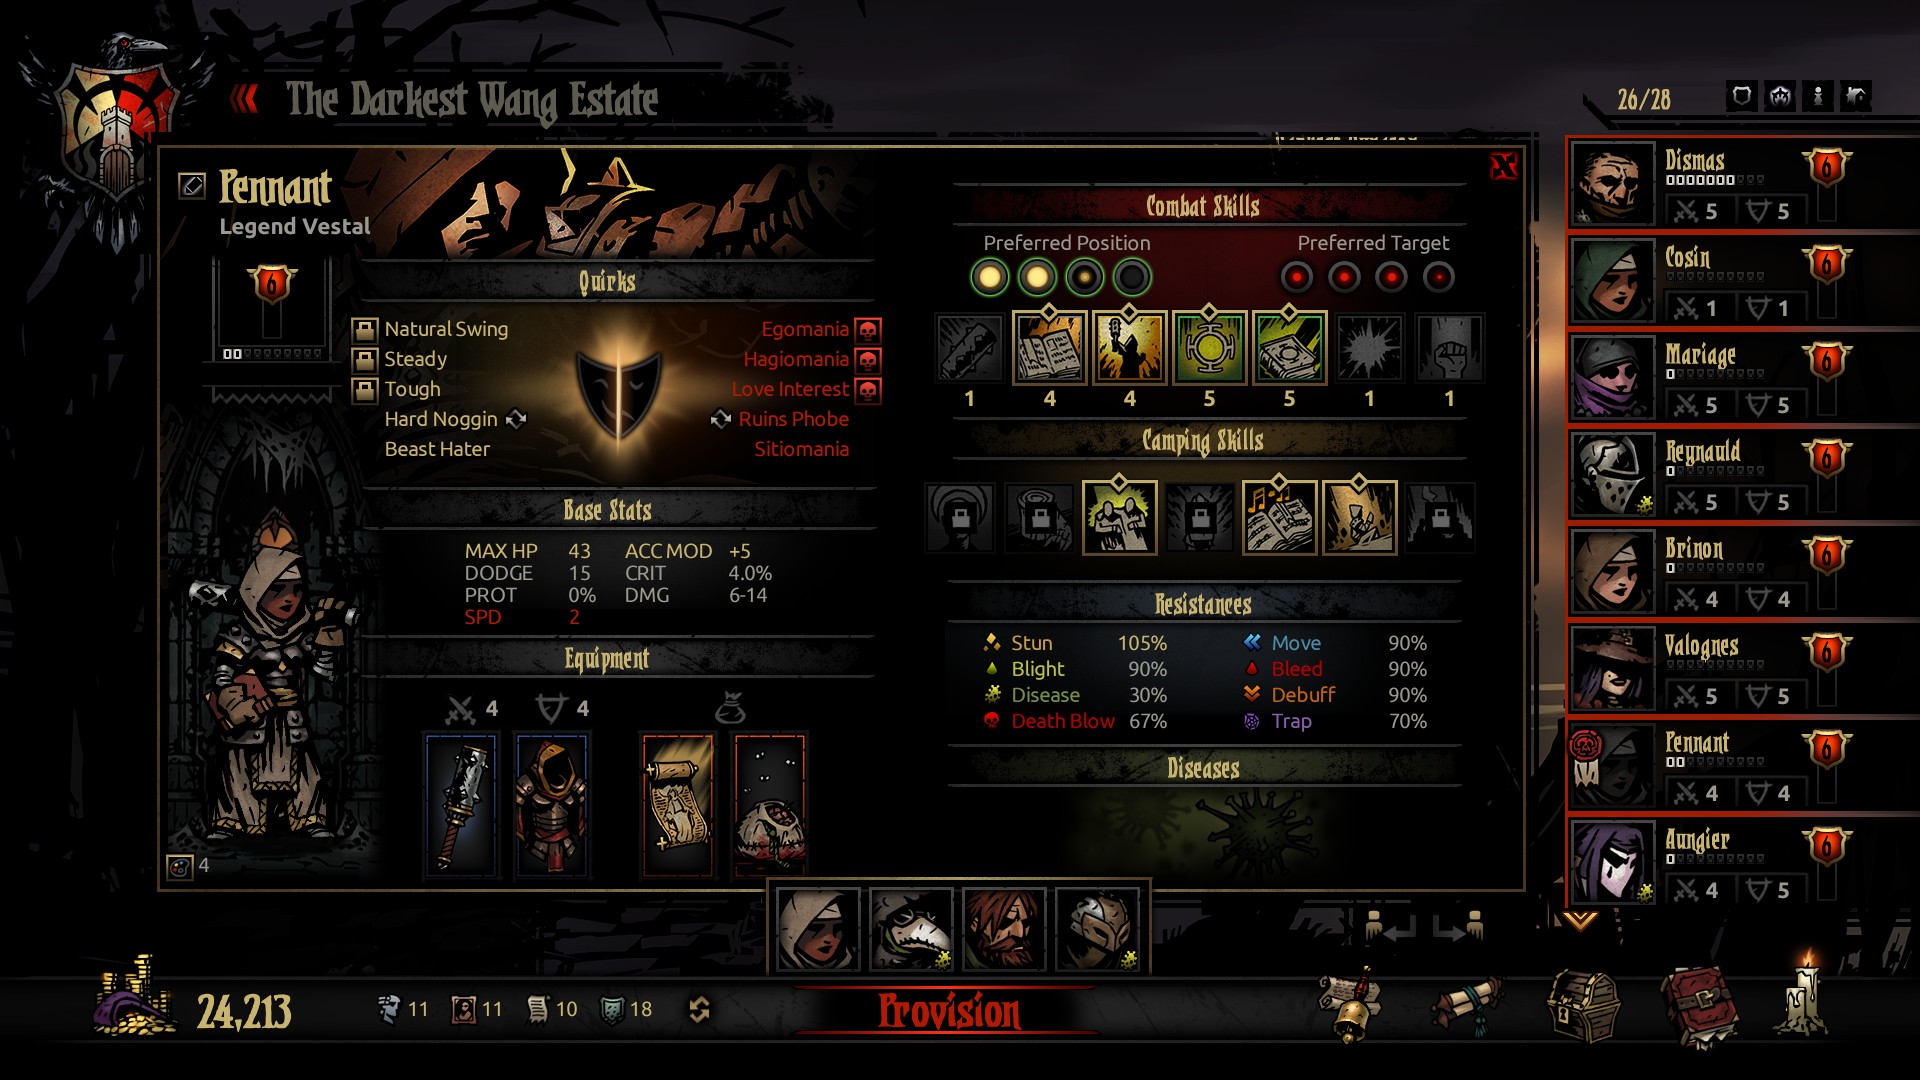
Rank 1: The Fist-Puncher
-Rank 1 is the classic tank spot, the place where you set your high HP characters and let them soak up all the damage while dishing out damage. In Darkest Dungeon, that's sort of the case still. There's no guarantee that an enemy will hit your rank 1 units even if you use the mark mechanic, however many enemies in the front line will focus on your front line in general so its smart to keep your beefy units up there. Said beefy units will also only be able to attack from the front line so they will be at home here anyway. Interestingly enough, there are a few accessories that favor dealing damage from rank 1 so the developers clearly wanted Rank 1 to be reserved for the chufty brawler type. Make sure your support units are never up here, mainly because a lot of healing & support spells cannot be casted at rank 1.
Usual Suspects: Crusader, Man-at-Arms, Hellion, Leper
Alternative Characters: Point-blank Highwayman, Blink Graverobber, Finale Jester, Transformed Abomination
Rank 2: The Every-man
-Rank 2 is the best slot in this game because damn near anything can go here. In general you put a wide-range damage dealer here to damage nearly every range, however with alternate builds you can also get crowd control and healing done from this slot as well. Its hard to cover the wide gamete of things to do here because of how versatile the 2nd slot can be. A thing to note: Anyone that is usually in rank 1 can also be put in rank 2, so if you want to double-up on tanky front-line offense then that option's there. Make sure that you configure your heroes to operate for the 2nd row, it'd be really awkward if you put your vestal here and not give her any of her rank 2 attacks.
Usual Suspects: Bounty Hunter, Highwayman, Graverobber, Houndmaster, Abomination, any Rank 1 dude
Alternate Characters: Offensive Vestal, Stun Occultist
Rank 3: Offensive Support
-This is where you start going into more support/control territories. Enemy AI is odd to where only enemies in rank 3/4 will try to attack your rank 3/4 characters, and there are only a select few enemies that can damage HP to a threatening degree. Your squishier characters are going to wind up here because of this, alongside the fact that most of their abilities only operate from this position. Another thing to note: many of your offensive options in this slot don't do a lot of damage but rather exist to supplement your front line with things like hexes, stuns and marks. Sadly this game doesn't have the traditional nuker so you won't be seeing a strong dedicated attacker in this slot. Instead you get off-attackers and the like. A common alternative set of heroes to put here are the "railgun" users: Heroes that have attacks that not only move them up one and can attack nearly any row, but also require to be in the back ranks to work.
Usual Suspects: Vestal, Occultist, Arbalest, Jester
Alternate Characters: Plague Doctor equipped with her knife, Cry Havoc Houndmaster, Pure-gun Highwayman, Dart Graverobber, Crowd-control Bounty Hunter "Railgun" classes (Crusader, Graverobber, Jester, Highwayman)
Rank 4: Primary Support
-Much like with Rank 1/2, you'll be seeing a lot of the same classes from rank 3 in rank 4 as well. A thing to note however, if you put someone in rank 4 they will not have a lot of their offensive options available to them. The only real exceptions to this is the Arbalest (who is built for this) and really situational builds such as the railgun crusaders.
Usual Suspects: Plague Doctor, Vestal, Arbalest, Antiquarian, Occultist
Alternate Characters: Support Man-at-Arms/Houndmaster, Crowd-Control Bounty Hunter, "Railgun" classes
Provisions
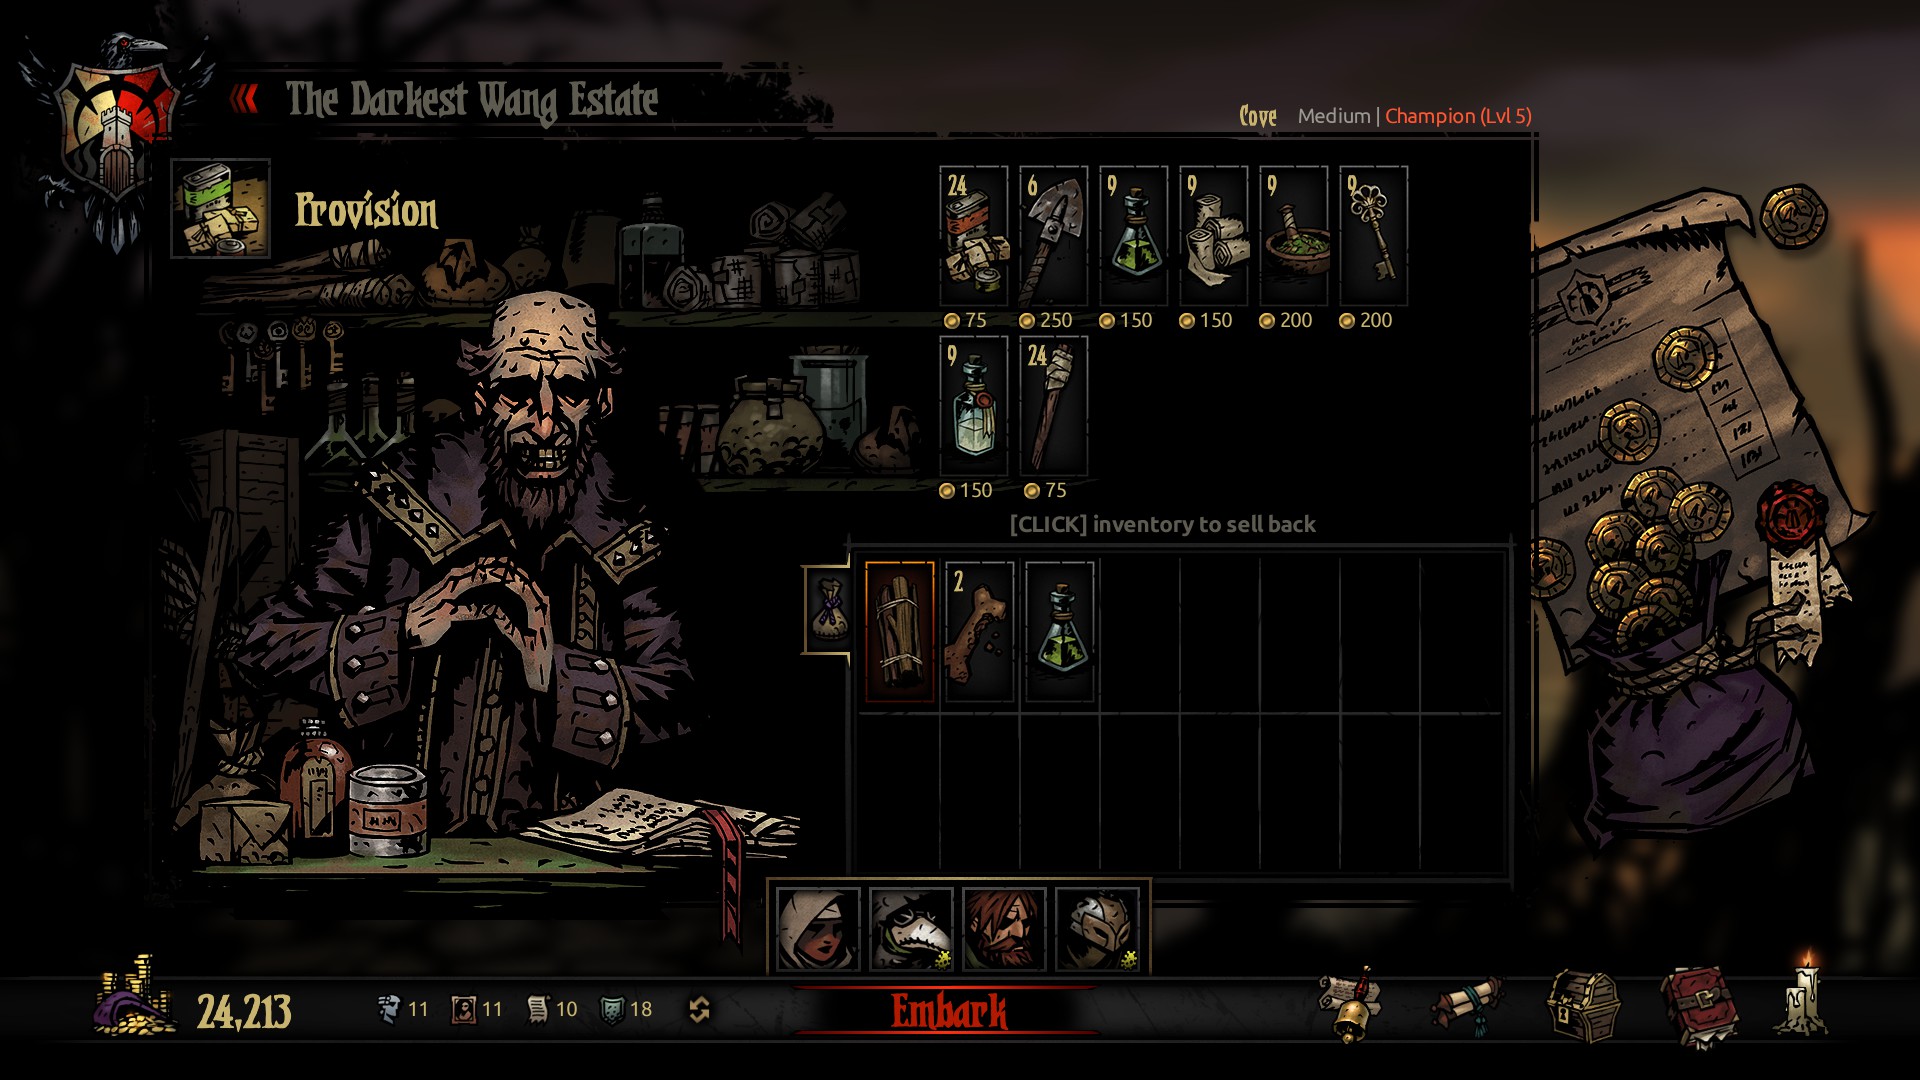
Provisions are the second half of preparing for a dungeon, and they're just as important in various ways. In order to get provisions, you need gold; I haven't been calculating exactly how much I typically spend on provisions, however if I had to ballpark it I would say Reserve at least 3-6k gold purely for getting provisions depending on mission length. Each item has a distinct use in a dungeon, along with an alternative use. Being the greedy asshole I am, I often use most of my supplies for the express purpose of getting more loot, however new players can use these items when they're in a bind in order to turn the tides of battle. I will be listing these items from left to right for spacing purposes.
One thing to note: Various classes will bring a supply with them into the dungeon, either for their own use or just as an in-general thing. You can save a small bit of coin like this, but I find it a waste of space in some outside-cases. Amusingly enough, this was added after a small houndmaster buff since the developers thought it odd that the houndmaster was the only one actually preparing for things to go wrong.
Food, Importance: Maximum
-Food is the life-blood of your team, since your heroes are human afterall. The primary use of food is staving off the starvation mechanic: If you don't have enough food to feed your team, whether on the road or while camping, everyone suffers 20% hp damage and ~20 stress damage. The starvation encounter usually appears anywhere between 2-4 times a mission, so I typically bring 8-12 food on a short mission, 20 on a medium mission, and I buy out the store for a long mission. Food also has the side benefit of providing a little bit of healing should you be unlucky enough to not have a vestal or occultist. If you are ever in a dire enough spot rely on this, buy out the store period.
On an aside, Food is often in abundance in the Warrens and the Cove depending on what curios you interact with and how. Its up to your discretion on how to act on this however. I often stick with my normal ration load-out and use any I pick up as a healing item.
Shovels, Importance: High
-Shovels, much like food, are a deterrence against a debilitating encounter in a dungeon. Should you ever run into a wall and not have a shovel, you will take 20% HP damage, 20 stress damage, and go down a tier on your torch. Each dungeon, in my observations, have a varying amount of wall spawns however which can influence how many shovels you can carry with you. Outside of that, shovels interact with various curios in order to give you a bunch of loot or ruin your life, mostly the former. From my experience, I typically bring Three shovels to the Ruins, Two to the Warrens, and Four to the Weald and Cove.
Positive curio effects: Locked Strongbox/Sarcophagus/Display Cabinet, Shallow Grave, Barnacle-covered Chest (All treasure)
Negative curio effects: Bas-Relief (100 Stress damage)
Note: Grave-robbers will start a mission with one shovel.
Torches, Importance: Variable
-Torches primarily exist to increase your light meter, which can determine survivability or profitability. For a standard run, I typically bring 6 torches on a short mission and 8 for Medium/Long missions, relying on campfires to restore my torch in the later bits. Torches also interact with assorted curios in a variety of ways. A simple tool, but very helpful.
Positive curio effects: Alchemy Workbench (Maximum Torch); Pile of Scrolls (Random negative quirk removal)
Negative curio effect: Pile of Books (100 stress damage)
????: Shambler's Altar (summons a unique fight)
Skeleton Keys, Importance: High/Medium
-Skeleton Keys do exactly what you think they do: Unlock things. There really isn't a bad outcome with using keys, so the only bad part of taking a key is the occupied inventory slot. Keys, to me however, are important early on because they are the key to getting a set of trinkets that can offer extra damage and, more importantly, extra healing. Once you get those accessories, the sole purpose of bringing keys is with the intent of making big money. I usually bring One key to every dungeon, and 2-3 to the Ruins mainly to gamble on secret rooms.
Positive curio effects: Anything with "Locked" in the name (Money)
Antivenom, Importance: Medium
-Antivenom isn't complicated, its primary use is to remove blight from a hero. However, it can also interact with various curios to make them "safe" and get you riches. I have a weird mindset with the curative items: I usually rely on either self-restoratives, plague doctors or camping skills to remove things such as blight, however using items such as this is a free-action so its no real waste to bring one aside from the used inventory slot.
I mainly bring Antivenoms to the Weald since there's both a wealth of blight enemies alongside curios that are affected by it. Antivenom can also be useful against a boss in the Warrens, and it has a middling use in the Cover for one curio. I never really bring it to the Cove however due to how little I encounter said curio. My usual logic is Bring 2-3 Antivenom to the Weald and Warrens, depending on mission length.
Positive curio effects: Left Luggage, Old Tree (Treasure); Brackish Tide Pool (Restore 5 HP & Stress)
Note: Plague Doctor starts a mission with one Antivenom
Bandages, Importance: Medium
-Bandages are primarily used to stop bleeding, and its a free-action in combat. Much like the other restoratives, it can also be used to interact with curios for cash.
I mainly bring bandages to the Cove, for their exact purpose! Cove is really bad with bleeding so I take band-aids there even if I have a plague doctor or any skills to remove bleed. The Warrens also has a boss that can consistently cause bleed, so its useful for that instance. As for curio effects, the weald and warrens both have curio effects that give you cash for them so it has some good worth. My mindset is usually bring 2-3 bandages to the Weald and Warrens, 4-6 to the Cove depending on mission length.
Positive curio effects: Mummified Remains, Eerie Spiderweb, Rack of Blades (Treasure)
Note: The Arbalest starts a mission with one bandage
Medicinal Herbs, Importance: Low or High
-Medicinal Herbs are primarily used to remove debuffs, and using one is a free action in combat. Much like other restoratives, it can also be used on curios for varying results.
I have a odd relationship with the medicinal herbs. I rarely use them since a debuff is never really crippling enough to ruin a run. It can be used on curios, but I'm usually not a huge fan of the interactions since they are so rare to see. However, with the arrival of the Cove came a curio that removes a negative quirk at random, so if I ever go to the cove I bring those for the sheer purpose of saving cash. A common thing people do in combat however is use the herbs when hit with a self-induced debuff, such as the hellion's moves or the jester's finale. This would make said skills more viable, but I'm not a huge fan of wasting inventory space just to make a skill viable. My usual mindset is bring 2 medicinal herbs to the Warrens and Cove purely for curio interactions.
Positive curio effects: Alchemy Table, Iron Maiden, Dinner Cart, Makeshift Dining Table, Beast Carcass, Fish Carcass (Treasure); Moonshine Barrel (Damage Buff); Eerie Coral (Remove Negative Quirk)
Note: The Leper starts a mission with one Medicinal Herb
Holy Water, Importance: Low to medium
-Holy water is an item used to buff all your resistances (barring stun) by 30% for 4 turns, and using it is also a free action in combat. Much like other provisions, Holy Water can also be used on curios to gain varying effects
Holy Water is an item I rarely use for treasure hunting, and almost never use for its intended purpose. The curios it interacts with are so rare and some appear in all dungeons, and often times the results are temporary so I rarely bother with it. One rare curio however, the Eldritch Altar, will remove a negative quirk with holy water; however said curio also appears in every dungeon and rarely so its never a guarantee like Scrolls or Coral. In terms of combat, I almost never use it for combat purposes, however Iron Chitlin clued me into a neat facet of info: certain boss gimmicks are coded to rely on debuff resist to resolve, so bringing four holy bottles to certain boss fights can increase your rate of survival. My usual mindset is Bring 2 holy bottles to the Ruins, and maybe one to the weald or cove if you're daring purely for curio effects.
Positive curio effects: Decorative Urn, Pile of Bones (Treasure); Fish Idol, Altar of Light (Buffs); Confession Booth, Holy Fountain, Pristine Foutnain (Restoration); Eldritch Altar (Negative Quirk Removal); Troubling Effigy (Random Positive Quirk)
Negative curio effects: Occult Scrawlings (-20 Dodge Debuff)
Note: The Crusader starts a mission with one Holy Water
Dog Biscuit, Importance: zoinks!
-The Dog Biscuit is the unique item for the Houndmaster, boosting their accuracy, and damage for 3 turns on use.
The biscuit has a sort of Elixir-mindset to me, to where I never really use them because I think I'll need them later. To wit, they often wind up wasting space for me. With this LP though I've been committing to using it whenever I feel threatened in a fight, and the difference is pretty noticeable. You can also use it on one specific curio for a goofy effect: Feeding it to a giant oyster will give you a huge dodge buff, so its fun in the Cove as well. Each Houndmaster starts with 2 dog treats.
Firewood, Importance: Cozy~
-Firewood is used in a medium or long mission to consume food for HP/Stress heal, along with activating camping skills. When you camp, there's a chance that you will be ambushed with an encounter afterwards unless you use a skill that prevents this. You get firewood for free when you start a medium-length mission, and two for a long mission.
Firewood's nice, but its not vital. If you're low on food, this can also be a detriment since camping without food will actively damage you. Interesting trivia: Once upon a time, you used to be able to throw away your firewood at a Sacrificial Altar in the Warrens for a Damage/Accuracy/Crit buff, but that got removed at some point I am unaware of. Sad really, it was a good risk-reward mindset.