Part 5: Overview: The Ruins
The Ruins"Come explore the rich history and deep culture from our family line"
Post theme: https://www.youtube.com/watch?v=9r3WbeZMbwY
The Ruins is the first dungeon you will explore when starting out, and it’s possibly the tamest dungeon in general when it comes to themed mechanics. The main theme of this area is a focus on the Unholy, namely centered around skeletons and the undead. In terms of combat mechanics, the enemies here mainly focus on regular damage or high stress damage, with some stun procs and very rare chance of bleed procs doled out from enemies. For future adventurers, we advise bringing a crusader here since he's the only character that has an anti-Unholy property in one of his skills. Alongside him, the enemies within the Ruins are heavily resistant to bleed but extremely weak to stun and blight, so bringing a plague doctor or any alternative classes with those skills can be a godsend to you. In order to maximize your treasure output as well, It is recommended that you bring two skeleton keys and two holy waters for curio exploitation, along with 3-4 shovels for both wall surmounting and backup curio exploitation.
Common enemies:
-The Bandit team, The Cultist Team, Spiders, Maggots, and the Madman
Exclusive Enemies (for now):
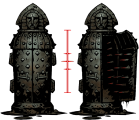
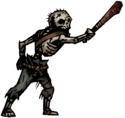 Bone Rabble (Threat Level: Mild)
 -These are the common front-line enemies you'll see in the Ruins, boasting very little health, evasion, and generally no threat. These enemies have two attacks: The most common attack, "Bump in the Night," is just a basic attack used in rank 1-3. In rank 4 however, in the extremely rare circumstance they wind up there, they have a move called "Tic Toc" that pushes them forward one. These guys exist to fill out the ranks though, and you either one-shot these to remove the action queue or just ignore them until the rest of the threats are gone.
 Bone Soldier (Threat Level: Medium)
-This enemy is the advanced version of their rabble counterparts. With a longsword and some patchworked pieces of armor, these enemies come with damage reduction, more damage, and an alarming crit rate to boot. Much like their club brothers, these guys have "Graveyard Slash" at ranks 1-3 for general attacking, and "Graveyard Stumble" at rank 4 in order to get them back in the fight along with doing small damage. Depending on your circumstances, you may have to address these enemies first so you don't lose a life, but an enemy with a stun is just as good at removing him from the fight until the other threats are gone.
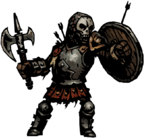 Bone Defender (Threat Level: SNORE.)
-This enemy is the hardy tank of the bone patrol, boasting a wealth of protection along with a decent amount of HP to work through. However their attack capacities are very limited: The main attack you have to worry about is "Dead Weight," a shield-bash that both stuns the victim and pushes them back one in order to screw with your formation. Their other attack, "Axeblade," is just raw damage and a pitiful amount at that. Their final attack is a desperation attack done at ranks 3&4 called "Clumsy Axeblade," with the express purpose of moving them up one to attack.
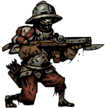 Bone Arbalest (Threat Level: High)
-With high raw damage, decent HP and the capacity to hit basically everyone, the Bone Arbalest is one of the main threats to deal with in the Ruins. Alongside all this, the AI has a fondness of attacking specifically rank 3 and 4 in order to wear down your healers, so this asshole has earned his spot as a high priority target. You also find these guys in the far back rows of the enemy team, so reaching them is a chore in general as well. Their main attack, "Quarrel," can hit rows 2-4 for a decent range and a roughly 1/5 chance to crit as well. If you're smart however and pull them forward, they can use the skill "Bayonet Jab" from ranks 1-2 for mild damage and also a free move backwards for them. The big issue is that their decent HP pool and their usual position make them a trial to kill, with the Hellion being one of the few people that can reliably one-shot them at rank 4. Kill or stun them first and foremost. Plague Doctors trivialize these jerks.
 Bone Courtier (Threat Level: FUCK)
-This jerk. Oh wow. This guy has low hp in general but he has a gross amount of dodge, so hitting him is a chore. He only has two attacks, however one of those is the biggest pain in the ass. "Tempting Goblet" can be used in rank 2-4 and causes high stress damage. Alone this is not a threat, but these guys love to come in both pairs and with Cultist Mages so stress damage comes in tides with these guys in tow. I aim for these guys first since they output stress damage way more than your team ever hope to heal reliably, and they can easily bring you out to the brink of madness with their dumb cups. Their other attack however, "Knife in the Dark," is used in front ranks as well and does middling damage. Stuns and Pulls are good ways of dealing with this jerk if you get tired of missing with his high evasion. Grave Robber and Arbalest are great counters for this guy; The Graverobber has both high accuracy and high speed for attacking but her damage range can make her sort of unreliable for the kill, while the Arbalest has a high accuracy/damage/crit rate but is generally slow so the Courtier can possibly get a cup attack out before her. I really hate this enemy btw.
Curios & Effects:
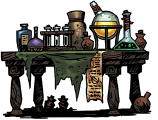 Alchemy Table
-This curio is rather rare, and I often never prepare the proper means to interact with this curio. If you use Medical Herbs on this curio, you will be rewarded with a set of gold drops for your efforts. If you use a Torch in this curio, it will provide a potent mix that maxes out your light meter on the spot, which is very useful. If you decide to risk flat-out interacting with it however, you have a 50% chance of getting Blighted, a 25% of getting a small amount of gold, and a 25% chance of nothing happening.
 Altar of Light
-This is a very nice curio, since interacting with it will always give you a +20% damage buff until you decide to camp if ever. If you have Holy Water to spare however, this buff gets increased to 30% extra damage. A nice curio to see, however I feel like the holy water is wasted here since it can be better used elsewhere.
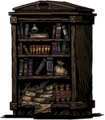 Bookshelves
-Ugh man. Fuck books. The bookshelf has a variety of events, both good and bad, and nothing you can do will make this a surefire safe thing. Among the things that can happen, starting with greatest frequency, are these: Absolutely nothing, Finding a map of the dungeon, A stressful book for stress damage, A random positive quirk, a journal entry for slight backstory, and a random negative quirk. I hate these things so much because I always feel like I get the worst part of it, however it’s one of the few places you can get journal entries for 100% completion so it’s a necessary thing to interact with.
 Confession Booth
-The confession booth is a great thing to see...if you have holy water to spare and don't have any curious heroes. Using Holy Water on a Confession Booth will sanctify it, restoring 30 stress from whoever used the curio at the time. This is a pretty great and *cheap* stress healing alternative compared to camping or the town services, so if it’s necessary this can be a cash-saver for stress removal. If you risk using it without any meddling however, the booth has a 50% chance of stressing out the user further, 25% chance of giving you some small change, and apparently the off-chance of removing a negative quirk from a hero. This curio is why I've been bringing more Holy Water to the Ruins, it’s a very useful cabinet.
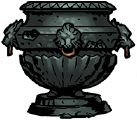 Decorative Urn
-This is the reason why I carry Holy Water to the ruins. A relatively rare curio, if you happen to find one in your adventures, pouring Holy Water into it will dissolve the ashes in the urn to reveal many gems and possible trinkets lying within, giving a hefty boost to your income. Another interaction, which is insanely dumb, is whacking it with a Shovel to get the negative trait "Guilty Conscience" and nothing else. An unmodified interaction has a variety of effects: ranging from some small treasures, absolutely nothing, getting Blighted or getting Diseased randomly or specifically with "Creeping Cough." Always keep one Holy Water on you in the Ruins, because this alone is worth that investment.
 Holy Fountain
-A nice curio, interacting with this on its own will either give you some free cash or heal a small amount of stress and regular HP alongside removing all status effects. However, if you use Holy Water on this, you get double the amount of healing that you'd get from the vanilla interaction. A nice effect, possibly run-saving if you have holy water and need some healing on a person.
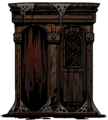
 Iron Maiden
-The Iron Maiden is a relatively rare curio in the Ruins, and one I never prepare for. If you use Medicinal Herbs to interact with it, the maiden is cleansed and you get two pieces of free loot of any kind. Risking a normal investigation though can bring about the same loot reward along with possibly nothing, making a hero claustrophobic, or having the hero gain either a random disease or specifically Tetanus. Given how rare this appears, I never bring medicinal herbs to the Ruins. It rarely feels worth it.
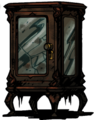 Locked Display Cabinet
-One of the many reasons I bring Keys to the Ruins. Unlocking it with a Skeleton Key will give you a mix of up to 5 gold rewards and heirlooms. Conversely, it’s also why I bring extra shovels because bashing it with a Shovel produces the same, albeit smaller, result. You should never interact with it on its own if you can, because the cabinet is trapped with a chance of either blight or bleed, and using bandaids/antivenom on it will not neutralize this trap. Worth buying the key quite frankly, plus you should have one key on hand at all times for the secret gambit.
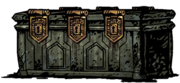 Locked Sarcophagus
-Quite literally the same as a Display Cabinet, right down to interactions and trap effects. However, its less profitable in general, so if you find yourself low on keys/shovels and have both these curios in the dungeon then go for the Display Cabinet first.
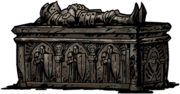 Sarcophagus
-The unlocked version of the last curio, however with much different effects. No real way to interact with it with an item sadly. More than often you’ll get a pile of loot varying from gold to heirlooms. Other times however you will get either nothing or the negative trait Thanatophobia, which makes them fear death. No real reason to fear this honestly.
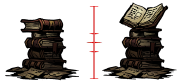 Stack of Books
-Did I ever mention how much I hate books? The only way to item-interact with a stack of books is a Torch, which will hit you with 100 stress for "desecrating knowledge." This could be a decent way of gambling with afflictions, but I really wouldn't recommend it. From a vanilla investigation you get the following: Heavy stress damage, A random positive quirk, nothing, a random negative quirk, a decrease of the light meter, or a journal entry. Much like bookshelves, the bookstack is the only way to get the backstory of this game and at a gamble as well. I really don't like books.
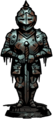 Suit of Armor
-This is a great curio. You can't item-interact with it, however you can only get a positive result from normal interactions. The usual reward from this is a buff for your hero's PROT and DODGE until camping, however there's the off-chance of getting either the Ruins Adventurer or Ruins Tactician trait from the Suit of Armor. A ray of sunshine among this dreary game.
[Images courtesy of this Darkest Dungeon Wiki]