Part 10: Compound Guide: Necromancers, Secrets, and Common Enemies
Episode 7 Notes, i.e. exploring things too small for their own post.This episode is interesting since we explore a bunch of random oddities that I find too small to discuss in general. I was going to do just a post on the Necromancer, but we can fit some small tidbits in as well.
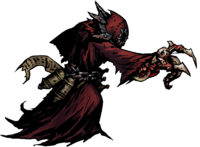
The Necromancer, Undead progenitor of the ruins.
The Necromancer, depending on how one plays, is usually the first boss players face off against and is a test to see if you can survive the rough and tumble fights that await you beyond this hurdle. If you couldn't guess, the Necromancer's main gimmick is summoning creatures; every attack the necromancer possesses also has the ability to summon a skeleton minion in front of him, and you don't address his creations ASAP then he will quickly run out of your reach and dole out punishment in bounds. As difficulties go up, the quality of minions the necromancer can summon increases as well, so hopefully your team is up to snuff for dealing with the undead before taking on this profane villain.
The Necromancer comes with three attacks:
-The Flesh is Willing is a gruesome attack where the necromancer stabs at the front two ranks with various bones and sinew accumulated from his vile arts. This attack does a fair bit of damage and comes with an 8% chance to crit. This attack is dangerous, but a well-prepared Vestal can negate all the damage it puts out.
-The Crawling Dead attacks the opposite side of the formation spectrum, dealing damage to your back rows with an 8% chance to crit. Much like the last attack, a properly trained vestal can respond to the damage in kind.
-Six Feet Under is probably his most dangerous attack, since it hits everyone for a decent amount of stress damage alongside the minion it summons. I consider this his most threatening attack since Stress is rather hard to remove if you don't anticipate it, and depending on how the walk to the Necromancer went, you might be starting the fight with enough stress to tip you over should he use this multiple times.
For fighting the Necromancer, as seen in the episode, Crusaders and Plague Doctors are wonderful for the fight. Crusader brings the damage for managing the summons, while the Plague Doctor controls the field with widespread stuns and blight. Your rank 2 fighter can be any ranged damage unit, I just like using the Grave Robber since the one we have right now is well built to dole out crits en masse. The big threat of this fight comes from the numbers he's capable of bringing to the fight, so once you're able to surmount that then the Necromancer's no big threat, especially since he lacks the normal action-economy benefits that other bosses have.
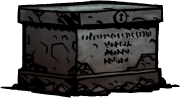 Secret Rooms
Secret rooms are a fun little thing added some time after the addition of The Collector. These rooms are the main reason why I bring keys to every dungeon nowadays. Now in order to find a secret room, you must scout it out; You cannot pull a cheap trick and just mash up to try and brute-force your way into a supposed secret room since they are an encounter generated from scouting and are not predetermined. I'm also not sure about this, but getting a map from a bookshelf or book pile won't reveal this since its supposed to be a hidden treasure that you wouldn't list in public documents.
Secret Rooms are always a plus, its just a matter of how much of a positive you want it to be. If you interact with it without any items, you will open it up to find a modest pile of three treasures for your time. However, if you use a skeleton key, your rewards are much more grand: You can recieve anywhere between 1-3 Puzzling Trapezohedrons worth 2500 each, along with a high chance of getting once of three rare accessories. These are heads of the "canon" adventurers for the Highwayman, Vestal and Man at Arms, and each provides a different buff at the cost of 20% more stress damage: Dismas' head gives you +25% damage along with the extra cost of -10% HP, Junia's head provides +33% Healing, and Barrista's head provides 13% PROT. These are wonderful accessories through the game in general,
Common Enemies
These enemies are found throughout all of the areas around your troubled estate. Sometimes they come in their own groups, other times they are woven into the local wildlife in order to mix up the team dynamic. Either way, you would do well to understand these enemies, lest you fall to them unceremoniously.
Brigands!
 Brigand Cutthroat, Threat Level: High
-The Cutthroat is the weird hybrid class of Tank and DPS for the Brigands, and they are good at what they do. Bringing decent protection with their hardened leathers, possessing the deftness of a huckster, and bringing heavy damage with their twin blades, these guys can dish out damage super fast and take hits while doing so. These guys can hit the front two rows with Slice & Dice for decent damage at a high crit rate, they can Uppercut Slice you for small damage and a knockback at nearly all ranks, they can Shank anyone for high damage and bleed, and if you ever put them in rank 4 they have Harmless Poke to not only get them back in the fight but also gain +2 speed. These are dangerous, high priority targets, take them out of the fight first and foremost.
 Brigand Fusilier, Threat Level: Medium
-The Fusilier is the nuker of the bandit crew, and they exist to wear you down over time from out of reach. You'll often see them in rank 3/4 with decent dodge, so hitting them can be a task at times. Their main attack, Blanket Fire, does a small amount of damage but to everyone on your team, and they can do this from rank 2-4, so trying to prevent this with pulling them is tough. As if that wasn't bad enough, they have Rushed Shot to put them back in a favorable distance away and can do this from rank 1-3. However, the Fusilier comes with rather low accuracy values and can often times miss your party with their shots. Also, while their carpet fire is middling on their own, the big threat comes when they are in pairs. If they're ever in pairs then you have to focus them down first and foremost.
 Brigand Bloodletter, Threat Level: Low
-The Bloodletter is the "tank" of the bandits, though he's really just a sack of HP with no PROT and very little dodge. These guys take point on the team and just sit there to make sure you can't meat-grinder the more threatening guys on his side. While his whip attacks do little damage and bleed damage, their main goal is to also inflict stress on you in order to slowly work your heroes over the edge. Their favorite attack, Rain of Whips, hits everyone for middling damage and middling bleed damage. Their alternate whip attack, Punishment, hits a little harder but only hits one target. Their most dangerous attack however comes not from a whip, but from Point Blank Shot in rank 1 with a staggering crit rate as well. Honestly, the only reason I consider them a threat is because of Point Blank Shot. Find a way to move them and their whips are hardly a threat.
Cultists!
 Cultist Brawler, Threat Level: Medium
-The Brawler is an enemy that can range from a mild inconvenience to "How the hell did you hit that hard?" They're a one-trick pony, but that trick does a lot of effects and can hurt a lot if the dice roll poorly. Their main attack, Rend for the Old Gods, does a myriad of things: Does a small amount of damage, causes middling bleed, debuffs you to take more stress damage, moves the Brawler forward, and also does more damage to marked targets. They can only do that attack from ranks 1-2 however, but if you shove them back they respond with Stumbling Scratch in order to get back in the fight. These guys exists to supplement their partners in combat, and while they don't really do much on their own they have a crit rate that can catch players off-guard easily.
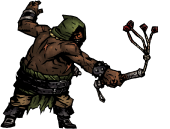
 Cultist Acolyte, Threat Level: High
-The Acolyte is the mage-role of the cultist, and is one hell of a threat in general. The Acolyte will often be in ranks 3-4, and they also come with high evasion so hitting them is a bit of a trial. However it really doesn't matter what position they're in since the Acolyte can attack in *any* position. Their primary attack, Stressful Incantation, does heavy stress damage and reduces your torch by 10 percent. This is the big threat, since alone the cultist hits for 20-30 stress damage in general and they have the chance of being in pairs, doubling that stress output. Along with that, they have Eldritch Push & Pull to completely mess with your formation and more than often ruin your healer's position and stop their healing. I have a polaroid of this enemy on a dartboard, I hate them that much. They die first.
Spiders!
 Webber & Spitter, Threat Level: Medium
-The spiders are, mechanically, one of the more fun things I see in this game. These guys operate on a sniper/spotter team, are really fast, and were designed to introduce players to the mark system. Webbers are the spotter and have two attacks: Web marks and stuns a target with a high chance, and Bite is an attack they use soon after to damage and blight the marked target. Spitters however are the sniper: They can shoot any rank with Spit and deal high damage to the marked target and also have Bite as well. The big threat comes from their cooperation, so if you take out one side of their team then the other half folds easily.
Other Fiends!
 Maggots, Threat Level: Medium
-Maggots are weird to me. They have low HP, average dodge, decent speed, and only one attack. That one attack however I feel like is a decent threat to merit the existence of these baby bugs. Grave Nibble does small damage, but it also causes stress damage, can stun the target, and can cause any disease. The disease is the big threat I see, because you can get super unlucky and get Black Plague or Tetanus and everything goes south. Luckily these guys have low HP and they only appear in their own groups, so once your teams cycle in they don't stick around long.
 Madman, Threat Level: High
-The Madman is a sort of miniboss in a sense that they're a pain to deal with. These guys come with high speed and high evasion, making them super hard to hit in general. Their attacks however only do stress damage, but do a real good job at it. His single target attack, Accusation, causes stress damage and makes the target vulnerable to stress damage. His AoE attack, Doomsday, does stress damage to everyone. These guys often replace units at random, and you can wind up in situations where you would be fighting two Cultist Acolytes and the Madman, so it'd be best to focus these guys down first.