Part 10: Episode IX: Learning the Ropes
Episode IX: Learning the Ropes
New Music: Peaceful Sleep (Vocal) (You should listen to this. The vocals only come in once we finish speaking to Anemone.)
.jpg)
 Also, there’s this girl near the entrance wearing the head of a machine lifeform... She’s a bit of an odd-ball, but she’s really smart, so I’m sure she’s got lots of useful information for you.
 .jpg)
Yeah, yeah... We’ll get right on top of that, Ranunculaceae Flower. What’s going on with your desk here? Let’s see... vague landmass maps. Can’t quite make those out... Machine lifeform concept art... smart. Hammer, wrench, technical documents, bulky future tablets. And oh... it’s good to see AK variants have survived 10,000 years into the future and are still in use.
.jpg)
As Anemone suggested, we ought to go speak with a few key NPCs in the Resistance Camp. Indeed, we cannot hit the next plot beat until we do so. However, there’s something far more pressing just to the left of Anemone’s work station...
.jpg)
...Jukebox jams.
.jpg)
 Ska is prohibited.
 I could tell you were a connoisseur just by looking at you! Here, have this. This is what people used to call a “jukebox,” a machine that plays music. You can play any song you like on it, as long as you have the necessary records. It’s yours to use!
 .jpg)
.jpg)
The music enthusiast android forks over the first of five Sound Data files. This allows us to listen to tunes in the Jukebox here. It’s just the tracks from the prologue mission up to exactly this point. The Jukebox is actually fairly robust with what it will play. You can pick from a track, which variation of it there is (Quiet, Upbeat, Battle, etc.) and whether or not to play the vocal layer if applicable.
.jpg)
2B can also take a seat on a nearby bench if she wants to chill out for a bit. The war against the machines has been going for longer than recorded human history at this point. It can wait a few more minutes.
.jpg)
But, alas... We must get back on track. Red arrows herald new legs of this quest to get acquainted with the locals. Let’s start with the Weapon Trader.
.jpg)
 I deal in weapons, if you’re interested in that type of thing.
  What kind of weapons? Basically, I rebuild and repair relics from the old world. Although to be honest, my tools are in pretty sad shape at the moment. But if I can get the servicing device in that toolbox up and running, I could start fixing and selling weapons again. Take a look at it, will you? *examines toolbox* That looks busted, all right.
 Guess what this mission really is about? If you guessed “sidequest tutorial” then ding-ding-ding! We have a winner...
.jpg) <Help him out> You mean it? That’d be a huge help! Looks like the servicing device shorted out. Must have put too much load on it. I’m thinking four complex gadgets will be enough to fix it. Any idea where I’d find complex gadgets? Folks say you can find ‘em over in the city ruins—although I also hear the place is crawling with incredibly aggressive machines.
<Help him out> You mean it? That’d be a huge help! Looks like the servicing device shorted out. Must have put too much load on it. I’m thinking four complex gadgets will be enough to fix it. Any idea where I’d find complex gadgets? Folks say you can find ‘em over in the city ruins—although I also hear the place is crawling with incredibly aggressive machines. .jpg)
And so we have our very first of many sidequests in NieR: Automata. If we want to get the Resistance Camp’s weapon merchant up and running, we need to go harvest four “Complex Gadgets” from the gritty noir reboot of Inspector Gadget. Or at least, a few blocks away in the City Ruins.
.jpg)
Any active sidequests are kept track of in the Quests tab of our menu screen alongside a handy blurb reminding us who gave us the quest and why. These first couple of sidequests are all but mandatory given how easy they are to complete and the benefits they unlock. But for reasons I’ll get to shortly, we’re going to be shelving most sidequests early on until a more appropriate time.
.jpg)
While we’re browsing the menu screen again, how about we have a little bit of fun. Since we are dealing with the weapons trader, I reckon we ought to get to business with an old tradition with this series. Let’s take a closer look at our weapons... or should I say weapon.
.jpg)
2B only has her default small sword, Virtuous Contract. Virtuous Treaty, her accompanying large sword in the prologue, was lost when 2B blew herself up. Don’t worry, we’ll get it again later. Weapon upgrading is back once more, like the rest of the Drakenier series. It’s still four levels of upgrade to max. This time around, weapons gain special attributes alongside their stat (and combo) increase.
For instance, Virtuous Contract gains an Attack Speed increase while equipped and upgraded to Level 2 onward. At max level, weapons receive a secondary special attribute. Some of which are unique to the weapon. In this one’s case, it gains Holy Blessing which will increase 2B’s attack power if she’s at max HP. Not bad... Honestly, this sword can carry 2B through the game. It’s quite good for a default weapon.
.jpg)
But the real reason we want to upgrade our assorted weapons is Weapon Histories. If you’ve never played any of the previous games in this series, every weapon in the game has a short story to go along with them. The range from silly little tales, to gruesome crude edgy messes, to the most metal shit around. Lemme tell you about the time a guy hacked off his own leg, carved a dagger out of his bones, and shanked a guy. NieR: Automata is no different with its weapon histories. And BOY have they gotten the most brutal they’ve been since the original Drakengard. So that’ll be a treat to look forward to. Additionally, all weapons now have a little mural to go along with their weapon stories. Some are completely unique to a particular weapon. This one is not... But its story is. Let’s take a look...
.jpg)
How long can I fight amidst this bloody vortex of a battlefield? How long, I wonder?
How long can I continue to protect what I love amidst this endless war? How long, I wonder?
How long can I continue to believe in a world laden with deceit and folly? How long, I wonder?
How long can I lie to myself as I despair at the dark future of this world? How long, I wonder?
.jpg)
But please, tell us how you really feel, 2B... I’ll be providing the full weapon stories as soon as we obtain a new weapon. Otherwise it’s just going to be a giant infodump of 30 weapon tales at once because hell if I’m upgrading more than one or two weapons to max until necessary. On that note, NieR: Automata does break from tradition. Unlike Drakengard 1, 3 and NIER, the final ending is NOT gated behind collecting all the weapons in the game. The story can fully be completed by just running around with 2B’s default sword and her fists, if you wanted. On the other hand... there is post-game story content that IS gated around collecting all weapons... And upgrading every single one to max level... So... frick!
At least it’s not replaying the entirety of Drakengard 2 two more times for just a single ending each. That LP was a mistake... But what’s not a mistake is moving on to the other merchant in the area!
.jpg) You some kind of supply trader for the Resistance?
You some kind of supply trader for the Resistance? You know it. Every item here is hand-crafted from abandoned parts and stuff plundered from enemy corpses. So then! To business. What can I get you?
 .jpg)
The Supply Trader possesses much of the same goods as the Bunker’s terminals. However, there are a couple new key items. The most important of which is the Sachet. This is caked in presumably moose urine and will prevent beasts from immediately fleeing from 2B when she's in their vicinity. That doesn’t mean they won’t get hostile and attack her. They just won’t be as instantly squirrelly. I’m going to go ahead and purchase that since it’s a permanent upgrade.
Animal Bait can be used in tandem with a Sachet in order to secure an animal to ride. The bait has to be tossed down and the moose has to start chowing on it before it becomes docile and allows 2B to hop onboard. This is all a lot easier method than having to battle a Doom Boar by hanging out on a rock for ten minutes lobbing magic during a side quest. Amazing what technological feats 10,000 years will bring.
.jpg) You mean those little doo-dads that serve as power-ups for your body? ‘Fraid not. I’d love to sell plug-in chips, but I don’t have the necessary raw materials. Now, if I happened to GET those raw materials, I bet we could do business. But until then... Say! Now there’s an idea: what if YOU got the materials for me? I’ve got this bum leg, see? Can’t really get around myself. Can’t you just repair your own leg? You work in the supply trade, after all. If only! Unfortunately, all of our parts are dedicated to the war effort. Can’t spare any for myself. Personally, I’m hoping you wipe out those machines so I can start dancing again. But until then, will you look for what I need? All right. Aw, thanks a million! Okay, so I need one broken spring, one small gear, and one broken circuit. You can smash up a few small machines to find ‘em. You can obtain them from enemies at the big open area towards the left when you exit the camp.
You mean those little doo-dads that serve as power-ups for your body? ‘Fraid not. I’d love to sell plug-in chips, but I don’t have the necessary raw materials. Now, if I happened to GET those raw materials, I bet we could do business. But until then... Say! Now there’s an idea: what if YOU got the materials for me? I’ve got this bum leg, see? Can’t really get around myself. Can’t you just repair your own leg? You work in the supply trade, after all. If only! Unfortunately, all of our parts are dedicated to the war effort. Can’t spare any for myself. Personally, I’m hoping you wipe out those machines so I can start dancing again. But until then, will you look for what I need? All right. Aw, thanks a million! Okay, so I need one broken spring, one small gear, and one broken circuit. You can smash up a few small machines to find ‘em. You can obtain them from enemies at the big open area towards the left when you exit the camp. .jpg)
.jpg)
And now we have our second (not actually optional) sidequest. A small gear and a broken key and circuit. You think he’d refuse a fully intact key? What about a pristine circuit? Course not. Those are separate drops, idiot.
.jpg)
One big improvement over the original NieR, at least for these kinds of sidequests, is that the location we need to go farm materials is marked on the map. And the quest spawns enemies at that location with a guaranteed drop of everything we need. Just gotta go there and beat the materials out of the trash can robot piñatas holding ‘em. It’s certainly better than “I dunno, go grind the Junk Heap for two hours” of days of yore.
.jpg)
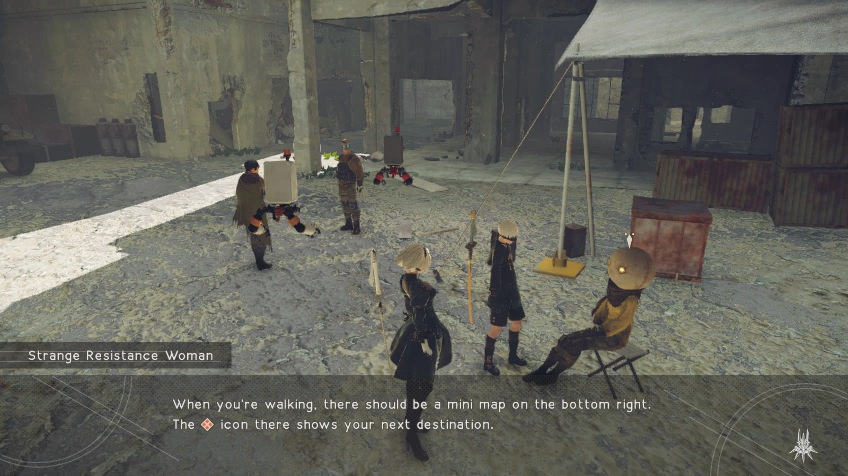
The third on the list of NPCs we’ve been sent to chat up is this oddball who had a Machine Lifeform Helm drop and DAMMIT, she’s gonna wear it! What’s your deal, lady?
.jpg)
 Hmm? My mask? It’s an electromagnetic-wave shielding device. I wear it to limit unnecessary information from the world. ...Ha! Just kidding.
.jpg)
Strange Resistance Woman doesn’t give the first shit about your 4th wall and is here to explain some business bluntly. Let’s just go down the line seeing what she has to say. We were directed to do so, after all.
> How do I save?
.jpg) First of all, remember that this game doesn’t auto-save. Once you activate a terminal, you can save from anywhere nearby so long as you’re within range. When there’s a connection icon displayed on the top right of your screen, you can go to the System Menu and quick save. You can use the access point here to return to that orbiting space station thingy of yours. The other access points are still undergoing maintenance, but you should be able to use them for transport soon. But—and I can’t repeat this enough—don’t forget that there’s no auto-save! Connectivity is limited to certain areas, but you should be able to save in more locations by activating access points. Oh, and let me say it again... There’s no auto-save!
First of all, remember that this game doesn’t auto-save. Once you activate a terminal, you can save from anywhere nearby so long as you’re within range. When there’s a connection icon displayed on the top right of your screen, you can go to the System Menu and quick save. You can use the access point here to return to that orbiting space station thingy of yours. The other access points are still undergoing maintenance, but you should be able to use them for transport soon. But—and I can’t repeat this enough—don’t forget that there’s no auto-save! Connectivity is limited to certain areas, but you should be able to save in more locations by activating access points. Oh, and let me say it again... There’s no auto-save!They say if you forget to auto-save, lose a significant portion of progress and bitch about it on the internet, Strange Resistance Woman will come to your house and cave your head in with a brick. Nobody knows what the brick has to do with auto-saving. But you’ve been warned.
> What’s an access point?
An access point is a piece of YoRHa equipment. More specifically, it’s that thing. You can save and check your mail there. They’re all disguised as wrecked vending machines outside the camp. They have a couple other functions, but I guess you’ll learn about that when you use ‘em. Sometimes enemies will attack terminals. In those cases, you won’t be able to use them again until you get rid of the enemies. Yeah... so most of the save points are derelict vending machines. We’ll go hunt them down at a later date.
> What should I do if I die?
.jpg) After a YoRHa body is destroyed, only its memory data is transferred to the new body. That means items aren’t transferred—so if you die, you need to recover plug-in chips from your previous body. If you die again before recovering your plug-in chips, they’ll all be lost, so take care. Basically, you need to recover everything from your previous body immediately.
After a YoRHa body is destroyed, only its memory data is transferred to the new body. That means items aren’t transferred—so if you die, you need to recover plug-in chips from your previous body. If you die again before recovering your plug-in chips, they’ll all be lost, so take care. Basically, you need to recover everything from your previous body immediately. Here’s a taste of the single worst design decision in the game. You know Dark Souls? You know the whole body retrieval mechanic from that game? They kinda went for that in NieR: Automata just... in the shittiest way possible. Imagine if you died in Dark Souls, instead of losing all your souls/currency, an entirely disposable resource, you lost all of your armor you were wearing. And when you respawned you were a naked beef jerky man and had to do a corpse run to retrieve it. And if you died whoops! That armor is gone forever! That’s sort of what this game does and it’s terrible.
There are more functions to the whole corpse system. But we’ll cross that bridge another time.
> Where should I go now?
 You’ll be fine so long as you follow the red marker.
 Yeah, Justin...
> I feel motion sick...
If you have any system-related questions, ask Maintenance. They handle everything from body maintenance to Pod adjustments. > This game is too difficult!
You can change the game difficulty at any time on the System Menu. In Easy mode, enemies are weaker and you can use special auto chips. Equip them and LT/L2 will activate automatically and evades. Normal mode is a standard level of difficulty. The enemy gets stronger in Hard mode and you can’t use any lock-on features. In Very Hard mode, not only is lock-on disabled, but the enemies are... Well, they’re kind of insane. It’s almost stupid difficult, but more daring players seem to like it. And hey, just between you and me, if you go to “Intel” and select “Tutorials,” you may find out some things you didn’t know. May be worth checking out if you’re ever bored out of your skull!.jpg)
I’m good. Thanks for your time, weird tutorial lady. We may come back later in the game to speak to this woman. She has a very special function late game.
.jpg)
.jpg)
.jpg)
As the Strange Woman mentioned, we’ve got to manually activate these terminals to save our game in the area and also get a more detailed overworld map. It’s possible to teleport back to the Bunker from JUST this terminal, early in the game. Fast travel will eventually unlock between all save points. We... do need to burn through about the first third of the main plot to get to that point.
Imagine I’m making direct eye-contact right now. Listen to my words:
DO NOT DO ANY SIDEQUESTS UNTIL YOU UNLOCK FAST TRAVEL! THERE IS A MAIN QUEST THAT TASKS YOU TO INVESTIGATE A VERY LARGE HOLE! MAINLINE THE PLOT UNTIL YOU GET TO THAT QUEST!
Trust me on this one. You can thank me later.
.jpg)
 Data may be displayed from the system menu. Map data, huh? It’s hard to get an accurate picture from this—our satellite resolution isn’t so hot. Hopefully they deploy some new satellites soon. A general idea is good enough. Heh. You don’t let anything get in your way, do you?
So those were the three NPCs we are directed to chat with here. In order to progress, we do have to go complete those sidequests first. But we’ll get to that in due time.
.jpg)
There’s not much of note going on with the androids around the camp. Some are stoked YoRHa is here since they’re badasses. A few give some general directions and whatnot.
.jpg)
It’s worth mentioning that yep... the planet is still kinda broken. There’s still no day-night cycle. At best it’ll be something approaching twilight. The sun still isn’t up there either. There’s a really bright point in the sky but there ain’t any glowing orb behind it. And there’s still no rain or any weather more threatening than somewhat overcast cloud cover. These were all elements from the original game that were all due to magic having REALLY fucked up this planet
.jpg)
Strangely, this tour of the camp omits what is probably the single most important merchant in the game. So let’s take one more mercantile pit stop.
.jpg)
 This is the Maintenance Shop. I service and consult on all types of android bodies.
 .jpg)
This is the maintenance shop. This merchant is solely responsible for a LOAD of upgrades. That item trader? There’s like a half dozen of him. Weapon shop guy? Two other bozos can do his job. NOBODY has the same function as this merchant. Which makes it really weird she’s not even pointed out as someone worth chatting with during this whirlwind tour of the camp.
.jpg)
Much like the Strange Woman, MSO has a variety of topics she’ll illuminate us on. Let’s just be thorough and get it all out of the way in one update, eh?
> Android Bodies
Android bodies are just that: bodies that belong to YoRHa androids. There are two way to enhance them: experience points or plug-in chips. Everyone knows what experience points are, so I’m not going to waste your time with a long-winded explanation. Plug-in chips are items that enhance bodies. They have various functions. However, we recognize that the process can be a tad confusing, and we don’t want you rage-quitting over it. So, I can actually recommend a chip setup based on what you’re carrying right now. Wanna give it a try.No, we’re good. Since we don’t have any chips. Also, it’s really not recommended to let the game auto-equip chips. They tend to stick on stupid shit you cannot even use yet.
> Upgrading Pods
Pods are tactical support units provided to YoRHa. There are two ways to upgrade them. The first is to take them to a maintenance shop like this one right here. It’ll cost money and materials, but you’ll end up with a stronger Pod. The second way is to equip them with new Pod Programs. There are various types of Pod Programs, and they do everything from firing attack lasers to jamming enemy movements. I’ve got a couple on sale here if you’re interested.Ugh... The former option here...
> Acquiring Additional Pods
You can equip multiple Pods at the same time, but they’re pretty rare, so we don’t ever get them in stock here at the shop. If you manage to find another Pod or two, however, it’ll make your life a lot easier! I sometimes hear about Pods lying around in the desert or being dropped in the sea...Hey. Here’s a hint: There’s two additional pods we can get. They’re in the desert and by the sea. Spoiler: There’s an area in the desert and one by the sea. They are, in fact, there.

> Weapons
The latest YoRHa models can equip weapons from the Weapons tab in the System Menu. You can equip two different sets with two weapons each, so try a few combinations to see what works for you. > Motion Sickness
Yikes! Well, before you barf everywhere... Try going to System > Settings > Camera and changing its behavior.Yeah, go turn both axis to inverted like history’s greatest monster. That’ll make the sickness go away.
.jpg)
That was a lot of jabbering. As I mentioned, this merchant has a lot of unique functions that only she will perform. For instance...
.jpg)
This is where we purchase like... half of the Pod Programs available in the game. We’re not going to buy any of ‘em anytime soon because, well, they’re not very good. Most of the Pod Programs are analogs to abilities from the original NIER. For instance, Mirage above is just straight up Dark Phantasm from the first game. A big sphere grows when activated and anyone within gets owned by a
R030: Hammer – Summons a mass of energy that unleashed a devastating blow upon its target. (It’s Dark Fist. Instead of a giant rad fist it’s a big digital hammer. It’s way too damn slow to be worth a damn.)
R040: Blade – Spins a Pod around the player at high speed, wreaking havoc on any enemies it touches. (Dark Whirlwind. It’s yellow now. It’s effective but boring.)
R050: Spear – Produces a mass of energy that spouts from the ground in the shape of deadly spears. (Copy and pasted Dark Execution. Kind of random. I never used it.)
A060: P Shield – Deploys a protective barrier that blocks melee attacks. (You have a ridiculously OP dodge ability. Why are you face tanking attacks?)
R070: M Shield – Deploys a protective barrier that blocks projectile attacks. (Same but magic orbs. This one at least blocks the dark purple ones.)
.jpg)
Really, like one of those attacks is worth a damn (It’s Dark Mirage.) But enough of that. The actual extremely important function of this character is expanding the total chips slot for 2B. The importance of this will make a lot more sense when we look at chips in a minute.
.jpg)
This merchant is also the only place to upgrade our Pod (and any future Pods.) You see this? You see this screen right here? Those materials on the left. This is the single biggest grind in the entire game. Getting all the weapons to fully upgraded? Not a big deal. Late game merchants sell literally every upgrade material necessary. It just costs a fortune. But Pod upgrade components? Shit outta luck there, buddy. It is all non-guaranteed harvest points and random drops for more than one of the most necessary components. Pure Water is this game’s Eagle Eggs.
To put it in perspective, by the time I hit all of the story endings I had upgraded one of the three Pods exactly once. And that was while doing all but maybe ten side quests. By the time I had done all side quests? Still only one. The time I upgraded every single weapon to max? You know it, baby. Just one! Upgrading all Pods to max was the second to last achievement I accomplished in this. It sucks! And the upgrades? Next to worthless. A Level 2 Pod gets a charge shot and does like 3% more damage with its shots.
Whoopee...
.jpg)
Fusing we cannot do right now because we have no chips. We’ll come back to that one. It’s probably the most poorly explained mechanic due to the fact it straight up does not have a tutorial.
.jpg) If you obtain any new chips or programs, make sure to try them out!
If you obtain any new chips or programs, make sure to try them out!.jpg)
Let’s save our game real quick and take a brief look at the Plug-in Chip system. Chips are plug and play abilities that will buff 2B or add special abilities. These range from attack boosts to increased item drops to shooting sonic booms when you do physical attacks and all manner of junk in-between. Getting a handle on the Plug-in Chips is the easiest way to break this game over your knee.
We can make three different chip loadouts that can be swapped in the menu. For instance, if we wanted a special set-up that was all speed boosts for say, theoretically a really shit race side quest against a total fucker... We could make that our Set Type C loadout so as not to interfere with our main rolling around set-up.
.jpg)
The chips themselves are divided into different categories. They’re all fairly self-explanatory. Support is usually the more unique of abilities. Chips themselves take a certain number of slots. Right now 2B only has 40 slots to work with and 20 are already occupied by HUD functions. That’s why expanding the number of total slots is one of the best early game upgrades available. Chips will take up more storage space the stronger they get. A single chip could take up to 28 slots, so it adds up quick early on.
.jpg)
Right now the only chips we have equipped are all HUD functions. It’s entirely possible to rip most all of these out to gain more Plug-in Chip space. Don’t want a mini-map? Already memorized where save points are? No need for numbers to pop out of enemies on damaging them (you fucked up joyless shit)? Rip ‘em out, even if the space REALLY isn’t going to make that much of a difference. But in a pinch, disabling a bit of the HUD to squeeze in a tiny bit more performance is always an option.
.jpg)
This is only ONE chip that absolutely should never be removed. That’s the one containing 2B’s Operating System. As it turns out that’s kind of important for an android to have installed. It says right there... Removal means death.
.jpg)
Like I said, you SHOULD never remove this chip. That doesn’t mean they’re going to stop you in any way. So... We’re gonna be curious, huh? Wanna see what happens? Tch... Alright.
.jpg)
.jpg)
You immediately die, just like it said you would! You stupid idiot! 9S is, as we speak, freaking the FUCK out because 2B just stuck her hand into the back of her head, pulled out her brain, and flopped over dead. I hope you’re happy...