Part 6: Chapter 7
All right, here we go. Afraid you guys are going to be disappointed by this vote again. Sorry.
***
__T+Eng1.00_Gaijin+Suicidal_-3.png)
Here we are. The Rope Ladder has been deployed, and we're ready to head into the courtyard.
Kazuo: Should we team up?
Akiko: Yes, good idea!
__T+Eng1.00_Gaijin+Suicidal_-4.png)
There's a key we can't reach up there, and a note.
Note: The basement entrance is close. The Low Key is under the memorial tower.
What could that possibly mean? We'll get back to it later.
__T+Eng1.00_Gaijin+Suicidal_-5.png)
If you thought the enemies up to this point were heavy hitters, you haven't met the Maniac. It can sometimes cause poison, but that's heavenly compared to its normal attack. Akiko took 71 damage from this guy. Hardest 50 experience you could earn.
__T+Eng1.00_Gaijin+Suicidal_-11.png)
That's a mirror up there, not a door. Remember that.
__T+Eng1.00_Gaijin+Suicidal_-12.png)
This is part of the problem with our current team. We'd need a Broom or Asuka to pass that broken glass. Which means we'll have to use her after checking out this room.
__T+Eng1.00_Gaijin+Suicidal_-13.png)
More Rope. Fantastic.
__T+Eng1.00_Gaijin+Suicidal_-15.png)
The key to this statement is making it down to the bottom of the screen, where that blue statue is, and pushing it. Your pointman is automagically separated from any other party members once he steps in, so if you have extra people, save them the trip and just leave the party before crossing. Once you do get to the statue, the flow of water eases and you can move upstream. If you get stuck on the right side of the screen because you're not fast enough to make it you can get out easily enough, but you take damage for every square you cross. How much, you may ask?
TEN DAMAGE. Per step.
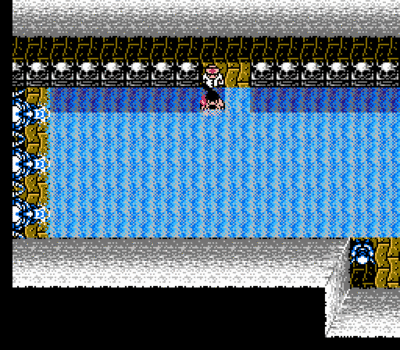
Fortunately, Kazuo makes it in one try.
__T+Eng1.00_Gaijin+Suicidal_-24.png)
What is good at breaking things? The Mallet. Did Kazuo or Akiko bring one? Nope!
After bringing Team Girl down here, breaking the statues is simple.
"Be brave!!"
"No body in... memorial... Must've been dug up... So foolish..."
__T+Eng1.00_Gaijin+Suicidal_-26.png)
After Vacuuming that broken glass and unlocking this door, we can continue.
__T+Eng1.00_Gaijin+Suicidal_-27.png)
Two corpses, Boots, Log, and a Skeleton. The only item we'll be needing anytime soon is the Log, so collecting that is essential.
NW Corpse: South fountain... near the lake...
NE Corpse: The lake... lies to the west... Ugh...
Skeleton: Help! The water!!
__T+Eng1.00_Gaijin+Suicidal_-33.png)
Another mirror. Guess what happens if you get within two squares in front of one?
__T+Eng1.00_Gaijin+Suicidal_-34.png)
Mirror is a fairly tough enemy. It's considered a right-side attribute enemy, so several party members will have trouble even making a dent in it. It can also cause Curse. However, using the Mallet during battle will do about 50 damage, so even a party member who has trouble causing damage can put the hurt on Mirror. They're only worth 24 experience each, and you have to fight them each time you pass by a mirror.
__T+Eng1.00_Gaijin+Suicidal_-40.png)
Well, unless you use the Mallet to smash the mirror, that is. Then you can safely pass that area. Boy, that thing's getting a lot of use down here.
__T+Eng1.00_Gaijin+Suicidal_-42.png)
Going west takes us to a division of paths, and an unreachable sword.
__T+Eng1.00_Gaijin+Suicidal_-43.png)
Killing and smashing the Mirror up here reveals a secret passage. We'll come back to that.
__T+Eng1.00_Gaijin+Suicidal_-56.png)
Both the doors here connect to the same room.
__T+Eng1.00_Gaijin+Suicidal_-58.png)
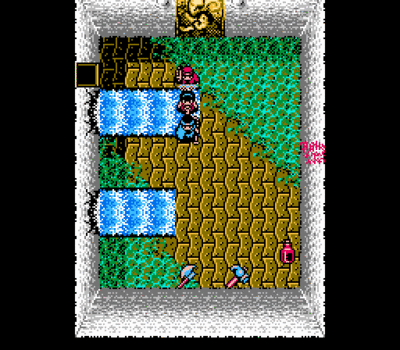
Inside is a flowing water area like the last one with the statue, but this time there's another Pick instead of a talking corpse. Not really much point to this unless you missed the previous two.
There was a clue tossed out in the last update about these rapid water sections of the game.
"Corpse: Pick... wouldn't have been washed away..."
Basically, using the Pick in your inventory will allow you to go against the flow of water in certain rooms. You'll still take damage if you're being crushed against a wall however, so it's not an absolute safety item.
__T+Eng1.00_Gaijin+Suicidal_-62.png)
South.
__T+Eng1.00_Gaijin+Suicidal_-63.png)
More south.
__T+Eng1.00_Gaijin+Suicidal_-64.png)
A Fresco, some bloody writing, a Heavy Axe, a Mallet, and a Tonic. Oh yeah, and...
Some water to play with.
Fresco: 3-13 The statue... Back to a lake...
Bloody Writing: In blood... Behind a mirror... A hidden room...
Naturally, this is a clue for that mirror we already smashed.
Let's check out that secret room now.
__T+Eng1.00_Gaijin+Suicidal_-44.png)
A water fountain that kind of looks like a dragon from here, and another Log. Take the Log.
__T+Eng1.00_Gaijin+Suicidal_-52.png)
This is the message the first time you Look at it. Looking again, however...
__T+Eng1.00_Gaijin+Suicidal_-83.png)
Drinking from a mysterious fountain in a flooded basement full of corpses and poisonous monsters? I don't see why not. (Yes)
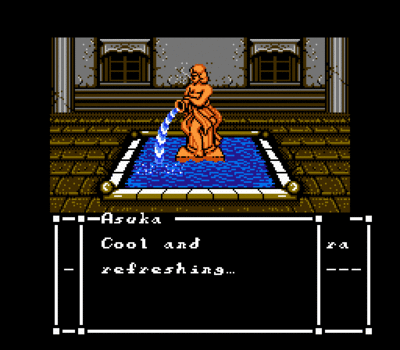
Something... isn't right here...
"A voice booms... Hehe... Fools! You drank the blood of my victims! Sooner or later, your blood will flow!!"
__T+Eng1.00_Gaijin+Suicidal_-93.png)

__T+Eng1.00_Gaijin+Suicidal_-94.png)
You can drink it again if you want. Nothing happens though. It still says it's cool and refreshing.
Anyway, let's check out that southwest room.
__T+Eng1.00_Gaijin+Suicidal_-45.png)
A very old bronze statue, a Log, a Doll, Tonic, and Pail. The statue can't be removed at this point, and the doll doesn't do anything. We need both the Log and Pail, but the Pail is most important right now.
Backtracking to the previous room and taking the northwest door.
__T+Eng1.00_Gaijin+Suicidal_-48.png)
Log, Match, Fresco, and Broom. Also hidden in the lower right corner is Gloves. I mostly found that by luck, because you can't cross over that square. It'll be useful in the next update.
Fresco: 3-25 Blood will melt aged bronze.
Starting to put the pieces together? We use the Pail to grab the blood from the fountain, then use it on that old bronze statue in the bedroom.
__T+Eng1.00_Gaijin+Suicidal_-98.png)
Like so.
__T+Eng1.00_Gaijin+Suicidal_-99.png)
The mirrors in this hall are harmless, and you can't smash them. To the far left is a Wire, and nearby are Pills.
__T+Eng1.00_Gaijin+Suicidal_-102.png)
Pipe. I can't remember if it does anything. Should I take it anyway?
__T+Eng1.00_Gaijin+Suicidal_-103.png)
Finally, we're outside.
__T+Eng1.00_Gaijin+Suicidal_-104.png)
__T+Eng1.00_Gaijin+Suicidal_-105.png)
__T+Eng1.00_Gaijin+Suicidal_-106.png)
__T+Eng1.00_Gaijin+Suicidal_-107.png)
__T+Eng1.00_Gaijin+Suicidal_-108.png)
Everyone except Kazuo is pretty beat up, but we shouldn't be too long out here.
Next time, skull pillars and a sudden surplus of item space!