Part 23: Update #23 Techniques used in stage 1 & 2 + Breakdown
^^^^^^^^^ I know right? Here's the full song:
Update #23
Let's have a wall-of-text breakdown of the moves I've been using so far

If you need a refresher on their animations, check out these two videos:
Techniques used from Stage 1-1 to Stage 2-2
Techniques used from Stage 2-3 to 2-7
Note:
"Counter-hit property" also counts as "Against stunned/dizzy opponents"

Punches are your main bread and butter and DPS, best used for your square slots combo (you start with 4 and can buy two upgrades at the shop to get up to 6 slots total.)
Chin Music
Damage: 3-4 (a two-hit move, first hit deals 3, second deals 4)
Pros: Fast startup and recovery; easily cancelable; great to stun dudes after a guard breaker
Cons: Shit damage; not much use apart from stunning dudes
Note: Chin Music's recovery animation is twice as slow in the JP version
Floating Butterfly & Stinging Bee
Damage: 6-6-10 & 8-8-10
Pros: Fast; good damage; great to stun dudes after a guard breaker
Cons: Enemies can block the attacks and will counter you if you don't cancel fast enough
Elbow Spin 1 & 2 & 3
Damage: 4-4 & 8-8 & 12-12
Pros: Good damage for version 2 and 3, ver. 1 not so much
Cons: Shittier and slower version of Chin Music; awkward to cancel.
Note: Looks cool in the middle of a square combo
Elbow Vortex
Damage: 6-6-10
Pros: Good damage; good for closing distance with enemies; good as combo-ender to look cool
Cons: Recovery animation is slow
Drunken Fist 1 & 2
Damage: 9 & 18
Pros: ok speed and damage; has a "kick" property that will knockback enemies
Cons: none, except it's easily spammable
Overhead Blow
Damage: 22
Pros: good damage; fast speed; has a "kick" property that will knockback enemies
Cons: none

Since most kicks have a Launch or Trip property, it is unwise to use them in your square move slot, unless you're doing it for style or place kick moves at the end of the square slot, this way you can cancel the square combo before you reach the slot you put a Kick move in.
High Side Kick 1 & 2 & 3
Damage: 10 & 20 & 30
Pros: fast animation; great overall
Cons: easily spammable (wall-kick spam)
Counter-hit property: launch
Step Back Kick
Damage: 25
Pros: great damage; can be used as alternative for backflipping (no i-frames though)
Cons: can be awkward to use and might whiff; the step back have very few i-frames if none at all
Counter-hit property: launch
Note: fast sidestep+backstep cancel utility similar to Nero's Table Hopper ability from DMC4
Low Kick 1 & 2 & Godly Low Kick
Damage: 6 & 12 & 20
Pros: fast animation; good for juggle setups on grounded enemy
Cons: none
Counter-hit property: trip (enemy falls on the ground)
Triple Side Kick
Damage: 6-6-6
Pros: ok damage; fast animation; good for stun
Cons: will push enemies away
High Snap Kick
Damage: 5-5-5
Pros: ok damage; good for stun
Cons: shittier and slower version of Triple Side Kick; will push enemies away
Right Roundhouse 1 & 2 & 3
Damage: 12 & 20 & 28
Pros: good wide range; good damage
Cons: enemies can dodge it and will counter you
Counter-hit property: trip
Back Roundhouse
Damage: 36
Pros: wide range; huge damage; great setup to trip enemy after a Launch
Cons: very slow startup
Counter-hit property: trip
High Kick
Damage: 16
Pros: decent
Cons: none
Counter-hit property: launch
Left Roundhouse
Damage: 18
Pros & Cons: similar to Right Roundhouse
Counter-hit property: trip
Note: can't be cancelled in the JP version for some unknown reason
High Cross Kick
Damage: 28
Pros: great damage; looks cool
Cons: none
Counter-hit property: launch
Reverse Sweep (not the default Reverse Sweep move, the other one)
Damage: 6 as opposed to 8 compared to default Reverse Sweep
Pros: faster than the other Reverse Sweep
Cons: does 2 less damage than the other RS
Counter-hit property: trip
Note: Evade High Attack property

Guard Breakers let you break the guard of enemies who are blocking (duh), leaving them vulnerable for a couple seconds. Most of the Break Guard moves however are unpractical on level 3 and DIE level since enemies block for a shorter time than on level 1 and 2. It's best to stick with a fast and easily cancellable move like "Guard Breaker" or "Spinning Backfist" than being fancy with a "Haymaker" or "Spinning Sobat" since they are so slow.
Guard Breaker
Damage: 2
Pros: Fast startup and recovery; easily cancelable
Cons: none
Note: Guard Breaker moves don't build stun meter
Spinning Backfist
Damage: 4
Pros: none
Cons: awkward to use; slightly slower than Guard Breaker
Right High Knee
Damage: 10
Pros: has a good meaty feeling when hit connects
Cons: none

Enemy will fly back after being hit. From level 1 to 3, enemies are weak to every launch techniques (Gene's running attacks as well). You need to stun an enemy or break his guard first to launch him on level DIE or Hard difficulty.
Reverse Hell Kick
Damage: 30
Pros: HUGE hitbox and range; huge damage
Cons: none
Counter-hit property: launch
Expert Sobat
Damage: 12
Pros: wide hitbox
Cons: can't cancel it properly; shit damage
Counter-hit property: launch
Note: Is a Guard Break technique in the JP version
Rolling Sobat
Damage: 26
Pros: cool animation; has a good meaty feeling when hit connects; good damage
Cons: can't cancel it properly
Counter-hit property: launch
One-Two Punch (first hit is Juggle, second hit is Launch)
Damage: 16-24
Pros: huge damage; fast animation for the first hit
Cons: enemies can dodge both hits
Counter-hit property: juggle first hit, launch second hit
Note: will lift enemies VERY HIGH into the air with god hand active
Toe Touch Kick
Damage: 35
Pros: huge damage
Cons: slow animation; can't cancel it properly
Counter-hit property: launch

Juggle moves let you lift enemies in the air. Enemies are weak to juggles no matter the difficulty, although connecting a juggle isn't 100% guaranteed since there's a chance enemies can dodge it anyway. Juggle moves will send weaker enemies (the "basic thugs" weight type) right above Gene's bust at Air Launch Kick/Dragon Punch height. Elites or fat enemies aren't affected the same way and will only get lifted at waist height. There's only one Juggle move in the game that will lift Elites at Air Launch Kick/Shoryuken height without the need of landing the attack as a counter-hit like with Charged Punch: Double Snap Kick.
Half Moon Kick
Damage: 10-15
Pros: looks cool
Cons: shit damage; enemies can dodge both hits
Note: has a Evade High Attack property
Rocket Uppercut
Damage: 23
Pros: fast
Cons: enemies can dodge it
Double Snap Kick
Damage: 5-10
Pros: completely broken, can send Elite enemy type at Air Launch Kick/Shoryuken Height
Cons: shit damage; enemies can dodge both hits
Counter-hit property: lift enemies at Air Launch Kick/Shoryuken Height
Somersault
Damage: 14
Pros: animation looks cool
Cons: shit damage; can't cancel it properly
Note: similar melee move present in Vanquish
Stomping Fist
Damage: 19
Pros: great for closing distance between enemy; amazing against Azel and Arena #51 boss (more on that later)
Cons: none
Heel Drop
Damage: 25
Pros & Cons: similar to Stomping Fist, does a bit more damage but is slower
Flying Knee
Damage: 28
Pros: can home-in on enemies; decent for closing distance between enemies
Cons: enemies can dodge it; can't cancel it properly
Hand Plant Kick
Damage: 20
Pros: completely broken; will send basic enemy type at Air Launch Kick/Shoryuken Height
Cons: enemies can dodge it; easily spammable
Note: has a Evade High Attack property (you dodge hits during the first half of the animation)

Moves that let you evade high attacks, a mix of defense and offense. Completely broken, best used with moderation.
Right Twister
Damage: 15
Cons: slow speed, not much else to say
Drunken Twist
Damage: 18
Cons: easily spammable by scrubs, not much else to say
Drunken Fall
Damage: 25
Pros: ok damage
Cons: easily spammable; can't cancel it properly; slow recovery animation
Counter-hit property: launch
Chin Rocker
Damage: 8
Pros: ok speed
Cons: shit damage

Moves that can be charged. Charging a move will multiply its base damage. The ingame description for Charged Punch 2 states: "Charge this attack to the limit for quadruple the power!" except it's a lie, see pic related:
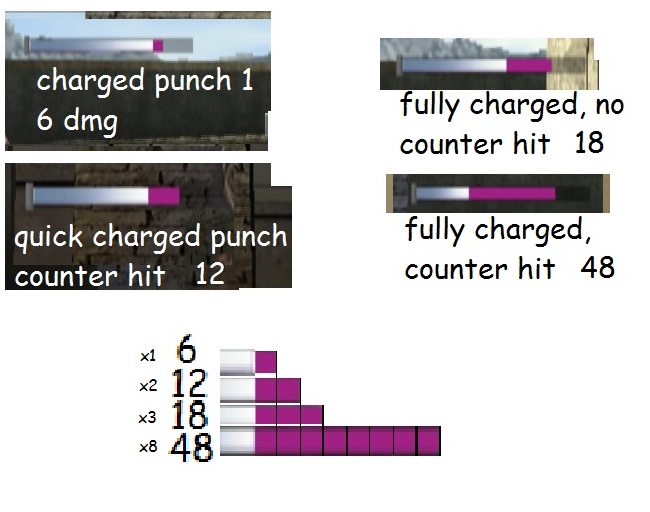
A quick Charged Punch 1 deals 6 damage while a fully charged deals 18 damage.
6 x 4 = 24, not 18. It's 6 x 3 = 18
Charged Punch 1 2 3 4 and God Charged Punch
Damage: 6 & 8 & 12 & 16 & 30
Pros: must-have for crowd control and counter-hits shenanigans; will lift enemies at bust height if not charged, great for Kick follow-up to launch enemy and get a breather
Cons: enemies can dodge it
Counter-hit property: sends enemies at Air Launch Kick/Shoryuken height
Note: see Invincibility-Frames Extension
Fist of Justice
Damage: 16 (not charged)
Pros: huge damage when charged
Cons: none
Counter-hit property: launch enemies when charged
Note: see Invincibility-Frames Extension

Only one move in the game has this property, Yes Man Kablaam. As explained in a previous update, its main use is to gain some God Hand meter back. Something that the game doesn't tell you though is that YMK has a Guard Break property. The move itself is very unpractical since the startup animation is awful.
Yes Man Kablaam
Damage: 10
Pros: give huge chunk of God Hand meter back; easily cancelable; funny to use
Cons: slow animation