Part 31: Interlude: Mechanics
Interlude: MechanicsToday I’m going to do something a bit different, and talk about how the actual game works for a bit. I’ll go over what all the characters do, what they’re good and bad at, how their items are set up, and then I’ll explain the incredibly important and totally opaque mechanic you need to understand to properly complete the game. I’ll do this again later when we finish up the party and have some more skills, but this is a great time to talk about things. Let’s get started the only right way, with Neptune.
Neptune:
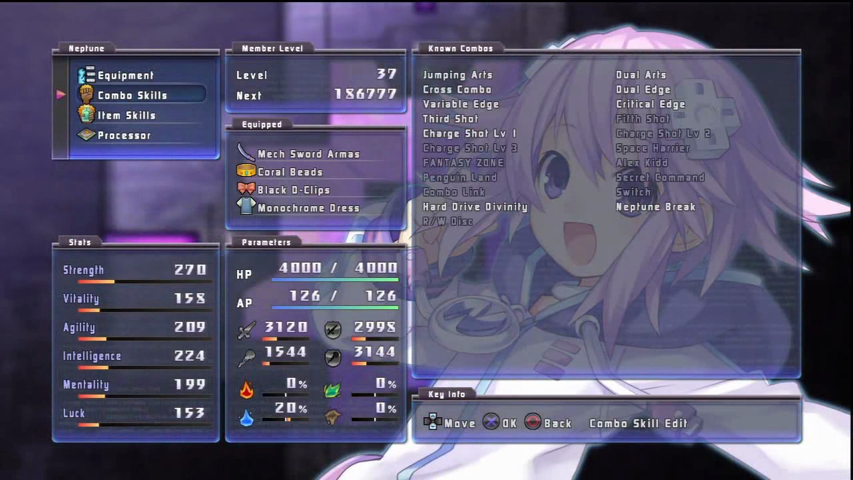
So Neptune is by far our strongest character at the moment. She’s got great stats in every category, though this is deceptive because her weapons don’t tend to have good Magic Attack which leads to her not generally getting much use out of magic damage effects. Neptune’s definitely the hardest character of our current ones to set up combos for, and let’s talk about why for a few.
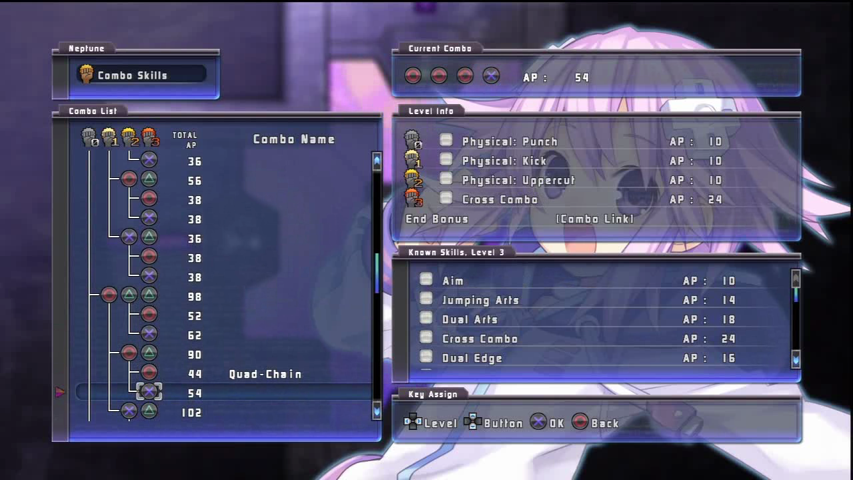
So, Neptune’s combos have to fill a lot of roles is the big problem. We need a combo that lets us transform, because there is never any reason not to in this game. We need to have access to Neptune Break, because that’s how we sweep through trash fights quickly. We would like to be able to Switch and take advantage of our back line, but we also would like to take advantage of how granular Neptune’s Combo Links are by having access to the powerful Cross Combo as well as a cheaper link. So, one thing to consider is that Neptune’s strongest attacks are her Circle hits. We’d like to as much as possible build our combos around them. My main combo, thus, is built in Circle. I actually branch off of it to end in a Switch on one hand, and built a secondary combo in Cross to take advantage of Cross Combo. My Transform section in Triangle isn’t really ideal as I think of it, I should have Dual Edge on Circle there so that I can take advantage of the fact that it acts as a Combo Link if we’re Transformed.
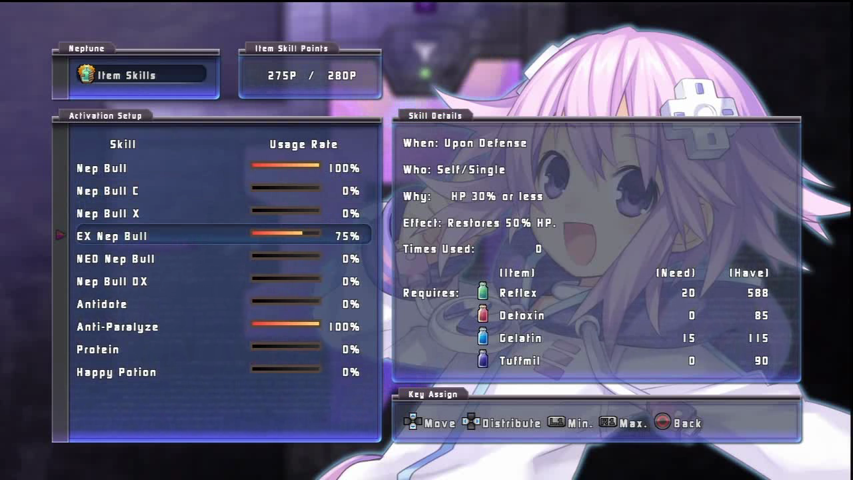
Now let’s talk about Neptune’s items. So just like Neptune, her items are all about her. Her Nep Bull line are all self heals with varying powers and conditions. The main line are increasingly large Upon Damage items that trigger at increasingly low health. For most situations the main Nep Bull works well, a 30% heal when you are damaged below 50%. EX Nep Bull heals like Nep Bull C when you defend, which gives you more control over it but also means you need to actually get a turn for it to happen. NEO Nep Bull is similar, but works when you Switch. Nep Bull DX is a massive heal if you are at critical health at the end of your action, which is an interesting option but can be really scary in the situations where you actually need such a large heal. Antidote and Anti-Paralyze are self status cures, set them if you’re hit by them from the menu in-battle. Protein and Happy Potion are kind of cool, they apply a positive status to you at the start of battle (Lunatic and Regen respectively). Lunatic makes you do more damage but prevents you using items and sometimes replaces special attacks with just a normal hit. Regen makes your health regenerate, as you’d expect. Again, nothing Neptune has targets anyone else, so just set her up to help herself like the jerk she is.
Compa:
Compa’s a shooting character, as her magic attack bears out. She’s got alright physicals but they really pale to her shooting. She does a pretty impressive amount of Guard Meter damage, and enough damage in general to be worth using for most of the game. The plot dungeons give you a goddamn broken weapon for her in a chest partway through, which helps a lot. She’s pretty fragile, though, you might want to get the DLC with the swimsuits for the powerful armors it lets you get for everyone.
Compa combos are incredibly simple, just get as many shooting attacks as you can linked with High Pressure until it’s time to switch or defend. Honestly there’s not a lot of reason to get fancy, her regular attacks are pretty decent damage/AP and rip through enemy Guard Meters like crazy (especially if you hit their weakness). I don’t generally bother with disc attacks, because they’re really expensive and detract from mauling things with a giant syringe.
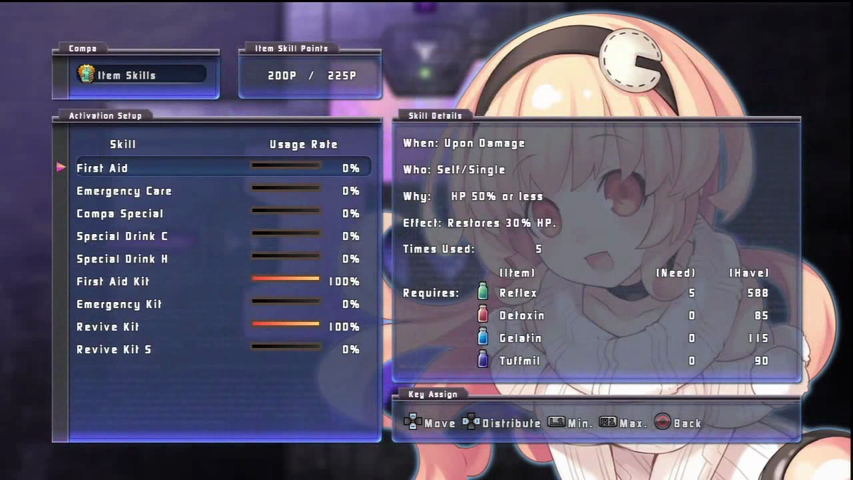
Let’s look at Compa’s items now. She has the standard suite of Self heals that most characters have, three that heal on damage of varying size, one that heals on defense, and one on switching. Her Kits are where she really becomes great, though. Kits happen at the start of her action if their condition is met. The First Aid/Emergency Kit is a group heal and for most of the game is the best way to deal with attacks that hit more than one target. Revive Kit brings back everyone who is defeated if anyone is when her action starts. Revive Kit S is sort of strange, it’s a Switch skill that revives with more health but is crazy expensive. I’d suggest just going with the normal Kit. Compa actually works pretty well without an Upon Damage skill set as long as you’ve got the funding to keep First Aid Kit active.
IF:
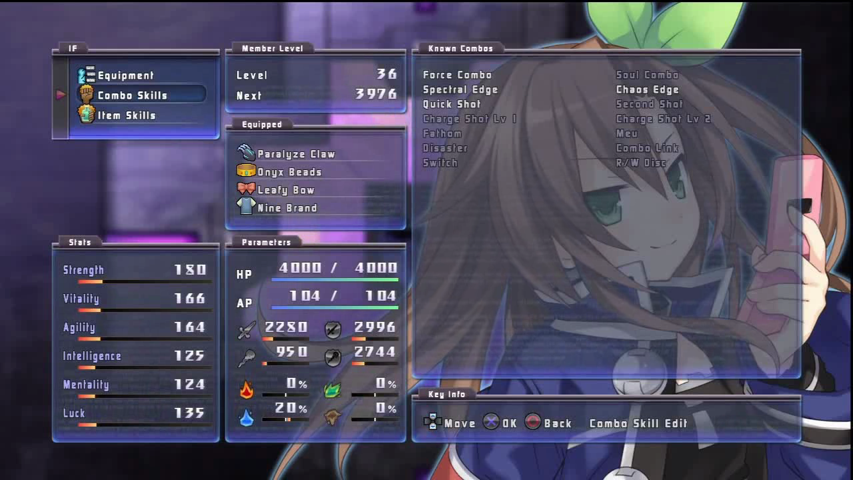
IF is definitely best at physical attacks. She does a lot of Guard Meter damage with her normal weapon attacks, and she can get weapons which cause status effects. I honestly have avoided upgrading her weapon for a bit because I like the paralyze effect more than I will get extra damage from her swings. She’s pretty durable and fast, which makes her a great front end for another character like Compa or 5pb. She’s not that great, though, and is probably the first character you’ll consider sitting once you have an embarrassment of good characters towards the end of the game.
IF’s combos are a lot like Compa’s, build them around basic Triangle attacks because you’re largely using her to chew up Guard Meter. Unlike Compa, you probably want to try and make sure she doesn’t Guard Break if you can help it because she can’t really take good advantage of it.
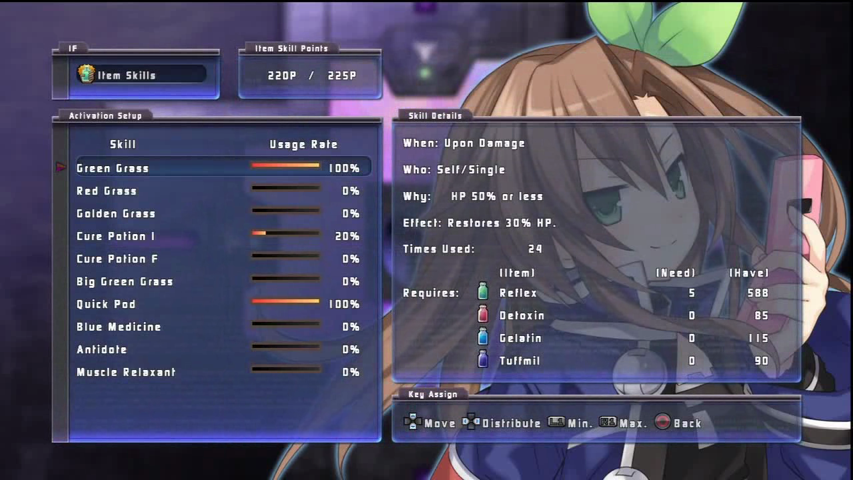
Her items are pretty standard, though her On Defense item is a large heal at critical instead of a moderate heal when low. Big Green Grass is interesting, it’s a large heal on the group at the end of a battle if anyone’s low. It’s a bit expensive, though. Quick Pod is an expensive but useful skill, it’s a large group heal on Action if someone is low sort of like Compa’s Emergency Kit. Be careful, though, because it’ll tear through your stock of materials if you’re having to use it a lot. That idea continues with her next skill, Blue Medicine. This is kind of a cool item, actually, it restores some of her AP when she switches. The cost is pretty crazy, so make sure you’ve stocked up on all your materials before you decide to set it. If you’ve got the materials to support it there’s no reason not to use it, just be careful not to let it wipe you out. Antidote and Muscle Relaxant are interesting, they’ll heal the group a small amount and cure poison or paralysis on Damage. Muscle Relaxant is probably most useful, because poison isn’t that scary in this. So, the overall message of IF’s items is that she does a lot of things okay, which makes her always sort of useful but is also why she gets outshined later.
Gust:
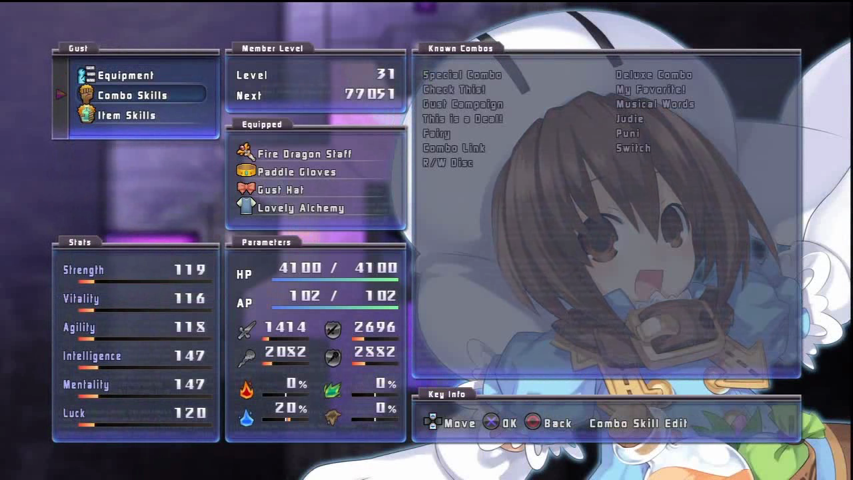
Gust is a magic character like Compa. She’s a bit more durable but not quite as strong offensively. She gets some interesting weapon options that let her use physicals instead, so that’s something to consider for her. She’ll never be as good at it as a real physical character, though.
Gust’s combos should be built around magic attacks (unless you’re using a physical attack weapon, again). She gets pretty standard linking attacks, though you may need to use physical Links and Switches depending on her level. As with everyone who’s not IF and Compa she’ll get a really powerful attack at higher levels, build that in the same way you’d do Neptune Break.
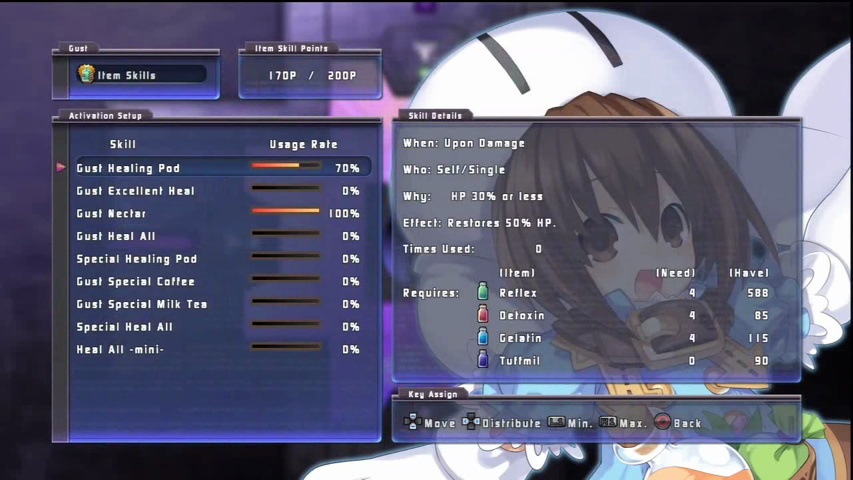
Gust is all about the items. She actually doesn’t really have the standard item suite, she’s got two On Damage items that miss out the standard small heal at 50% or less. Gust Nectar is a revival item like Compa’s Revival Kit, always useful since most characters can’t revive. Gust Heal All is like the First Aid Kit but activates on damage at 50% or less HP instead of On Action. Special Healing Pod is a single target heal on any party member below half when Gust Defends, which is pretty cool though it’s a bit expensive. Gust Special Coffee and Special Milk Tea are designed to work in concert with the next two items and apply the Hi-Tension and Lo-Tension statuses to her. Hi-Tension makes your abilities do more damage and cost more AP, while Lo-Tension is the opposite. These activate any time you act at high health, so it’s easy to keep them active. Special Heal All is a cheap, large party heal that activates whenever she’s damaged if she has Hi-Tension. Heal All –mini- is the Lo-Tension version, which is a smaller but cheaper heal. Special Heal All is honestly a good argument for using Gust as long as you keep your items funded, because it’s really damn hard to kill your party through a 50% party heal after every enemy turn. I don’t use her much, though, because this set up does require a decent level on her and money to fund the items.
Nisa:
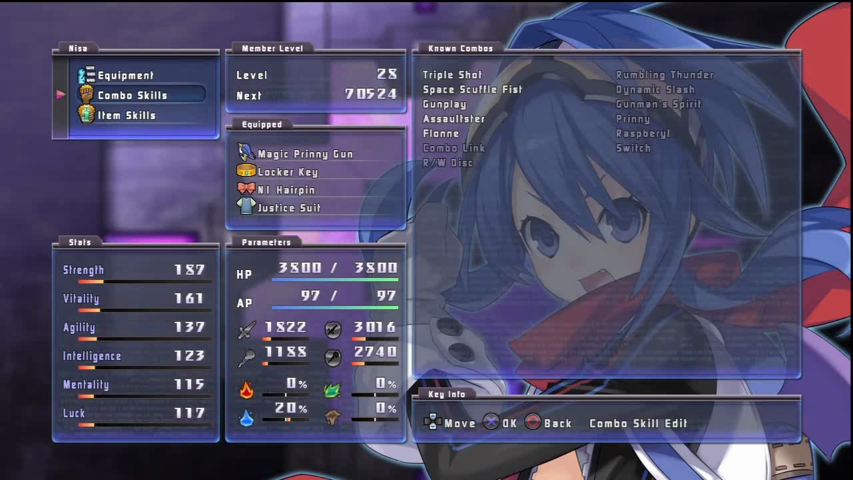
Don’t let her stats here fool you, Nisa is a significantly more powerful physical character than IF. She’s also extremely tanky, taking hits even better than Neptune once she gets some levels together. She might be the very best front line hit taker of them all once she’s up at your party level.
Her Combos are pretty simple, build them around triangle mostly with potential for adding in more powerful AP spenders in the middle (unlike IF her specials are worthwhile to consider and you’re not just trying to get as many attacks out to tear up Guard Meters).
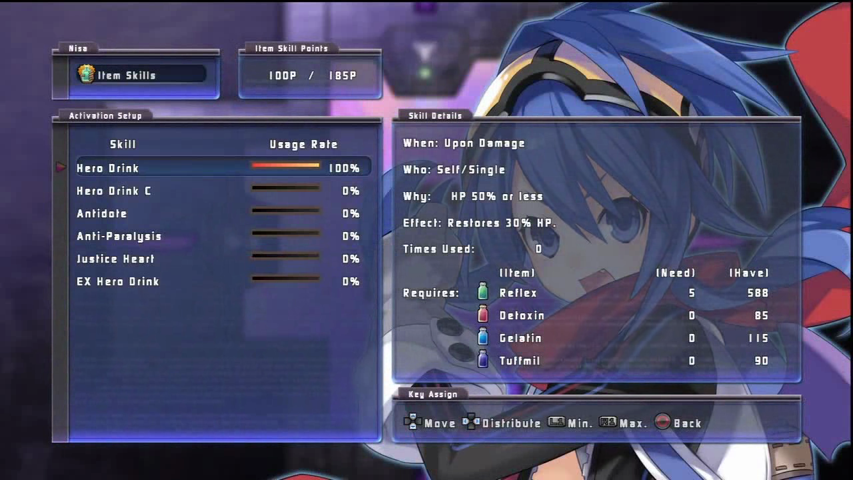
As of this level, her items are pretty simple. She gets a couple of standard On Damage self heals, and can cure Poison and Paralysis as well as heal the group if she’s afflicted on her action. Justice Heart lets her apply Lunatic to herself. It’s spendy but makes her pretty damn brutal, and unlike Neptune it’s okay if she gets taken out (more on this later). EX Hero Drink is like Gust’s Special Healing Pod, it heals an ally who is low health when she Defends. She’ll get more items later, so I’ll talk about them in the second mechanics post then. Bottom line is Nisa owns and you should use her if you have her DLC.
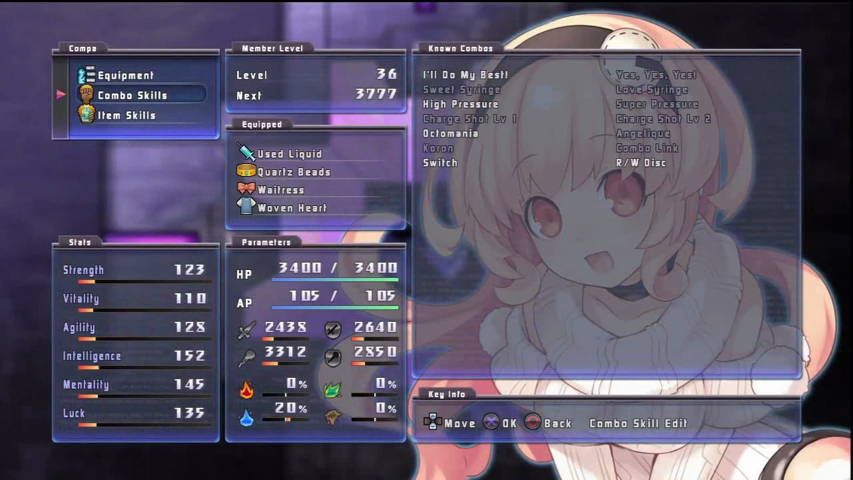
5pb:
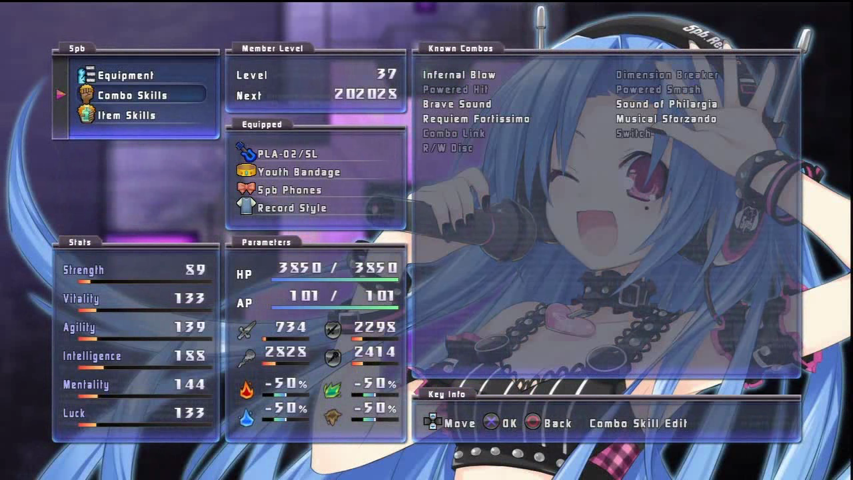
5pb is the best magic attacker and worst physical attacker in the game. She’s pretty fragile, too, so try to insulate her from getting direct enemy attacks. Since elemental resistances don’t mean anything because IF can’t code for shit the items that have a lot of defense at the cost of resistances are a great choice for her.
5pb’s combos are sort of weird, actually. Her magical Combo Links are all pretty expensive and very powerful. You have the choice of either using Sound of Philargia to hit a group or Musical Sforzando to hit a single target with your Link. Brave Note and Requiem Fortissimo are similar but cheaper because they Switch instead, so they’re better to mix into your combos as AP spenders. I need to work more on my 5pb combo honestly because I leave way too many AP of hers unspent that could have been extra Requiem Fortissimos.
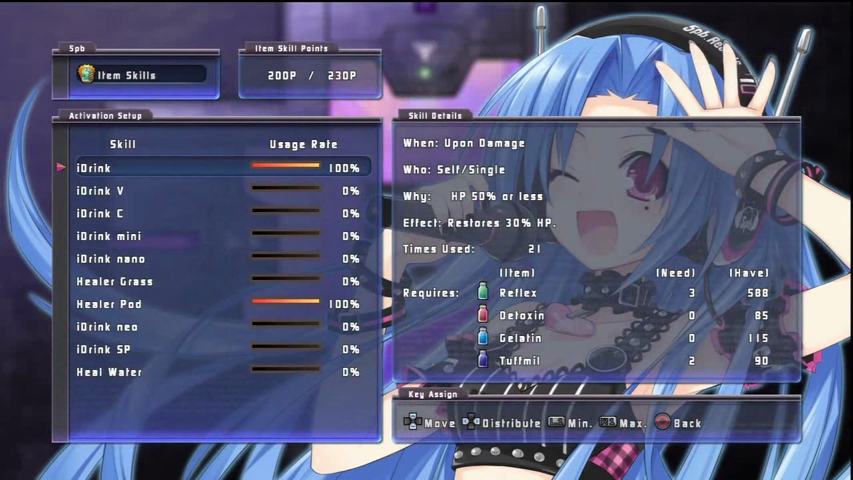
5pb gets a lot of items, the first three are pretty standard On Damage ones just like Neptune’s. The mini and nano iDrinks are both On Defense heals, which she gets two of. Healer Grass is a pretty standard On Switch heal for her. Healer Pod is a smallish group heal On Switch, which is never a bad thing. iDrink neo is a small heal for her if she’s below half at the end of a battle. iDrink SP is a similar large heal for any ally at the end of a battle if they’re below half. It’s a bit spendy, though. Heal Water is iDrink neo, but activates at the start of a battle instead. What all this ends up meaning is 5pb has amazing control over her self healing, even before she gets a special attack that heals everyone.
RED:
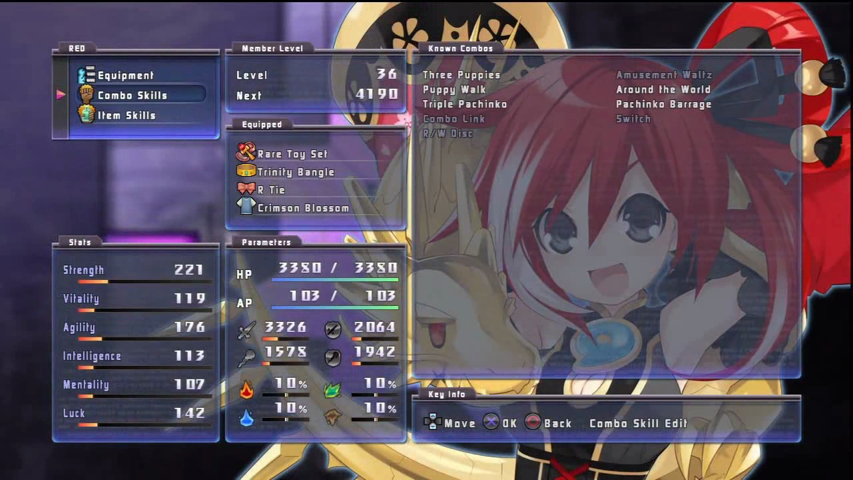
RED has terrible max health and abysmal magic capabilities. This is balanced by the fact that she hits laughably hard with her physical attacks. She unleashes yo-yo based ruination on things with reckless abandon.
So, you really kind of want to build her combo around her cheapest link, Three Puppies. This is because it hits the whole damn enemy party on the cheap, which is amazing. If RED was faster she’d sweep shit even before Neptune got a chance to Neptune Break them. Build her combo like IF’s otherwise (you might want to slip more Three Puppies in honestly to give her better group offense but Neptune Break sort of obsoletes that).
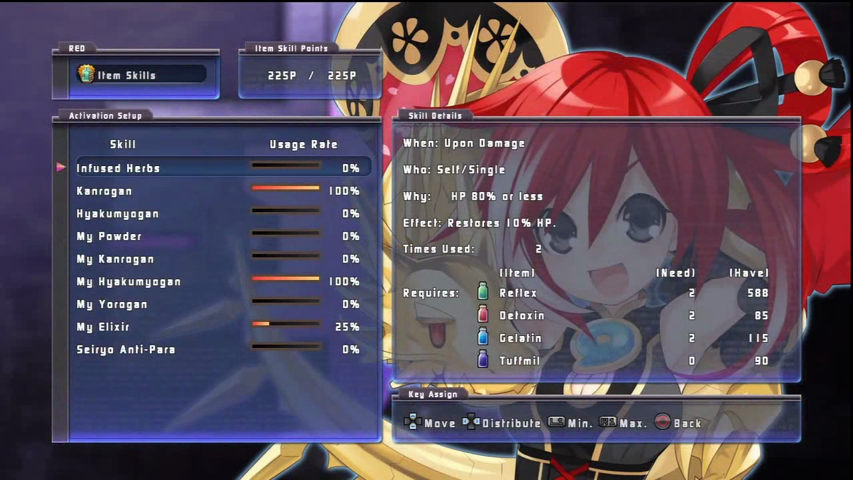
RED’s healing items are so damn weird. She gets a very small self heal that can basically activate on any damage she takes, a relatively normal heal at 50%, and a weird 40% heal at 40% that’s super cheap for such an item but then no big heal at critical. My Powder is a small heal on herself if she’s injured at the start of battle. My Kanrogan is the same when she switches. My Hyakumyogan heals the whole party a little if anyone’s hurt at the end of battle, which is great honestly. My Yorogan is a small self heal if she’s injured when she defends. Do you see a pattern yet? My Elixir is a small self heal when she finishes her action if she’s hurt. Seiryo Anti-Para is a small group heal and paralysis cure if she’s paralyzed and injured. RED is basically all about lots of little heals with no really good way to get herself back up if she gets really low, so be careful.
THE SINISTER SECRET OF SHARES:
Having Nisa in the party lets us see what dungeons will do to Shares. So what the fuck are Shares, you’re asking. You’d be asking with justification because the game NEVER EVER explains what the deal with Shares is.
So, Shares are things that move around when we do non-story dungeons. Each world has a bar of shares, as does a mysterious ‘other’. There’s also a pool of shares that it will pull from until they’re all in play as far as I can tell. When we complete a dungeon in a land, it will give that land Shares. Generally this will come at the expense of another land, because once all Shares are in play it becomes a zero-sum game. So why do Shares matter? Two ways. First of all, the Shares of a land directly impact the combat stats of that land’s goddess when we have them in our party. For now this only matters for Neptune, and means we should try to keep Planeptune’s shares up. Secondly, Share levels in a land unlock new scenes there later on. We’ll need to get the shares up in each land in order to eventually recruit the other goddesses, though we haven’t met the story requirement for that yet so there’s no point messing with it too much right now.
So, a thing to consider is that every time Neptune dies in battle it seems some small number of Shares are PERMANENTLY LOST. This is a bad thing and you should not let Neptune get killed. This is why despite how powerful she is you’ll see me be really gingerly with her on tough bosses.
Messing with Shares is a hassle because this game isn’t as clear about numerically how it’s moving shares around, unlike mk2 where it’s all implemented much better. You just need to watch the pop up on the dungeon that Nisa gives you and compare to the others you have available to see what is going to happen. It’s a real pain. I’ll go into more detail as to how to efficiently move Shares once we get to the point where we need them.
Alright, mechanical interlude over. I’ll be back tomorrow with more plot.