Part 1: Mission 1: Introduction
 Opening Video
"We good? MechWarriors, do you read me?"
"Excellent. Welcome to Port Arthur. You've seen the briefing video?"
"He's with Battalion, waiting for them to patch his Mech up. The drop hit him pretty badly, and we're not sure if his Mech will make it."
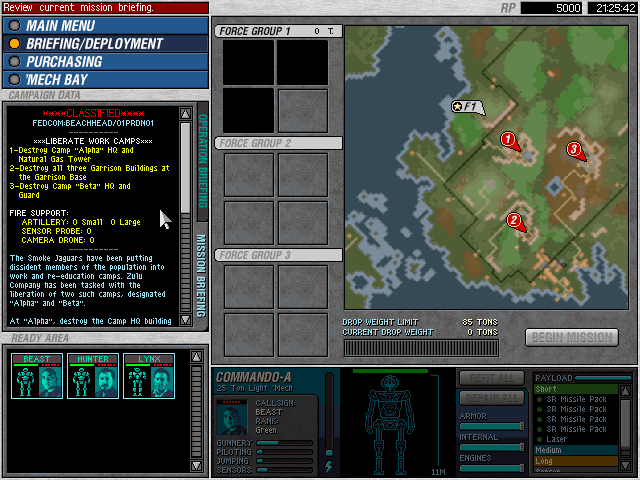
((This is the main screen, from where we will organize our lances, refit and repair our Mechs, and later vehicles, as well as manage all our sundry items.
The upper left contains our menu, where we can go back to the main menu and load our games and change our options. I didn't show it because it's boring. We are currently on the Briefing and Deployment screen. The middle-left, where the mouse cursor is at is the briefing tab. It tells you what you need to blow up, what fire-support missions you can call upon (more on those when we get them), and then fluff for the mission.
Below that is the list of available Mechs and their pilots. From left to right, we have Beast in a Commando-A, Hunter in a Commando-W, and Lynx in a Firestarter-W. The bottom-right frame contains more info about them, pilot status and Mech status.
All pilots have 5 stats. First is Health, represented by the red dots. Being hurt in battle reduces dots, as can ejecting. Less health means a performance degradation, and pilots heal by sitting out of missions. Callsign should be obvious, while Rank determines how heavy a BattleMech they can safely pilot. Green for Lights (upto 35t), Regular for Mediums (55t), Veteran for Heavies (75t) and Elites for Assault (100t).
Gunnery determines how good a pilot is with their weapons. Piloting shows how good a pilot is with handling damage, not falling on ones face, and general ability to get from point A to point B. Jumping determines skill with Jumpjets, while Sensors allows them to keep a better lookout for enemies while in motion.
All skills are improved with use.
In the very right corner, we have the Mech's loadout, as well as the quality of its armour, internal structure and engine. You can't deploy a Mech if the Internals or Engine is damaged in any way.
Weapons come in three range brackets, Short, Medium and Long. There's a Rock-Paper-Scissors relationship between them, but I'll cover that in mission two when it becomes relevant and practical.
The large frame in the middle/upper right allows us to deploy our Mechs and review the map. We can deploy upto 12 vehicles and Mechs, divided into three lances of up to 4 units each. As this is the first mission, we have three slots and three Mechs to put into them. Force Group 1 will start at point 'F1' on the map. Below the map is our drop weight, a further limit to prevent me from doing something silly like dropping 3 Atlases into this mission. Like MW2, you get an end-of-mission bonus for going in under weight.
As a note - my three Mechs weigh in at 80t total, so coming in under is unavoidable in this mission.
The Map itself shows the terrain, where we start, our objectives, and from it we can glean useful information. Solid green patches are forests, black lines roads. Blue is water (Which we can't cross without jumping), brown lines are ridges which are also impassible to movement, but you can easily fire or jump across,while the darker green is general terrain. Finally Orange bits are buildings.
But you see that gradient in the middle, that gets lighter? That's an elevation marker, and the higher you are, the better your sight and weapons. I'll show that off in the mission.
Very top right are the RP's - the in-game currency, and the time on my computer.))
"You three will form up here, at F1. We have a clear path there from the North, and I want all of us there before we make our move. There are three facilities we have to destroy in the area, Objectives 1, 2 and 3.
"Marker 1 has a work camp servicing the Natural gas tower at the same location. We have to destroy both."
"Very explosive. Keep your distance. You have the mid-range PPC, so you'll be the best person for that job.
"Objective 2 is the local Bondsman camp. We can't expect any defectors, so we'll have to deny them the infrastructure, even if nobody's home. Blow all the buildings, then we can move on.
"Objective 3 is the same as Objective 1, just without the Gas Tower."
"Light vehicles mostly. Expect a couple tanks. We've reports of an Uller in the area, so look sharp."
"I know. I'm talking to Battalion about that, and I should have and answer soon. For now, it's called a Firestarter, and we'll stick with it. Besides, any Clanner thinks we're fielding an anti-infantry Mech and responds in kind will be in for a surprise."
"I'll contact you all once you're in position. Command out."
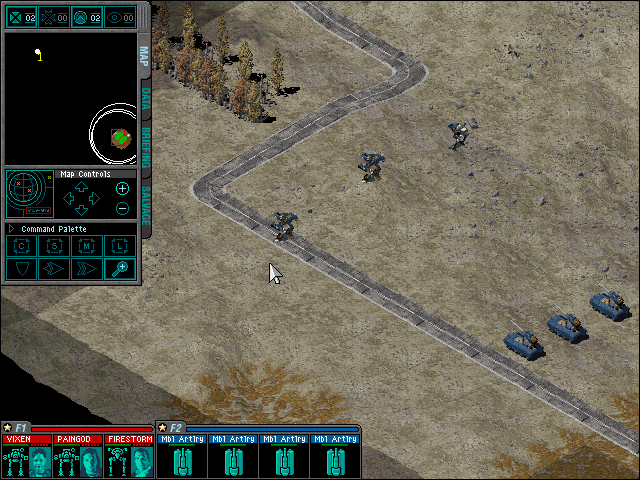
((This is *not* what you're about to see. This is from a different mission entirely to avoid immediate spoilers. Here we have the basic screen I – and by extension you – will be seeing in my LP. The bottom row contains my Mechs and vehicles (which are sometimes added by the mission, like this one), as well as their Lance/Force Group divisions. You can see that I have three Mechs in F1, with the four Mobile Artillery vehicles in F2. They are ever colour coded for my convenience!
Each unit has a small icon to represent it, which gives a quick notation on its status. The image of the Mech changes colour (green -> Yellow -> Red -> Black) to show level of damage to that part, the health of the pilot, and a picture of said pilot. Of note is the green bar which represents combat capacity, and includes such things like ammo counts and armor damage in a more general line. Mechs can be destroyed with this bar still having length left, and this bar can be reduced to nothing and the Mech can still be active – just all their weapons will be shot off and they'll have no armor. Vehicles are much the same, except they tend to be squishier and relegated to a more supportive role than anything else.
The central area is where I command my units, telling them to move and attack, all with the mouse, and some keyboard shortcuts.
But the upper left is the deep command interface, the MFD, or Multi Function Display. There are four tabs to the MFD, and I'll cover each in order. You can hide and reveal the MFD through the 'alt' key, or by clicking the tab in the very upper right of it. But first, the stuff on the bottom that doesn't change, those eight buttons. In order, from top to bottom, left to right, they are:
1)Fire Weapons from Current Position – keyboard 'c'
2)Fire Short Range Weapons – 's'
3)Fire Medium Range Weapons – 'm'
4)Fire Long Range Weapons – 'l'
5)Guard Target - 'g'
6)Use Jumpjets - 'j' (greyed out because nothing of mine has them)
7)Run to destination – 'spacebar'
8)Zoom in/out Main Screen - '+' '-' (I will never use this. Ever. I'm already playing at 640x480, why should I pretend to play at 320x240?)
There was an additional command that would normally go there, but was only added with the Expansion pack. By pressing the 'a' key, then clicking on a target, you will order your Mechs to conserve their (A)mmo, which is something I will use quite a lot.
Additionally, at the top of the MFD is the Munitions bar. We have, from left to right – Small Airstrike, Large Airstrike, Radar Drone and Camera Drone. I'll cover those in the videos as they come up.
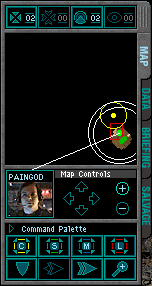
This is a detail of the Map Tab. You can see the fog of war, in addition to my area of sight in the lower right. My objective is marked in the upper left with a '1', and as objectives are completed, they are removed from the map. Green dots are friendlies, with the bright green being the currently selected group or unit. The yellow dot is an enemy contact.
The white circles represent radar range, that being how far into the fog of war each of my mechs can see. Standing still, they are at their greatest range, but moving causes them to shrink. Having a good Sensor skill on your Mech Warrior causes that penalty to be reduced. A Red circle indicates enemy radar range, while a Yellow one indicates that the radar in question is being affected by ECM from an opposing unit.
You can use the arrows and the +/- to manipulate the map, but I prefer the keyboard for that, rather than the mouse.
Also, if one of your pilots is talking, like Paingod here, then their picture will come up as well as a white line showing you where they are at on the map. Useful.
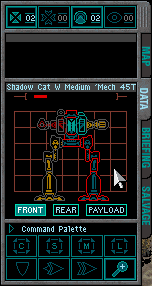
The next tab is the Data tab, which shows you information on the currently selected unit. Which, as you can see by this picture is a very mauled Clan Shadow Cat. There are a couple subscreens here for forward armour, rear armour and payload. Payload lets you see what weapons are available to the Mech, and how much ammo they have left (if any).
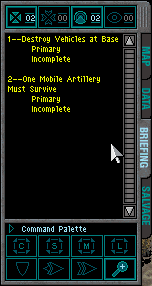
This is the Objectives Tab. They are, as said earlier, numbered according to their location on the map. Yellow Objectives are incomplete, Red Objectives are finished and Hidden Objectives don't show up until they are complete – if at all. However, hidden objectives will always show up in the Mission Success at the end of the videos.
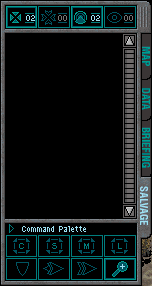
This is the Salvage Tab. It's empty because I don't have any. Salvage only really applies between missions, but having a running tally of what you've got can help. You may see me check this in my videos after blowing up enemy Mechs so I can see if I've got a free Mech or not.
That's it, onto the Mission!))

((I apologize for the bad quality of the video in the game. It's a .smk video being played inside of a frame in the game, and FRAPS doesn't like that, so you get the choppy video. Sorry.))
"Welcome back, MechWarriors. I trust your trip back was relaxing?"
"I'm looking through the files now, Lynx. Hrm."
"Ah, here we go. Looks like there are reports from Yankee and other parts of Zulu that the Smoke Jaguars are fielding Sphere 'Mechs for their garrison forces and Bondsman. That would have been nice to know before going into the mission."
"Well, nobody has any real damage to their 'Mechs. Battalion will have them fixed up and restocked inside four hours. No viable salvage from either Mech you guys put down, but the storage containers did come with some LRM racks with ammo, as well as a couple spare Lasers. Nothing to write home about."
”Well, that's enough for now guys. I'll be in touch once we've got our next mission.”