Introduction
Spread Your Wings and Fly. Let's Play Atelier Escha & Logy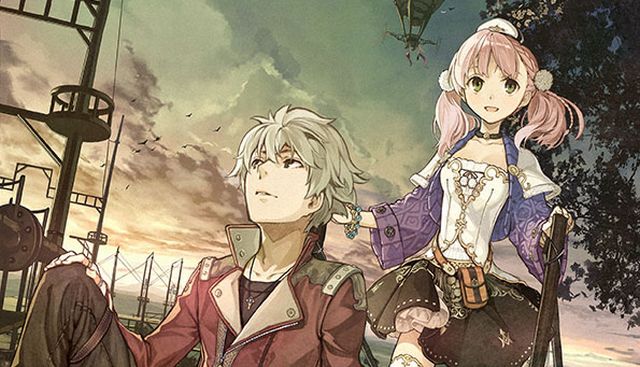
A little introduction
2013 / 2014's Atelier Escha & Logy: Alchemists of the Dusk Sky is the fifth Atelier game to be released on the PS3, but most certainly not the last (with the sequel, the third game in the Dusk Trilogy, Atelier Shallie: Alchemists of the Dusk Sea, released a little over a month ago in Japan). This title is a sequel to Atelier Ayesha, taking place a few years later, but in a totally different part of the world. In this world, humanity finds itself on the edge of another civilization-ending catastrophe, another Dusk. Indeed, the names of the title characters are taken directly from a branch of theology called Eschatology, which concerns itself with the end of ages, eras, and / or histories.
But this game isn't really about that. It's the personal story of Escha Malier and Logix Ficsario as they fulfill their different, but eminently related, lifetime goals. Although two characters share the spotlight in this game, no matter what, this game's plot is their journey together.
LP Structure
Although I liked writing as Ayesha in my Ayesha thread, I eventually came to feel I didn't go far enough with that thread's main theme. As such, I'm going all the way with this game. I won't deliver any commentary as myself, instead choosing to speak through the words I invent for Escha and Logy. Italics after Escha and Logy's portraits indicate dialogue I made up, not in the game but wedded to it. As with my previous Atelier threads, I'll be showing off all the substantive DLC (additional characters and dungeons), as well as everything in the main story.
But, I should establish something before we begin. Before this game begins, you can choose either Escha or Logy for the main protagonist. Whoever you choose influences the game in a few important ways. The starring character will have more scenes than the character not chosen, you'll hear their thoughts in cutscenes, and they'll appear on-screen in the field and in town. While neither the plot nor gameplay change considerably between characters, there's only so much you can see in the game playing as the character you do end up playing as. This also includes endings that are exclusive to each character. For the purposes of this LP, I'll be doing two playthroughs: one as Logy, and one as Escha. For the LP, I'll be integrating the two playthroughs as much as I can to give you the whole game in one package.
As such, I won't show every scene for both characters in this LP. Such a venture would feel bloated to me, and it's just not what I want to do with this thread. The primary idea for this thread is to integrate the storylines of both characters into one cohesive whole.
An additional note
Some of you may have heard that this game had an anime that aired earlier this year, the first Atelier game to get an anime adaptation (for a series that's been going on for like 20 years, and is unspeakably anime in almost every way, that's pretty surprising). It's actually not bad, in spite of its limited budget, and an enjoyable watch if you ask me. As an adaptation, instead of a straight retread of the game it's based on, the anime's plot takes its considerable liberties with the game's story and tells something quite a bit different from the game. There are a lot of minor and big differences between the anime and game (such as Escha knowing two characters at the start of the game, but meets for the first time early on in the anime on-screen), but nothing too earthshaking.
By all means, if you want to see the plot develop in a different way, give the anime a watch if that's your thing.
Spoiler Policy
Same as it ever was for my threads. No talking about stuff I haven't talked about unless in spoiler tags.
Table of Contents
Chapter I: The Alchemic Boy and Girl
Chapter II: The Enterprising Lad and Lass
Chapter III: The Pint-Sized Merchant and Herbalist
Chapter IV: The Lonely Road and Village
Chapter V: The Adventurous Mage and Swordsman
Bonus Update 1
Chapter VI: The Deserted Plains and Ruins
Chapter VII: The Evergreen Mountain and Atelier
Chapter VIII: The Sweltering Path and Desert
Chapter IX: The Thirsty People and Settlement
Chapter X: The Sorrowful Memory and Body
Bonus Update 2
Chapter XI: The Passionate Gofer and Team
Chapter XII: The Ambitious Project and Plan
Chapter XIII: The Abyssal Depths and Graveyard
Chapter XIV: The Hotblooded Manager and Bartender
Chapter XV: The Shining Swords and Staves
Bonus Update 3
Chapter XVI: The Blazing Wasteland and Mountains
Chapter XVII: The Supportive Friend and Confidant
Chapter XVIII: The Overeager Mechanic and Engineer
Chapter XIX: The Courageous Pirate and Butler
Chapter XX: The Fateful Materials and Syntheses
Bonus Update 4
Chapter XXI: The Mysterious Lab and Research
Chapter XXII: The Soaring Hopes and Dreams
Chapter XXIII: The Enigmatic Place and Voice
Chapter XXIV: The Incompetent Decision and Command
Chapter XXV: The Crimson Bow and Arrow
Bonus Update 5
Chapter XXVI: The Enduring Promise and Friendship
Chapter XXVII: The Distant Reaches and Sunset
Chapter XXVIII: The Prescient Uncle and Troublemaker
Chapter XXIX: The Dangerous Expeditions and Adventures
Chapter XXX: The Triumphant Hero and Heroine
Bonus Update 6
Chapter XXXI: The Grateful Traveler and Medic
Chapter XXXII: The Last Stories and Tales
Chapter XXXIII: The Final Decision and Choice
Bonus Update 7
Endings
Chapter XXXIV: The Great Chances and Opportunities - To Each Their Own Journey
Chapter XXXV: The Great Chances and Opportunities - Busybodies
Chapter XXXVI: The Great Chances and Opportunities - There Were Just the Two of Us
Chapter XXXVII: The Great Chances and Opportunities - Great Expectations
Chapter XXXVIII: The Great Chances and Opportunities - Tea Time
Chapter XXXIX: The Great Chances and Opportunities - The Wild Blue Yonder
Chapter XL: The Great Chances and Opportunities - Reyfer Luckberry and The Last Crusade
Chapter XLI: The Great Chances and Opportunities - The Sky is the Limit
Chapter XLII: The Great Chances and Opportunities - Farewell is for Tomorrow's Sake
Mechanics Post
This is going to be a short, non-update update on how the mechanics of the game works behind the scenes, just so that everyone knows how the game is actually played without having to play the game. I understand one key point of an LP is to explain the game's mechanics and how it works, but once you have a theme, you have to stick to it. Anyhow, let's begin.
Job Requests
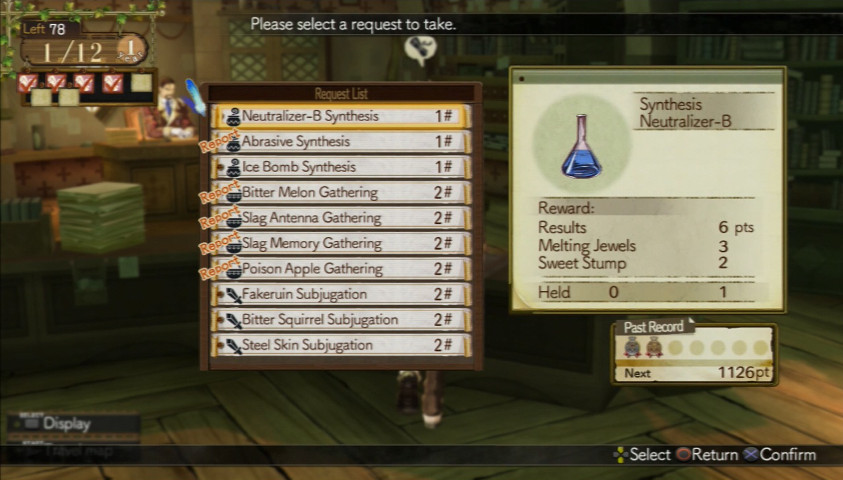
Solle is the only person in the game you can accept requests from, much like the job system in Rorona and Meruru (Totori and Ayesha being exceptions). Every 10-20 days or so, Solle will update his list, and you can accept more requests. Unlike the rest of the PS3 Ateliers I've covered, there's no penalty whatsoever for failing to complete a request. Solle just gives you a verbal dressing down, and you can move on. Requests are good from the time you accept them until the start of a new assignment.
The reason you want to do jobs is twofold: every request gives you a certain point value to leveling up R&D, and most important, candy to fuel the homunculi production lines. So, there's no real need to go out of your way to fulfill Solle's requests most of the time, and the batch of auto-generated requests you've already fulfilled just by having stuff in your Container is usually more than enough to set you on your way.
Leveling up R&D adds lines you can put items in to take on adventures. Escha and Logy both start with one line in their backpack or whatever they're carrying items in, and can add up to five more lines I think. Each line has five slots, and no item in the game can go over five spaces. If you're not like super hardcore, don't even bother leveling up R&D all the way. If you complete all the main assignment requests (the 9 main ones and all the extra ones), you'll level up R&D to the second-to-last level, but you have to do a metric ton of requests to get R&D all the way. As far as I know, there's basically no point to doing that.
Anyway, speaking of the homunculi...
Homunculus Requests
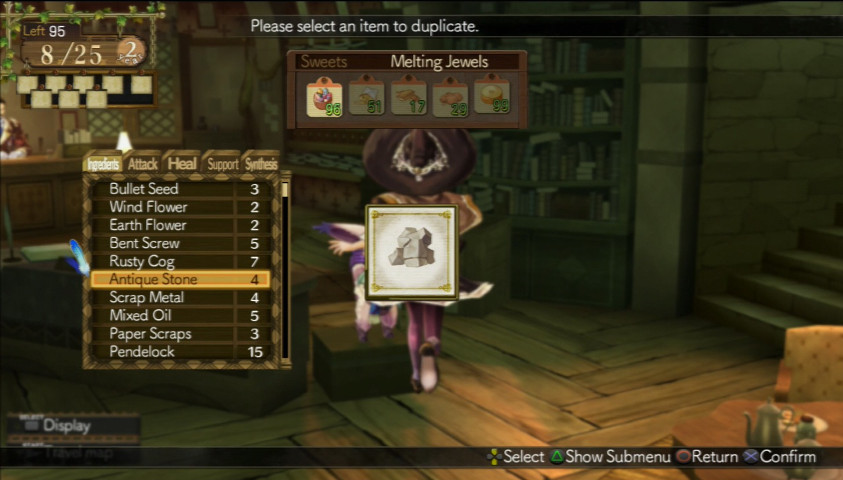
Once Solle gives you access to the homunculi at the start of Assignment 4 (investigate the Abandoned River), you can start using all that candy you've been getting from jobs and putting them towards making copies of anything in your Container (your Container has limitless capacity, just so you know).
Anyway, Melting Jewels and Sweet Stumps are by far the most common two candies you'll get. However, to get the homunculi to do jobs for you in one of the five categories (Ingredient, Attack, Heal, Support, Synthesis), you'll need the appropriate candy, which is as follows:
Ingredients - Melting Jewels
Attack - Dried Taro Chips
Heal - Cloud Financier
Support - Preserved Biscuit
Synthesis - Sweet Stump
So, if you need an item in a particular category, focus on requests from Solle that will give you that particular candy. That's about all there is to that. Homunculi cannot duplicate Search items, like the Dowsing Rod, weapons, armor, or accessories.
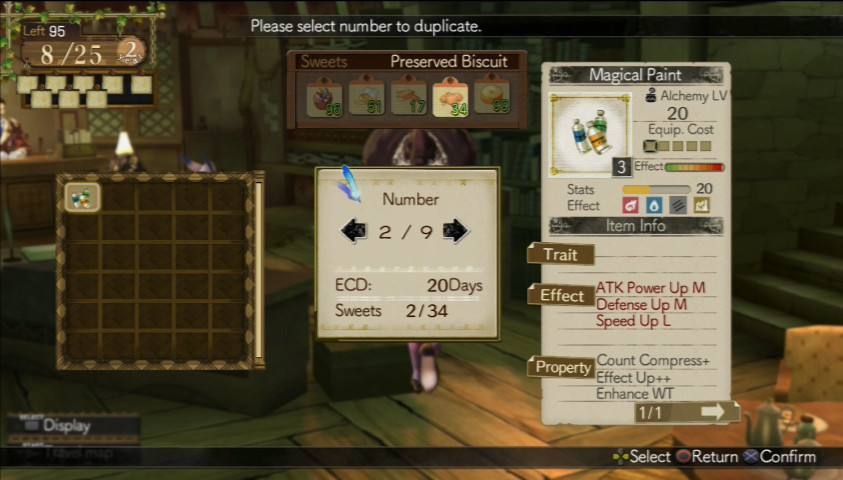
This is the screen for ordering jobs. You can tell the homunculi to make up to 9 copies of a single item on a single order, but you have to pay more candy to make more, obviously (1-1 relationship there). As long as you have open order slots (starts with 3, you can upgrade it to 5 and 10 via R&D experiment books bought from Marion) you can put in as many orders for one item you want. The homunculi take longer to acquire / make copies of rarer items.
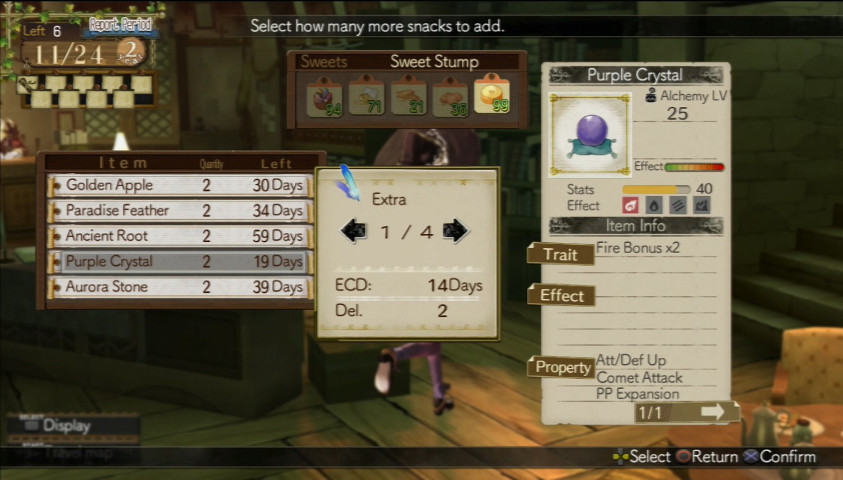
One final note about the homunculi is that you can expedite any order by paying them more candy, up to and including giving the homunculi enough candy to somehow instantly finish the order. Best not to think about how that works too hard.
Alchemy
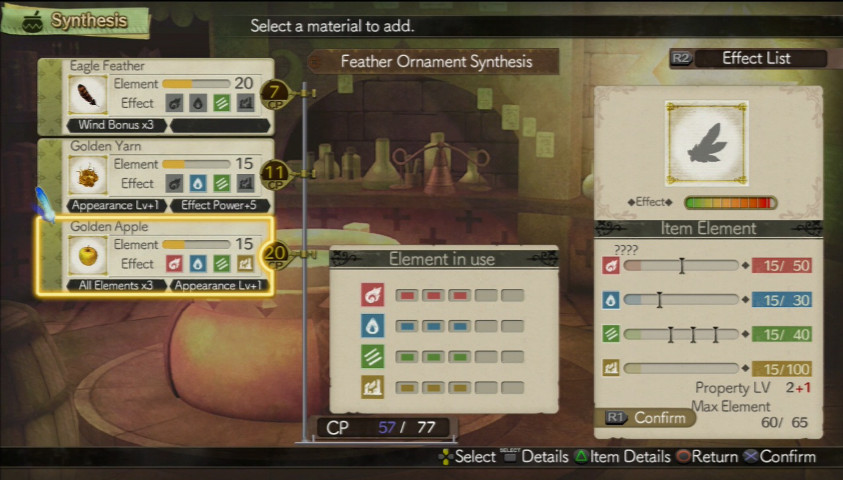
I already went over the most fundamental of alchemy mechanics in a regular update, and have done supplements occasionally, but here's how the system works in simple terms. Each material / item in the game has a specific element or elements associated with it. In this screenshot, for example, the Golden Yarn has one point of Water and Wind. There are four elements: Fire, Water, Wind, and Earth, and you can stock up to five of each point. Any points added after five are completely wasted.
Additionally, sometimes a item can have several of one element or another. The Eagle Feather has 3 Wind Elements, for example, and the Golden Apple has three of each. The Dunkelheit, the best ingredient in the game, has a whopping five of each element. You can see exactly what each item will add in the little black box underneath each item.
The average of all three items will determine was the Effect of the item is (it's directly underneath the picture of the item). The Effect is basically how well it does the stated function. It's mostly closely related to "Quality" from the previous games, but the Effect is not nearly as important as the "Effects" of the tem, which is determined by the four gauges underneath the Effect bar.
By adding enough to a specific one of the four elements, you can unlock effects for the final item, such as making a bomb slow enemy speed or having an item regenerate more HP, etc, etc, etc. You can check out what any one effect does by pushing the select button and highlighting the effect you want to know more about. However, sometimes increasing an element will make an effect go AWAY. This is mostly for items that consume a large amount of MP if you use them. Higher elements can lessen the effect of the MP subtraction or eliminate it completely. While higher values are not necessarily better, this is true for about 95% of effects in this game. If you haven't seen the effect before, it'll be "???" on the property preview screen you can check out by pressing R1 at any time.
Finally, let's go back to making the item. The reason you want element points is to unlock alchemy skills. Alchemy skills include all sorts of things, like increasing the Effect of the item, making more of the item (mostly related to items that don't have a use count), doubling the number value for the item's elements (so in this example, I can have the Golden Apple add 30 to each element instead of 15), or allow you to use an item up to three different times (if you have the skill Perfect Division, which consumes 4 Wind Points, which you get at alchemy level 33). You can only use a skill if you have enough corresponding element points. A key point is you can only use each alchemy skill ONCE in a synthesis.
The Cost Points (CP) system returns from Ayesha. Your CP is determined by some experiments purchased from Marion's R&D "store" (which happens to be the main point of money aside from buying recipe books), but mostly determined by Escha's alchemy level x2. Her alchemy level goes up to 50. She and Logy share alchemy experience, and you can certainly level up as Logy. If you run out of CP, you still have to add the ingredients, but you won't get any element points from the materials.
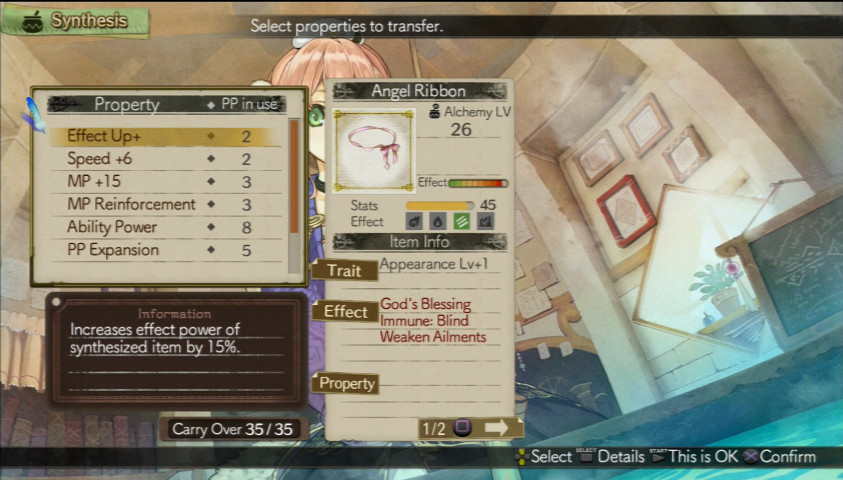
Once you're happy with a synthesis, you can continue on to make the item. The Properties you can attach to an item are determined by the items you threw into the synthesis, as well as making sure you don't go over the total Property Points (PP) you have available. If you ever see a Property +5, PP Expansion or whatever, those traits are automatically factored into the synthesis, and are added onto whatever base PP value you already have. You can increase the number of PP available for syntheses in a particular category by buying books from R&D. There's a bomb category, food category, accessory category, on and on. Simple idea, hopefully.
Also, much like the Atelier PS3s after Rorona, you can only put certain traits on certain items. So, in this screenshot, Ability Power can only be put on accessories (as do most stat increasing properties).
Battles
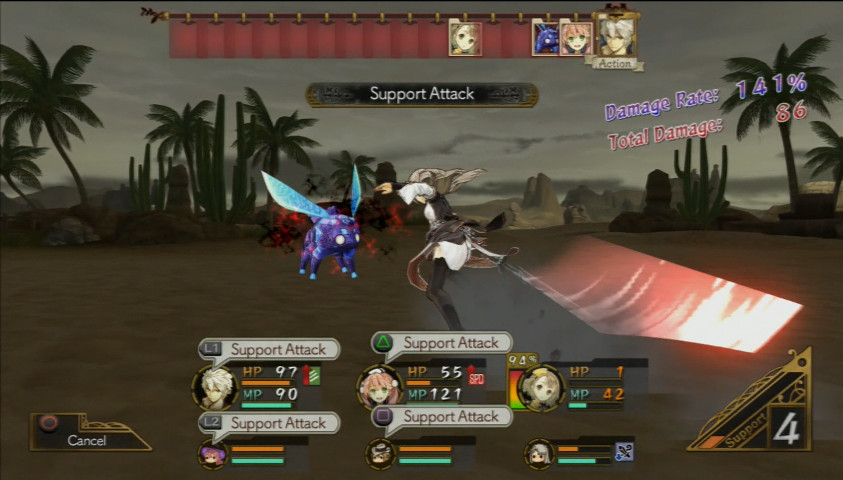
Battles are probably the single most-changed aspect of this game after Ayesha. Your party can be up to six characters at once, and you have to combine your attacks to defeat the enemy. There are a number of changes. The top right is where we start, where the thing that bears most explanation is the Rate. Rate is basically a multiplier added to an attack that increases the damage done normally. So, let's say Linca begins at attack with Rate at 105%. That attack, all things being equal to an attack at Rate 141%, will do less damage.
Support numbers are for attacking and defending. You can attack with a support gauge that is at least at level 1 (with a maximum level of 9), and defend another character with a gauge that's at least 50% full. Once you gain six party members, you unlock special attacks once the Rate goes over 200%. The 200% needs to be reached BEFORE the sixth party member attacks. If you have reached thet condition, the words "Special Support" will flash on the screen, and you'll get to activate a special attack from the party member launching the final attack. For most (everyone except Logy and Threia), this is just a simple damaging attack, but for Logy's Thunder Fall, it'll frequently give Logy absolute priority in the turn order. Very handy. Threia's special support hits the enemy with every debuff, which makes it perfect for follow-up attacks. Every attack (including support attacks) will increase the gauge, but attacks that hit an enemy from the side or from behind will make it increase more. A Slag Essence with the trait Slag Wave on it will add a whopping three points to the gauge.
Super Attacks are available once a character hits level 30. In typical Atelier fashion, everyone except the main characters get one. For every attacking and defending action, that number builds up (for attacks, strikes that hit more than one target will make it increase faster). Once it reaches 100%, you can activate the Super Move for no cost, other than resetting the counter. You cannot follow-up Super Attacks with support skills.
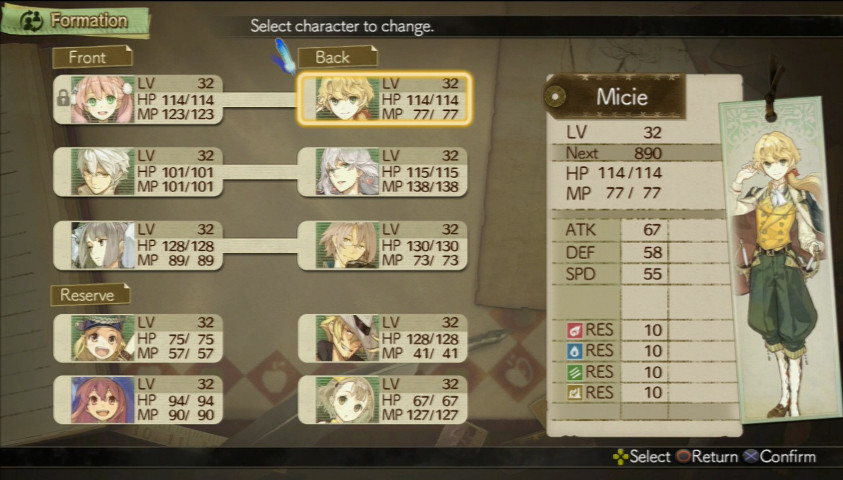
Getting KO'd works a little differently in this game. When a character is KO'd, if they're not revived before they get another turn, a character in the back line will rush in to replace them. From then, you can revive the fallen character, as long as you have the appropriate item (the first KO recovery item you'll probably get is the Cup of Life, which you can use to target the back line if you start to use it but press L1 to target the back line). All six characters at the front of the queue in your party can fight in a battle, if you switch out active characters with back line ones. This system is completely new to this game in the Atelier series. As such, when a character joins, they're in your party for the rest of the game, unlike the recruiting system in the previous four games.
Friendship levels
One of the quirkier aspects of this game is that each character in the game has a certain friendship level that's based on a simple numbering system, but as far as anyone can tell this value is completely hidden in-game. Because this game has character endings, you need to increase character affections to get more scenes with the character, and eventually, the choice to get that character's ending.
Basically, here's how it works. Characters in your active party (the three characters who are on the field at the start of the fight) gain the most friendship points. Characters in the back line get a little less, and characters in reserve get the absolute least. If you keep a character in reserve the entire game, you probably won't see all their events. As another note, your fellow alchemist (Logy for Escha, and Escha for Logy), doesn't work the same way, so as far as friendship points go, having the non-player alchemist in reserve is the best way, but that character's ability to use items is incredibly handy. Essentially, you'll be fine as long as you switch up your party every now and then.
You'll know when you've seen all of a character's events if you see a CG starring that character. Sometimes (like with Linca) all you have to do is see a number of events, but other characters might be a bit more elaborate. Awin is definitely the most elaborate to see all his events, because he unlocks a completely new area of the game on his character path.
You can change your front line, back line, and reserve at any point in town or in the field, but your player character is locked into the front line (as indicated by the padlock next to Escha).
That's basically all the fundamental mechanics of the game. If there's anything else you'd like to know, feel free to ask in the thread, and I'll discuss it as best I can.