Introduction
If you're anything like me, you fondly remember one of Grey Hunter's best LPs, the great War in the East. It was a horribly complex grognard turn-based strategy game, telling the story of Operation Barbarossa, the Nazi German attack on the USSR. In that game, GH guided the Axis armies to complete victory, going as far east as Baku and seizing Moscow in late March 1943.Would you like to see if you can beat that time? Then this might be the LP for you. Were you sorry for the Russians as they forgot to evacuate their industry and only felt vindicated by the time uPen's Soviet WitE LP rolled around? Then feel free to look into this one as well!
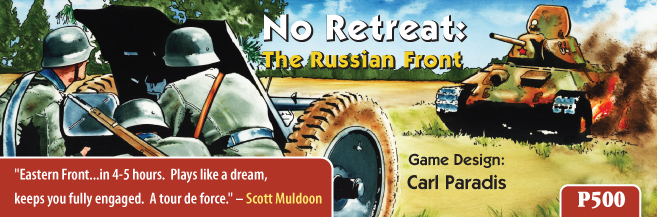
No Retreat! The Russian Front is a 2011 board game by Carl Paradis, published by GMT Games. It allows two players to fairly easily recreate history of the Great Patriotic War, or to change it if their luck and skills permit. It has a lot of the strategic and tactical depth of many bigger wargames on the subject, but nowhere near their overwhelming complexity or detail. Where most theatre-level games can take a day or more to complete and cover several tables with boards and even hundreds of unit counters, No Retreat! boasts that it can take around 4-5 hours and has a grand total of about 60 unit counters (excluding variant units).
It is a really great card-driven wargame and I'd love to play it with you all - and to that end I want to borrow another cue from Grey Hunter and his Goons Take Command LPs. Namely, everyone can sign up and take up some responsibilities in the army of either side with one goon being the supreme commander and appointing other volunteers to command Army or Front Groups. Hopefully it will be fun for everyone involved and will lead to much hilarity as commanders bicker between themselves or misunderstand the superiors' orders. I will also keep a running tally of points I will arbitrarily award to commanders who perform in line of duty (both in-game and in-thread) so that you have some more incentive to compete.
Of course, if we fill in all the spaces with actual command responsibilities, you will still be able to sign up to "command" single Armies/Fronts. In that case, you don't get to make any actual decisions, but you can take part in strategic debates in the doc of your side, gather points in our little scoreboard, and roleplay the commander of your unit. You will also be put on the fast track to actual command, if you will so desire - and I will do my best to keep the rotation in the chain of command fairly rapid.
Axis troops preparing to attack the flanks of the Kursk salient
Basic game concepts
The rules are, even if simple in comparison to the game's big brothers, quite extensive, but basic ideas are fairly simple. This post will lay them out before proceeding to more specific rules. Any mechanics that are not in play yet will be revealed when they become relevant and are considered spoilers until that point, so please don't talk about them in-thread without spoiler tags. Same for everything that happens on the Turn Track.
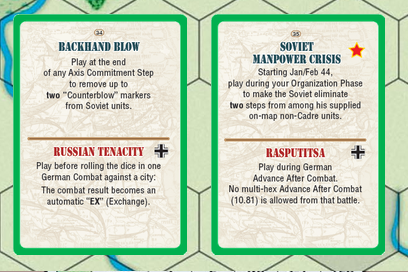
At the start of your side's turn, you will draw a bunch of cards. These will be posted in a Google Drive document that will be private to you and your brothers-in-arms so that you can talk about the cards without the other side bothering you (I would still prefer that card-unrelated planning be done in the thread). Cards are the main driving factor in this game, allowing you to use powerful events, to replace and improve your units, and set up dastardly traps on your enemies. They are explained in more detail in the example of play post, linked at the end of this write-up.
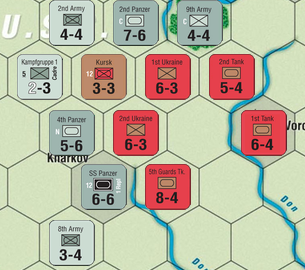
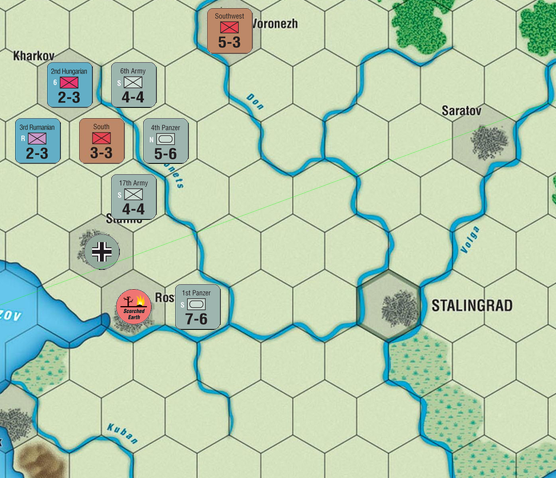
Below are the unit types you will encounter at the beginning of the game.
The grey counters are German units, the brown ones are Soviets. The blue counters represent Axis Allies. German units have two "steps" - that is, when they take a hit, they flip from their dark, full-strength side (as seen in case of 2nd Panzer and 4th Army) to their light, reduced-strength side (3rd Panzer). When they take a hit at their reduced-strength side, they are removed from the board to be reconstituted later. Soviet units are one-step: when hit, they are removed from the board to be rebuilt later. Most Axis Allies (with the exception of Finns) are also one-step, but when destroyed, they go to the turn track to arrive as reinforcements later.
The icons in the middle of the counter indicate the unit type. 2nd and 3rd Panzer are both Armoured units, they get a combat bonus against other types of units in open terrain, but move more slowly through difficult terrain. The 4th Army, West Front and the 2nd Rumanian are all Infantry units, they have no special traits. The Central Front is a Mechanized Infantry unit, which is immune to the bonus Armoured units get. The Leningrad unit is regional infantry - functionally identical to regular Infantry. Finally, the Finnish unit is a Fortress - these units are immobile and cannot voluntarily attack, but are very resilient on defence.
Most units have two numbers on their counters. The one on the left is Combat Strength, which is used to determine possible battle outcomes. The one on the right is their Movement Allowance, which is how far they can move. The Finns only have Combat Strength, because they cannot move, but it is in white to show that they cannot voluntarily attack, and in parentheses to show that they do not exert a Zone of Control (ZOC).
Each unit with its strength not in parentheses has a ZOC. It means that all the hexes around it are somehow controlled by it or its subunits. If your unit enters an Enemy Zone of Control (EZOC), it has to end movement immediately. It can also allow you to cut off enemy Supply Paths.
The Axis forces smash through Soviet positions at the outset of Case Blue
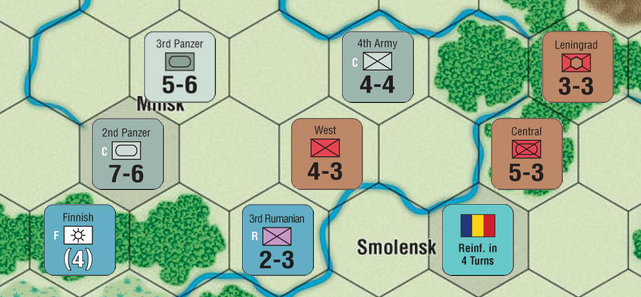
Supply is another key concept. This is very important, so I will lay it out here already. Near the beginning of your turn, you check all units on the map for supply. To be in supply, a unit must be within 4 hexes away from an overland supply source (that is, at most 3 hexes between the unit and the supply source). A supply source is either a map edge in your side's colour (that is, the western map edge for the Axis and the eastern and south-eastern map edge for the Soviets) or a supplied City. A supplied City is one that can trace a line of any length going from it towards a friendly map edge. However, it has to be a line going only westward for the Germans or only eastward for the Soviets, like so:
However, there are also Alternate Supply Sources. The first one is an adjacent friendly unit that can trace an overland supply path. The second is from sea - if your unit stands on the coast, it will be supplied, with some restrictions: the Baltic helps both sides, but the Soviets only as long as they control Leningrad and have it in supply, the Black Sea helps both sides, the Caspian only helps Soviets and the Sea of Azov helps no-one. Finally, the Finns are always in supply in Finland.
Here's an example of supply at work:
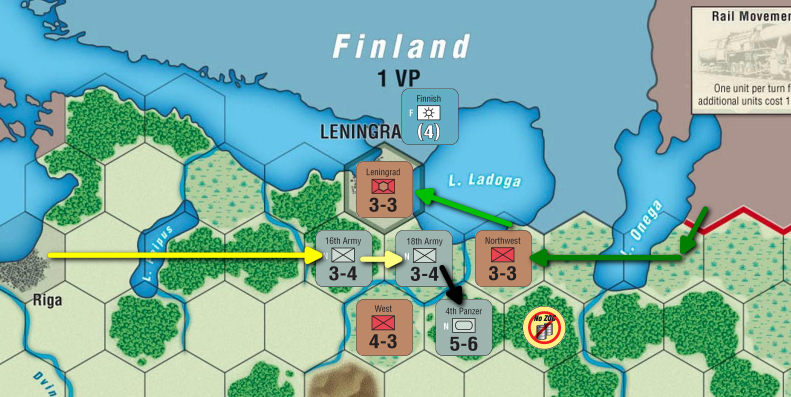
The German 16th Army is just at the edge of the supply range from Riga (yellow arrow) - note that Lake Peipus counts as a hexside that is impassable and blocks ZOC, but - like all lakes - lets supplies through with no problem. The 18th Army gets their supplies from the 16th army (pale yellow arrow), so they are in supply as well. Note that neither the West Front nor the Northwest Front do not block the flow of supply in spite of their ZOCs - that is because friendly units present cancel out EZOCs for the given hex the purposes of supply. The 4th Panzer, however, is out of supply (and there is a marker for it next to it, normally it would have been on the unit): it cannot trace back to the 18th Army (black arrow), as it is itself supplied from an Alternate (and not Overland) supply source. On the Soviet side, the Northwest Front grabs supply from the map edge. The City of Leningrad is also supplied - it has a supply path going across Lake Ladoga (like the Germans have with Peipus, but Ladoga is considered simply a very big non-hexagonal hex), through the NW Front positions and on to the map edge.
Unsupplied units are removed at the end of turn if they can't get back in supply. They also suffer a whole slew of penalties, outlined in the Example of Play post.
Germans preparing to strike during Barbarossa
After checking supply you place units you get from the Turn Track and recreate units you have lost, paying for it in cards. Then you move your units around up to the limit of their movement allowance. Different types of terrain have a different cost to traverse, which you can see in the Charts & Map section of this post.
Next, you designate targets you wish to attack and the opponent may discard cards to make you attack where they want to. Combats are resolved by tallying the strength of fighting units, seeing how they fare against one another and rolling a die to see the outcome. More on that in Charts and Example of Play.
At the end of turn you check unsupplied units to see if they're back in supply range. If not, they surrender.
How to win
To win, Axis forces need to control (and trace supply to) at least three of the five Axis Objective hexes: Leningrad, Moscow, Sevastopol, Stalingrad and Caucasus Oil Fields. Controlling Moscow and the Oil Fields also makes the Soviets lose card draws, which is always nice.
The Soviets need to control (and trace supply to) three out of four Soviet Objective hexes: Konigsberg, Berlin, Vienna and Prague. They can make the Germans lose card draws by controlling the Ploesti Oil Fields, but those are not an Objective Hex for them.
At the start of the game only Axis gather VPs, though this will change at one point, unlocking further ways to win for the Soviets - we'll talk about them later. Bottom line is: Axis want as many VPs as possible as quickly as possible to make it harder for the Reds to win.
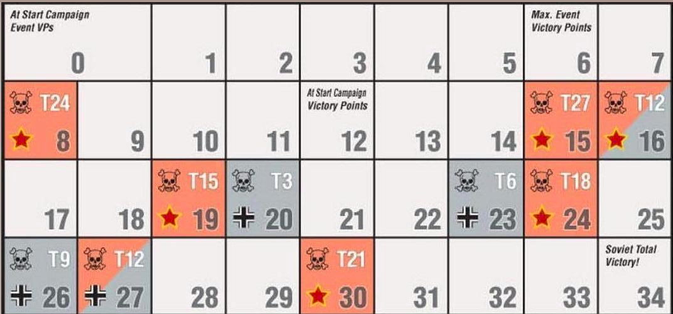
This is the Victory Point Track. As you can see, it has a bunch of "skull" squares in it. Those are Sudden Death thresholds. In a normal game, if a given side has that many victory points at the beginning of the indicated turn (e.g. 20 German VPs on turn 3), they win. This is in place to make the players act with the same kind of insane resilience their historical counterparts exhibited, rather than abandon the front lines early to preserve strength. In this game, however, we want to avoid the game ending too early, so we're going to play with a variant rule. It's called "No Surrender". If the side with the ability to score VPs hits the Sudden Death threshold on time, the other side loses card draws - and cards are quite critical to this game. If the threshold is exceeded, the opponent has to lose even more draws!
You get VPs by capturing cities and oil fields hexes, forcing enemy units to surrender and through some events. Objective hexes count just like regular ones, there are no double points for holding one or anything of the sort.
 Example of Play post is here!
Charts and Map

The Map
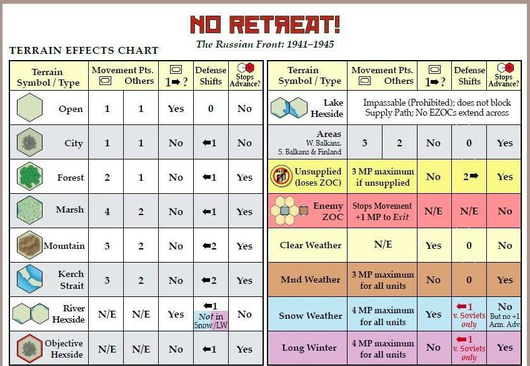
Terrain Effects Chart
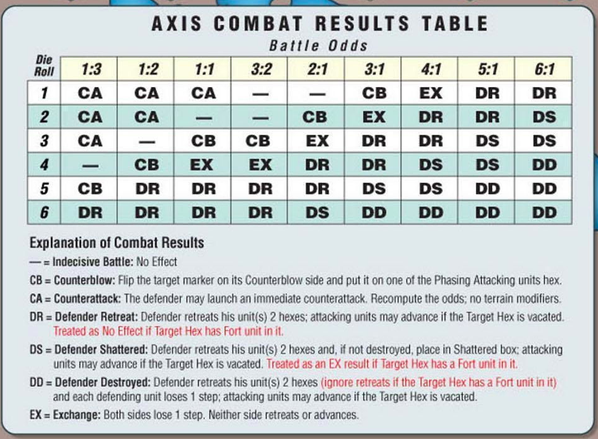
Axis Combat Results Table
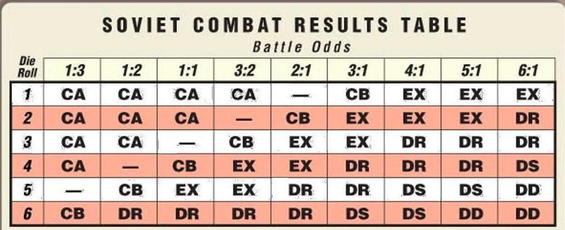
Soviet Combat Results Table
This thread was in large part a common effort. It would never have come to pass without the participation of many goons who stepped up to the task of commanding forces and failing at it. They changed their commands many times over the course of the game, and thus listing them all would take too long to do here. The full list of participants is featured in the final post. I hope that over the course of the game it'll be clear who commands where and gives out which orders. Thanks again to all those who took part!
Also, in the table of contents below, the updates have been named after whichever phase or turn begins in a given post. The resolutions typically follow in the next post. This gets weird sometimes, but I think it's logical and should be easy to navigate.
Table of Contents
- Turn 1 - June 1941
- Turn 1 - Axis Movement Phase: The Preludes
- Turn 1 - Axis Combat Phase: The Border Blitz
- Turn 1 - Soviet Card Phase: The Red Front Collapses
- Turn 1 - Soviet Org Phase: Production Problems
- Turn 1 - Soviet Movement Phase: Look at the Map, Ye Mighty
- Turn 1 - Soviet Combat Phase: Reforming The Line
- Turn 1 - Soviet Detraining Phase: The Battle of Zhytomyr. The Minsk Pocket Surrenders
- Turn 2 - July/August 1941: Where Do We Go from Here
- Turn 2 - Axis Movement Phase: Continuing On
- Turn 2 - Axis Combat Phase: The Towers of Smolensk
- Turn 2 - Soviet Org Phase: Peipus to Luga. Fall of Smolensk. Breakthrough at Odessa.
- Turn 2 - Soviet Movement Phase: Red Army Reborn
- Turn 2 - Soviet Combat Phase: The Mozhaysk Line
- Turn 3 - September/October 1941: Guderian Hesitates, Kiev Surrenders, General Mud Arrives
- Turn 3 - Axis Combat Phase: Luga to Leningrad, Smolensk to Mozhaysk
- Turn 3 - Soviet Org Phase: Not a Step Back! First Leningrad.
- Turn 3 - Soviet Movement Phase: Sevatopol Fortress
- Turn 3 - Soviet Combat Phase: Springing the Trap
- Turn 4 - The Autumn Offensive. November/December 1941.
- Turn 4 - Axis Combat Phase: Across the Muddy Steppe
- Turn 4 - Soviet Org Phase: The Pocket Reopened. NKVD at Second Leningrad. Russian Courage. Fall of Kharkov.
- Turn 4 - Soviet Movement Phase: Defending The Donbas
- Turn 4 - Soviet Combat Phase: The Second Moscow Pocket
- Turn 4 - Soviet Detraining Phase: Savages! New Conscripts. Hitler's Interference.
- 1941 Year Summary: Why Is Defending the Motherland So Hard? I Blame You
- Turn 5 - January/February 1942: General Winter, You're Late
- Turn 5 - Axis Movement Phase: Changing Gears
- Turn 5 - Axis Combat Phase: One More Push
- Turn 5 - Axis Detraining Phase: Third Leningrad. German Winter Offensive.
- Turn 5 - Soviet Org Phase: Velikiye Luki Pocket Closes
- Turn 5 - Soviet Movement Phase: Fortifying Leningrad
- Turn 5 - Soviet Combat Phase: Pocket Reopened, Just Barely
- Turn 5 - Soviet Detraining Phase: The Battle of Volkhov. Battle of Kharkov.
- Turn 6 - March/April 1942: Foreshadowing
- Turn 6 - Axis Movement Phase: Hungarians Arrive
- Turn 6 - Axis Combat Phase: Kharkov Pocket Reopened
- Turn 6 - Axis Detraining Phase: Second Volkhov. Oka Offensive.
- Turn 6 - Soviet Org Phase
- Turn 6 - Soviet Movement Phase: Turning Red
- Turn 6 - Soviet Combat Phase
- Turn 7 - May/June 1942: :cryingmussolini:
- Turn 7 - Axis Movement Phase: Troops From North Africa
- Turn 7 - Axis Combat Phase: The Summer Offensive
- Turn 7 - Axis Detraining Phase: Fourth Leningrad, Ukraine Offensive
- Turn 7 - Soviet Org Phase
- Turn 7 - Soviet Movement Phase: What a Shock
- Turn 7 - Soviet Combat Phase
- Turn 7 - Soviet Detraining Phase: Yeremenko at Fifth Leningrad. Battle of Lozova.
- Turn 8 - Crimean Front Breakout. July/August 1942. Lost Victories 1.
- Turn 8 - Axis Movement Phase
- Turn 8 - Axis Combat Phase
- Turn 8 - Axis Detraining Phase - Sixth Leningrad, The Voronezh Push
- Turn 8 - Soviet Org Phase
- Turn 8 - Soviet Movement Phase
- Turn 8 - Soviet Combat Phase: Blood in the Don
- Turn 8 - Soviet Detraining Phase: Seventh Leningrad. The Don Pocket Snaps Shut
- Turn 9 - September/October 42. Lost Victories 2.
- Turn 9 - Axis Combat Phase
- Turn 9 - Axis Detraining Phase: The Battles of Belgorod and Rossosh
- Turn 9 - Soviet Org Phase: The Aftermath
- Turn 9 - Soviet Movement Phase: The Shovel: A Soldier's Friend
- Turn 9 - Soviet Combat Phase: Operations Perun 2, Veles 2, Son of Veles
- Turn 9 - Soviet Detraining Phase: Success and Failure
- Turn 10 - November/December 42
- Turn 10 - Axis Movement Phase
- Turn 10 - Axis Combat Phase: Mistakes Are Made
- Turn 10 - Axis Detraining Phase: Breakout on the Donets
- Turn 10 - Soviet Org Phase: A Major Offensive
- Turn 10 - Soviet Movement Phase
- Turn 10 - Soviet Combat Phase
- Turn 10 - Soviet Detraining Phase: Hold at All Costs!
- 1942 Year Summary: The Tide Turns Early
- Turn 11 - January/February 43: Die Ghostenbuesters
- Turn 11 - Axis Movement Phase
- Turn 11 - Axis Combat Phase: Taking a Step Back
- Turn 11 - Axis Detraining Phase: Hero City Leningrad
- Turn 11 - Soviet Org Phase: Red Orchestra
- Turn 11 - Soviet Movement Phase
- Turn 11 - Soviet Combat Phase: Payback
- Turn 11 - Soviet Detraining Phase: Chicken and Luftwaffles
- Turn 12 - March/April 43: Na Berlin!
- Turn 12 - Axis Movement Phase: SS Panzer Arrives
- Turn 12 - Axis Combat Phase: Firefighting
- Turn 12 - Axis Detraining Phase: Stalin's Interference
- Turn 12 - Soviet Org Phase
- Turn 12 - Soviet Movement Phase: Preparing the Second Swing
- Turn 12 - Soviet Combat Phase
- Turn 12 - Soviet Detraining Phase: The Liberation of Latvia
- Turn 13 - May/June 43
- Turn 13 - Axis Movement Phase: Rebuilding the Broken Machine
- Turn 13 - Axis Combat Phase
- Turn 13 - Axis Detraining Phase: Tanks in the Black Sea
- Turn 13 - Soviet Org Phase
- Turn 13 - Soviet Movement Phase: The Aftershock
- Turn 13 - Soviet Combat Phase: The Steamroller Powers Up
- Turn 13 - Soviet Detraining Phase: The Final Blows
- День Победы. The Docs. The Aftermath.
- Why call it now?